Difference between revisions of "Giving access to the system to other people"
From SimplyBook.me
| Line 2: | Line 2: | ||
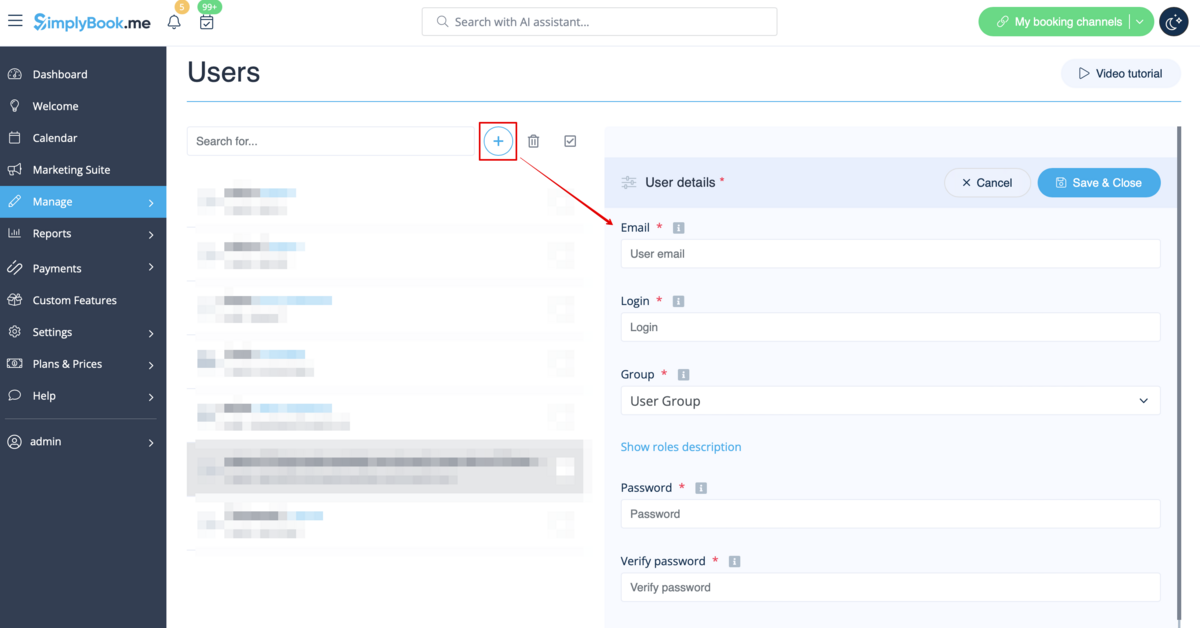
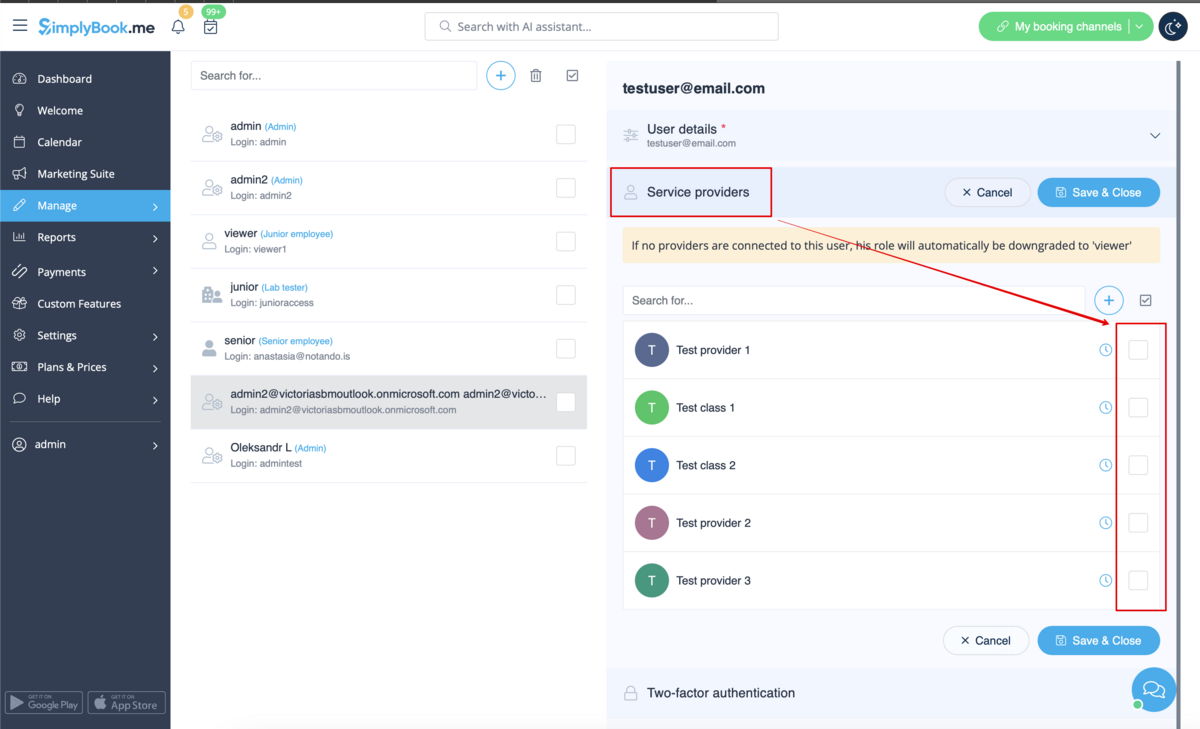
You can create a separate user for the person who needs to access your admin page in <span style="background-color:#d4f8e5; padding:5px; border-radius:5px;">Manage</span> -> <span style="background-color:#d4f8e5; padding:5px; border-radius:5px;">Users</span> and assign the corresponding rights to him/her. <br>See the list of available user roles <span style="background-color:#cdeffc; padding:5px; border-radius:5px;">[[Adding_other_users_to_the_system#User_Roles| here]].</span> | You can create a separate user for the person who needs to access your admin page in <span style="background-color:#d4f8e5; padding:5px; border-radius:5px;">Manage</span> -> <span style="background-color:#d4f8e5; padding:5px; border-radius:5px;">Users</span> and assign the corresponding rights to him/her. <br>See the list of available user roles <span style="background-color:#cdeffc; padding:5px; border-radius:5px;">[[Adding_other_users_to_the_system#User_Roles| here]].</span> | ||
| − | [[File:Create | + | [[File:Create new user path redesigned.png|1200px | center|link=https://help.simplybook.me/images/f/f0/Create_new_user_path_redesigned.png]] |
| − | [[File: | + | [[File:Relate user with provider redesined.png|1200px | center|link=https://help.simplybook.me/images/4/4b/Relate_user_with_provider_redesined.png]] |
<br><br> | <br><br> | ||
When adding new user details just enable the switch <span style="background-color:#d4f8e5; padding:5px; border-radius:5px;">Send login information to user</span> and save the user record.<br> | When adding new user details just enable the switch <span style="background-color:#d4f8e5; padding:5px; border-radius:5px;">Send login information to user</span> and save the user record.<br> | ||
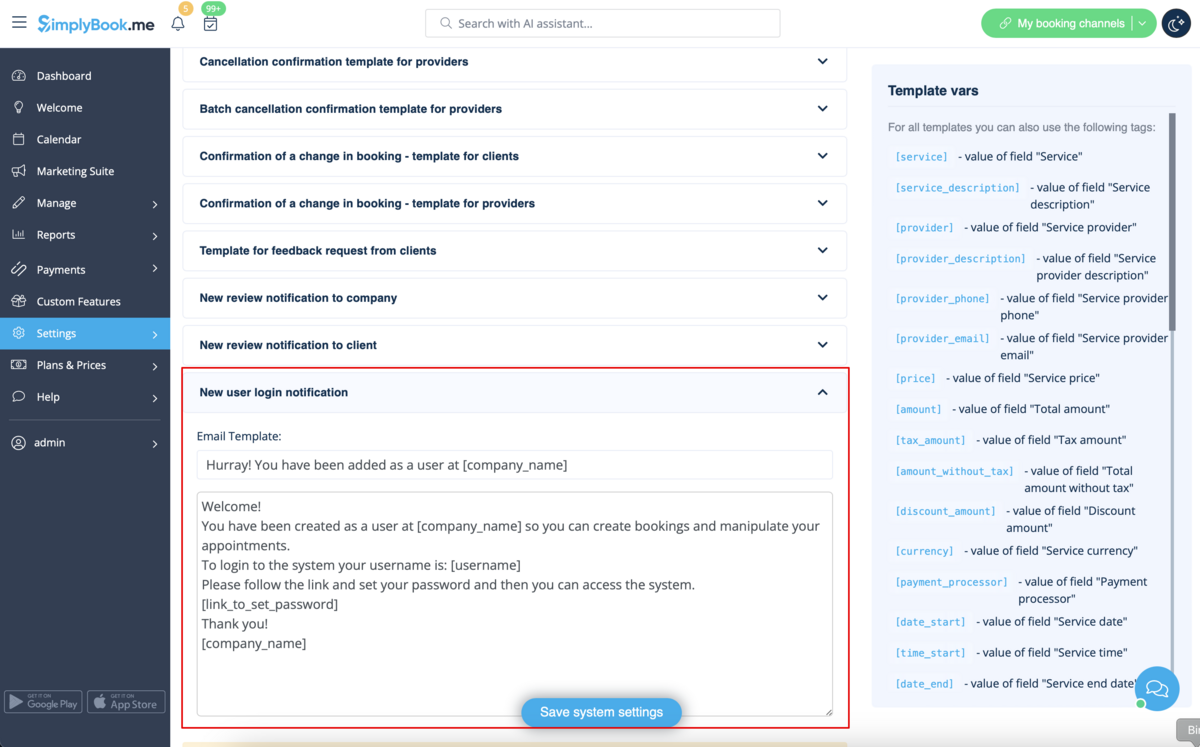
The system will automatically send the email with the login credentials according to the template you have set in <span style="background-color:#d4f8e5; padding:5px; border-radius:5px;">Settings</span> -> <span style="background-color:#d4f8e5; padding:5px; border-radius:5px;">Email and SMS Settings</span> -> <span style="background-color:#d4f8e5; padding:5px; border-radius:5px;">New user login notification.</span> | The system will automatically send the email with the login credentials according to the template you have set in <span style="background-color:#d4f8e5; padding:5px; border-radius:5px;">Settings</span> -> <span style="background-color:#d4f8e5; padding:5px; border-radius:5px;">Email and SMS Settings</span> -> <span style="background-color:#d4f8e5; padding:5px; border-radius:5px;">New user login notification.</span> | ||
| − | [[File:New user | + | [[File:New user notification redesigned.png|1200px|border|center|link=https://help.simplybook.me/images/e/e8/New_user_notification_redesigned.png]] |
<br><br> | <br><br> | ||
Or you can manually send login and password to your users along with the link to your admin page after saving the user. | Or you can manually send login and password to your users along with the link to your admin page after saving the user. | ||
<br><br> | <br><br> | ||
Revision as of 13:38, 5 September 2024
You can create a separate user for the person who needs to access your admin page in Manage -> Users and assign the corresponding rights to him/her.
See the list of available user roles here.
When adding new user details just enable the switch Send login information to user and save the user record.
The system will automatically send the email with the login credentials according to the template you have set in Settings -> Email and SMS Settings -> New user login notification.
Or you can manually send login and password to your users along with the link to your admin page after saving the user.


