Difference between revisions of "Additional tips"
| Line 20: | Line 20: | ||
To add Facebook tracking pixel to SimplyBook.me site:<br> | To add Facebook tracking pixel to SimplyBook.me site:<br> | ||
| − | 1. Go to your [https://www.facebook.com/business/url/?href=https%3A%2F%2Fwww.facebook.com%2Fads%2Fmanager%2Fpixel%2Ffacebook_pixel&cmsid=952192354843755&creative=link&creative_detail=advertiser-help-center&create_type&destination_cms_id&orig_http_referrer Facebook Pixel tab] in Ads Manager. | + | 1. Go to your [https://www.facebook.com/business/url/?href=https%3A%2F%2Fwww.facebook.com%2Fads%2Fmanager%2Fpixel%2Ffacebook_pixel&cmsid=952192354843755&creative=link&creative_detail=advertiser-help-center&create_type&destination_cms_id&orig_http_referrer Facebook Pixel tab] in Ads Manager.<br> |
2. Follow the simple steps to create pixel.<br> | 2. Follow the simple steps to create pixel.<br> | ||
| − | [[File:FBTP01_750.png|750px|center]] | + | [[File:FBTP01_750.png|750px|center]]<br> |
| + | 3. Insert the title of the pixel and press Create button.<br> | ||
| + | [[File:FBTP02_750.png|750px|center]]<br> | ||
| + | 4. At install the code step copy src of the tracking pixel:<br> | ||
| + | [[File:FBTP03_750.png|750px|center]]<br> | ||
| + | 5. In your SimplyBook.me admin interface go to Plugins // Plugins section and enable Custom CSS plugin. In plugin settings add code with src copied from previous step:<br> | ||
| + | <code>.go-back-link { | ||
| + | background-image: url("src from facebook"); | ||
| + | } | ||
| + | </code><br> | ||
| + | [[File:FBTP06_750.png|750px|center]]<br> | ||
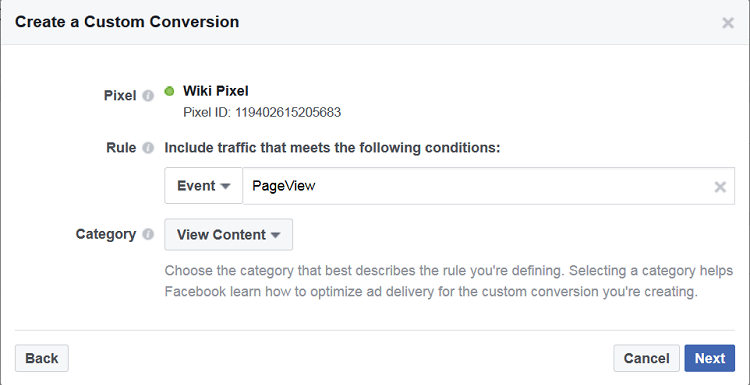
| + | 6. Now you can track successful bookings. In [https://www.facebook.com/business/url/?href=https%3A%2F%2Fwww.facebook.com%2Fads%2Fmanager%2Fpixel%2Fcustom_audience_pixel%2F&cmsid=952192354843755&creative=link&creative_detail=advertiser-help-center&create_type&destination_cms_id&orig_http_referrer Facebook pixel tab] press Create conversion // Track Custom Conversions. In the section Rule section, click on dropdown and change URL Contains to Events. Then choose PageView as a value. In Category section choose View Content. Then press Next.<br> | ||
| + | [[File:FBTP08_750.png|750px|center]]<br> | ||
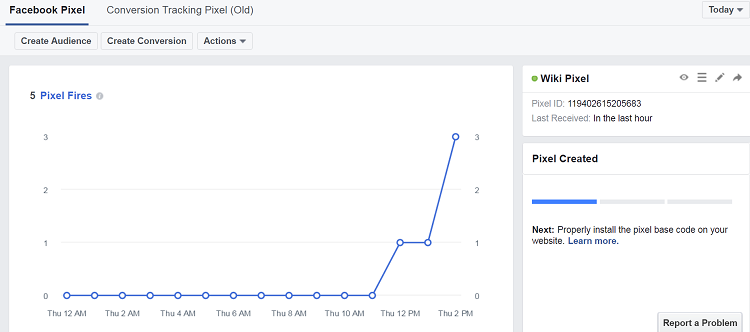
| + | 7. Check your booking pages activity in Facebook Pixel tab.<br> | ||
| + | [[File:FBTP07_750.png|750px|center]]<br> | ||
Revision as of 15:26, 10 November 2016
How to take screenshot
https://help.acuityscheduling.com/hc/en-us/articles/225736447-How-to-Take-a-Screenshot
How to copy link from browser
How to reload page
How to clear cache
How to add SimplyBook.me to mobile screen
https://help.acuityscheduling.com/hc/en-us/articles/219149487-Mobile-App-for-iPhone-iPad-and-Android
Tracking pixel
Facebook tracking pixel
To add Facebook tracking pixel to your site please follow the instructions from Advertiser Help Center
To add Facebook tracking pixel to SimplyBook.me site:
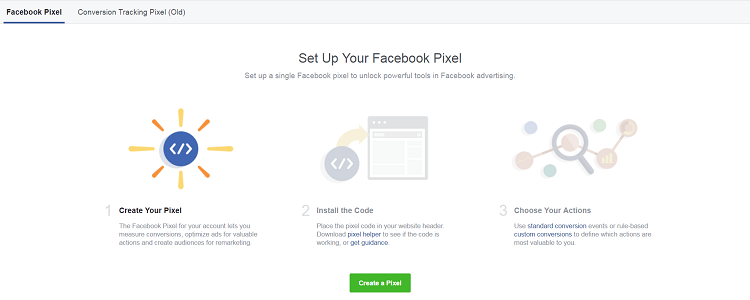
1. Go to your Facebook Pixel tab in Ads Manager.
2. Follow the simple steps to create pixel.
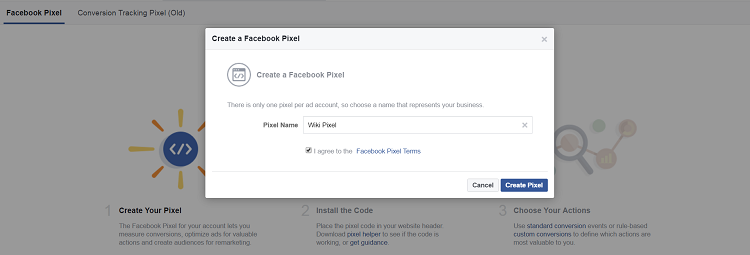
3. Insert the title of the pixel and press Create button.
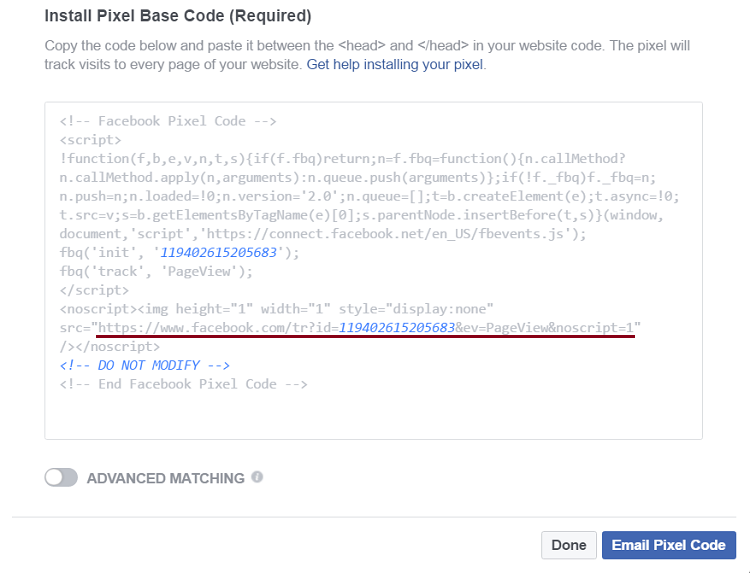
4. At install the code step copy src of the tracking pixel:
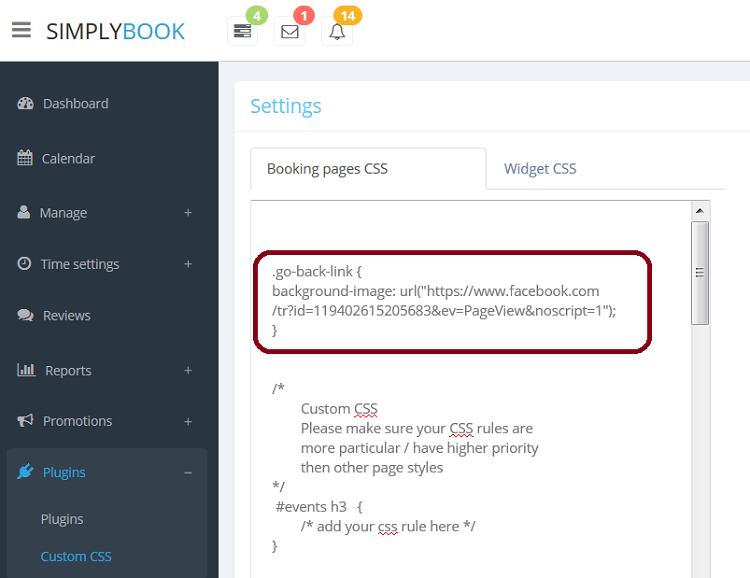
5. In your SimplyBook.me admin interface go to Plugins // Plugins section and enable Custom CSS plugin. In plugin settings add code with src copied from previous step:
.go-back-link {
background-image: url("src from facebook");
}
6. Now you can track successful bookings. In Facebook pixel tab press Create conversion // Track Custom Conversions. In the section Rule section, click on dropdown and change URL Contains to Events. Then choose PageView as a value. In Category section choose View Content. Then press Next.
7. Check your booking pages activity in Facebook Pixel tab.
