Aceitar pagamentos

O recurso Personalizado de Aceitar Pagamentos permite que você aceite pagamentos de seus clientes online. É possível definir o preço para o seu serviço/membership/pacote, etc. e quando seus clientes fazem um agendamento/compra, eles serão solicitados a pagar para confirmar a compra. Você pode aceitar pagamentos por meio de uma variedade de processadores de pagamento. Todos os pagamentos online são processados pelo processador de pagamento de sua escolha e, se houver necessidade de emitir um reembolso para um cliente, isso pode ser feito se você tiver a integração SBPay.me PRO ou manualmente a partir da conta de administrador do seu processador de pagamento.
Para verificar os gateways disponíveis por país, siga esse link.
Video tutorial ![]()
SBPay.me PRO tutorial em vídeo de integração ![]()
Atenção! Os Recursos Personalizados de Membership, Pacotes, Adicionais de Serviço, Produtos à Venda, Cupons e Cartões de Presente não funcionarão se o Recurso Personalizado de Aceitar Pagamentos não estiver ativado.
Como habilitar
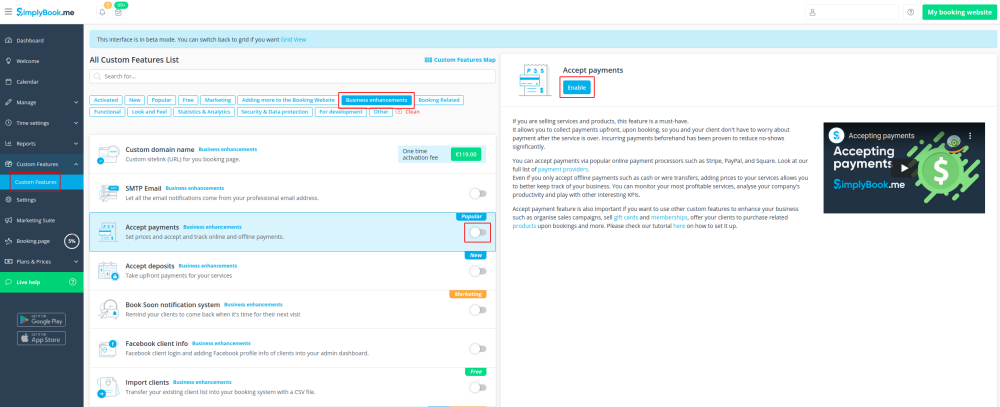
1. Ative o recurso personalizado de Aceitar Pagamentos na seção Recursos Personalizados.
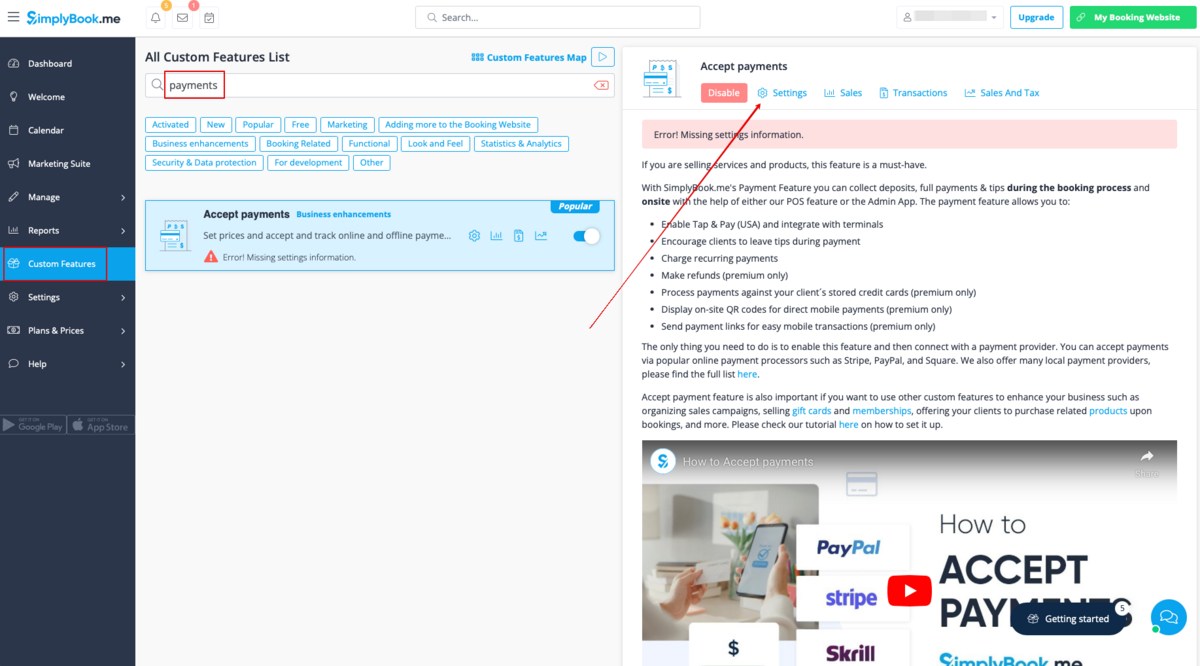
2. Depois de habilitado, clique no botão Configurações.
3. Ajuste as informações da sua empresa no formulário a seguir, se necessário.
(Ele será preenchido automaticamente com os detalhes da empresa que você já tem no sistema).
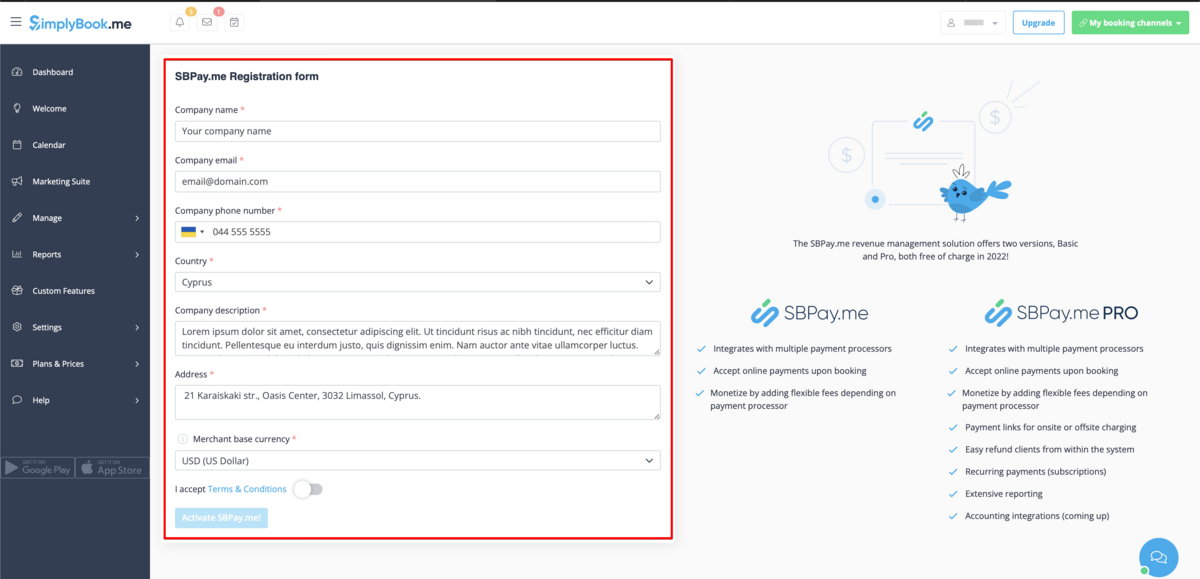
4. Clique no botão Ativar SBPay.me.
Atenção! A maioria dos ajustes e configurações relacionados a pagamentos serão gerenciadas através do SBPay.me, que se torna acessível ao habilitar o recurso de Aceitar Pagamentos através do item Pagamentos no menu de navegação. Por favor, verifique mais informações aqui.
Onde definir os preços
Com o SimplyBook.me, você pode aceitar pagamentos por agendamentos de serviços/aulas, pacotes, subscrições, cartões-presente, produtos e complementos.
Por favor, verifique os seguintes pontos para definir preços para os itens desejados:
1. Serviços/Aulas:
- Acesse Gerenciar -> Serviços/Aulas.
- Clique no Serviço específico e acesse Detalhes do Serviço/Aula.
- Role até o campo Preço para definir o preço do serviço.
2. Pacotes:
- Vá para Gerenciar -> Pacotes. * Clique no Pacote desejado e acesse Detalhes do Pacote. * Defina o preço no campo Preço para o pacote.
3. Subscrição:
- Acesse Gerenciar -> Subscrições.
- Acesse os detalhes da Subscrição e localize Primeiro Pagamento para definir o preço inicial.
- Se a Associação for recorrente, também defina o preço no campo Preço Recorrente. Mais detalhes sobre como configurar Subscrições podem ser encontrados aqui.
4. Complementos de Serviço:
- Navegue até Gerenciar -> Complementos de Serviço.
- Clique no Complemento de Serviço específico e acesse os Detalhes do Complemento de Serviço.
- Ajuste o preço no campo Preço do Complemento.
5. Produtos à Venda:
- Vá para Gerenciar -> Produtos para Venda.
- Clique no Produto à Venda desejado e acesse os Detalhes do Produto.
- Especifique o preço no campo Preço do Produto.
Como adicionar impostos
1. Adicione as opções de impostos necessárias em Gerenciar -> Impostos -> +.
Escolha a padrão, se necessário - ela será automaticamente definida para cada novo item de venda que você criar no sistema.

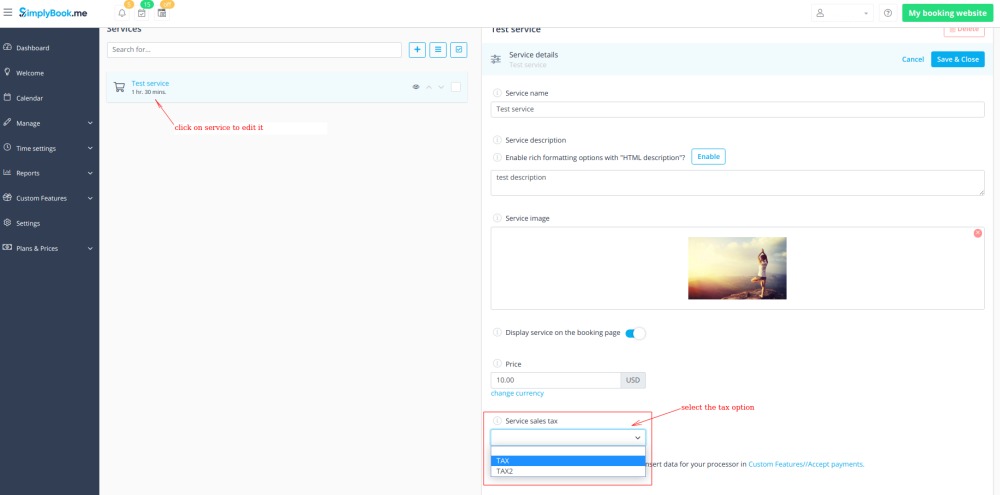
2. Vá até Gerenciar -> Serviços e selecione a opção de imposto para cada serviço.
Se você tiver outros itens como Aulas, Pacotes, Subscrições, Produtos à venda, Complementos de serviço, Cartões-presente e precisar que os impostos sejam aplicados lá também, vá para a página de gerenciamento correspondente e selecione os impostos pré-criados para cada item.
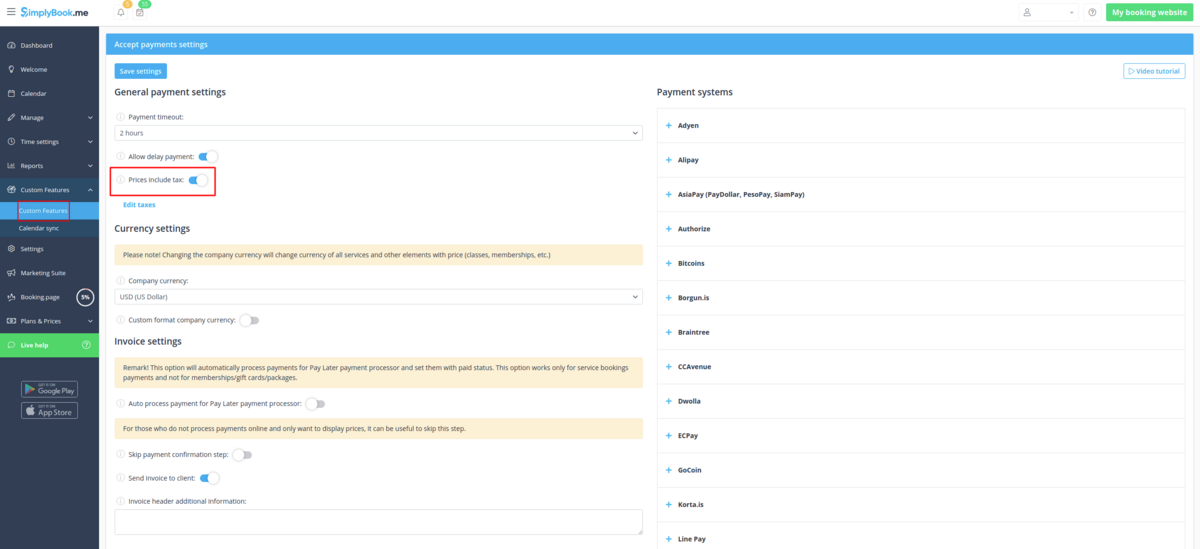
3. Em Recursos Personalizados -> Aceitar Pagamentos -> Configurações, escolha se o valor do imposto deve ser adicionado ao preço que você definiu por serviço (ou outro item) ou se já está incluído usando a opção Preços incluem impostos".
Se você habilitar esta opção, significa que o valor que você definiu por serviço já inclui os impostos.
Caso desabilite esta opção, o sistema adiciona automaticamente a porcentagem de imposto selecionada aos preços dos itens.
Tempo limite de pagamento
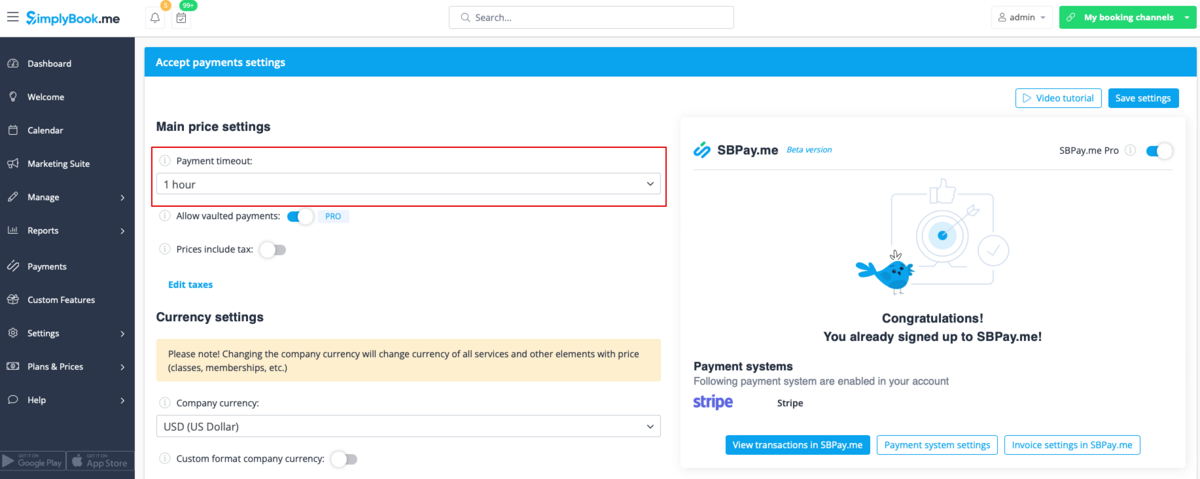
This setting allows to determine the duration within which a payment transaction must be completed before it expires. If not paid within the defined period, the associated transaction and booking/s will be canceled automatically.
The recommended period is at least 1 hour to give clients enough time to complete the payment and for the payment system to send us the confirmation.
How to change currency
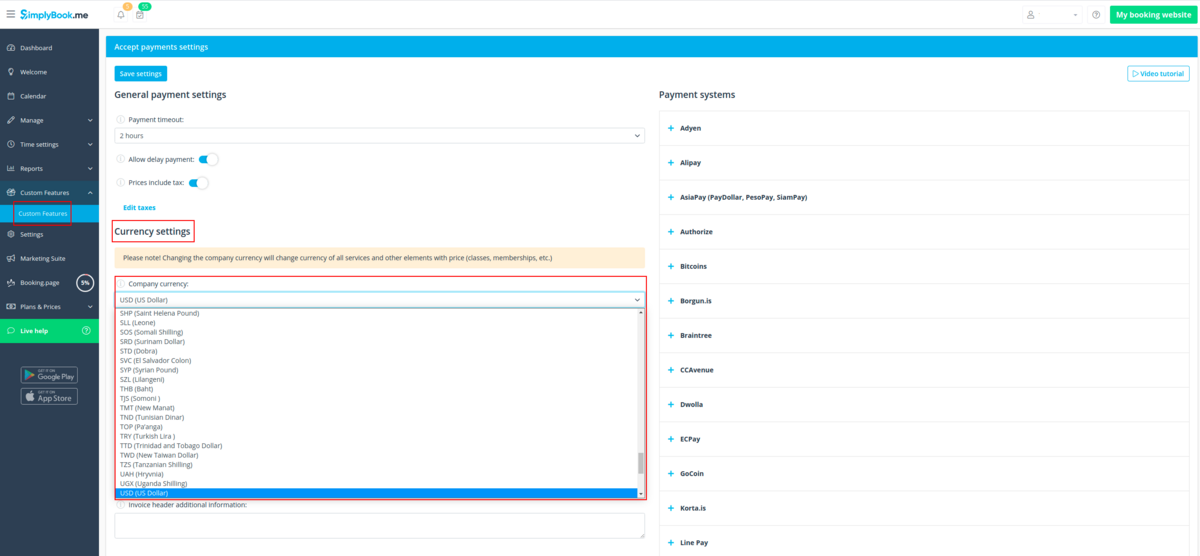
You can adjust the currency in the settings of Accept payments custom feature.
Please note! Some payment processors do not support all currencies. Before setting the currency, check if the selected payment processor supports it.
What is "Pay later" option
When your clients are transferred to the payment page after Details tab, they usually have several options: your payment processor (one or several) and Pay Later. Pay Later in most cases means that client will pay right on the place when he/she arrives to the appointment. In your Dashboard, when you click on the appointment, such booking in the service price field will have a note "Pay Later".
Additionally, you can enable the Auto process payment for Pay Later payment processor to automatically set the Paid status for the service bookings where Pay Later was chosen as the payment method. Note that this option does not apply to memberships, gift cards, or packages.
As well you can activate Skip payment confirmation step option. This is particularly useful for those who only wish to display prices without processing payments online. If enabled, this step will be omitted.
If you want to disable Pay later option please navigate to Payments in the left-side menu (i.e. SBPay.me interface) -> Payment processors and deactivate Pay later option there.
Payment links
(available with Premium subscription (i.e. SBPay.me PRO version)
With this option you can now easily send payment links via emails or sms to your clients to pay onsite or offsite for some order/booking or unpaid remainder amount when deposits were used.
Check more details on how to use it here
Vaulted Payments
(available with Premium subscription (i.e. SBPay.me PRO version)
This option enables clients to securely store their card details as a preferred payment method. With vaulted payments, clients can seamlessly pay for future orders without re-entering their payment information, enhancing convenience and expediting transactions. From the admin side, you will be able to charge the saved payment method of your clients.
Check more details on how it works here
Refunds
(available with Premium subscription.
It may happen that you need to give the money back to your customer due to some reason and now it is possible to easily manage such cases with SBPay.me Pro integration.
Check more details on how it works here
How to customize the client invoices
It may be necessary to show or hide some data or change the look for the invoices that the system sends to clients after they make a purchase on your booking website.
Using SBPay.me Invoices feature can adjust the following items:
Check more details here here
Notifications
There are several types of the payment-related notifications that can be sent to you and/or your clients. Within the paid subscriptions you can customize notification templates using provided variables.
The following notifications are available:
- Payment failed notification (can be sent to client and/or to company);
- Payment link for Delay payment method (with SBPay.me Pro only);
- Refund confirmation (with SBPay.me Pro only).
How the whole payments process works
- 1. A client goes through the booking process and presses Book Now at the end. Or he/she selects some memberships/package/gift card, etc. to buy.
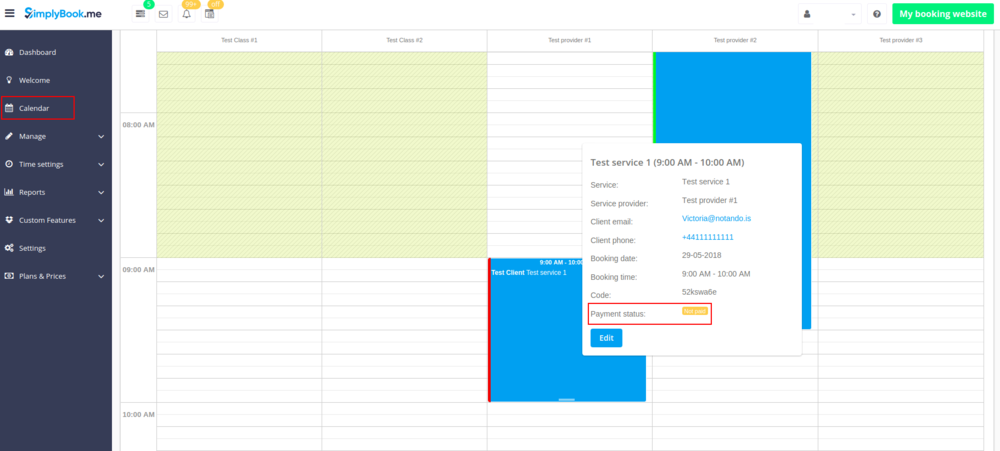
- 2. He is directed to summary step to choose a payment method. At this stage unconfirmed booking appears in the admin calendar marked red as not paid to reserve this time so that no other person can accidentally book the same slot and there will be no double-bookings. As well an order with the New status appears in Payment transactions report.
- 3. After that, the client has 2 options:
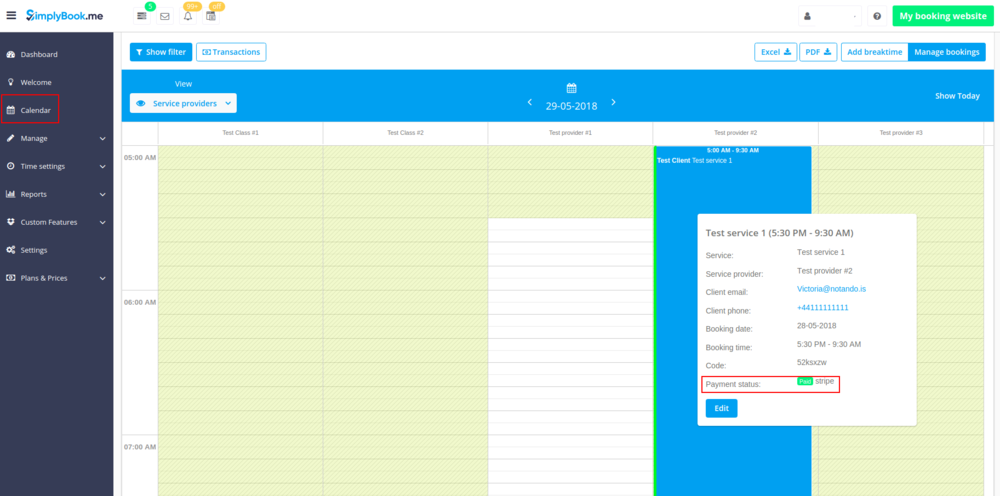
- 3.1. to pay and the payment processor will send us confirmation that client has paid and we will automatically approve the transaction on our side (booking will be marked with green color and the order with paid status).
- 3.1. to pay and the payment processor will send us confirmation that client has paid and we will automatically approve the transaction on our side (booking will be marked with green color and the order with paid status).
- 3.2. to not finish paying: the client is directed to the payment system, but then he closes the page, closes the browser, or simply leaves it open without any actions for a long period of time. In this case, the system will wait until timeout you set up in the settings of Accept payments custom feature will end and will cancel the non-paid booking/transaction because it was never finished. You can set the emails to be sent to client and/or you to be notified about the timed out bookings.
- Same happens if the client paid, but paid later than timeout. In this case, if you receive a notification from PayPal/Stripe/etc. that client paid for the booking/order but as it was too late you can go to Payments -> Transactions or Reports -> Payment transactions within SimplyBook.me interface and approve this booking manually.
- 3.2. to not finish paying: the client is directed to the payment system, but then he closes the page, closes the browser, or simply leaves it open without any actions for a long period of time. In this case, the system will wait until timeout you set up in the settings of Accept payments custom feature will end and will cancel the non-paid booking/transaction because it was never finished. You can set the emails to be sent to client and/or you to be notified about the timed out bookings.
