Accepter betalinger - tilpasset funktion

Accepter betalinger Med den tilpassede funktion kan du acceptere onlinebetalinger fra dine kunder. Du kan fastsætte prisen for din service/medlemskab/pakke osv., og når dine kunder foretager en booking/et køb, bliver de bedt om at betale for at bekræfte deres køb.
Du kan acceptere betalinger via en række forskellige betalingsudbydere. Alle onlinebetalinger behandles af den betalingsgateway, du har valgt, og hvis det er nødvendigt at tilbagebetale en kunde, kan dette gøres, hvis du har SBPay.me PRO-integration eller manuelt fra din betalingsudbyders administratorkonto.
For at se de gateways, der er tilgængelige i de enkelte lande, skal du følge dette link.
Video-vejledning ![]()
SBPay.me PRO-integrationsvideo ![]()
Bemærk! Medlemskab, pakker, service-tilføjelser, produkter til salg, kuponer og gavekort, brugerdefinerede funktioner fungerer ikke, hvis den brugerdefinerede funktion "Accepter betalinger" ikke er aktiveret.
Sådan aktiveres
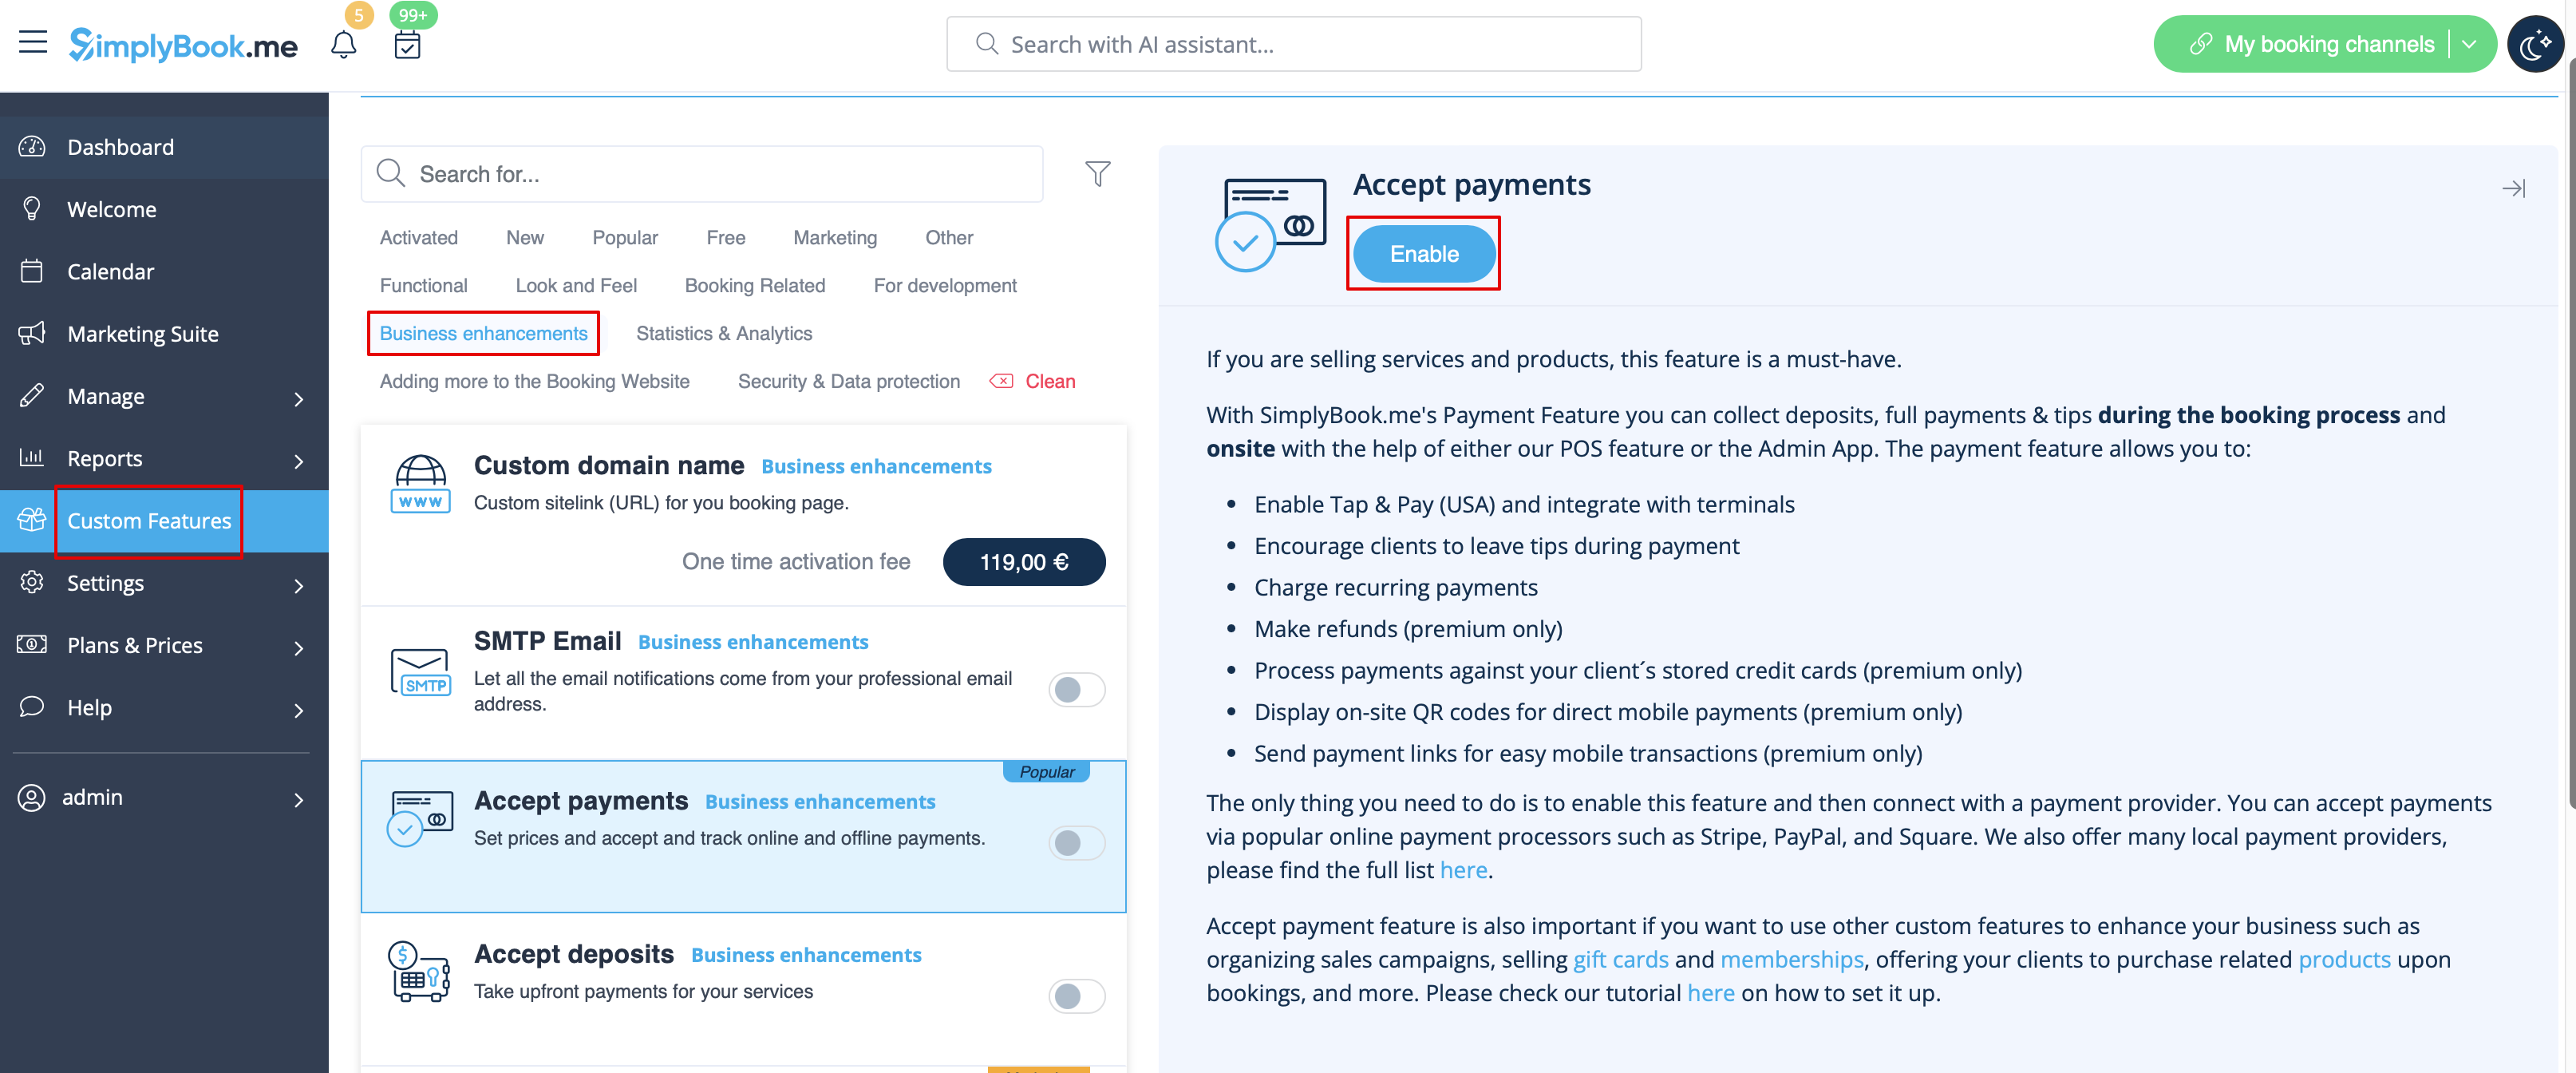
- 1. Aktivér den tilpassede funktion "Accepter betalinger" i afsnittet "Tilpassede funktioner".
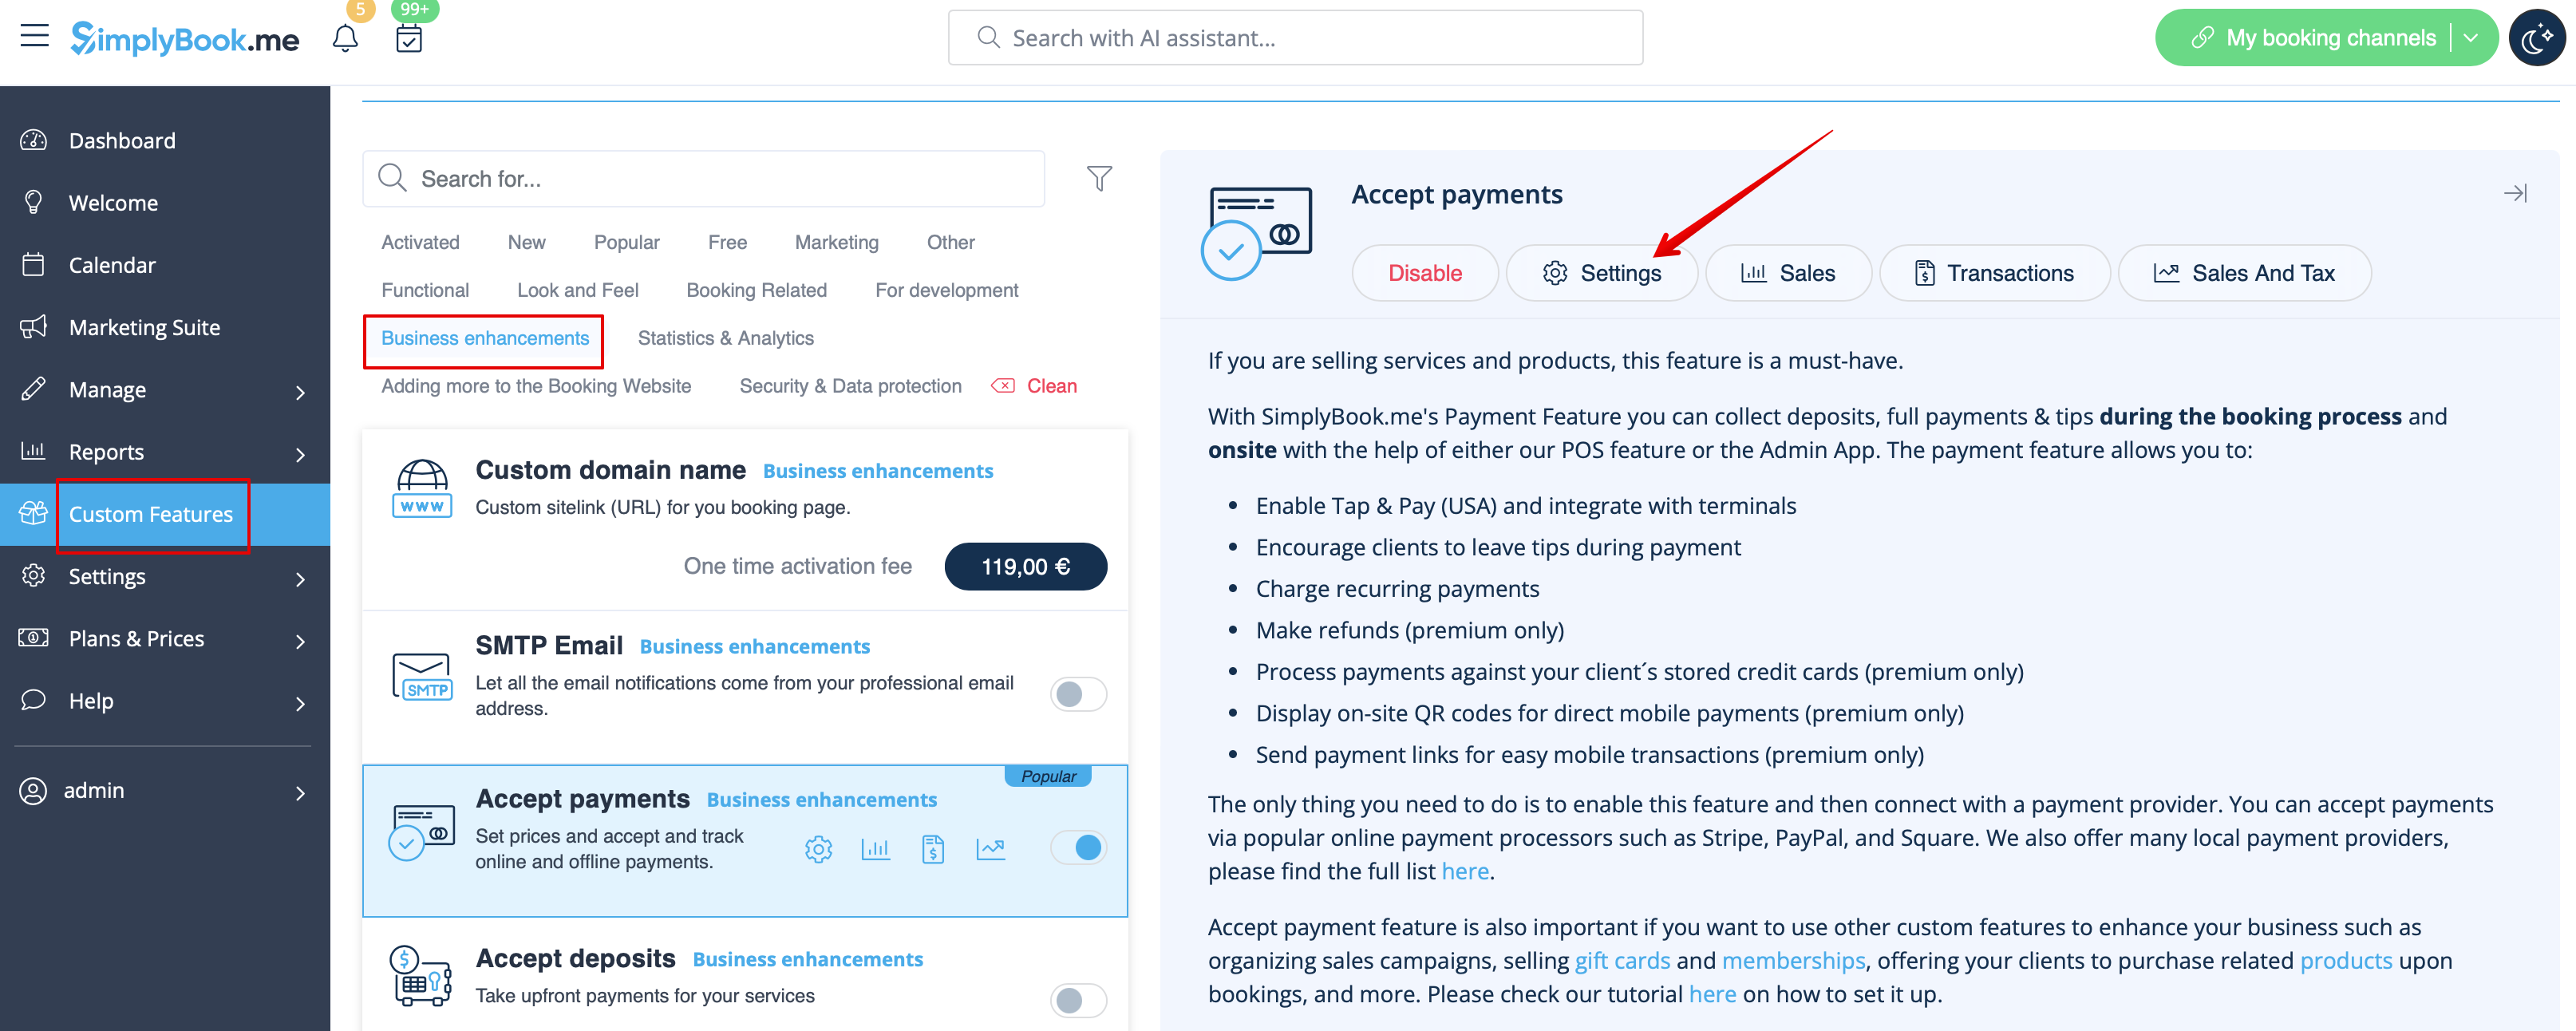
- 2. Når funktionen er aktiveret, skal du klikke på knappen "Indstillinger".
- 3. Juster dine virksomhedsoplysninger i nedenstående formular, hvis det er nødvendigt.
- (De vil blive udfyldt automatisk med de virksomhedsoplysninger, du allerede har i dit system).
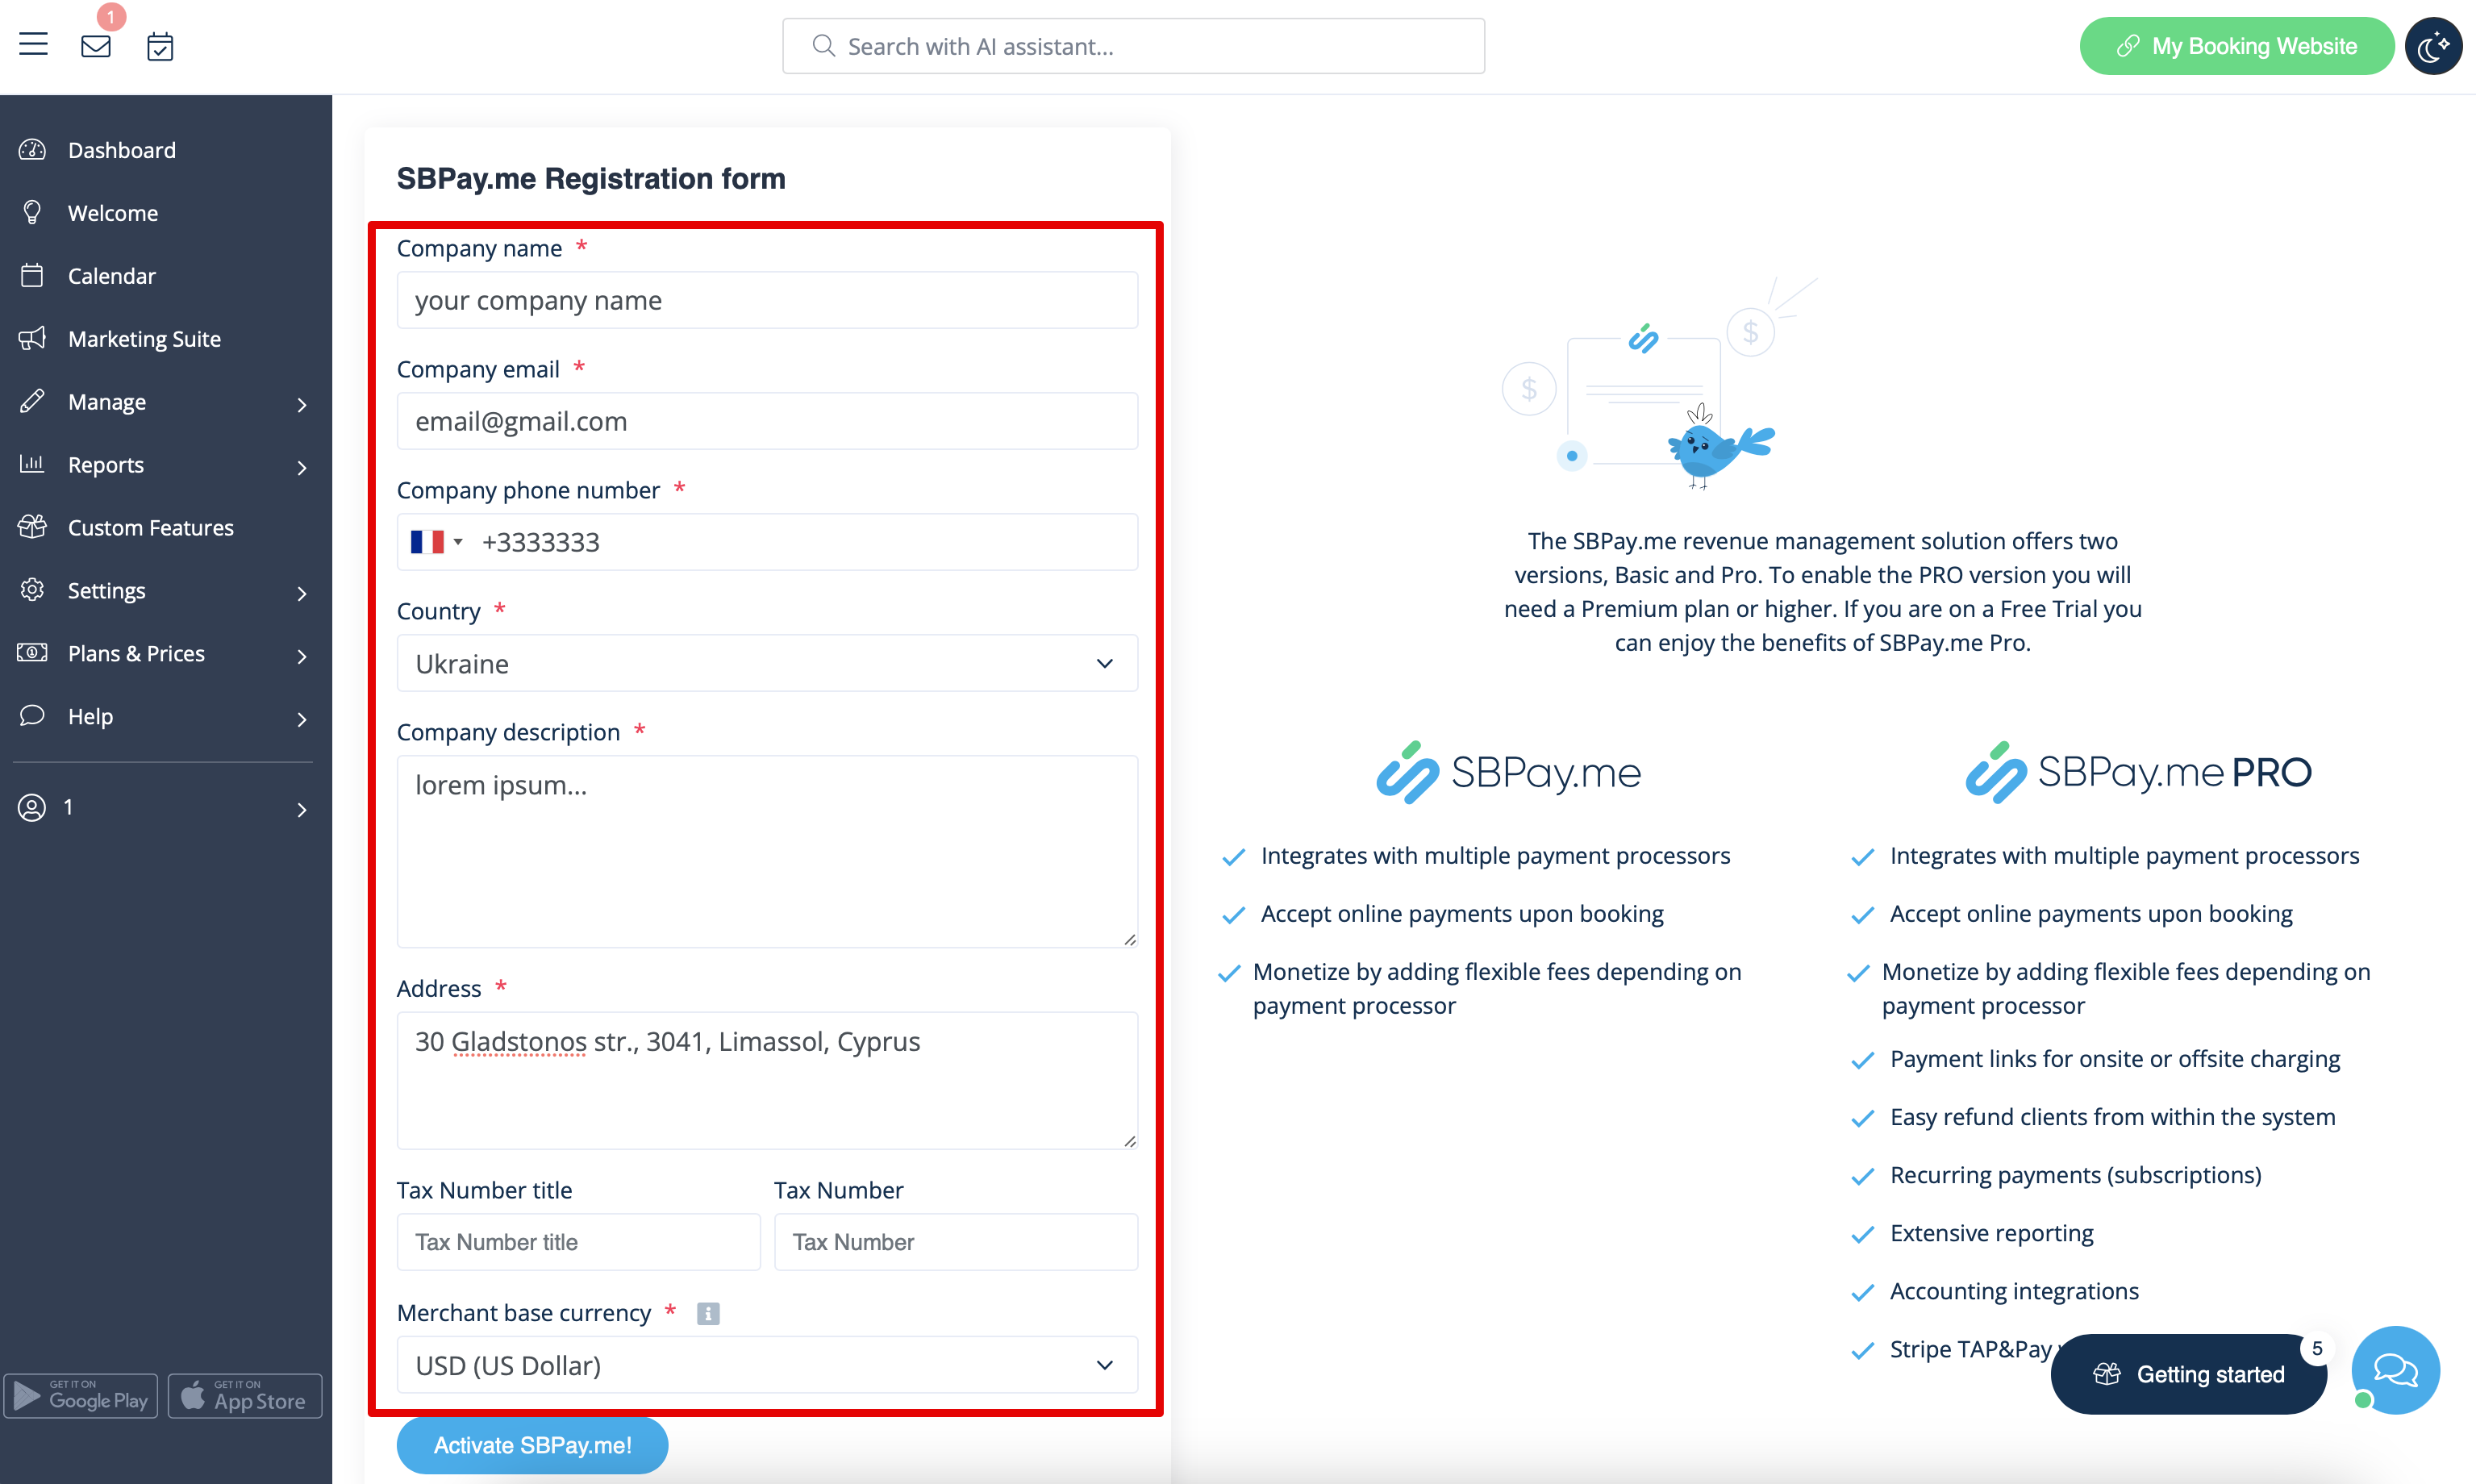
- 4. Klik på knappen Aktiver SBPay.me.
- Bemærk! De fleste af dine betalingsrelaterede indstillinger og konfigurationer administreres via SBPay.me, som bliver tilgængeligt, når du aktiverer funktionen Accepter betalinger via punktet Betalinger i navigationsmenuen. Se mere information her.
Hvor skal priserne angives?
Med SimplyBook.me kan du acceptere betalinger for service-/klassebookinger, pakker, medlemskaber, gavekort, produkter og tilføjelser.
Kontroller følgende punkter for at fastsætte priser for de ønskede varer:
1. Services/klasser:
- Gå til Administrer -> Tjenester/klasser.
- Klik på den specifikke tjeneste og åbn Tjeneste-/klasseoplysninger.
- Rul ned til feltet Pris for at angive prisen for tjenesten.
2. Pakker:
- Gå til Administrer -> Pakker.
- Klik på den ønskede pakke og få adgang til pakkedetaljer.
- Indtast prisen i feltet Pris for pakken.
3. Medlemskaber:
- Go to Manage -> Memberships.
- Access Membership Details and locate First Payment to set the initial price.
- If the Membership is recurring, also set the price in the Recurring Price field. Further details on setting up Memberships can be found here.
4. Service Add-ons:
- Navigate to Manage -> Service Add-ons.
- Click on the specific Service Add-on and access Service Add-on Details.
- Adjust the price in the Add-on Price field.
5. Products for Sale:
- Go to Manage -> Products for Sale.
- Click on the desired Product for Sale and access Product Details.
- Specify the price in the Product Price field.
How to add taxes
- 1. Add the necessary taxes options in Manage -> Taxes -> +
- Choose the default one if necessary - it will be automatically set for each new sale item that you will create in the system.

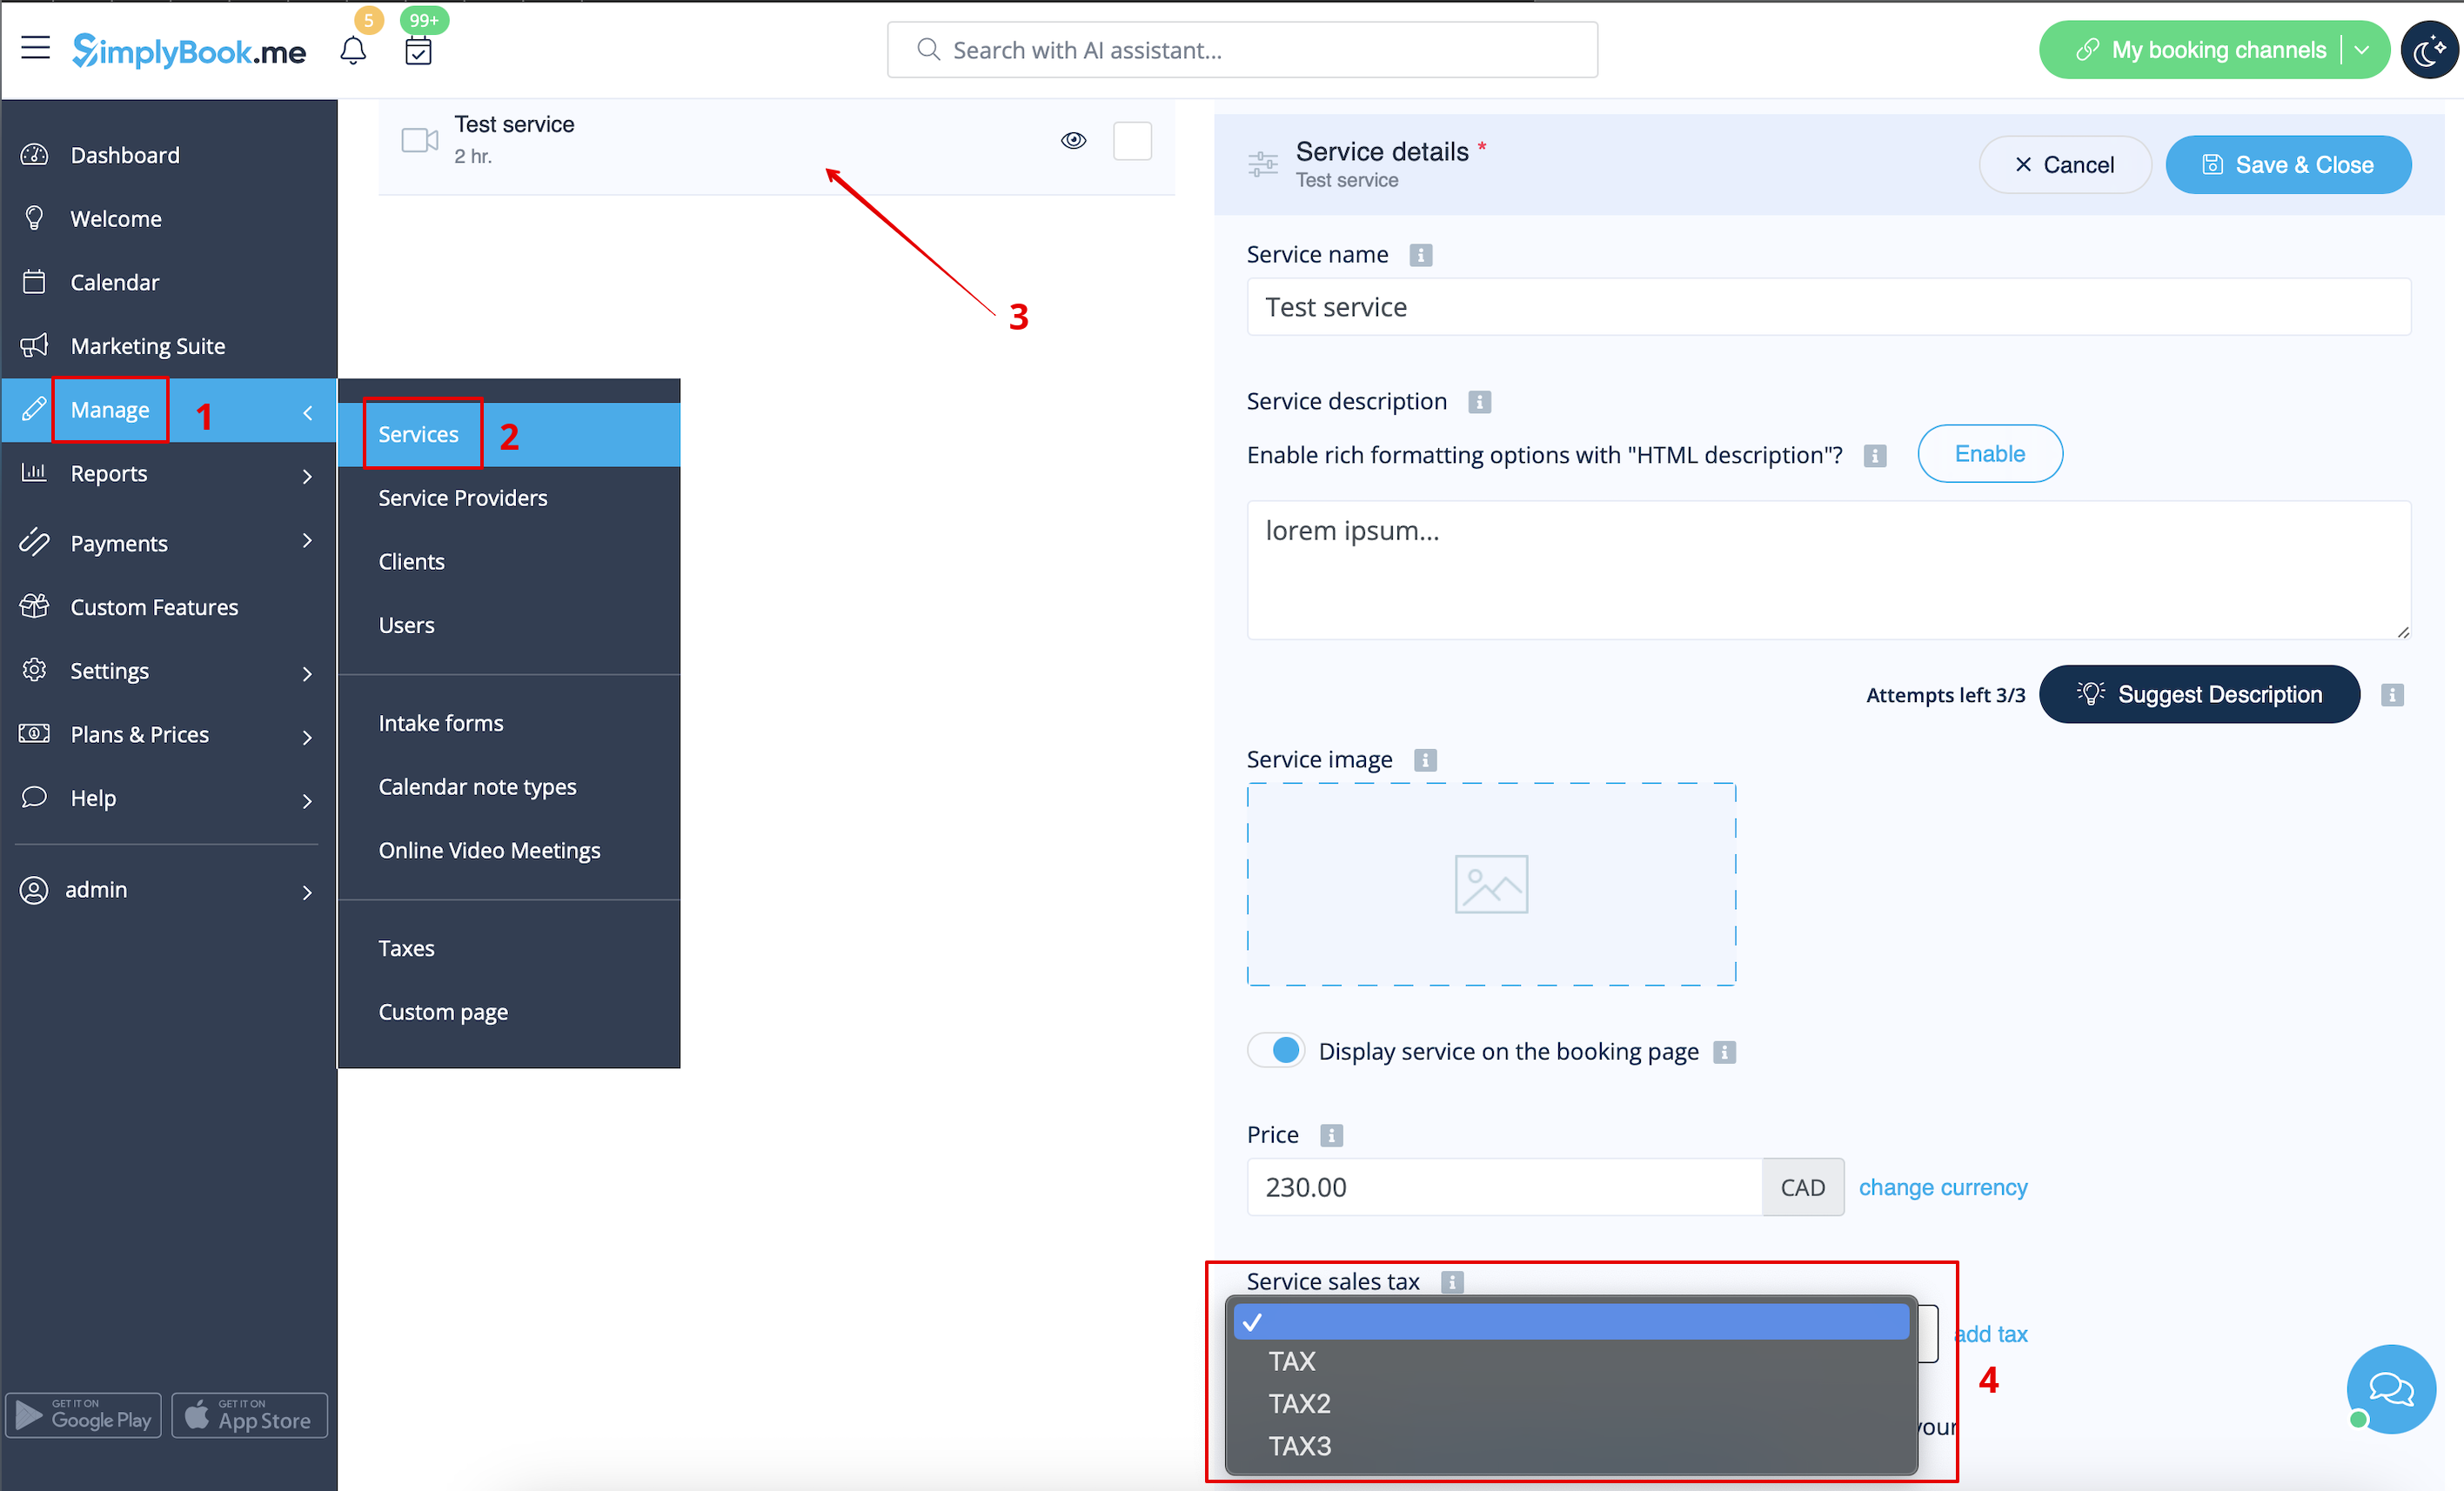
- 2. Navigate to Manage -> Services and select the tax option per each service.
- If you have other items like Classes, Packages, Memberships, Products for sale, Service add-ons, Gift cards and need taxes to be applied there as well please go to the corresponding management page and select from the pre-created taxes for each item.
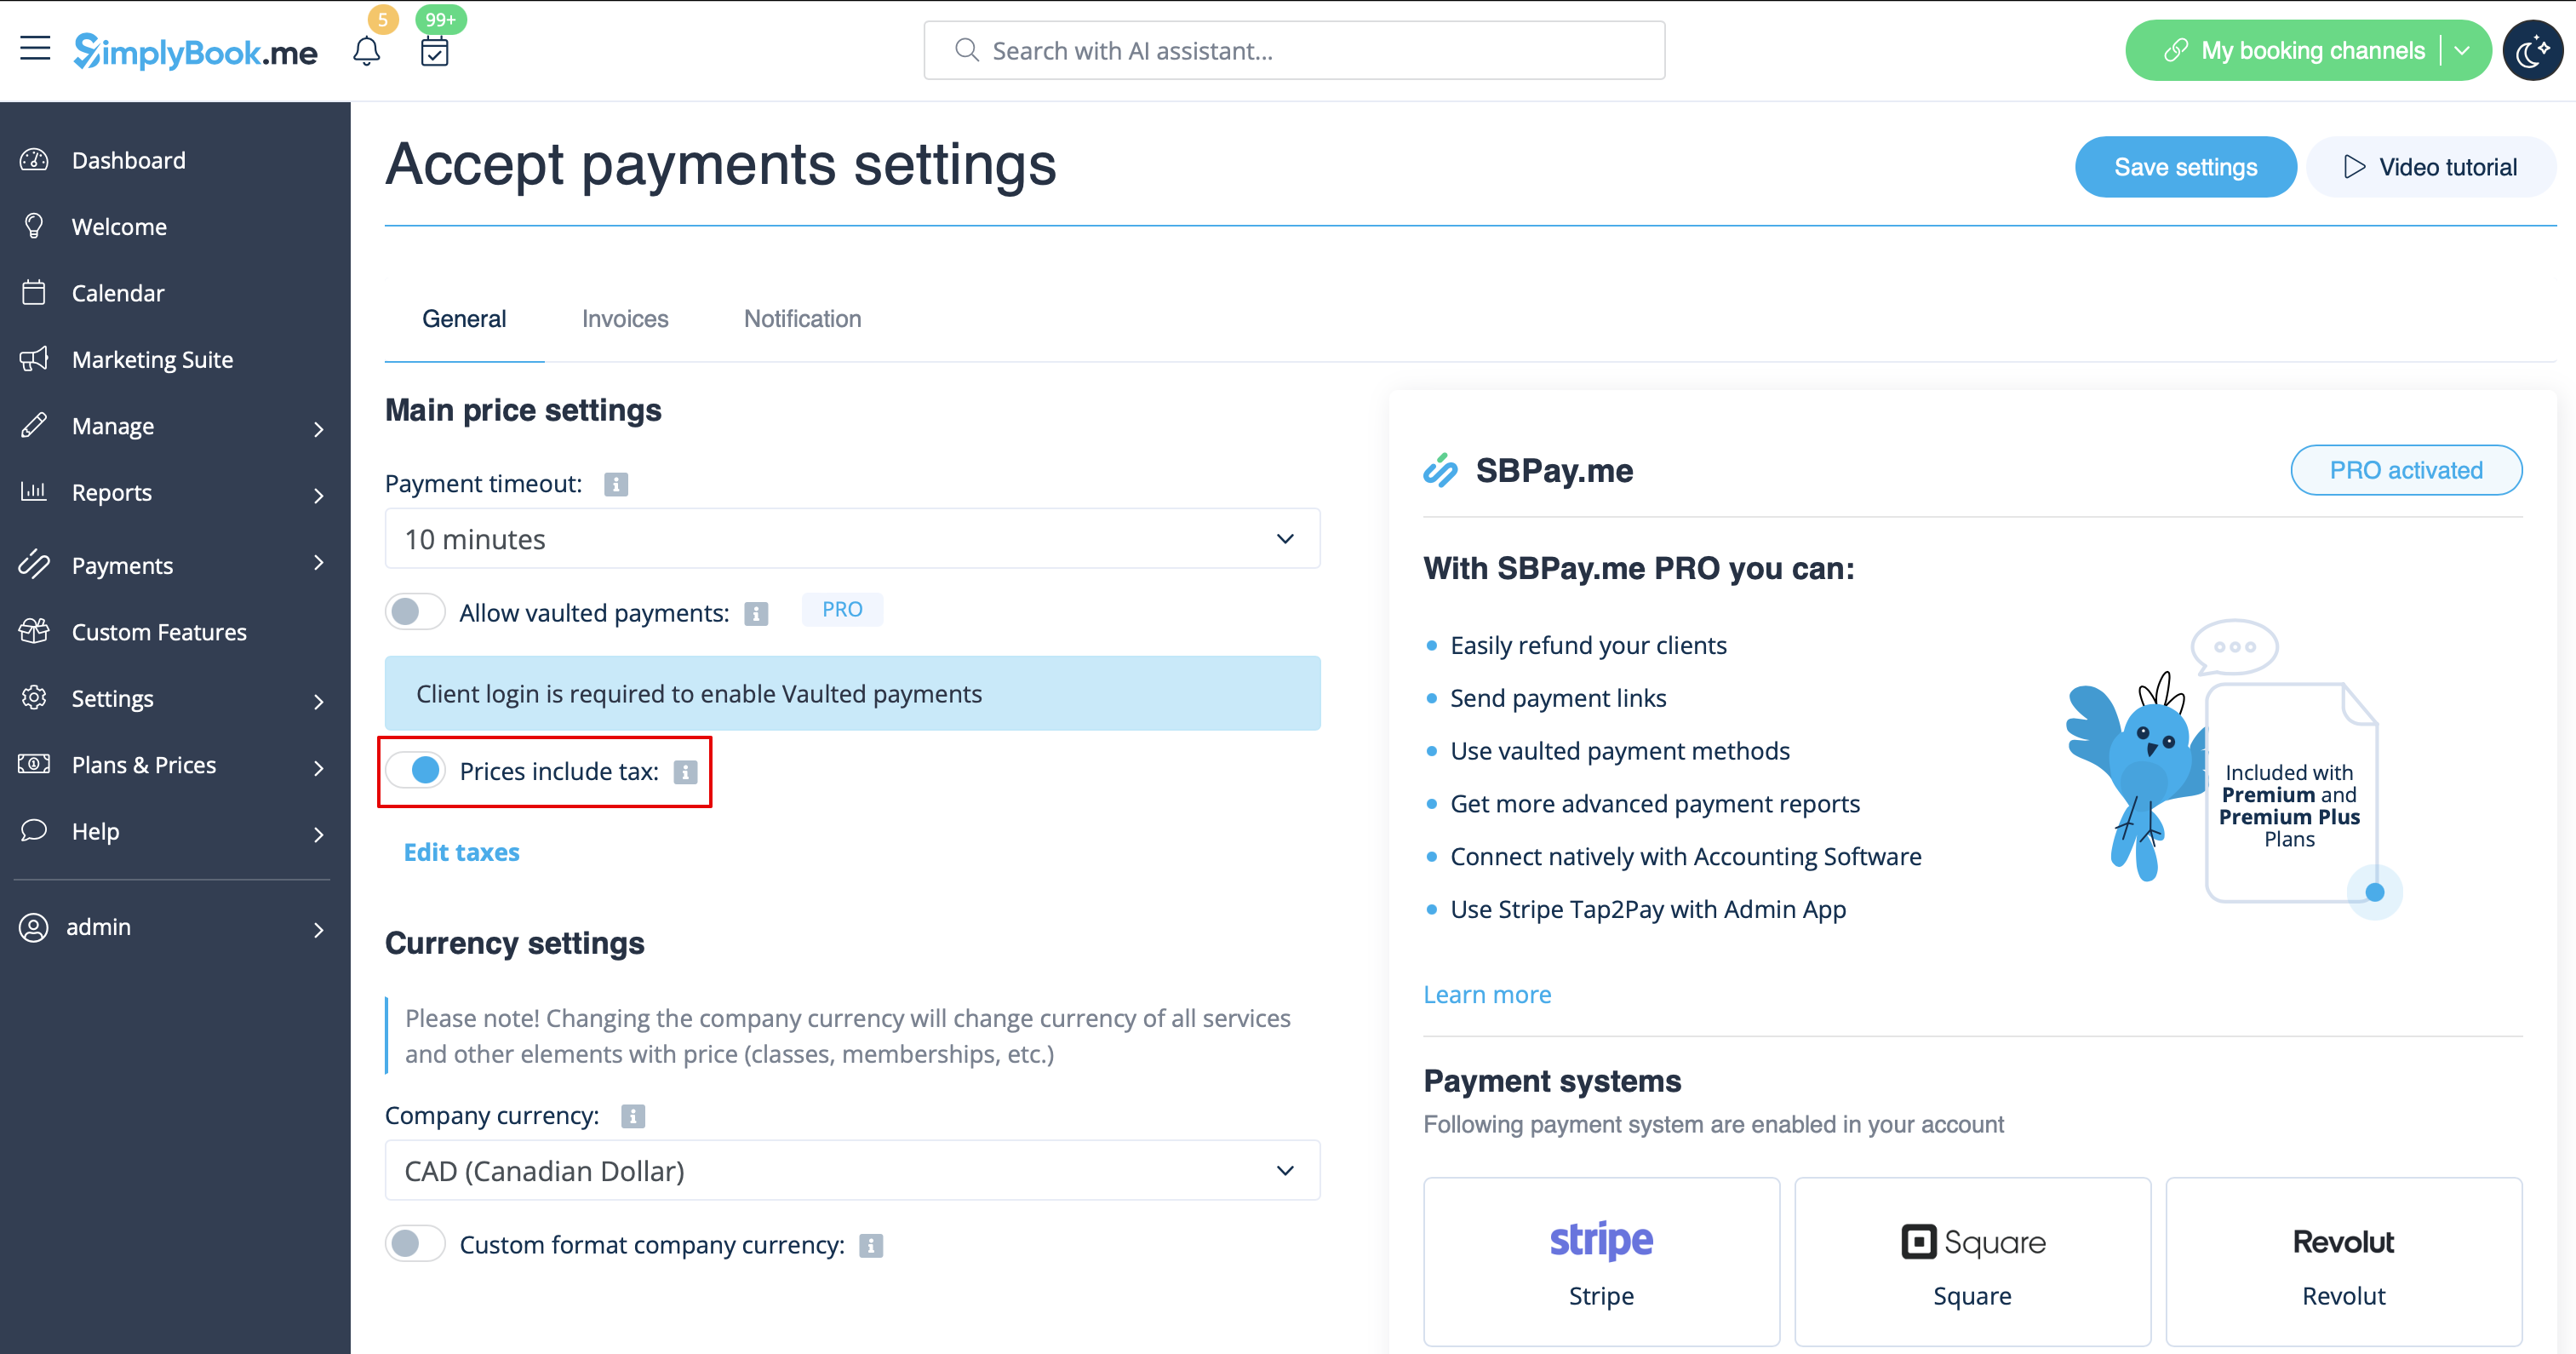
- 3. In Custom features -> Accept payments -> Settings choose whether the tax amount should be added to the price that you have set per service(or other item) or it is already included by using the switcher Prices include tax.
- If you enable the switcher it will mean that the amount that you have set per service is already with taxes.
- In case you disable the switcher the system will automatically add the selected tax percentage to the items prices
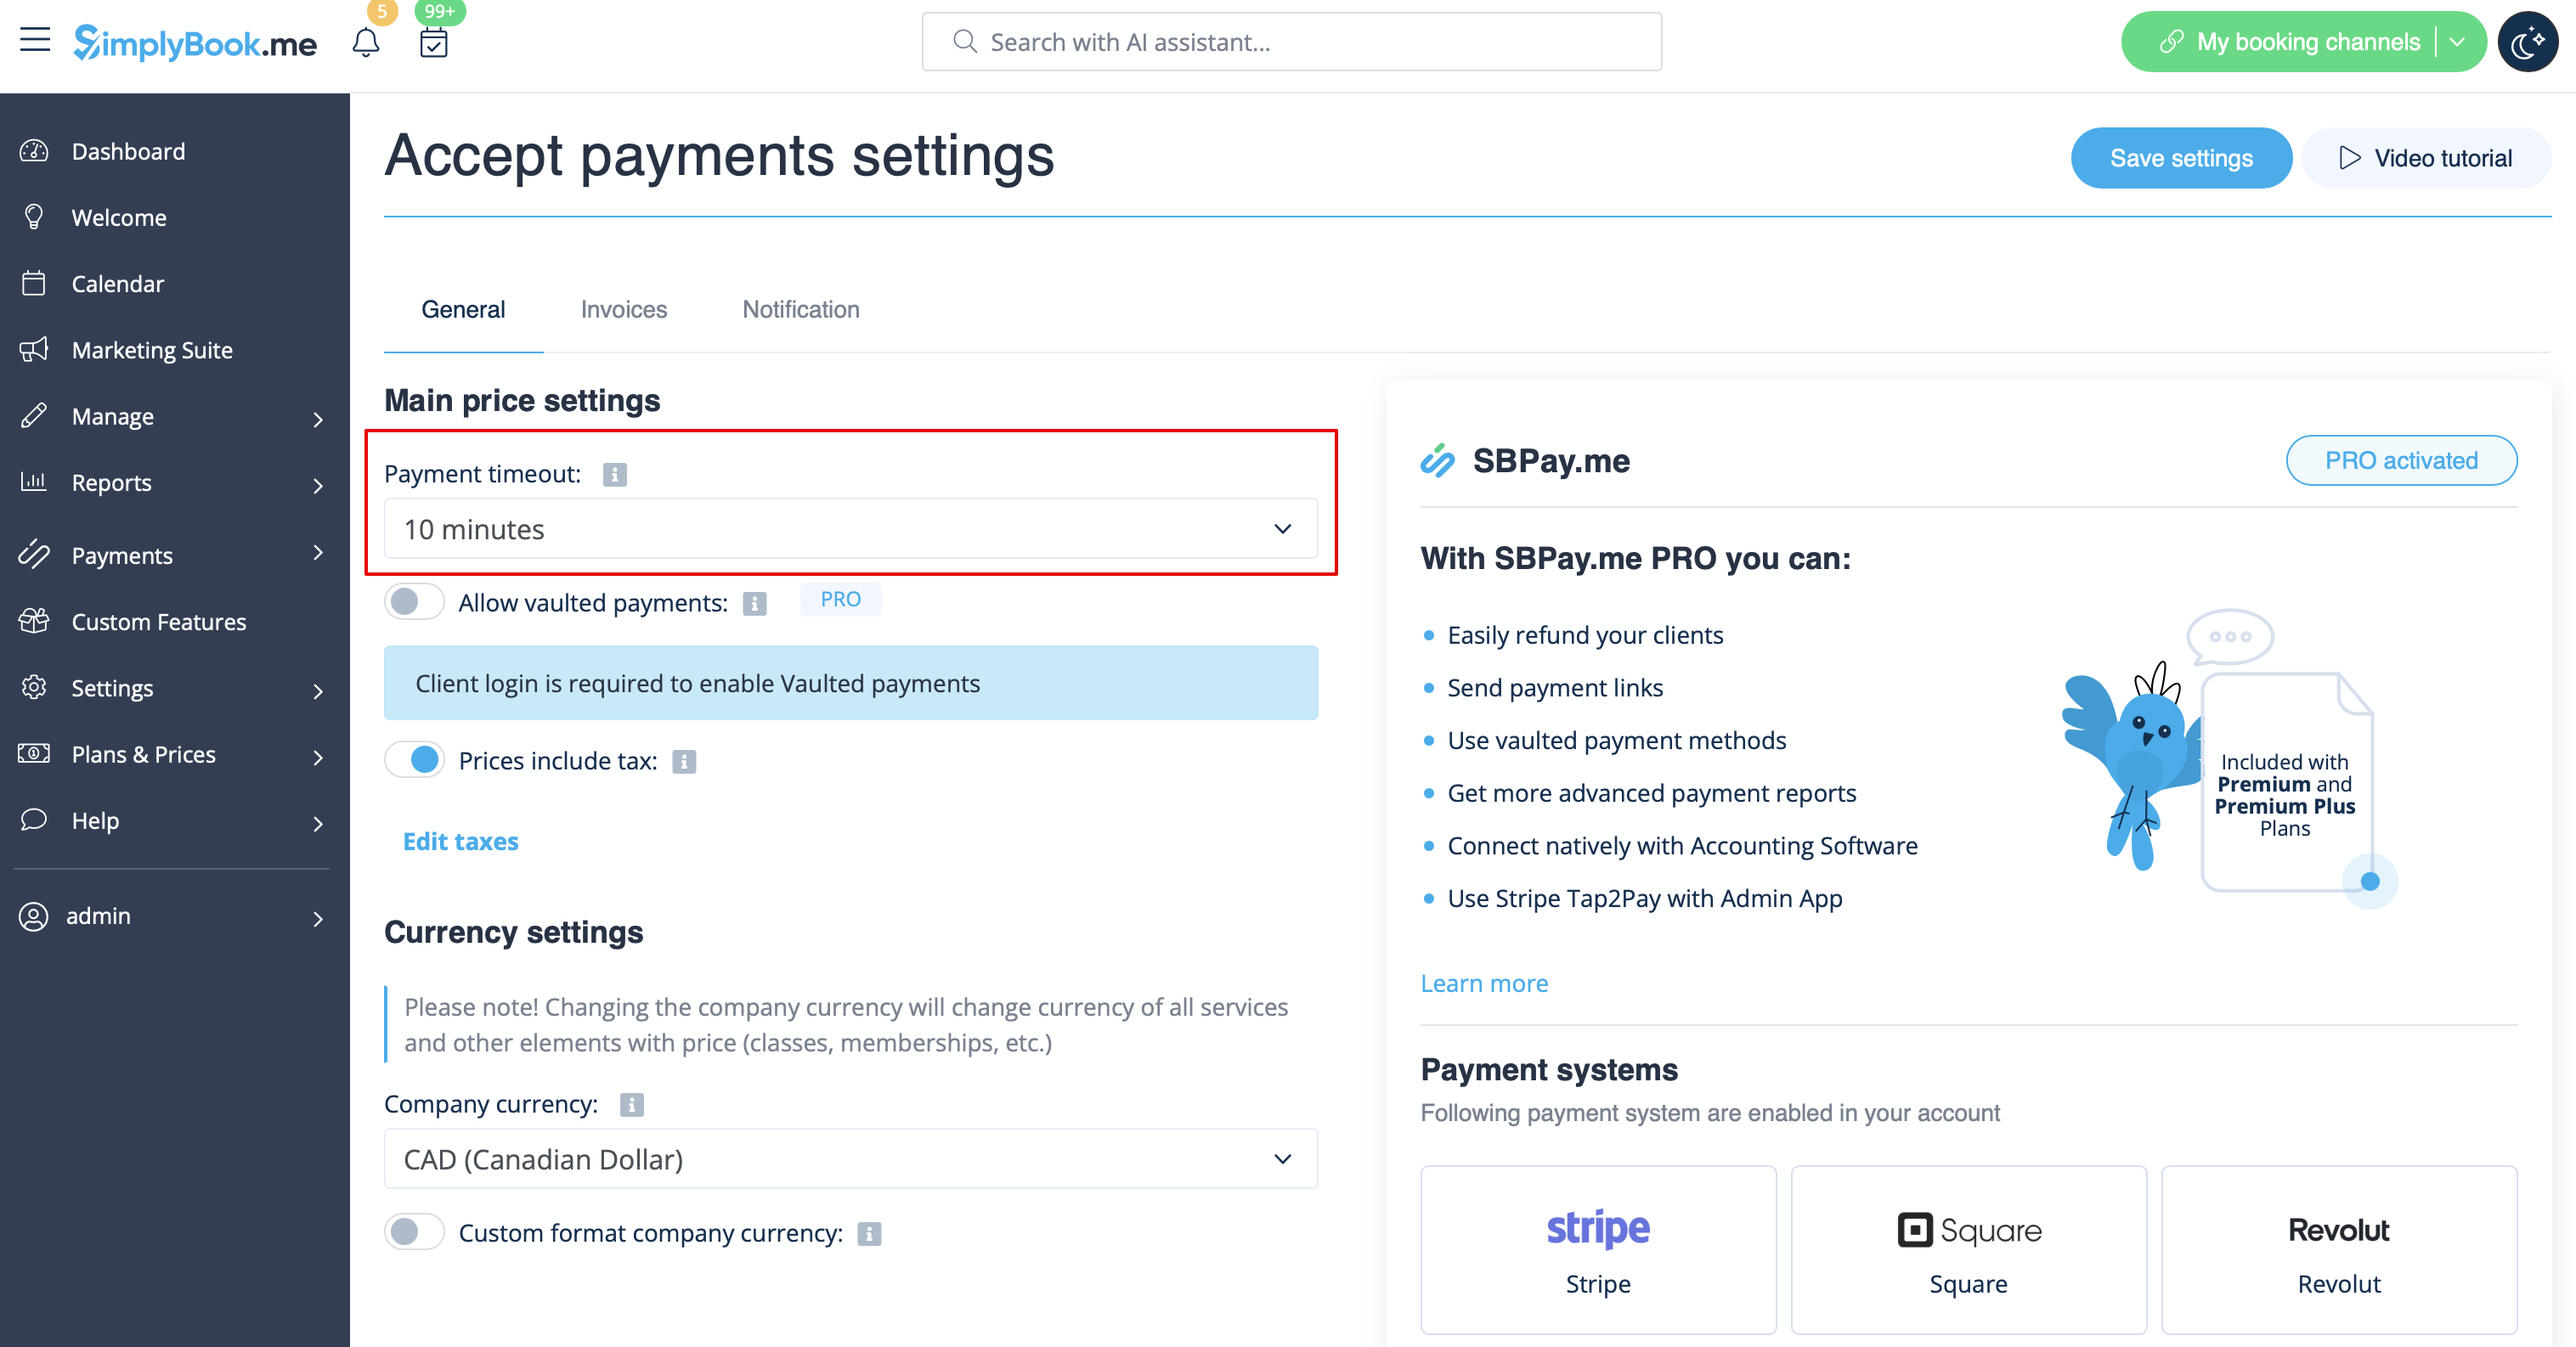
Payment Timeout
This setting allows to determine the duration within which a payment transaction must be completed before it expires. If not paid within the defined period, the associated transaction and booking/s will be canceled automatically.
The recommended period is at least 1 hour to give clients enough time to complete the payment and for the payment system to send us the confirmation.
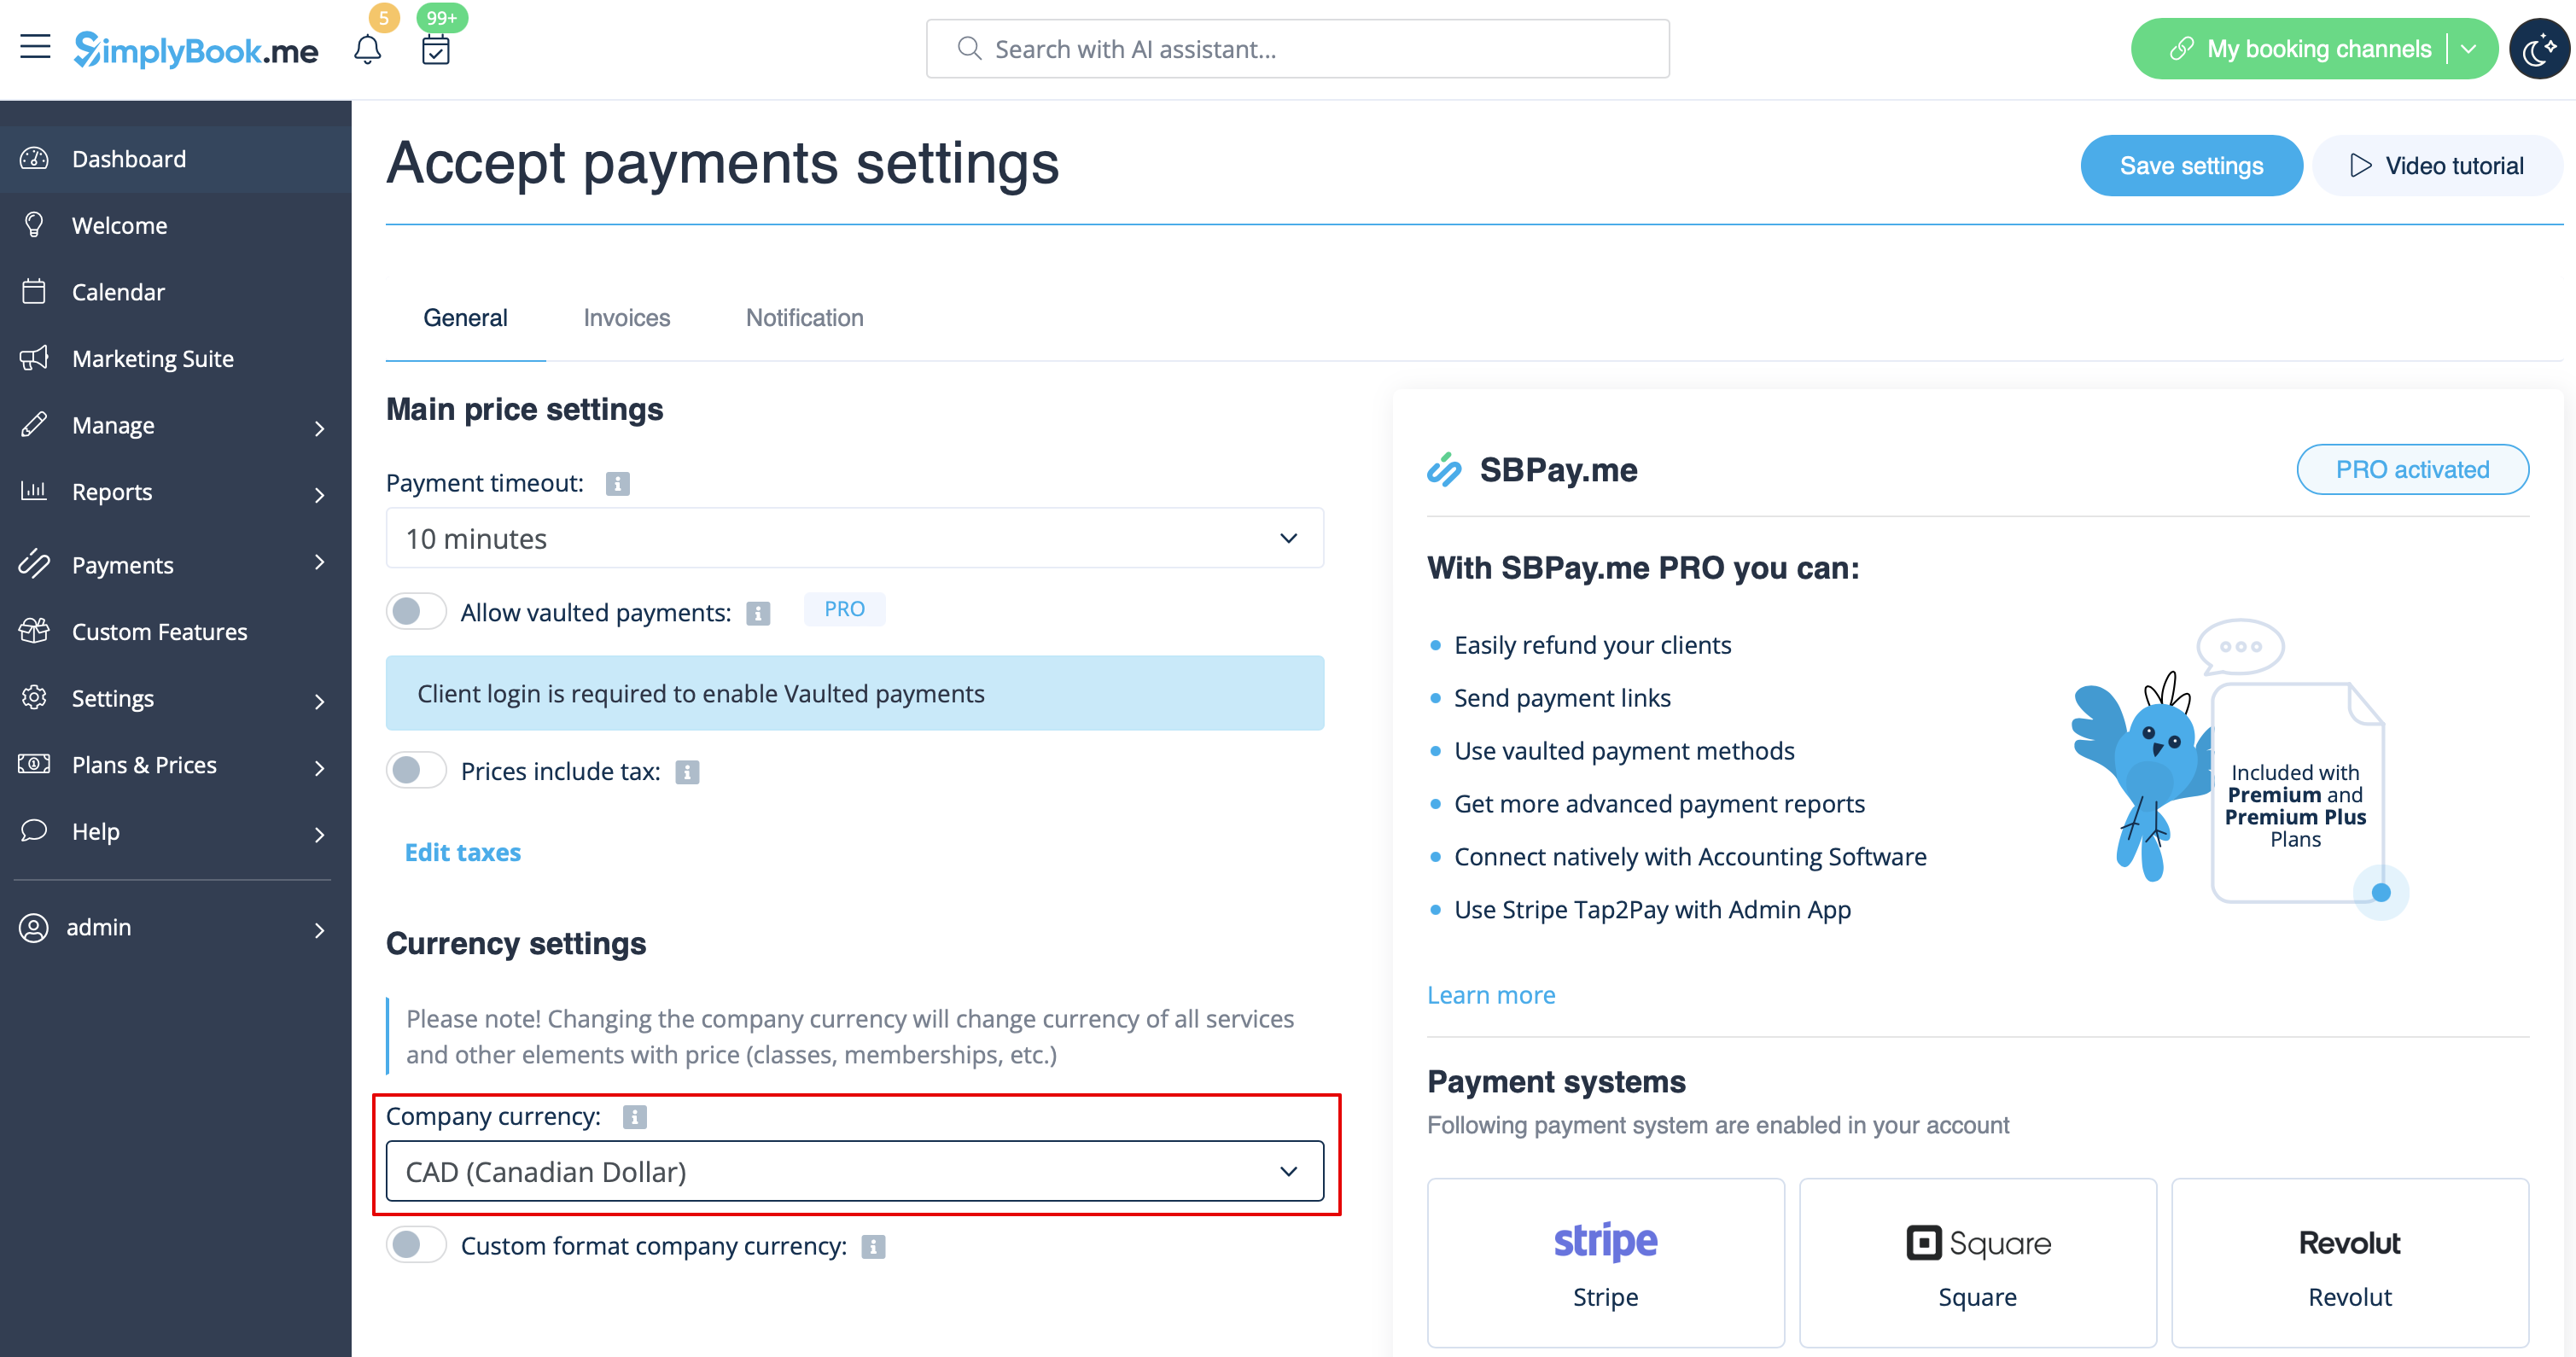
How to change currency
You can adjust the currency in the settings of Accept payments custom feature.
Please note!
- Some payment processors do not support all currencies. Before setting the currency, check if the selected payment processor supports it.
- There is no option to select multiple company currencies. The currency you choose will be the same for all your offerings.
In the Currency settings, you can enable Custom formatting company currency to adjust the following:
- Currency Symbol: Customize the currency symbol if needed.
- Decimal Separator: Choose between "," or "." to be displayed in your prices.
- Digits: In this section, select the number of digits displayed after decimal separator in the amount, ranging from 0 to 3. For example, if the service price is set to $10 and the number of digits in Currency settings is set to 0, the price on the booking website will be $10. If set to 2, the format will be $10.00. If the number of digits is set to 0, it will not be possible to add amounts less than $1 (where $ stands for your company currency in this example).
- Positioning of the Currency Symbol
- Add space between the amount and symbol if desired.
What is "Pay later" option
When your clients are transferred to the payment page after Details tab, they usually have several options: your payment processor (one or several) and Pay Later. Pay Later in most cases means that client will pay right on the place when he/she arrives to the appointment. In your Dashboard, when you click on the appointment, such booking in the service price field will have a note "Pay Later".
Additionally, you can enable the Auto process payment for Pay Later payment processor to automatically set the Paid status for the service bookings where Pay Later was chosen as the payment method. Note that this option does not apply to memberships, gift cards, or packages.
As well you can activate Skip payment confirmation step option. This is particularly useful for those who only wish to display prices without processing payments online. If enabled, this step will be omitted.
If you want to disable Pay later option please navigate to Payments in the left-side menu (i.e. SBPay.me interface) -> Payment processors and deactivate Pay later option there.
Payment links
(available with Premium subscription (i.e. SBPay.me PRO version)
With this option you can now easily send payment links via emails or sms to your clients to pay onsite or offsite for some order/booking or unpaid remainder amount when deposits were used.
Check more details on how to use it here
Vaulted Payments
(available with Premium subscription (i.e. SBPay.me PRO version)
This option enables clients to securely store their card details as a preferred payment method. With vaulted payments, clients can seamlessly pay for future orders without re-entering their payment information, enhancing convenience and expediting transactions. From the admin side, you will be able to charge the saved payment method of your clients.
Check more details on how it works here
Refunds
(available with Premium subscription.
It may happen that you need to give the money back to your customer due to some reason and now it is possible to easily manage such cases with SBPay.me Pro integration.
Check more details on how it works here
How to customize the client invoices
It may be necessary to show or hide some data or change the look for the invoices that the system sends to clients after they make a purchase on your booking website.
Using SBPay.me Invoices feature can adjust the following items:
Check more details here here
Notifications
There are several types of the payment-related notifications that can be sent to you and/or your clients. Within the paid subscriptions you can customize notification templates using provided variables.
The following notifications are available:
- Payment failed notification (can be sent to client and/or to company);
- Payment link for Delay payment method (with SBPay.me Pro only);
- Refund confirmation (with SBPay.me Pro only).
How the whole payments process works
- 1. A client goes through the booking process and presses Book Now at the end. Or he/she selects some memberships/package/gift card, etc. to buy.
- 2. He is directed to summary step to choose a payment method. At this stage unconfirmed booking appears in the admin calendar marked red as not paid to reserve this time so that no other person can accidentally book the same slot and there will be no double-bookings. As well an order with the New status appears in Payment transactions report.

- 3. After that, the client has 2 options:
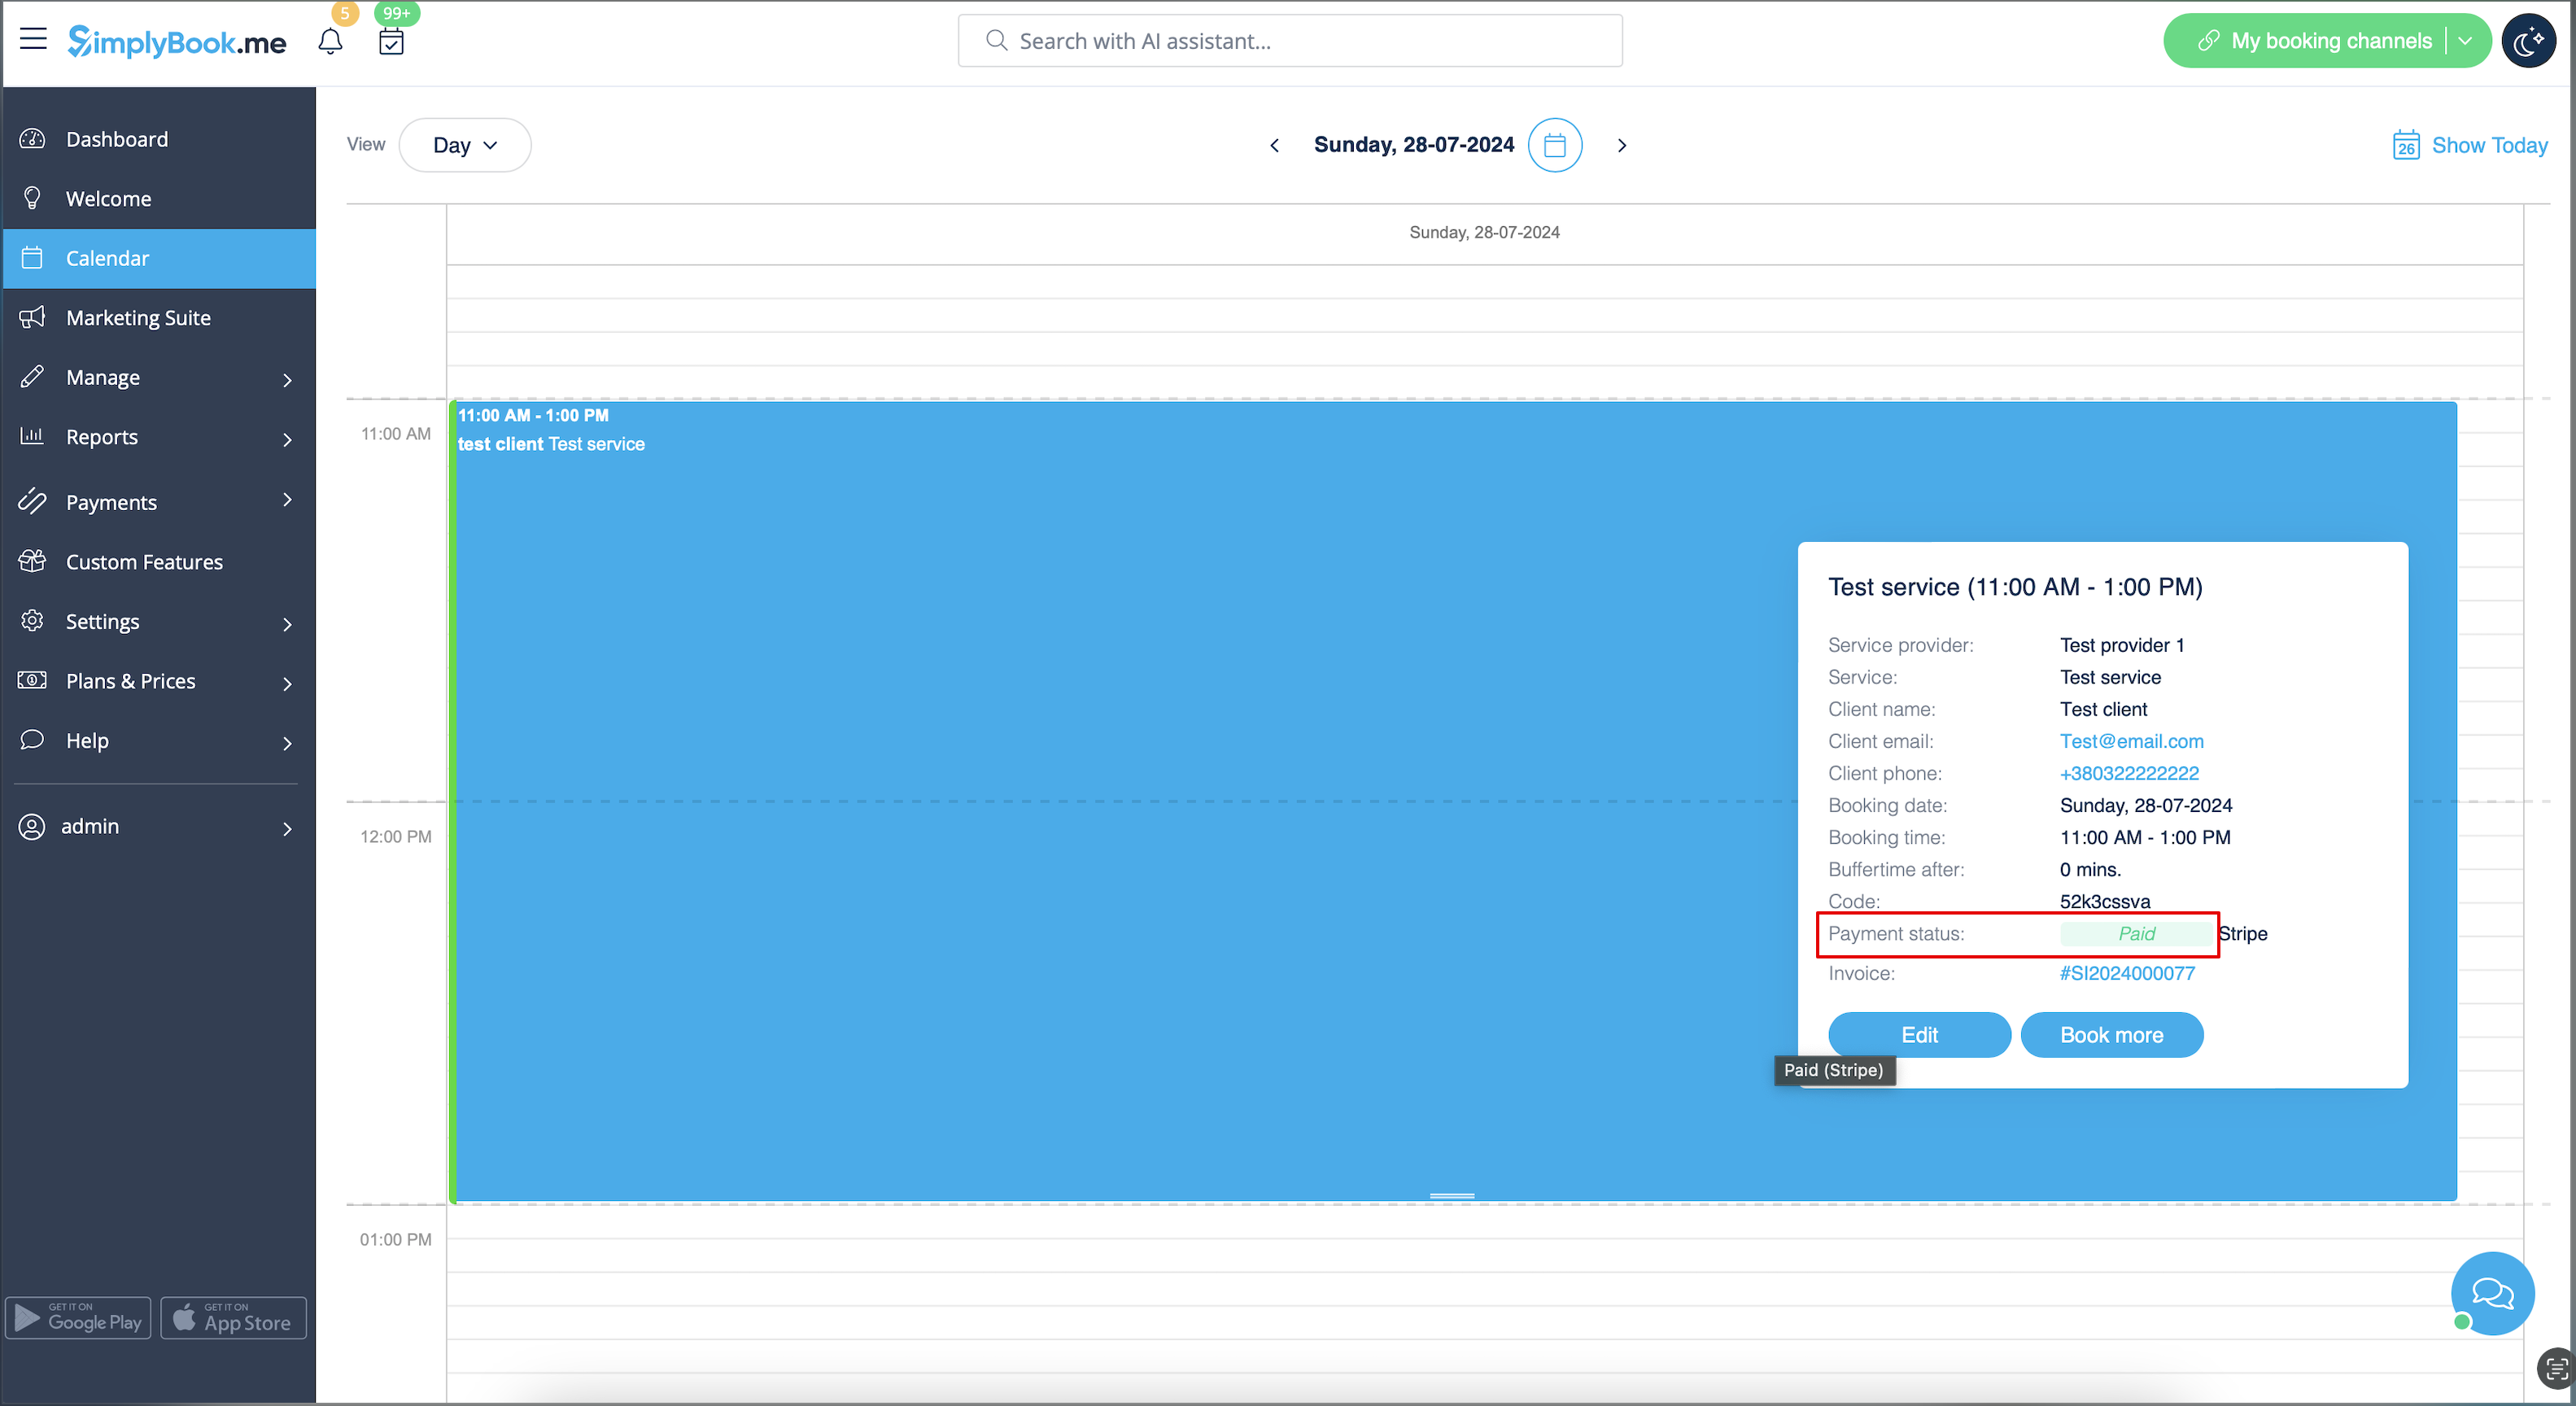
- 3.1. to pay and the payment processor will send us confirmation that client has paid and we will automatically approve the transaction on our side (booking will be marked with green color and the order with paid status).
- 3.1. to pay and the payment processor will send us confirmation that client has paid and we will automatically approve the transaction on our side (booking will be marked with green color and the order with paid status).
- 3.2. to not finish paying: the client is directed to the payment system, but then he closes the page, closes the browser, or simply leaves it open without any actions for a long period of time. In this case, the system will wait until timeout you set up in the settings of Accept payments custom feature will end and will cancel the non-paid booking/transaction because it was never finished. You can set the emails to be sent to client and/or you to be notified about the timed out bookings.
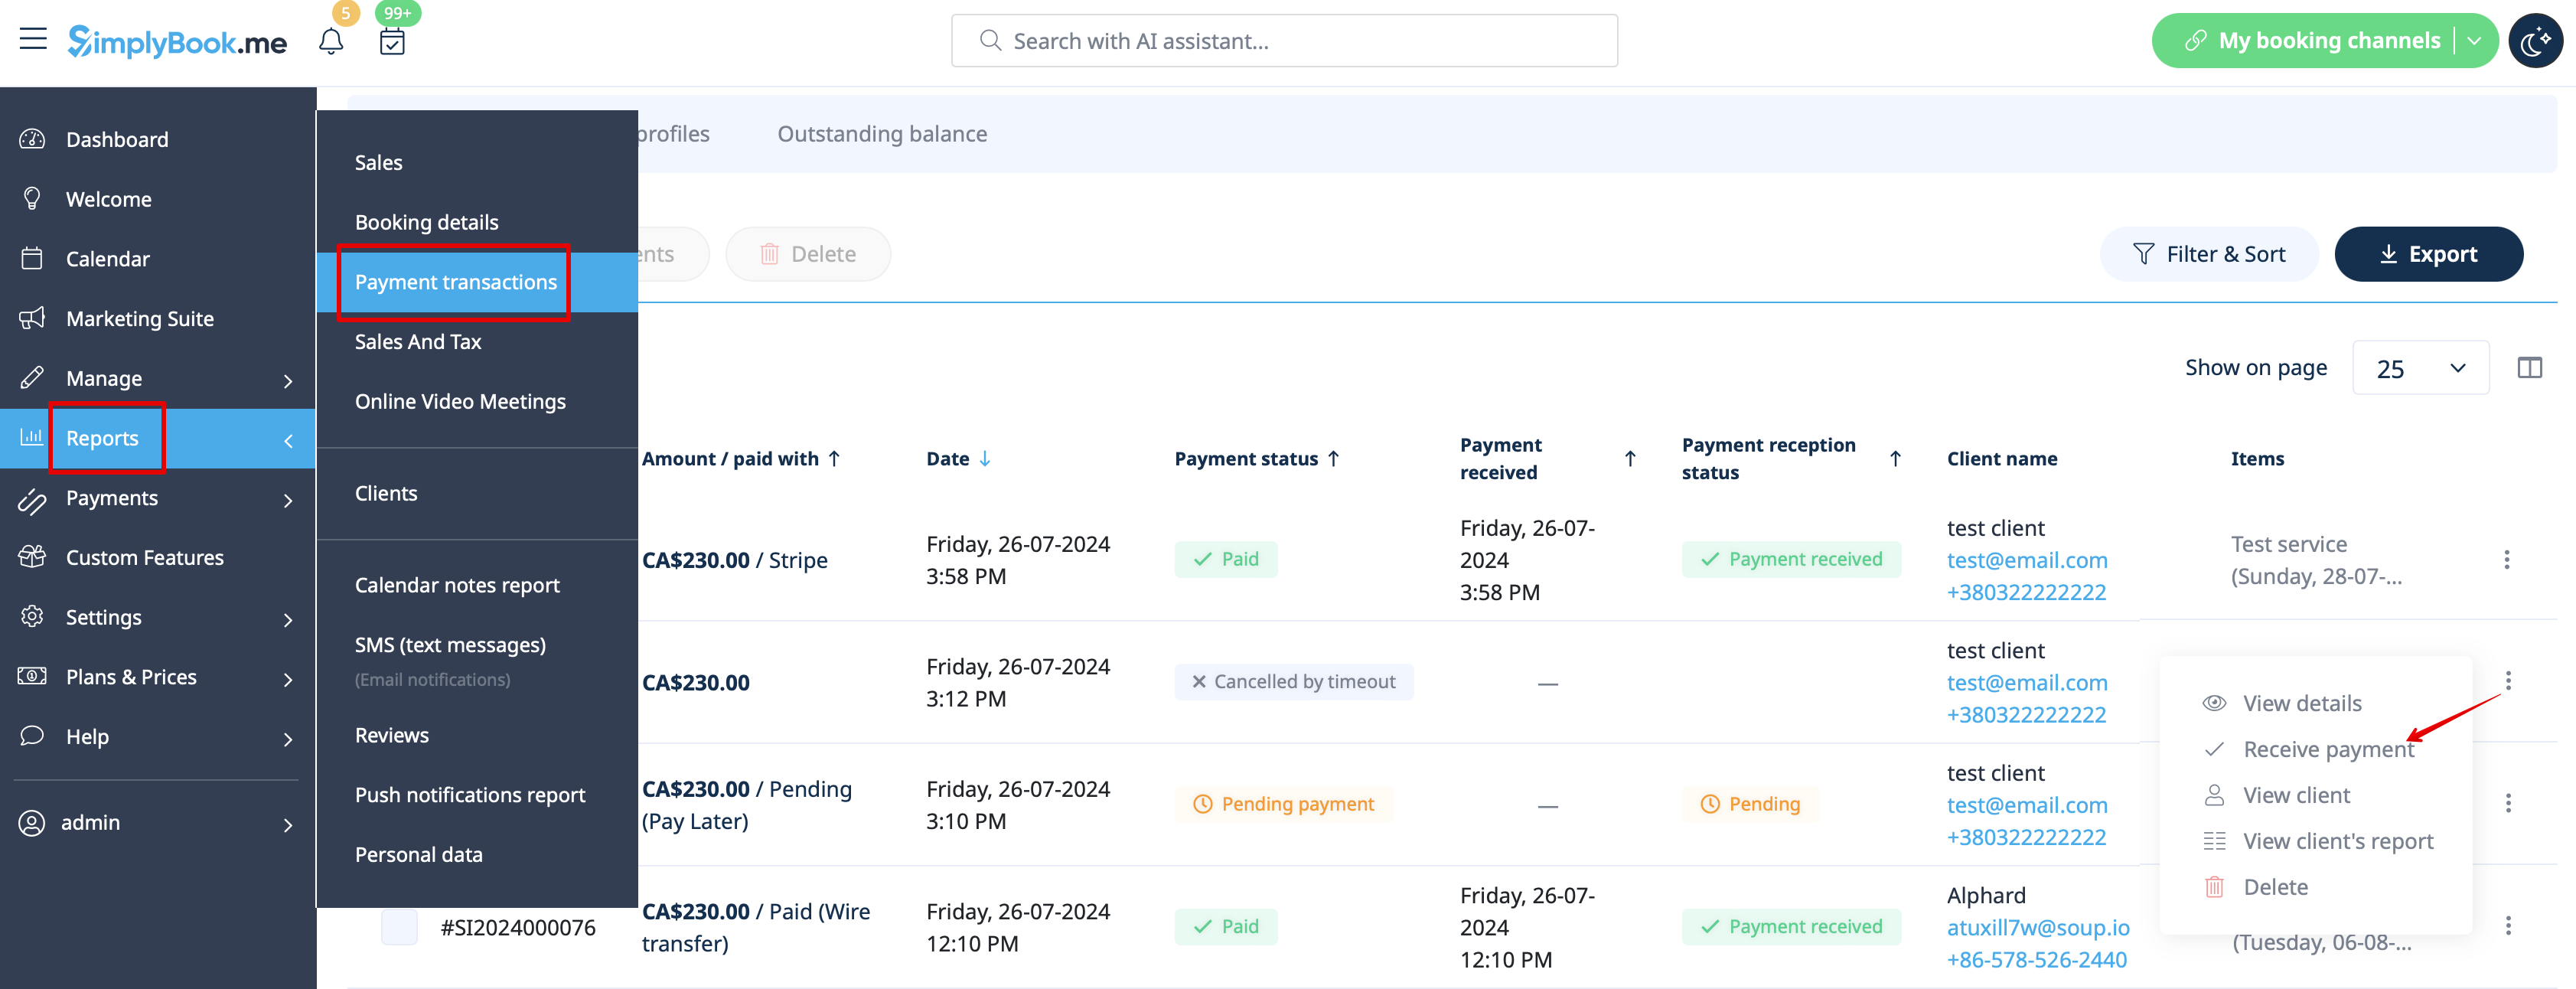
- Same happens if the client paid, but paid later than timeout. In this case, if you receive a notification from PayPal/Stripe/etc. that client paid for the booking/order but as it was too late you can go to Payments -> Transactions or Reports -> Payment transactions within SimplyBook.me interface and approve this booking manually.
- 3.2. to not finish paying: the client is directed to the payment system, but then he closes the page, closes the browser, or simply leaves it open without any actions for a long period of time. In this case, the system will wait until timeout you set up in the settings of Accept payments custom feature will end and will cancel the non-paid booking/transaction because it was never finished. You can set the emails to be sent to client and/or you to be notified about the timed out bookings.