Difference between revisions of "Accept payments custom feature"
| (13 intermediate revisions by the same user not shown) | |||
| Line 1: | Line 1: | ||
| + | <languages/> | ||
| + | <translate> | ||
| + | </translate> | ||
{{#seo: | {{#seo: | ||
|title=Accept Payments Custom Feature - SimplyBook.me | |title=Accept Payments Custom Feature - SimplyBook.me | ||
|titlemode=append | |titlemode=append | ||
| − | |keywords=faq, frequently asked questions, booking software, appointment system questions, appointments online, calendar software, booking system, booking calendar, scheduling software, online appointment scheduling, online scheduling, setup, setup help, support, help content, accept payments, accept payments online, online payments | + | |keywords=faq, frequently asked questions, booking software, appointment system questions, appointments online, calendar software, booking system, booking calendar, scheduling software, online appointment scheduling, online scheduling, setup, setup help, support, help content, accept payments, accept payments online, online payments, sbpay, sbpay.me |
}} | }} | ||
| + | <translate> | ||
| + | <!--T:1--> | ||
[[File:Accept payments small2.png|left]] | [[File:Accept payments small2.png|left]] | ||
| − | Accept Payments Custom Feature allows you to accept payments from your clients online. You can set the price for your service and when your clients make a booking, they will be | + | <!--T:2--> |
| − | You can accept payments via | + | Accept Payments Custom Feature allows you to accept payments from your clients online. You can set the price for your service/membership/package, etc. and when your clients make a booking/purchase, they will be asked to pay to confirm their purchase. |
| + | You can accept payments via a variety of payment processors. All the online payments are processed by the payment gateway of your choice and if there is a need to issue a refund to a client it can be done if you have SBPay.me PRO integration or manually from the admin account of your payment processor. | ||
<br><br> | <br><br> | ||
| − | To check gateways available by country please follow [https://simplybook.me/en/ | + | To check gateways available by country please follow <span style="background-color:#cdeffc; padding:5px; border-radius:5px;">[https://simplybook.me/en/booking-system-features/payments this link].</span> |
<br><br> | <br><br> | ||
| − | <span style="background-color:#e7e3f9; padding:5px; border-radius:5px;">Video tutorial | + | <span style="background-color:#e7e3f9; padding:5px; border-radius:5px;">Video tutorial [[File:Youtube-Logo.png|link=https://www.youtube.com/watch?v=iN-Yjaayvp4]]</span> |
<br><br> | <br><br> | ||
| − | = | + | <span style="background-color:#e7e3f9; padding:5px; border-radius:5px;"><span style="background-color:#cdeffc; padding:5px; border-radius:5px;">[[Special:MyLanguage/SBPay.me integration|SBPay.me PRO]]</span> integration video tutorial [[File:Youtube-Logo.png|link=https://www.youtube.com/watch?v=XPX7Xnsp5aM]]</span> |
<br><br> | <br><br> | ||
| + | <span style="background-color:#ffe9e9; padding:5px; border-radius:5px;">Please note! [[Special:MyLanguage/Membership custom feature|Membership]], [[Special:MyLanguage/Packages custom feature|Packages]], [[Special:MyLanguage/Service Add-Ons custom feature|Service Add-Ons]], [[Special:MyLanguage/Products for Sale custom feature|Products for Sale]], [[Special:MyLanguage/Coupons and Gift Cards custom feature|Coupons and Gift Cards]] Custom Features will not work if the Accept Payments Custom Feature is not activated.</span> | ||
| + | <br><br> | ||
| + | |||
| + | =How to enable= <!--T:3--> | ||
| + | |||
| + | <!--T:4--> | ||
:1. Enable <span style="background-color:#d4f8e5; padding:5px; border-radius:5px;">Accept Payments</span> custom feature in <span style="background-color:#d4f8e5; padding:5px; border-radius:5px;">Custom Features</span> section. | :1. Enable <span style="background-color:#d4f8e5; padding:5px; border-radius:5px;">Accept Payments</span> custom feature in <span style="background-color:#d4f8e5; padding:5px; border-radius:5px;">Custom Features</span> section. | ||
| − | [[File:Accept payments enable path new cf.png| border | center]] | + | [[File:Accept payments enable path new cf.png| border | center|link=https://help.simplybook.me/images/8/8a/Accept_payments_enable_path_new_cf.png]] |
<br><br> | <br><br> | ||
| − | :2. | + | :2. Once enabled, click on the <span style="background-color:#d4f8e5; padding:5px; border-radius:5px;">Settings</span> button. |
| − | [[File:Accept payments settings path | + | [[File:Accept payments settings path sbpay.png|1200px|border | center|link=https://help.simplybook.me/images/8/83/Accept_payments_settings_path_sbpay.png]] |
<br><br> | <br><br> | ||
| − | :3. | + | :3. Adjust your company information in the following form if necessary. |
| − | [[File: | + | :(It will be autocompleted with the company details that you already have in your system). |
| + | [[File:Sbpayme registration form.png|1200px|center|link=https://help.simplybook.me/images/0/0e/Sbpayme_registration_form.png]] | ||
<br><br> | <br><br> | ||
| − | : | + | :4. Click on the <span style="background-color:#d4f8e5; padding:5px; border-radius:5px;">Activate SBPay.me</span> button. |
<br><br> | <br><br> | ||
| − | : | + | :<span style="background-color:#ffe9e9; padding:5px; border-radius:5px;">'''Please note!''' The majority of your payment-related settings and configurations will be managed through SBPay.me, which becomes accessible upon enabling the Accept Payments feature through '''Payments''' item in the navigation menu. Please check more information [[Special:MyLanguage/SBPay.me integration|here]].</span> |
| − | [[ | ||
<br><br> | <br><br> | ||
| − | :5. | + | |
| − | [[ | + | =Where to set prices= <!--T:5--> |
| + | |||
| + | |||
| + | <!--T:6--> | ||
| + | With SimplyBook.me you can accept payments for service/class bookings, packages, memberships, gift cards, products and add-ons.<br> | ||
| + | Please check the following points to set prices for the desired items: | ||
| + | |||
| + | <!--T:7--> | ||
| + | 1. <span style="background-color:#d4f8e5; padding:5px; border-radius:5px;">Services/Classes:</span> | ||
| + | |||
| + | <!--T:8--> | ||
| + | * Navigate to <span style="background-color:#d4f8e5; padding:5px; border-radius:5px;">Manage</span> -> <span style="background-color:#d4f8e5; padding:5px; border-radius:5px;">Services/Classes.</span> | ||
| + | * Click on the specific Service and access <span style="background-color:#d4f8e5; padding:5px; border-radius:5px;">Service/Class Details.</span> | ||
| + | * Scroll down to the <span style="background-color:#d4f8e5; padding:5px; border-radius:5px;">Price</span> field to set the price for the service. | ||
| + | |||
| + | <!--T:9--> | ||
| + | 2. <span style="background-color:#d4f8e5; padding:5px; border-radius:5px;">Packages:</span> | ||
| + | |||
| + | <!--T:10--> | ||
| + | * Head to <span style="background-color:#d4f8e5; padding:5px; border-radius:5px;">Manage</span> -> <span style="background-color:#d4f8e5; padding:5px; border-radius:5px;">Packages.</span> | ||
| + | * Click on the desired Package and access <span style="background-color:#d4f8e5; padding:5px; border-radius:5px;">Package Details.</span> | ||
| + | * Set the price in the <span style="background-color:#d4f8e5; padding:5px; border-radius:5px;">Price</span> field for the package. | ||
| + | |||
| + | <!--T:11--> | ||
| + | 3. <span style="background-color:#d4f8e5; padding:5px; border-radius:5px;">Memberships:</span> | ||
| + | |||
| + | <!--T:12--> | ||
| + | * Go to <span style="background-color:#d4f8e5; padding:5px; border-radius:5px;">Manage</span> -> <span style="background-color:#d4f8e5; padding:5px; border-radius:5px;">Memberships.</span> | ||
| + | * Access <span style="background-color:#d4f8e5; padding:5px; border-radius:5px;">Membership Details</span> and locate <span style="background-color:#d4f8e5; padding:5px; border-radius:5px;">First Payment</span> to set the initial price. | ||
| + | * If the Membership is recurring, also set the price in the <span style="background-color:#d4f8e5; padding:5px; border-radius:5px;">Recurring Price</span> field. Further details on setting up Memberships can be found [[Special:MyLanguage/Membership custom feature|here]]. | ||
| + | |||
| + | <!--T:13--> | ||
| + | 4. <span style="background-color:#d4f8e5; padding:5px; border-radius:5px;">Service Add-ons:</span> | ||
| + | |||
| + | <!--T:14--> | ||
| + | * Navigate to <span style="background-color:#d4f8e5; padding:5px; border-radius:5px;">Manage</span> -> <span style="background-color:#d4f8e5; padding:5px; border-radius:5px;">Service Add-ons.</span> | ||
| + | * Click on the specific Service Add-on and access <span style="background-color:#d4f8e5; padding:5px; border-radius:5px;">Service Add-on Details.</span> | ||
| + | * Adjust the price in the <span style="background-color:#d4f8e5; padding:5px; border-radius:5px;">Add-on Price</span> field. | ||
| + | |||
| + | <!--T:15--> | ||
| + | 5. <span style="background-color:#d4f8e5; padding:5px; border-radius:5px;">Products for Sale:</span> | ||
| + | |||
| + | <!--T:16--> | ||
| + | * Go to <span style="background-color:#d4f8e5; padding:5px; border-radius:5px;">Manage</span> -> <span style="background-color:#d4f8e5; padding:5px; border-radius:5px;">Products for Sale.</span> | ||
| + | * Click on the desired Product for Sale and access <span style="background-color:#d4f8e5; padding:5px; border-radius:5px;">Product Details.</span> | ||
| + | * Specify the price in the <span style="background-color:#d4f8e5; padding:5px; border-radius:5px;">Product Price</span> field. | ||
<br><br> | <br><br> | ||
| − | |||
| − | |||
| − | |||
| − | |||
| − | |||
| − | |||
| − | |||
| − | |||
| − | |||
| − | |||
| − | |||
| − | = | + | =How to add taxes= <!--T:17--> |
| − | + | ||
| − | + | <!--T:18--> | |
| − | |||
| − | |||
| − | |||
| − | < | ||
| − | |||
| − | |||
| − | |||
| − | |||
| − | |||
| − | |||
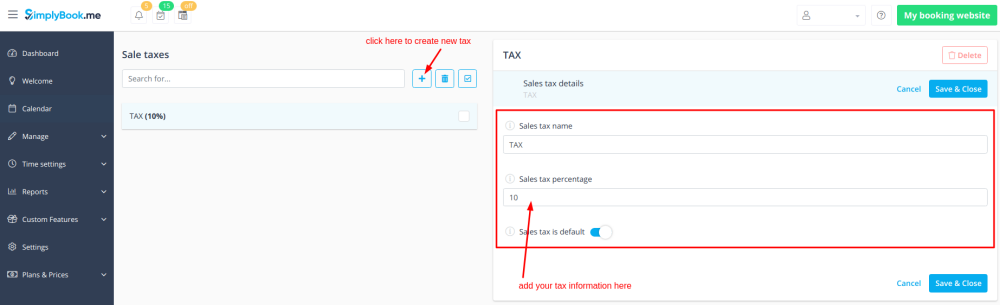
:1. Add the necessary taxes options in <span style="background-color:#d4f8e5; padding:5px; border-radius:5px;">Manage</span> -> <span style="background-color:#d4f8e5; padding:5px; border-radius:5px;">Taxes</span> -> <span style="background-color:#d4f8e5; padding:5px; border-radius:5px;">+</span> | :1. Add the necessary taxes options in <span style="background-color:#d4f8e5; padding:5px; border-radius:5px;">Manage</span> -> <span style="background-color:#d4f8e5; padding:5px; border-radius:5px;">Taxes</span> -> <span style="background-color:#d4f8e5; padding:5px; border-radius:5px;">+</span> | ||
:Choose the default one if necessary - it will be automatically set for each new sale item that you will create in the system. | :Choose the default one if necessary - it will be automatically set for each new sale item that you will create in the system. | ||
| − | [[File:Creating_tax.png| border| center]] | + | [[File:Creating_tax.png| border| center|link=https://help.simplybook.me/images/f/f5/Creating_tax.png]] |
<br><br> | <br><br> | ||
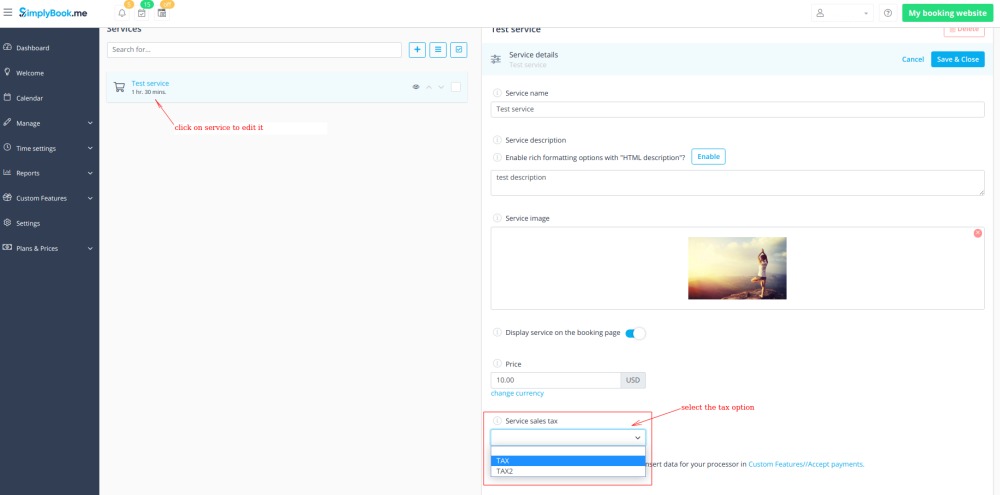
:2. Navigate to <span style="background-color:#d4f8e5; padding:5px; border-radius:5px;">Manage</span> -> <span style="background-color:#d4f8e5; padding:5px; border-radius:5px;">Services</span> and select the tax option per each service. | :2. Navigate to <span style="background-color:#d4f8e5; padding:5px; border-radius:5px;">Manage</span> -> <span style="background-color:#d4f8e5; padding:5px; border-radius:5px;">Services</span> and select the tax option per each service. | ||
| − | :If you have other items like <span style="background-color:#cdeffc; padding:5px; border-radius:5px;">[[Classes_custom_feature|Classes]],</span> <span style="background-color:#cdeffc; padding:5px; border-radius:5px;">[[Packages_custom_feature|Packages]],</span> <span style="background-color:#cdeffc; padding:5px; border-radius:5px;">[[Membership_custom_feature|Memberships]],</span> <span style="background-color:#cdeffc; padding:5px; border-radius:5px;">[[Products_for_Sale_custom_feature|Products for sale]],</span> <span style="background-color:#cdeffc; padding:5px; border-radius:5px;">[[Service_Add-Ons_custom_feature|Service add-ons]],</span> <span style="background-color:#cdeffc; padding:5px; border-radius:5px;">[[Coupons_and_Gift_Cards_custom_feature|Gift cards]]</span> and need taxes to be applied there as well please go to the corresponding management page and select from the pre-created taxes for each item. | + | :If you have other items like <span style="background-color:#cdeffc; padding:5px; border-radius:5px;">[[Special:MyLanguage/Classes_custom_feature|Classes]],</span> <span style="background-color:#cdeffc; padding:5px; border-radius:5px;">[[Special:MyLanguage/Packages_custom_feature|Packages]],</span> <span style="background-color:#cdeffc; padding:5px; border-radius:5px;">[[Special:MyLanguage/Membership_custom_feature|Memberships]],</span> <span style="background-color:#cdeffc; padding:5px; border-radius:5px;">[[Special:MyLanguage/Products_for_Sale_custom_feature|Products for sale]],</span> <span style="background-color:#cdeffc; padding:5px; border-radius:5px;">[[Special:MyLanguage/Service_Add-Ons_custom_feature|Service add-ons]],</span> <span style="background-color:#cdeffc; padding:5px; border-radius:5px;">[[Special:MyLanguage/Coupons_and_Gift_Cards_custom_feature|Gift cards]]</span> and need taxes to be applied there as well please go to the corresponding management page and select from the pre-created taxes for each item. |
| − | [[File:Add tax to service.png | border| center]] | + | [[File:Add tax to service.png | border| center|link=https://help.simplybook.me/images/1/1c/Add_tax_to_service.png]] |
<br><br> | <br><br> | ||
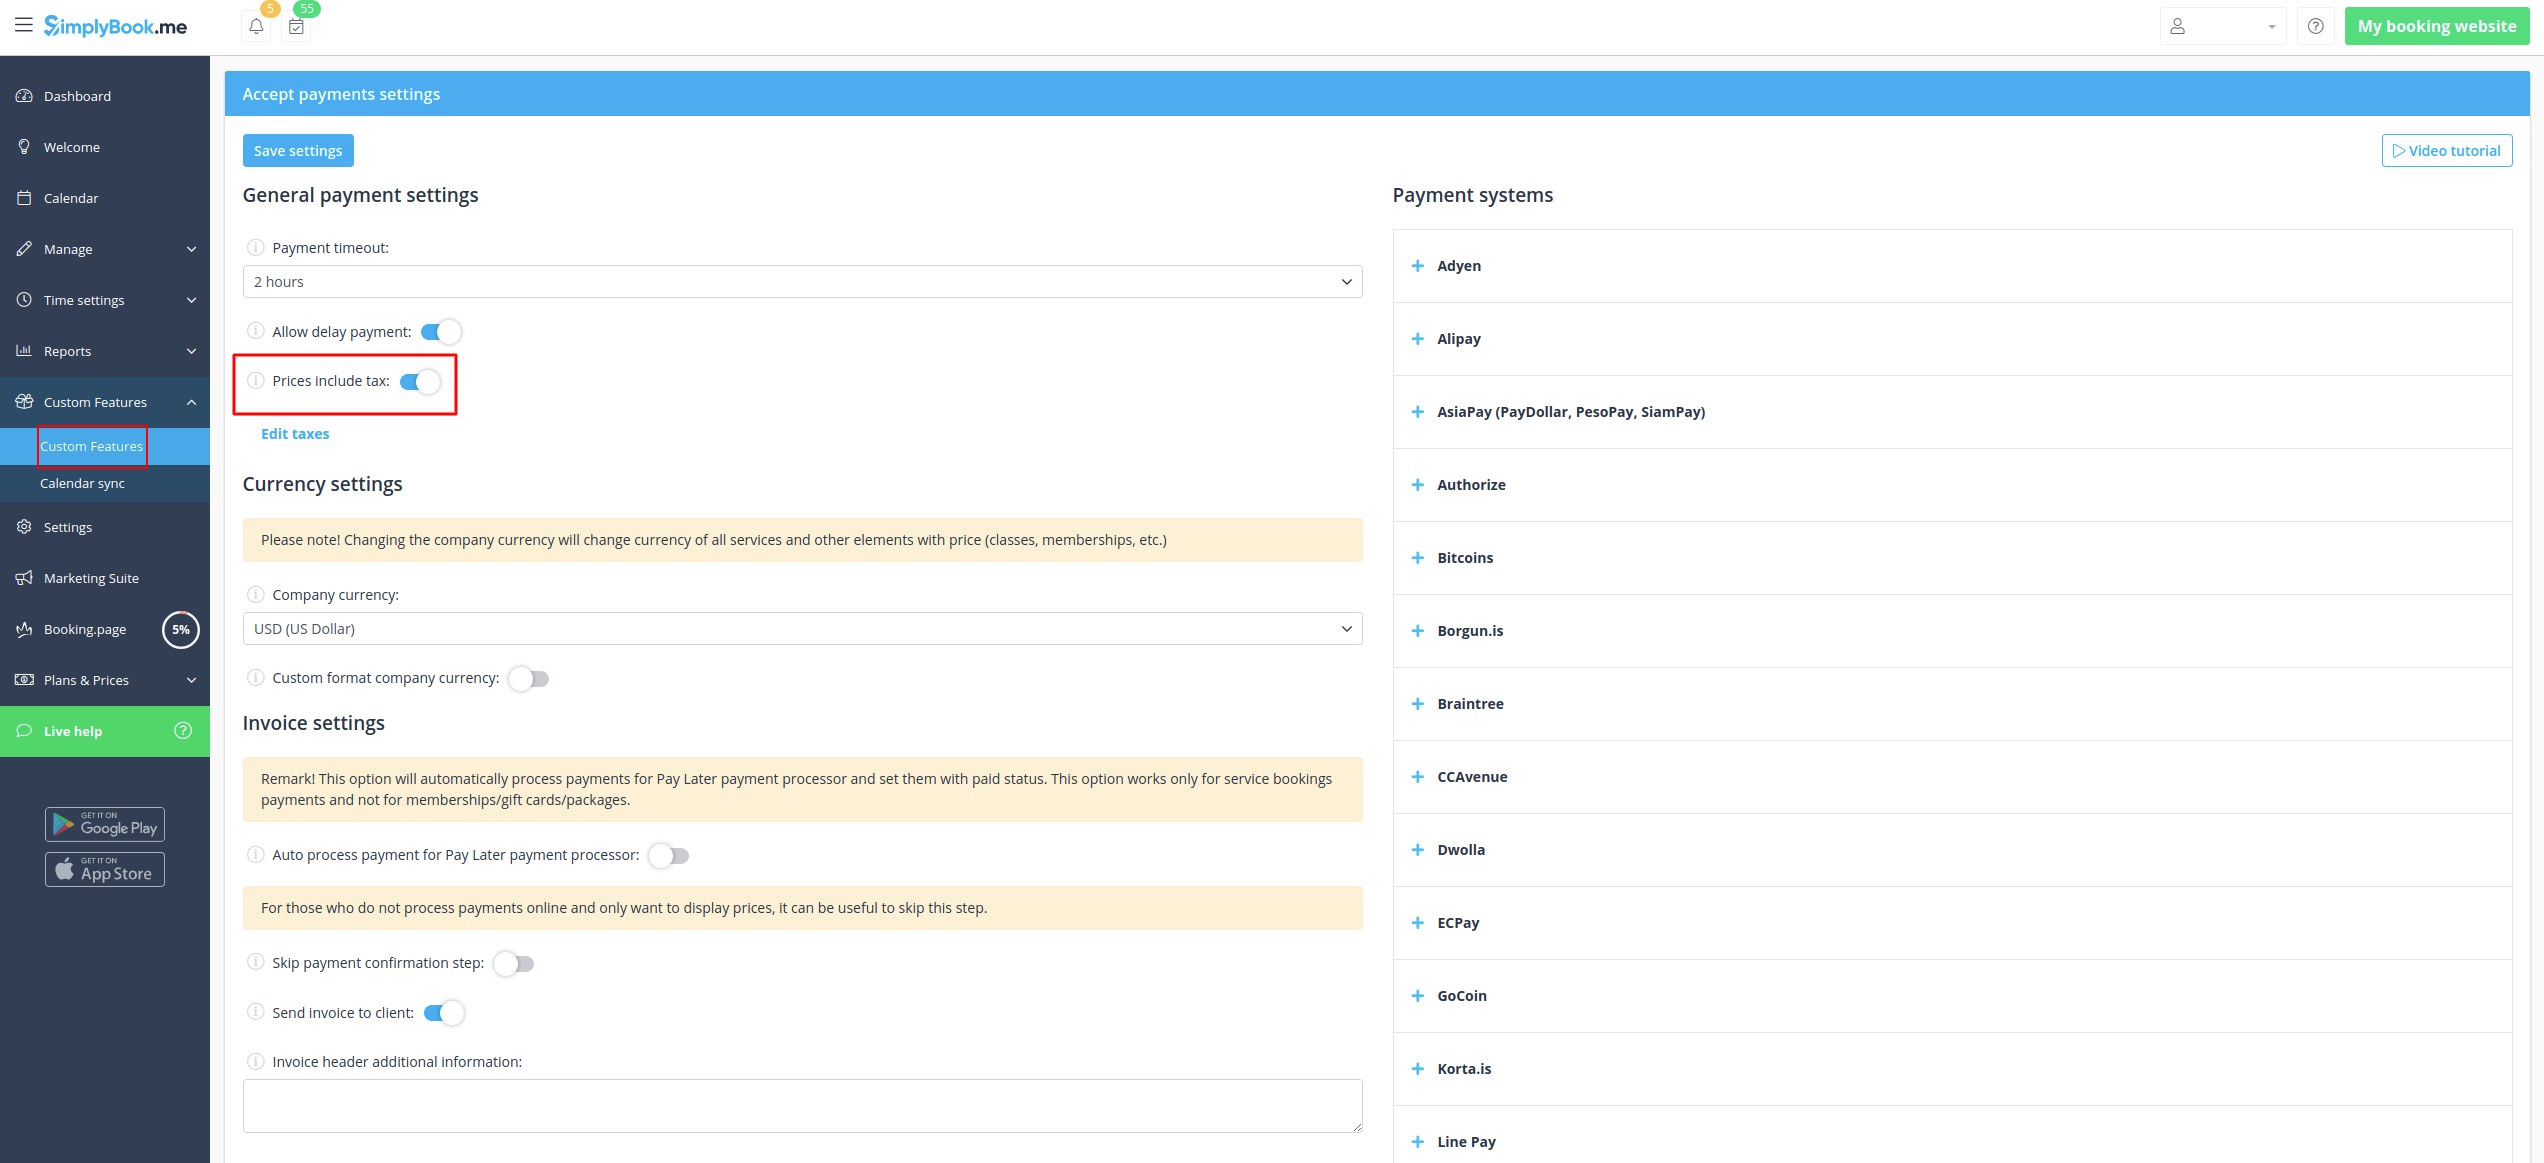
:3. In <span style="background-color:#d4f8e5; padding:5px; border-radius:5px;">Custom features</span> -> <span style="background-color:#d4f8e5; padding:5px; border-radius:5px;">Accept payments</span> -> <span style="background-color:#d4f8e5; padding:5px; border-radius:5px;">Settings</span> choose whether the tax amount should be added to the price that you have set per service(or other item) or it is already included by using the switcher <span style="background-color:#d4f8e5; padding:5px; border-radius:5px;">Prices include tax.</span><br> | :3. In <span style="background-color:#d4f8e5; padding:5px; border-radius:5px;">Custom features</span> -> <span style="background-color:#d4f8e5; padding:5px; border-radius:5px;">Accept payments</span> -> <span style="background-color:#d4f8e5; padding:5px; border-radius:5px;">Settings</span> choose whether the tax amount should be added to the price that you have set per service(or other item) or it is already included by using the switcher <span style="background-color:#d4f8e5; padding:5px; border-radius:5px;">Prices include tax.</span><br> | ||
:If you enable the switcher it will mean that the amount that you have set per service is already with taxes.<br> | :If you enable the switcher it will mean that the amount that you have set per service is already with taxes.<br> | ||
:In case you disable the switcher the system will automatically add the selected tax percentage to the items prices<br> | :In case you disable the switcher the system will automatically add the selected tax percentage to the items prices<br> | ||
| − | [[File:Prices include tax new.png|1200px|border|center]] | + | [[File:Prices include tax new.png|1200px|border|center|link=https://help.simplybook.me/images/d/df/Prices_include_tax_new.png]] |
<br><br> | <br><br> | ||
| − | = | + | |
| + | =Payment Timeout= <!--T:19--> | ||
| + | |||
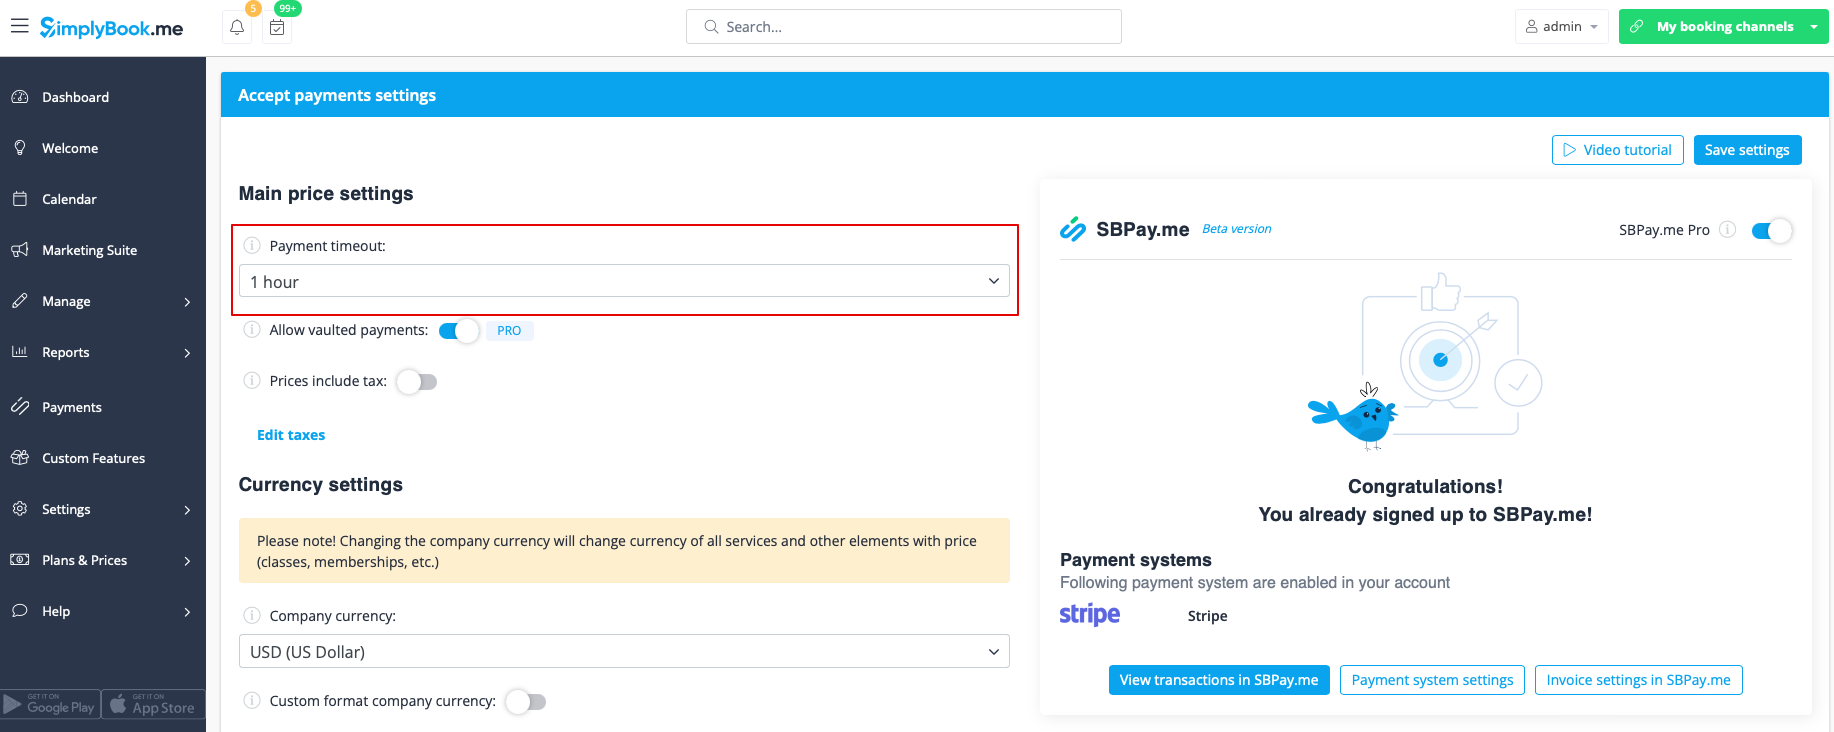
| + | <!--T:20--> | ||
| + | This setting allows to determine the duration within which a payment transaction must be completed before it expires. If not paid within the defined period, the associated transaction and booking/s will be canceled automatically.<br> | ||
| + | The recommended period is at least 1 hour to give clients enough time to complete the payment and for the payment system to send us the confirmation. | ||
| + | [[File:Payment timeout setting path.png|1200px|center|link=https://help.simplybook.me/images/8/89/Payment_timeout_setting_path.png]] | ||
| + | <br><br> | ||
| + | |||
| + | =How to change currency= <!--T:21--> | ||
<br><br> | <br><br> | ||
| − | + | You can adjust the currency in the settings of <span style="background-color:#cdeffc; padding:5px; border-radius:5px;">[[Special:MyLanguage/Custom_Features#Accept_Payments | Accept payments]]</span> custom feature. <br><br> | |
| + | <span style="background-color:#ffe9e9; padding:5px; border-radius:5px;">'''Please note!'''</span> | ||
| + | *<span style="background-color:#ffe9e9; padding:5px; border-radius:5px;">Some payment processors do not support all currencies. Before setting the currency, check if the selected payment processor supports it.</span> | ||
| + | *<span style="background-color:#ffe9e9; padding:5px; border-radius:5px;">There is no option to select multiple company currencies. The currency you choose will be the same for all your offerings.</span> | ||
| + | [[File:Select company currency.png|1200px|border|center|link=https://help.simplybook.me/images/5/56/Select_company_currency.png]] | ||
<br><br> | <br><br> | ||
| − | = | + | In the <span style="background-color:#d4f8e5; padding:5px; border-radius:5px;">Currency settings</span>, you can enable <span style="background-color:#d4f8e5; padding:5px; border-radius:5px;">Custom formatting company currency</span> to adjust the following: |
| − | + | <br><br> | |
| − | + | *<span style="background-color:#d4f8e5; padding:5px; border-radius:5px;">Currency Symbol:</span> Customize the currency symbol if needed. | |
| + | *<span style="background-color:#d4f8e5; padding:5px; border-radius:5px;">Decimal Separator:</span> Choose between "," or "." to be displayed in your prices. | ||
| + | *<span style="background-color:#d4f8e5; padding:5px; border-radius:5px;">Digits:</span> In this section, select the number of digits displayed after decimal separator in the amount, ranging from 0 to 3. For example, if the service price is set to $10 and the number of digits in Currency settings is set to 0, the price on the booking website will be $10. If set to 2, the format will be $10.00. If the number of digits is set to 0, it will not be possible to add amounts less than $1 (where $ stands for your company currency in this example). | ||
| + | *<span style="background-color:#d4f8e5; padding:5px; border-radius:5px;">Positioning</span> of the Currency Symbol | ||
| + | *Add <span style="background-color:#d4f8e5; padding:5px; border-radius:5px;">space</span> between the amount and symbol if desired. | ||
<br><br> | <br><br> | ||
| − | + | =What is "Pay later" option= <!--T:22--> | |
| − | + | ||
| − | + | <!--T:23--> | |
| + | When your clients are transferred to the payment page after <span style="background-color:#d4f8e5; padding:5px; border-radius:5px;">Details</span> tab, they usually have several options: your payment processor (one or several) and <span style="background-color:#d4f8e5; padding:5px; border-radius:5px;">Pay Later</span>. <span style="background-color:#d4f8e5; padding:5px; border-radius:5px;">Pay Later</span> in most cases means that client will pay right on the place when he/she arrives to the appointment. In your <span style="background-color:#d4f8e5; padding:5px; border-radius:5px;">Dashboard</span>, when you click on the appointment, such booking in the service price field will have a note <span style="background-color:#d4f8e5; padding:5px; border-radius:5px;">"Pay Later"</span>. | ||
| + | Additionally, you can enable the <span style="background-color:#d4f8e5; padding:5px; border-radius:5px;">Auto process payment for Pay Later payment processor</span> to automatically set the Paid status for the service bookings where Pay Later was chosen as the payment method. Note that this option does not apply to memberships, gift cards, or packages.<br> | ||
| + | As well you can activate Skip payment confirmation step option. This is particularly useful for those who only wish to display prices without processing payments online. If enabled, this step will be omitted.<br> | ||
| + | If you want to disable <span style="background-color:#d4f8e5; padding:5px; border-radius:5px;">Pay later</span> option please navigate to <span style="background-color:#d4f8e5; padding:5px; border-radius:5px;">Payments</span> in the left-side menu (i.e. SBPay.me interface) -> <span style="background-color:#d4f8e5; padding:5px; border-radius:5px;">Payment processors</span> and deactivate <span style="background-color:#d4f8e5; padding:5px; border-radius:5px;">Pay later</span> option there. | ||
<br><br> | <br><br> | ||
| − | [[ | + | |
| + | =Payment links= <!--T:24--> | ||
| + | |||
| + | <!--T:25--> | ||
| + | (available with Premium subscription (i.e. SBPay.me PRO version)<br> | ||
| + | With this option you can now easily send payment links via emails or sms to your clients to pay onsite or offsite for some order/booking or unpaid remainder amount when deposits were used. | ||
| + | |||
| + | <!--T:26--> | ||
| + | Check more details on how to use it [[Special:MyLanguage/SBPay.me_integration#Payment_links|here]] | ||
<br><br> | <br><br> | ||
| − | + | ||
| + | =Vaulted Payments= <!--T:27--> | ||
| + | |||
| + | <!--T:28--> | ||
| + | (available with Premium subscription (i.e. SBPay.me PRO version)<br> | ||
| + | This option enables clients to securely store their card details as a preferred payment method. With vaulted payments, clients can seamlessly pay for future orders without re-entering their payment information, enhancing convenience and expediting transactions. From the admin side, you will be able to charge the saved payment method of your clients. | ||
| + | |||
| + | <!--T:29--> | ||
| + | Check more details on how it works [[Special:MyLanguage/SBPay.me_integration#Vaulted_payments|here]] | ||
<br><br> | <br><br> | ||
| − | + | =Refunds= <!--T:30--> | |
| − | + | ||
| − | + | <!--T:31--> | |
| − | < | + | (available with Premium subscription.<br> |
| − | [[ | + | It may happen that you need to give the money back to your customer due to some reason and now it is possible to easily manage such cases with SBPay.me Pro integration. |
| + | |||
| + | <!--T:32--> | ||
| + | Check more details on how it works [[Special:MyLanguage/SBPay.me_integration#Refunds|here]] | ||
<br><br> | <br><br> | ||
| − | + | =How to customize the client invoices= <!--T:33--> | |
| − | + | ||
| − | + | <!--T:34--> | |
| + | It may be necessary to show or hide some data or change the look for the invoices that the system sends to clients after they make a purchase on your booking website.<br> | ||
| + | Using SBPay.me Invoices feature can adjust the following items: | ||
<br><br> | <br><br> | ||
| − | [[ | + | Check more details here [[Special:MyLanguage/SBPay.me_integration#SBPay.me_Invoices|here]] |
<br><br> | <br><br> | ||
| − | + | =Notifications= <!--T:35--> | |
| − | + | ||
| − | + | <!--T:36--> | |
| − | + | There are several types of the payment-related notifications that can be sent to you and/or your clients. Within the paid subscriptions you can customize notification templates using provided variables.<br> | |
| + | The following notifications are available: | ||
| + | *Payment failed notification (can be sent to client and/or to company); | ||
| + | *Payment link for Delay payment method (with SBPay.me Pro only); | ||
| + | *Refund confirmation (with SBPay.me Pro only). | ||
<br><br> | <br><br> | ||
| − | + | ||
| − | + | =How the whole payments process works= <!--T:37--> | |
| + | |||
| + | <!--T:38--> | ||
<br><br> | <br><br> | ||
| − | As the | + | :1. A client goes through the booking process and presses <span style="background-color:#d4f8e5; padding:5px; border-radius:5px;">Book Now</span> at the end. Or he/she selects some memberships/package/gift card, etc. to buy.<br><br> |
| − | [[File: | + | :2. He is directed to summary step to choose a payment method. At this stage unconfirmed booking appears in the admin calendar marked red as ''not paid'' to reserve this time so that no other person can accidentally book the same slot and there will be no double-bookings. As well an order with the ''New'' status appears in '''Payment transactions''' report.<br> |
| + | [[File: Non-paid booking view.png | border | center|link=https://help.simplybook.me/images/8/88/Non-paid_booking_view.png]]<br><br> | ||
| + | :3. After that, the client has 2 options: | ||
| + | ::3.1. to pay and the payment processor will send us confirmation that client has paid and we will automatically approve the transaction on our side (booking will be marked with green color and the order with ''paid'' status). <br> | ||
| + | [[File: Paid booking view.png | border| center|link=https://help.simplybook.me/images/2/29/Paid_booking_view.png]]<br><br> | ||
| + | ::3.2. to not finish paying: the client is directed to the payment system, but then he closes the page, closes the browser, or simply leaves it open without any actions for a long period of time. In this case, the system will wait until timeout you set up in the settings of <span style="background-color:#cdeffc; padding:5px; border-radius:5px;">[[Special:MyLanguage/Custom_Features#Accept_Payments | Accept payments]]</span> custom feature will end and will cancel the non-paid booking/transaction because it was never finished. You can set the emails to be sent to client and/or you to be notified about the timed out bookings. <br> | ||
| + | ::Same happens if the client paid, but paid later than timeout. In this case, if you receive a notification from PayPal/Stripe/etc. that client paid for the booking/order but as it was too late you can go to <span style="background-color:#d4f8e5; padding:5px; border-radius:5px;">Payments</span> -> <span style="background-color:#d4f8e5; padding:5px; border-radius:5px;">Transactions</span> or <span style="background-color:#d4f8e5; padding:5px; border-radius:5px;">Reports</span> -> <span style="background-color:#d4f8e5; padding:5px; border-radius:5px;">Payment transactions</span> within SimplyBook.me interface and approve this booking manually.<br> | ||
| + | [[File:Approve timeout booking v3.png | border|center|link=https://help.simplybook.me/images/c/c8/Approve_timeout_booking_v3.png]]<br><br> | ||
<br><br> | <br><br> | ||
| − | + | </translate> | |
| − | |||
| − | |||
| − | |||
| − | |||
| − | |||
Latest revision as of 14:39, 2 February 2024

Accept Payments Custom Feature allows you to accept payments from your clients online. You can set the price for your service/membership/package, etc. and when your clients make a booking/purchase, they will be asked to pay to confirm their purchase.
You can accept payments via a variety of payment processors. All the online payments are processed by the payment gateway of your choice and if there is a need to issue a refund to a client it can be done if you have SBPay.me PRO integration or manually from the admin account of your payment processor.
To check gateways available by country please follow this link.
Video tutorial ![]()
SBPay.me PRO integration video tutorial ![]()
Please note! Membership, Packages, Service Add-Ons, Products for Sale, Coupons and Gift Cards Custom Features will not work if the Accept Payments Custom Feature is not activated.
How to enable
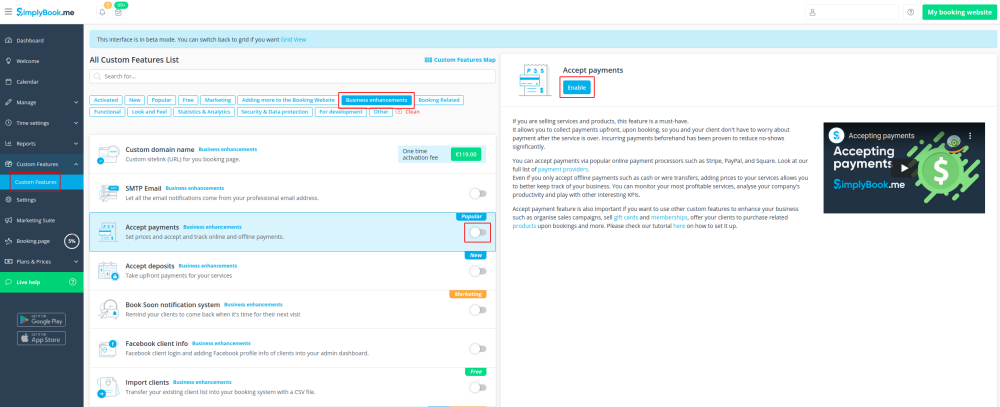
- 1. Enable Accept Payments custom feature in Custom Features section.
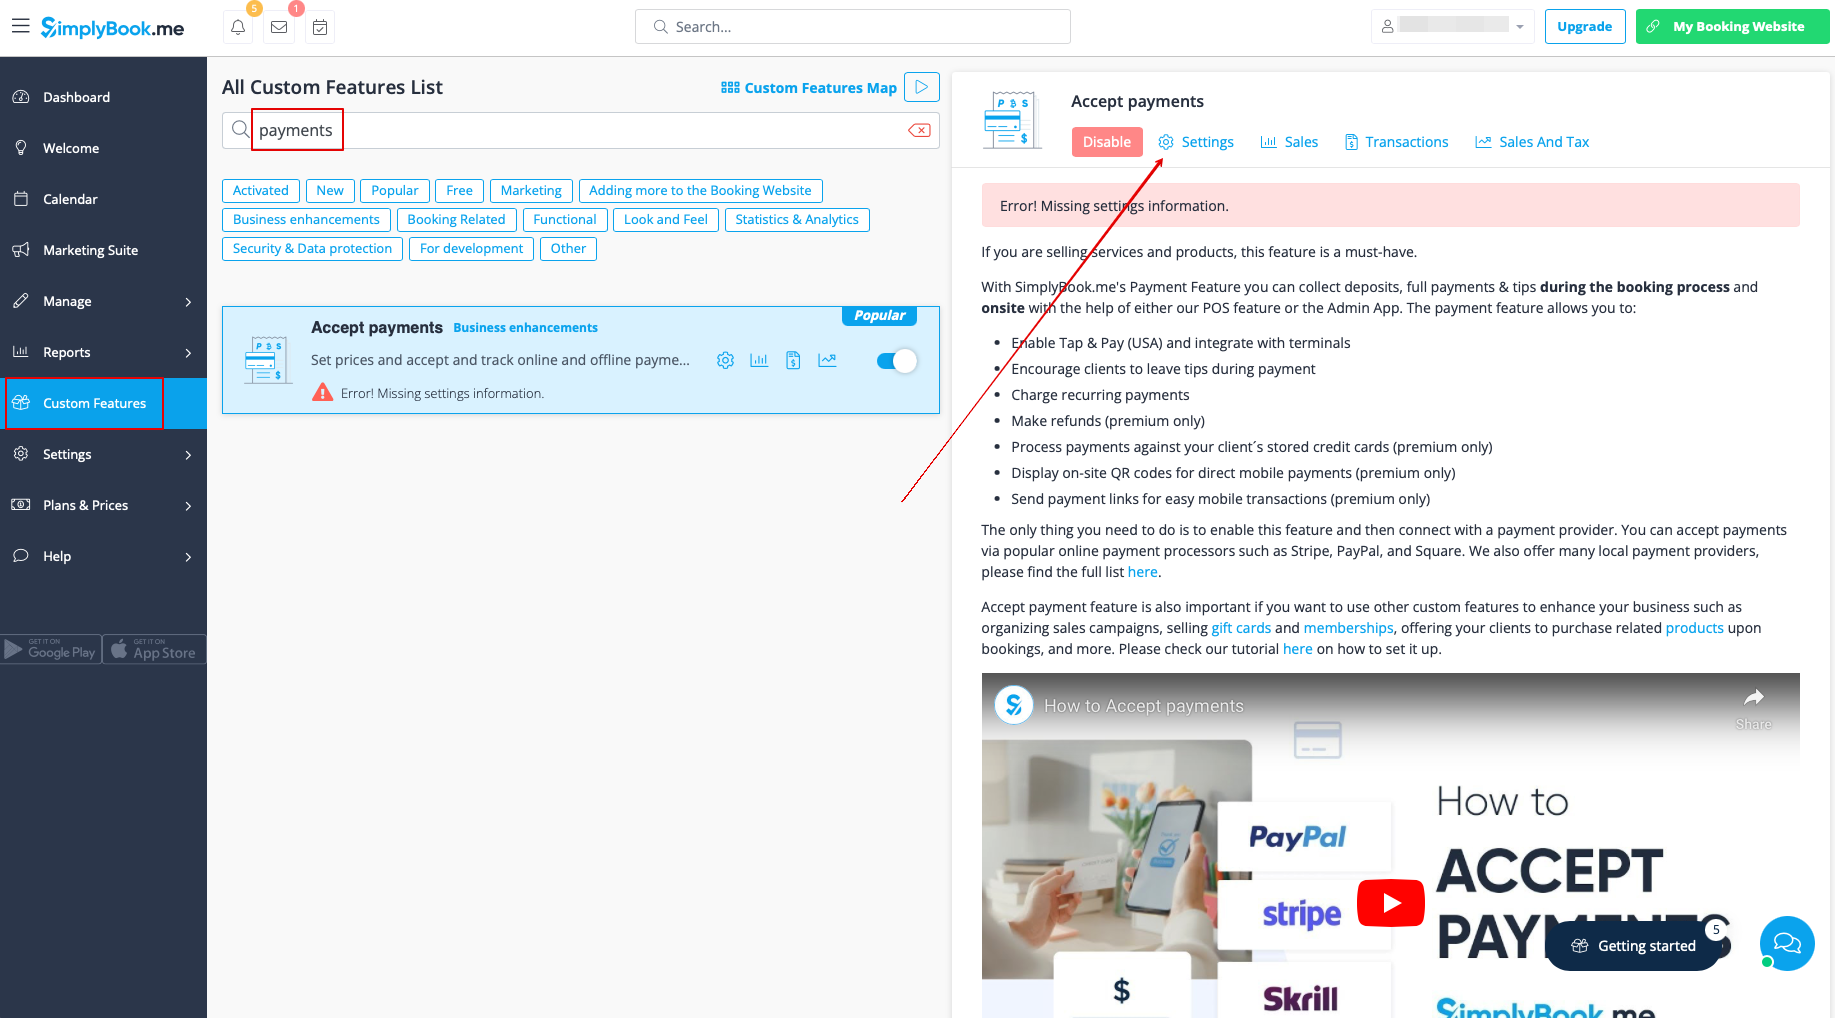
- 2. Once enabled, click on the Settings button.
- 3. Adjust your company information in the following form if necessary.
- (It will be autocompleted with the company details that you already have in your system).
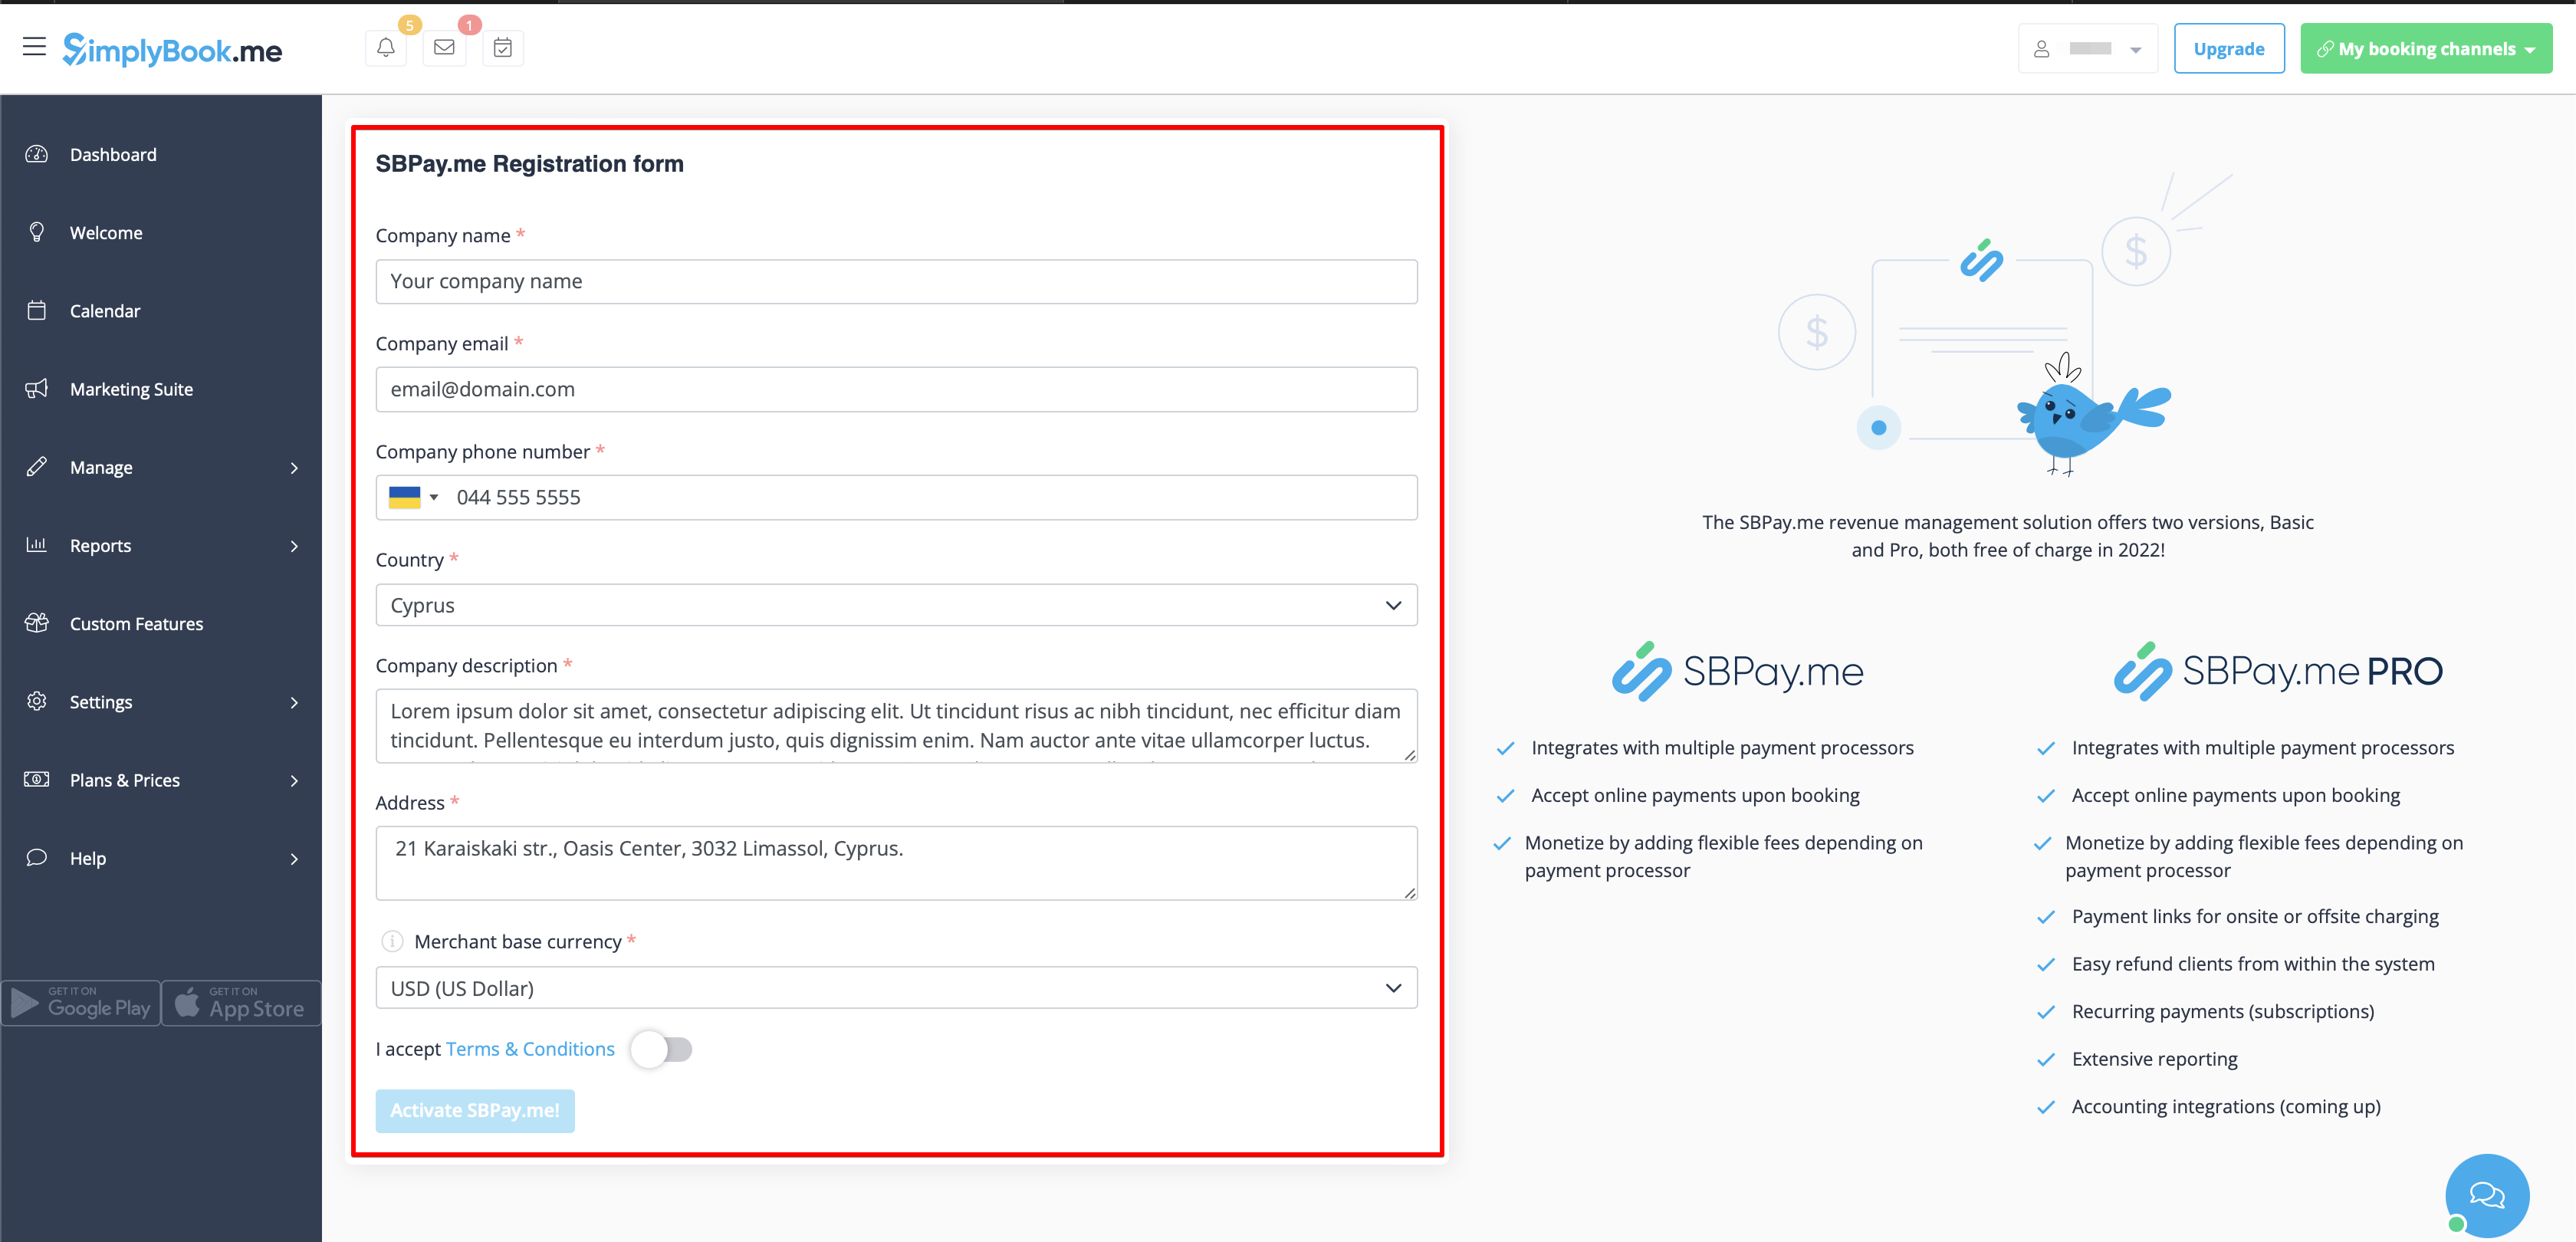
- 4. Click on the Activate SBPay.me button.
- Please note! The majority of your payment-related settings and configurations will be managed through SBPay.me, which becomes accessible upon enabling the Accept Payments feature through Payments item in the navigation menu. Please check more information here.
Where to set prices
With SimplyBook.me you can accept payments for service/class bookings, packages, memberships, gift cards, products and add-ons.
Please check the following points to set prices for the desired items:
1. Services/Classes:
- Navigate to Manage -> Services/Classes.
- Click on the specific Service and access Service/Class Details.
- Scroll down to the Price field to set the price for the service.
2. Packages:
- Head to Manage -> Packages.
- Click on the desired Package and access Package Details.
- Set the price in the Price field for the package.
3. Memberships:
- Go to Manage -> Memberships.
- Access Membership Details and locate First Payment to set the initial price.
- If the Membership is recurring, also set the price in the Recurring Price field. Further details on setting up Memberships can be found here.
4. Service Add-ons:
- Navigate to Manage -> Service Add-ons.
- Click on the specific Service Add-on and access Service Add-on Details.
- Adjust the price in the Add-on Price field.
5. Products for Sale:
- Go to Manage -> Products for Sale.
- Click on the desired Product for Sale and access Product Details.
- Specify the price in the Product Price field.
How to add taxes
- 1. Add the necessary taxes options in Manage -> Taxes -> +
- Choose the default one if necessary - it will be automatically set for each new sale item that you will create in the system.
- 2. Navigate to Manage -> Services and select the tax option per each service.
- If you have other items like Classes, Packages, Memberships, Products for sale, Service add-ons, Gift cards and need taxes to be applied there as well please go to the corresponding management page and select from the pre-created taxes for each item.
- 3. In Custom features -> Accept payments -> Settings choose whether the tax amount should be added to the price that you have set per service(or other item) or it is already included by using the switcher Prices include tax.
- If you enable the switcher it will mean that the amount that you have set per service is already with taxes.
- In case you disable the switcher the system will automatically add the selected tax percentage to the items prices
Payment Timeout
This setting allows to determine the duration within which a payment transaction must be completed before it expires. If not paid within the defined period, the associated transaction and booking/s will be canceled automatically.
The recommended period is at least 1 hour to give clients enough time to complete the payment and for the payment system to send us the confirmation.
How to change currency
You can adjust the currency in the settings of Accept payments custom feature.
Please note!
- Some payment processors do not support all currencies. Before setting the currency, check if the selected payment processor supports it.
- There is no option to select multiple company currencies. The currency you choose will be the same for all your offerings.
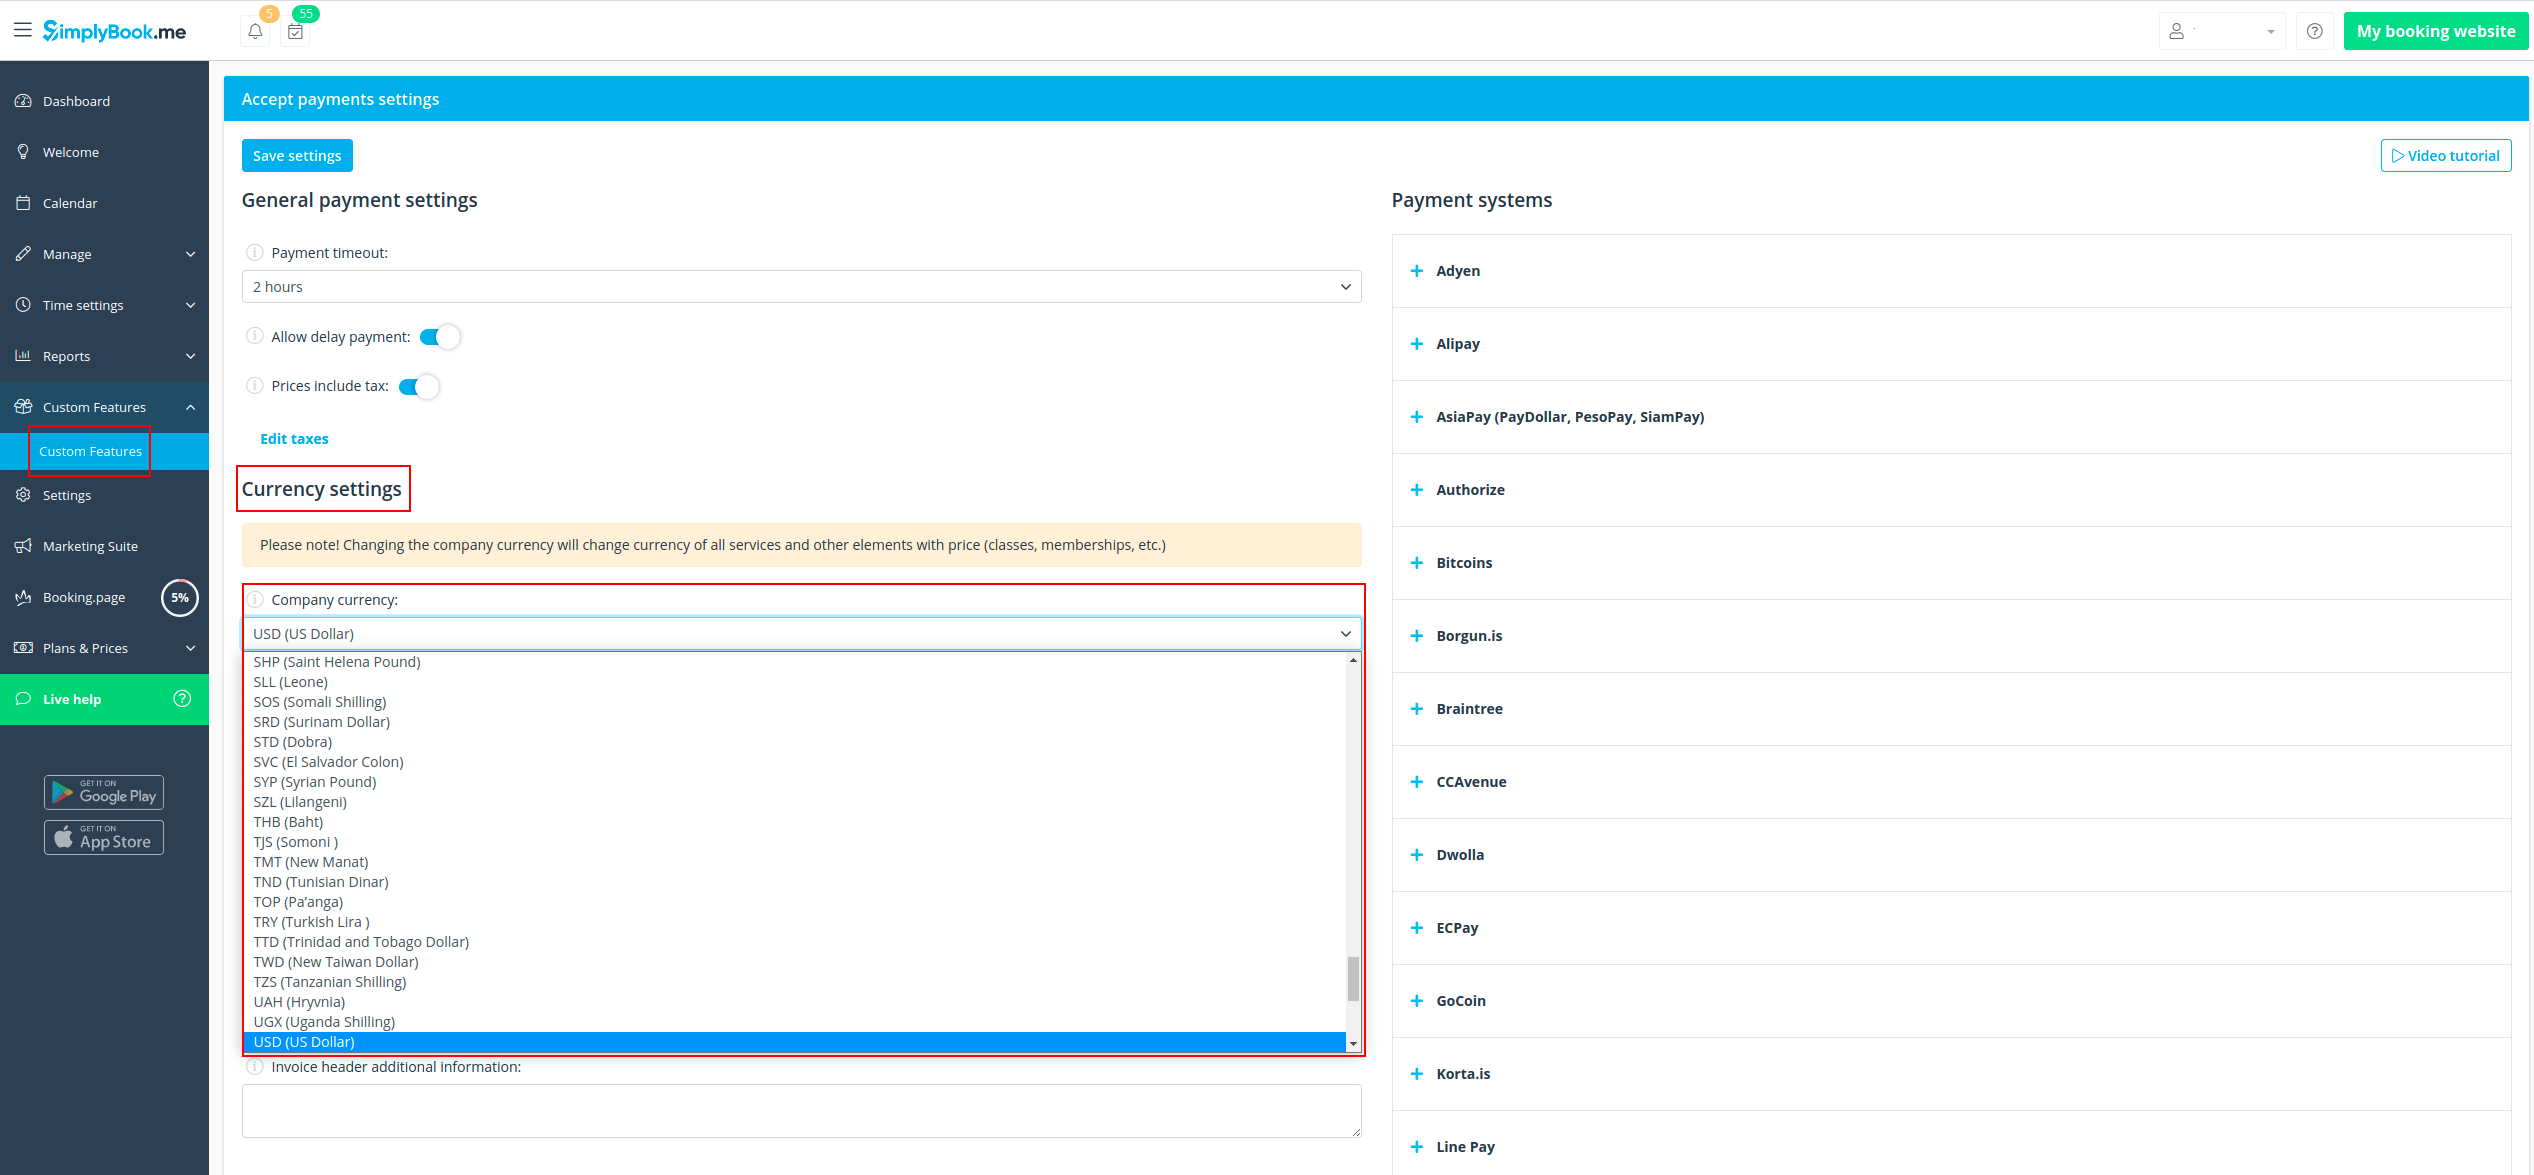
In the Currency settings, you can enable Custom formatting company currency to adjust the following:
- Currency Symbol: Customize the currency symbol if needed.
- Decimal Separator: Choose between "," or "." to be displayed in your prices.
- Digits: In this section, select the number of digits displayed after decimal separator in the amount, ranging from 0 to 3. For example, if the service price is set to $10 and the number of digits in Currency settings is set to 0, the price on the booking website will be $10. If set to 2, the format will be $10.00. If the number of digits is set to 0, it will not be possible to add amounts less than $1 (where $ stands for your company currency in this example).
- Positioning of the Currency Symbol
- Add space between the amount and symbol if desired.
What is "Pay later" option
When your clients are transferred to the payment page after Details tab, they usually have several options: your payment processor (one or several) and Pay Later. Pay Later in most cases means that client will pay right on the place when he/she arrives to the appointment. In your Dashboard, when you click on the appointment, such booking in the service price field will have a note "Pay Later".
Additionally, you can enable the Auto process payment for Pay Later payment processor to automatically set the Paid status for the service bookings where Pay Later was chosen as the payment method. Note that this option does not apply to memberships, gift cards, or packages.
As well you can activate Skip payment confirmation step option. This is particularly useful for those who only wish to display prices without processing payments online. If enabled, this step will be omitted.
If you want to disable Pay later option please navigate to Payments in the left-side menu (i.e. SBPay.me interface) -> Payment processors and deactivate Pay later option there.
Payment links
(available with Premium subscription (i.e. SBPay.me PRO version)
With this option you can now easily send payment links via emails or sms to your clients to pay onsite or offsite for some order/booking or unpaid remainder amount when deposits were used.
Check more details on how to use it here
Vaulted Payments
(available with Premium subscription (i.e. SBPay.me PRO version)
This option enables clients to securely store their card details as a preferred payment method. With vaulted payments, clients can seamlessly pay for future orders without re-entering their payment information, enhancing convenience and expediting transactions. From the admin side, you will be able to charge the saved payment method of your clients.
Check more details on how it works here
Refunds
(available with Premium subscription.
It may happen that you need to give the money back to your customer due to some reason and now it is possible to easily manage such cases with SBPay.me Pro integration.
Check more details on how it works here
How to customize the client invoices
It may be necessary to show or hide some data or change the look for the invoices that the system sends to clients after they make a purchase on your booking website.
Using SBPay.me Invoices feature can adjust the following items:
Check more details here here
Notifications
There are several types of the payment-related notifications that can be sent to you and/or your clients. Within the paid subscriptions you can customize notification templates using provided variables.
The following notifications are available:
- Payment failed notification (can be sent to client and/or to company);
- Payment link for Delay payment method (with SBPay.me Pro only);
- Refund confirmation (with SBPay.me Pro only).
How the whole payments process works
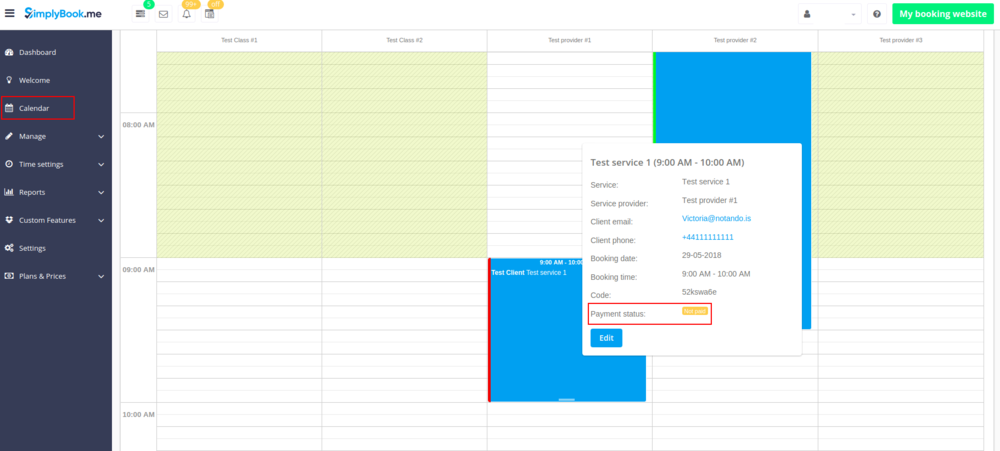
- 1. A client goes through the booking process and presses Book Now at the end. Or he/she selects some memberships/package/gift card, etc. to buy.
- 2. He is directed to summary step to choose a payment method. At this stage unconfirmed booking appears in the admin calendar marked red as not paid to reserve this time so that no other person can accidentally book the same slot and there will be no double-bookings. As well an order with the New status appears in Payment transactions report.
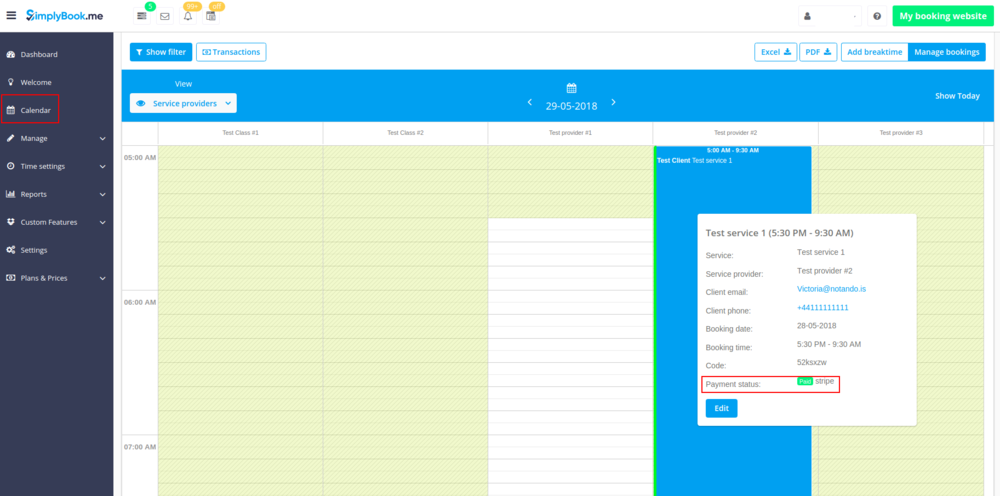
- 3. After that, the client has 2 options:
- 3.1. to pay and the payment processor will send us confirmation that client has paid and we will automatically approve the transaction on our side (booking will be marked with green color and the order with paid status).
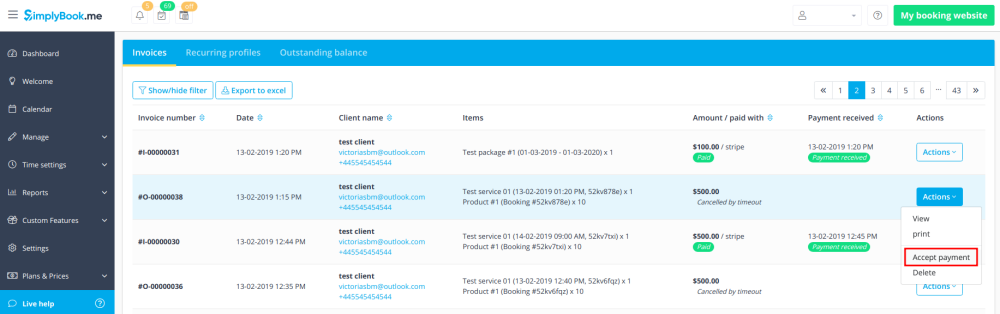
- 3.1. to pay and the payment processor will send us confirmation that client has paid and we will automatically approve the transaction on our side (booking will be marked with green color and the order with paid status).
- 3.2. to not finish paying: the client is directed to the payment system, but then he closes the page, closes the browser, or simply leaves it open without any actions for a long period of time. In this case, the system will wait until timeout you set up in the settings of Accept payments custom feature will end and will cancel the non-paid booking/transaction because it was never finished. You can set the emails to be sent to client and/or you to be notified about the timed out bookings.
- Same happens if the client paid, but paid later than timeout. In this case, if you receive a notification from PayPal/Stripe/etc. that client paid for the booking/order but as it was too late you can go to Payments -> Transactions or Reports -> Payment transactions within SimplyBook.me interface and approve this booking manually.
- 3.2. to not finish paying: the client is directed to the payment system, but then he closes the page, closes the browser, or simply leaves it open without any actions for a long period of time. In this case, the system will wait until timeout you set up in the settings of Accept payments custom feature will end and will cancel the non-paid booking/transaction because it was never finished. You can set the emails to be sent to client and/or you to be notified about the timed out bookings.