Difference between revisions of "Accept payments custom feature/de"
(Created page with "2. span style="background-color:#d4f8e5; padding:5px; border-radius:5px;">Pakete:</span>") |
(Created page with "=So fügen Sie Steuern hinzu=") |
||
| Line 64: | Line 64: | ||
4. <span style="background-color:#d4f8e5; padding:5px; border-radius:5px;">Service-Extras:</span> | 4. <span style="background-color:#d4f8e5; padding:5px; border-radius:5px;">Service-Extras:</span> | ||
| − | + | *Navigieren Sie zu <span style="background-color:#d4f8e5; padding:5px; border-radius:5px;">Verwalten</span> -> <span style="background-color:#d4f8e5; padding:5px; border-radius:5px;">Service-Extras.</span> | |
| − | * | + | *Klicken Sie auf das jeweilige Service-Extra und rufen Sie die Service-Extra <span style="background-color:#d4f8e5; padding:5px; border-radius:5px;">Details</span> auf. |
| − | * | + | *Passen Sie den Preis im Feld <span style="background-color:#d4f8e5; padding:5px; border-radius:5px;">Service-Extra-Preis</span> an. |
| − | * | ||
| − | |||
| − | + | 5. <span style="background-color:#d4f8e5; padding:5px; border-radius:5px;">Produkte zum Verkauf:</span> | |
| − | 5. <span style="background-color:#d4f8e5; padding:5px; border-radius:5px;"> | ||
| − | |||
| − | + | *Gehen Sie zu <span style="background-color:#d4f8e5; padding:5px; border-radius:5px;">Verwalten</span> -> <span style="background-color:#d4f8e5; padding:5px; border-radius:5px;">Produkte für den Verkauf.</span> | |
| − | * | + | *Klicken Sie auf das gewünschte zu verkaufende Produkt und rufen Sie die <span style="background-color:#d4f8e5; padding:5px; border-radius:5px;">Produktdetails</span> auf. |
| − | * | + | *Geben Sie den Preis in das Feld <span style="background-color:#d4f8e5; padding:5px; border-radius:5px;">Produktpreis</span> ein. |
| − | * | ||
| − | |||
| − | |||
| − | + | =So fügen Sie Steuern hinzu= | |
| − | |||
| − | |||
<div lang="en" dir="ltr" class="mw-content-ltr"> | <div lang="en" dir="ltr" class="mw-content-ltr"> | ||
Revision as of 14:07, 12 January 2024

Die individuelle Funktion "Zahlungen akzeptieren" ermöglicht es Ihnen, online Zahlungen von Ihren Kunden anzunehmen. Sie können den Preis für Ihre Dienstleistung/Mitgliedschaft/Paket usw. festlegen, und wenn Ihre Kunden eine Buchung/einen Kauf tätigen, werden sie aufgefordert, zu zahlen, um ihren Kauf zu bestätigen. Sie können Zahlungen über eine Vielzahl von Zahlungsdienstleistern akzeptieren. Alle Online-Zahlungen werden über das Zahlungs-Gateway Ihrer Wahl abgewickelt, und wenn Sie einem Kunden eine Rückerstattung gewähren müssen, können Sie dies über die SBPay.me PRO-Integration oder manuell über das Verwaltungskonto Ihres Zahlungsanbieters tun.
Um die verfügbaren Gateways nach Land zu überprüfen, folgen Sie bitte diesem Link.
Video-Tutorial ![]()
SBPay.me PRO integration video tutorial ![]()
Bitte beachten Sie! Die individuellen Funktionen Mitgliedschaft, Pakete, Service-Add-Ons, Produkte zum Verkauf, Gutscheine und Geschenkkarten funktionieren nicht, wenn die Individuelle Funktion Zahlungen akzeptieren nicht aktiviert ist.
Aktivieren der Funktion
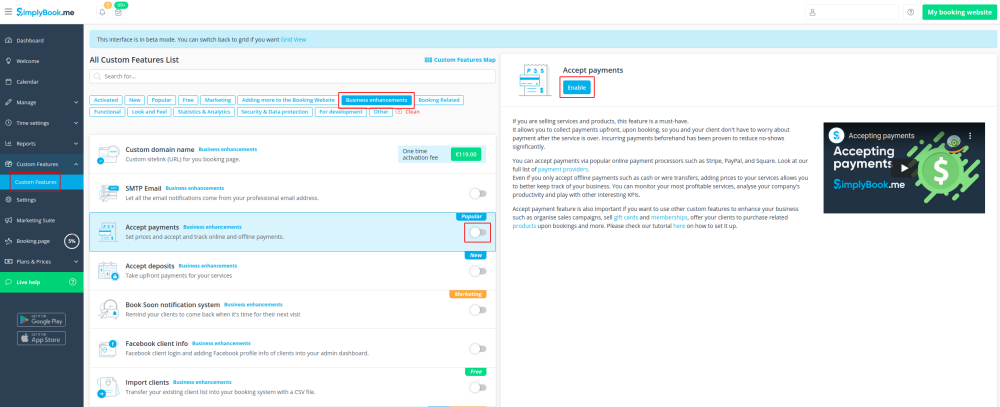
1. Aktivieren Sie die individuelle Funktion Zahlungen akzeptieren im Abschnitt Benutzerdefinierte Funktionen.
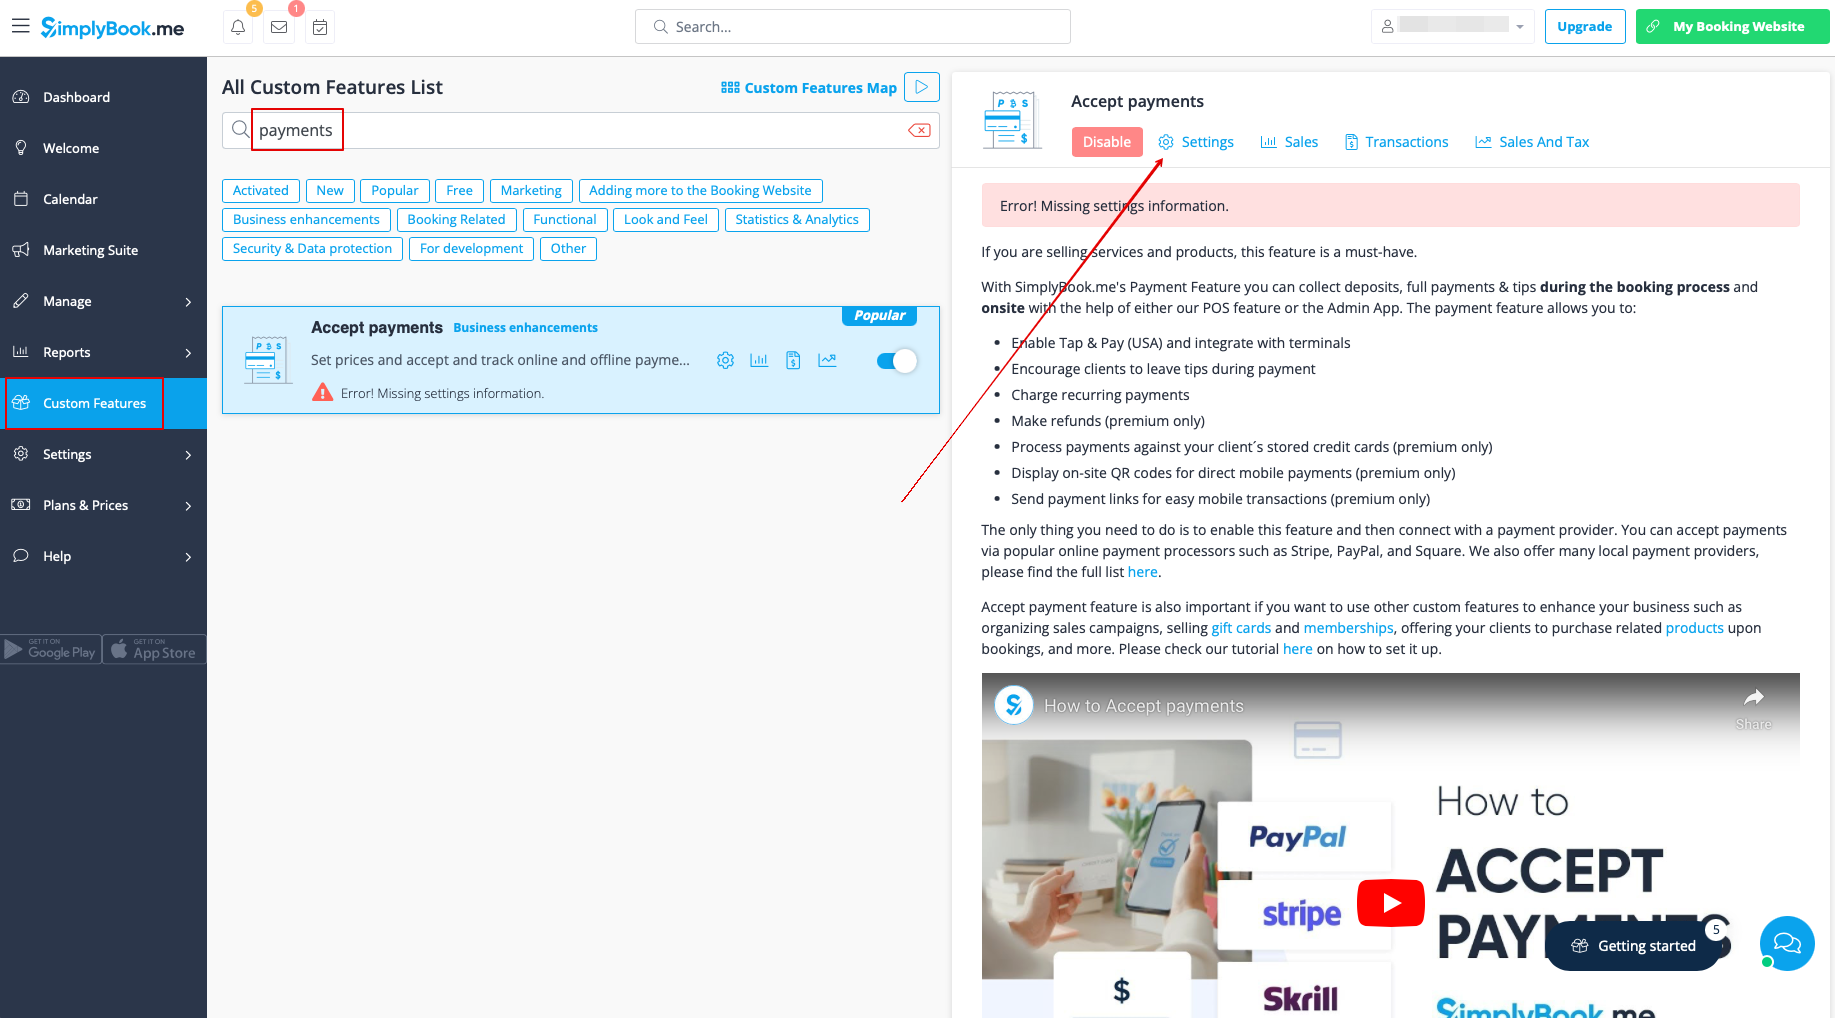
2. Klicken Sie nach der Aktivierung auf die Schaltfläche Einstellungen.
3. Passen Sie Ihre Unternehmensinformationen im folgenden Formular an, falls erforderlich.
(Es wird automatisch mit den Unternehmensdaten ausgefüllt, die Sie bereits in Ihrem System haben).
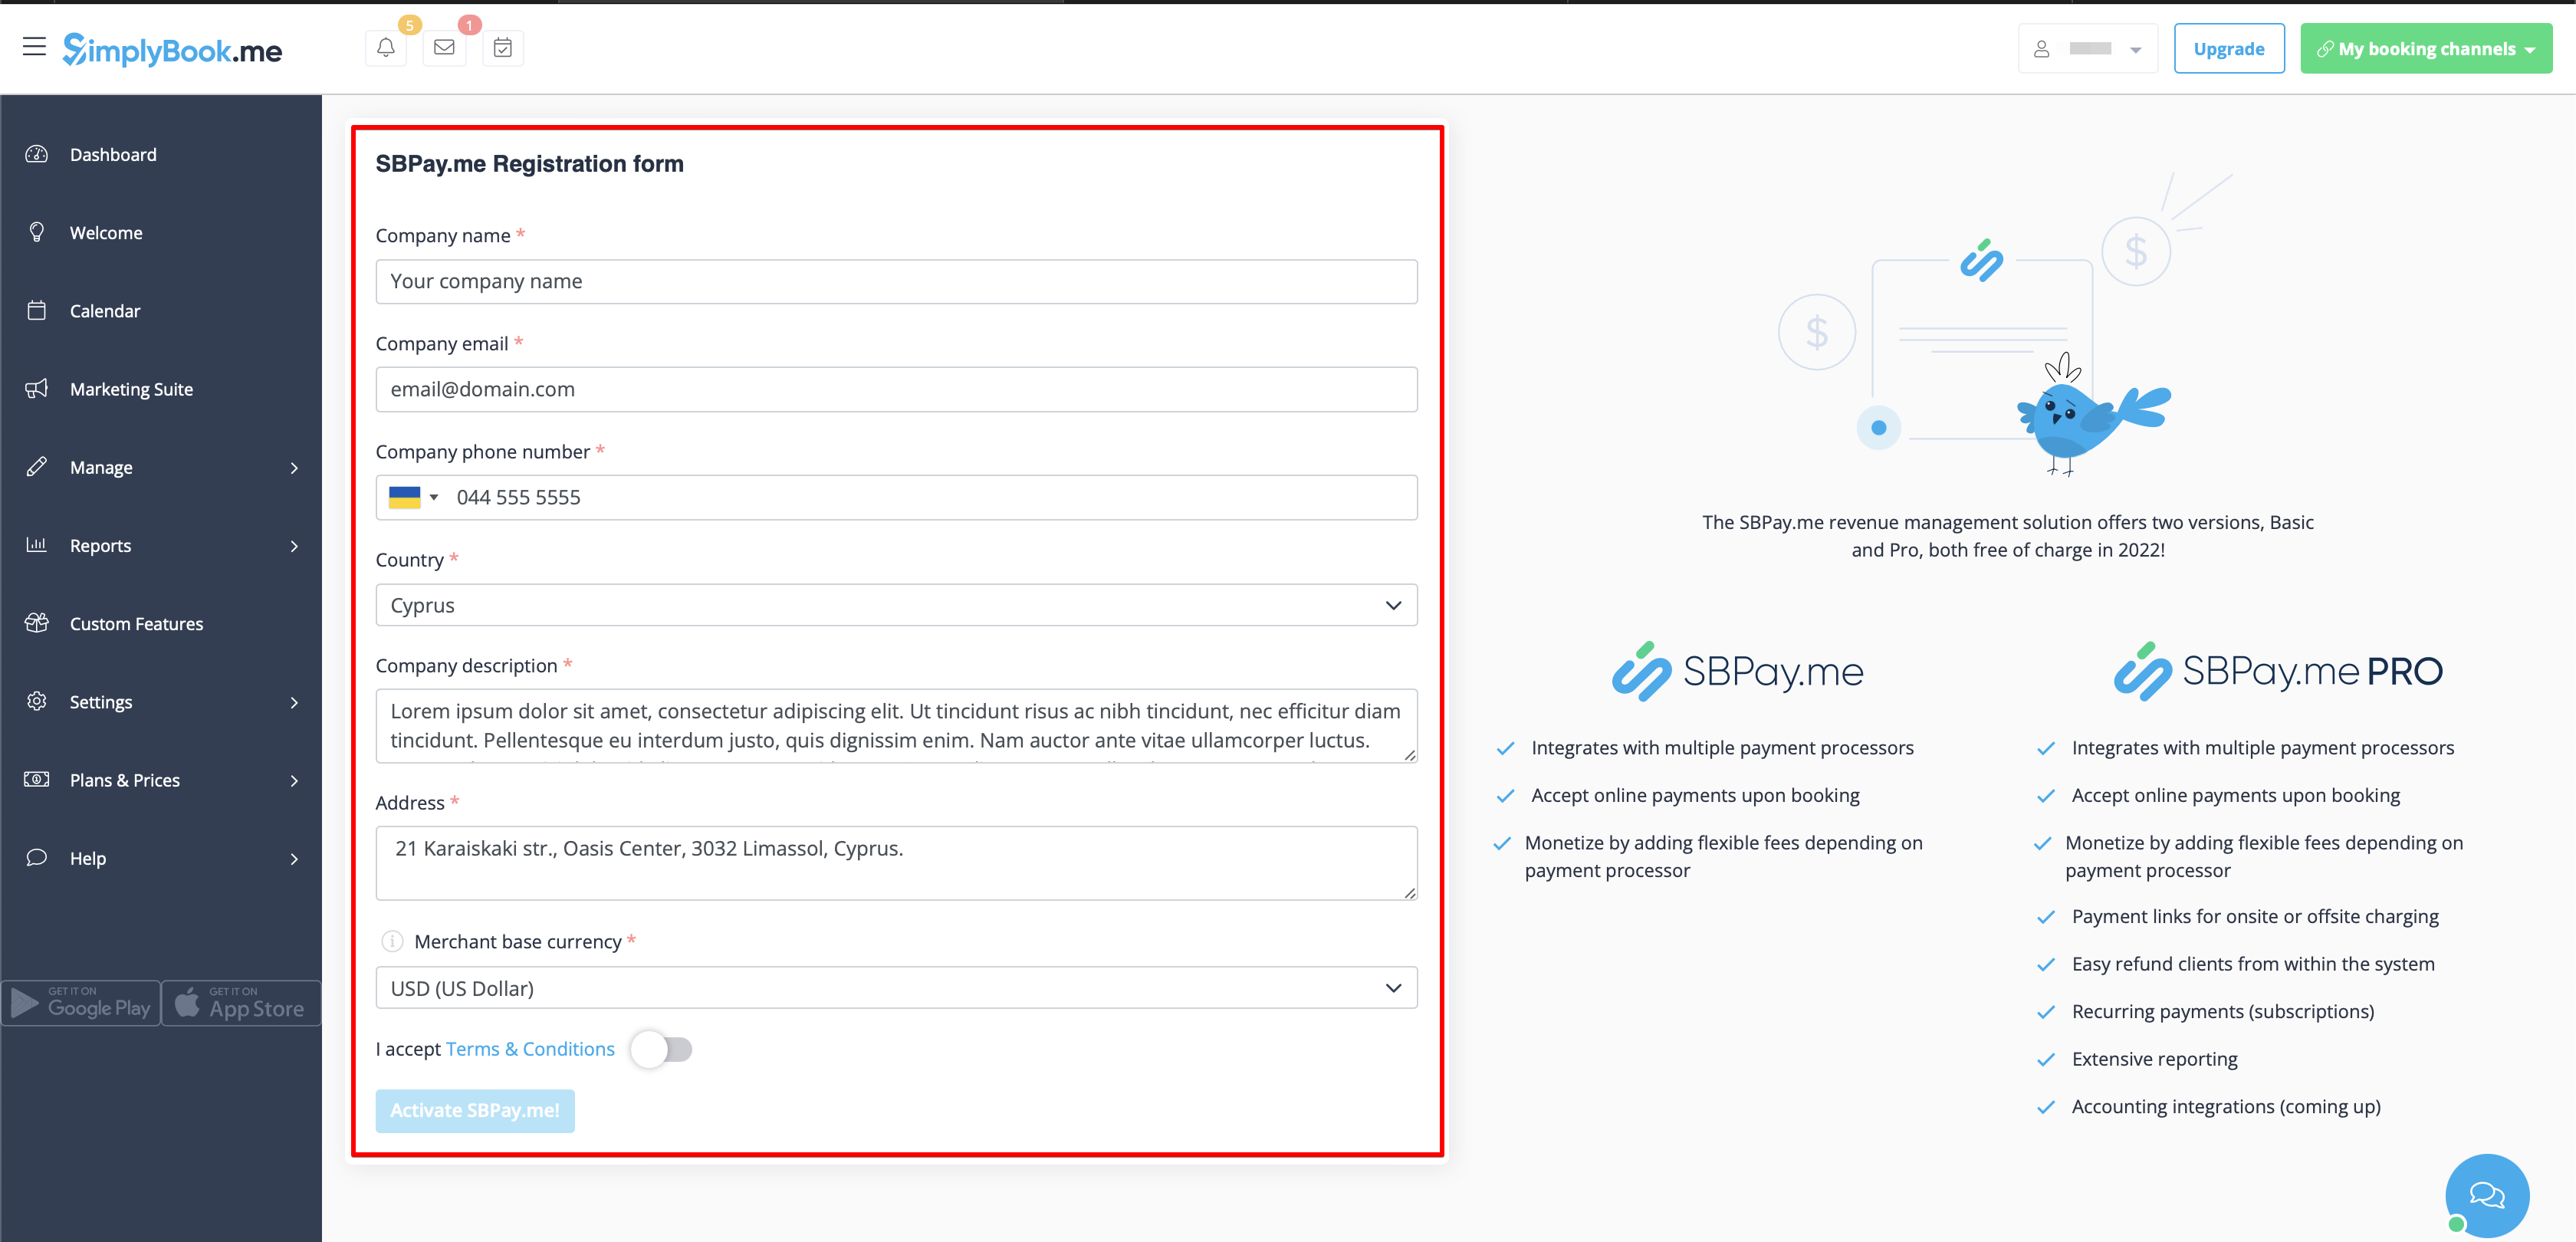
4. Klicken Sie auf die Schaltfläche SBPay.me aktivieren.
Bitte beachten Sie! Die meisten Ihrer zahlungsbezogenen Einstellungen und Konfigurationen werden über SBPay.me verwaltet, auf das Sie zugreifen können, wenn Sie die Funktion "Zahlungen akzeptieren" über den Punkt "Zahlungen" im Navigationsmenü aktivieren. Weitere Informationen finden Sie [Special:MyLanguage/SBPay.me integration|hier].
Wo Sie die Preise festlegen können
Mit SimplyBook.me können Sie Zahlungen für Buchungen von Dienstleistungen/Kursen, Paketen, Mitgliedschaften, Geschenkkarten, Produkten und Service-Extras akzeptieren. Bitte prüfen Sie die folgenden Punkte, um Preise für die gewünschten Artikel festzulegen:
1. Dienstleistungen/Kurse:
- Navigieren Sie zu Verwalten -> Dienstleistungen/Kurse.
- Klicken Sie auf den jeweiligen Service und rufen Sie die Dienstleistungs-/Kursdetails
- Scrollen Sie nach unten zum Feld Preis, um den Preis für den Service festzulegen
2. span style="background-color:#d4f8e5; padding:5px; border-radius:5px;">Pakete:
- Gehen Sie zu Verwalten -> Pakete.
- Klicken Sie auf das gewünschte Paket und rufen Sie die Paketdetails auf.
- Legen Sie den Preis im Feld Preis für das Paket fest.
3. Mitgliedschaften:
- Gehen Sie zu Verwalten -> Mitgliedschaften.
- Rufen Sie die Details zur Mitgliedschaft auf und wählen Sie Erste Zahlung, um den Anfangspreis festzulegen.
- Wenn es sich um eine wiederkehrende Mitgliedschaft handelt, legen Sie den Preis auch im Feld Wiederkehrender Preis fest. Weitere Einzelheiten zur Einrichtung von Mitgliedschaften finden Sie hier.
4. Service-Extras:
- Navigieren Sie zu Verwalten -> Service-Extras.
- Klicken Sie auf das jeweilige Service-Extra und rufen Sie die Service-Extra Details auf.
- Passen Sie den Preis im Feld Service-Extra-Preis an.
5. Produkte zum Verkauf:
- Gehen Sie zu Verwalten -> Produkte für den Verkauf.
- Klicken Sie auf das gewünschte zu verkaufende Produkt und rufen Sie die Produktdetails auf.
- Geben Sie den Preis in das Feld Produktpreis ein.
So fügen Sie Steuern hinzu
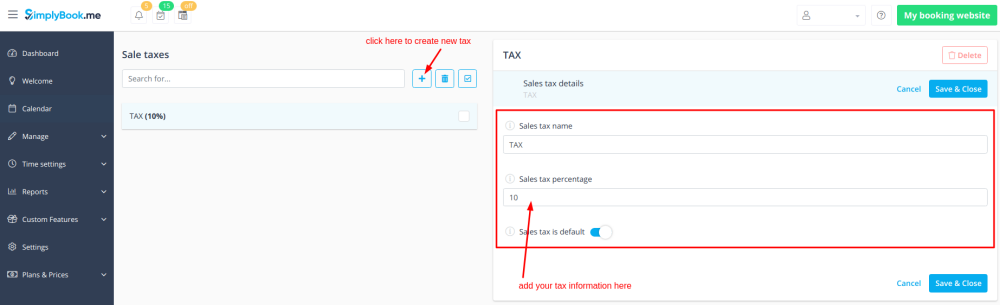
- 1. Add the necessary taxes options in Manage -> Taxes -> +
- Choose the default one if necessary - it will be automatically set for each new sale item that you will create in the system.
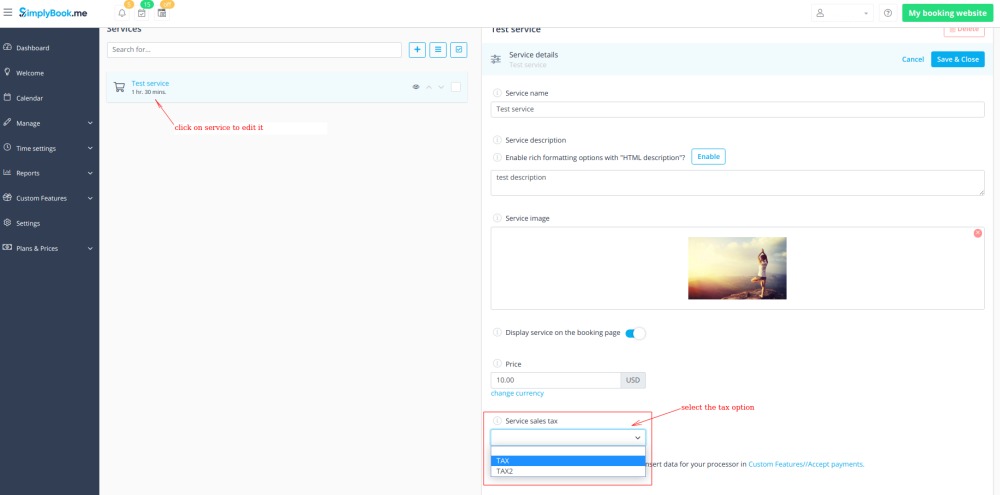
- 2. Navigate to Manage -> Services and select the tax option per each service.
- If you have other items like Classes, Packages, Memberships, Products for sale, Service add-ons, Gift cards and need taxes to be applied there as well please go to the corresponding management page and select from the pre-created taxes for each item.
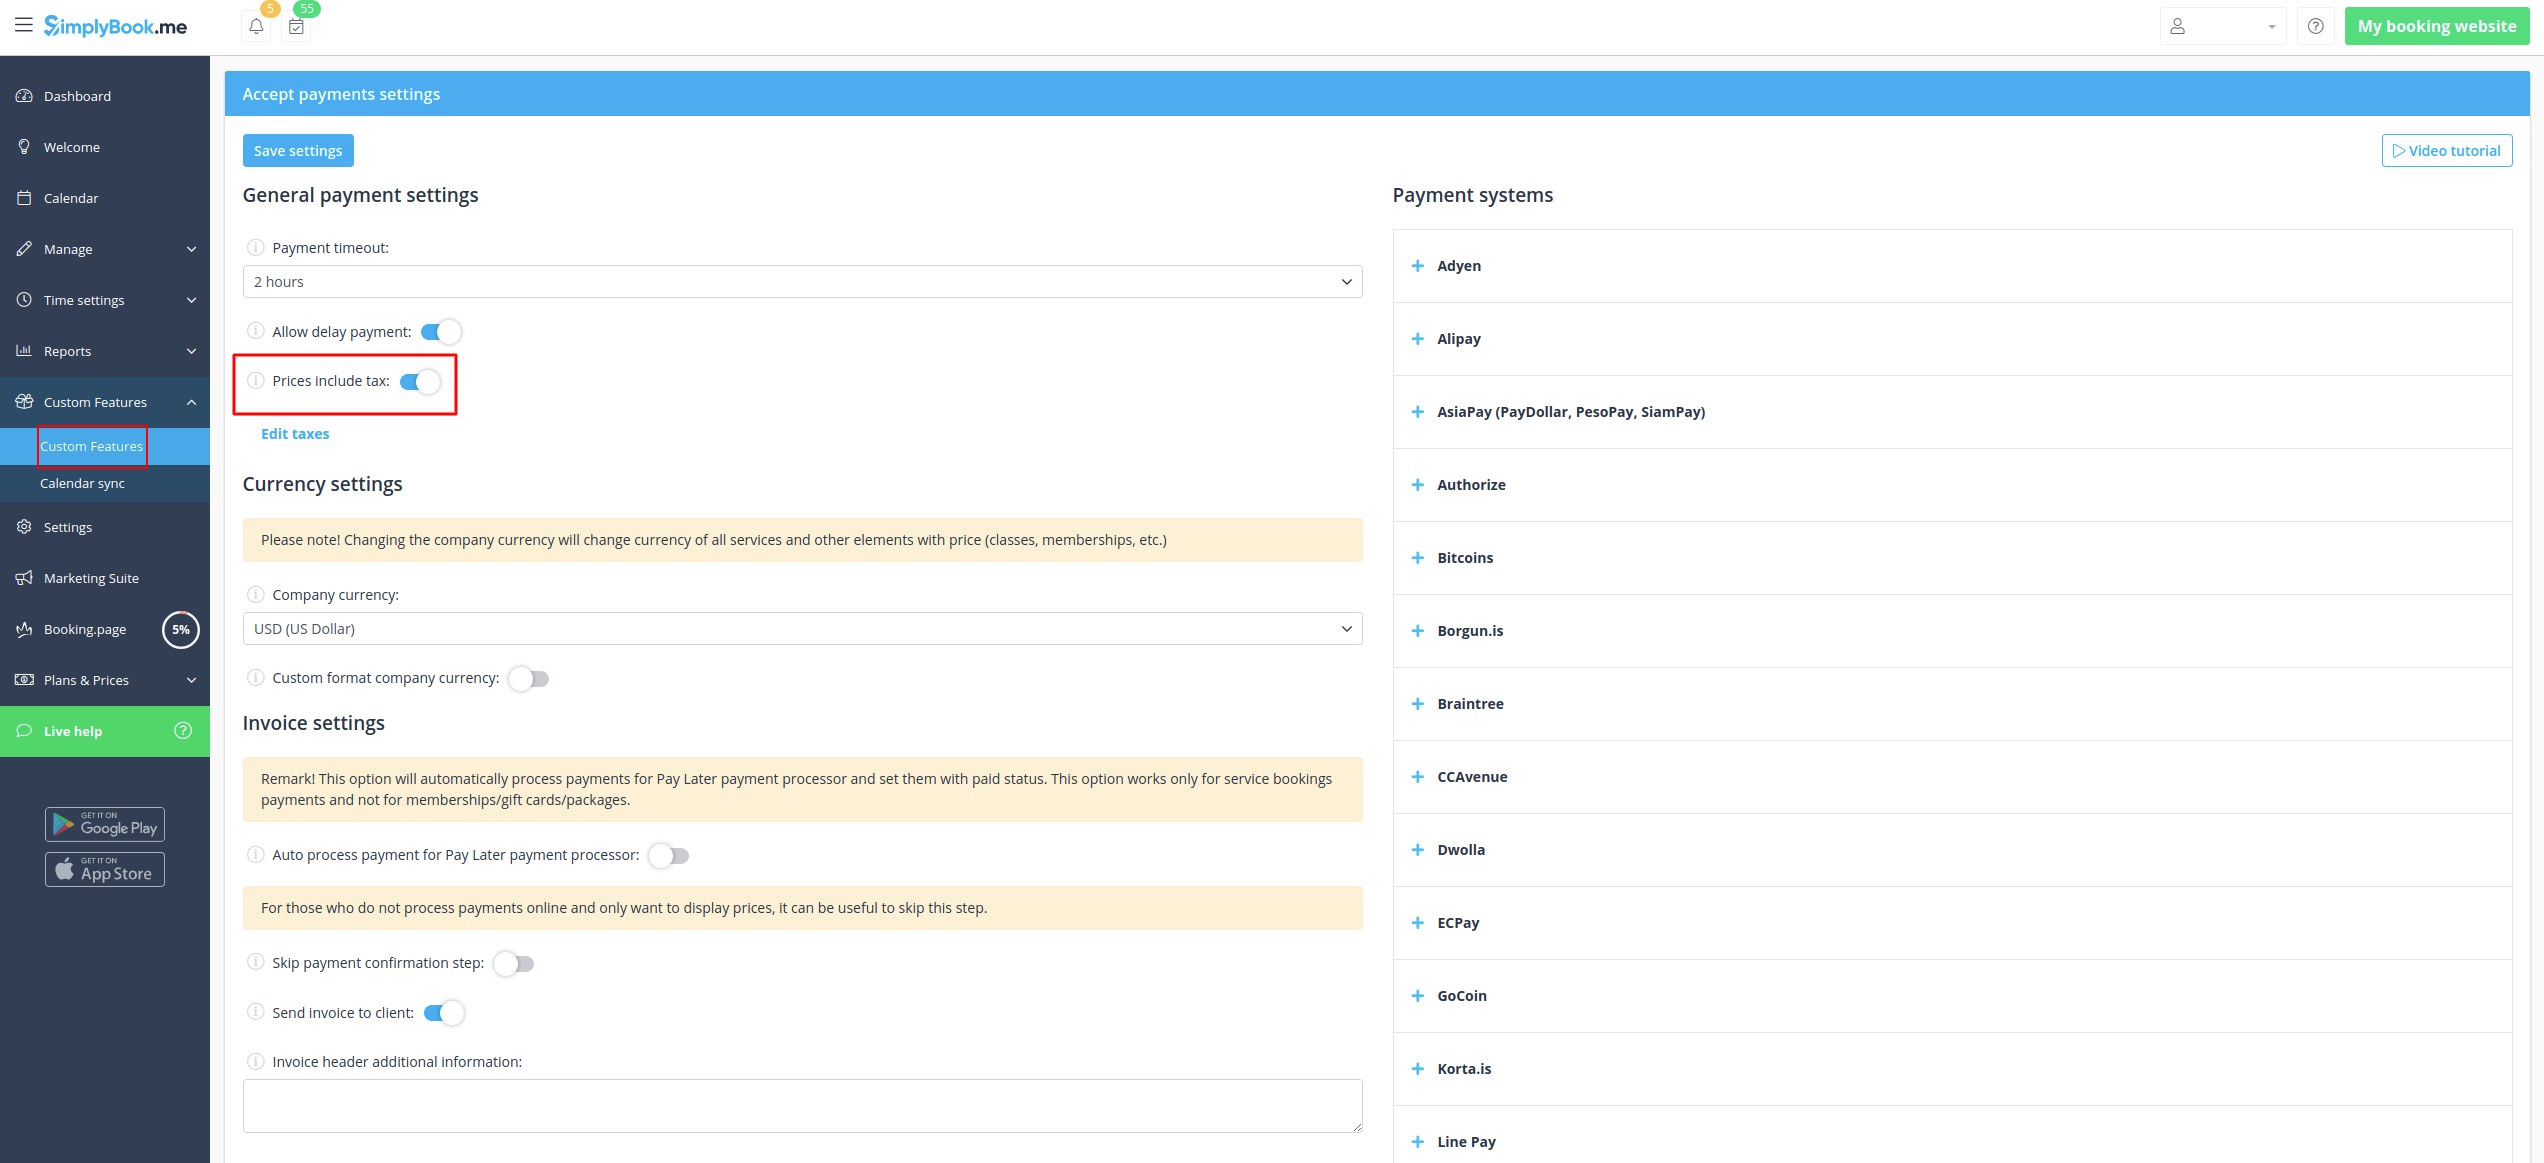
- 3. In Custom features -> Accept payments -> Settings choose whether the tax amount should be added to the price that you have set per service(or other item) or it is already included by using the switcher Prices include tax.
- If you enable the switcher it will mean that the amount that you have set per service is already with taxes.
- In case you disable the switcher the system will automatically add the selected tax percentage to the items prices
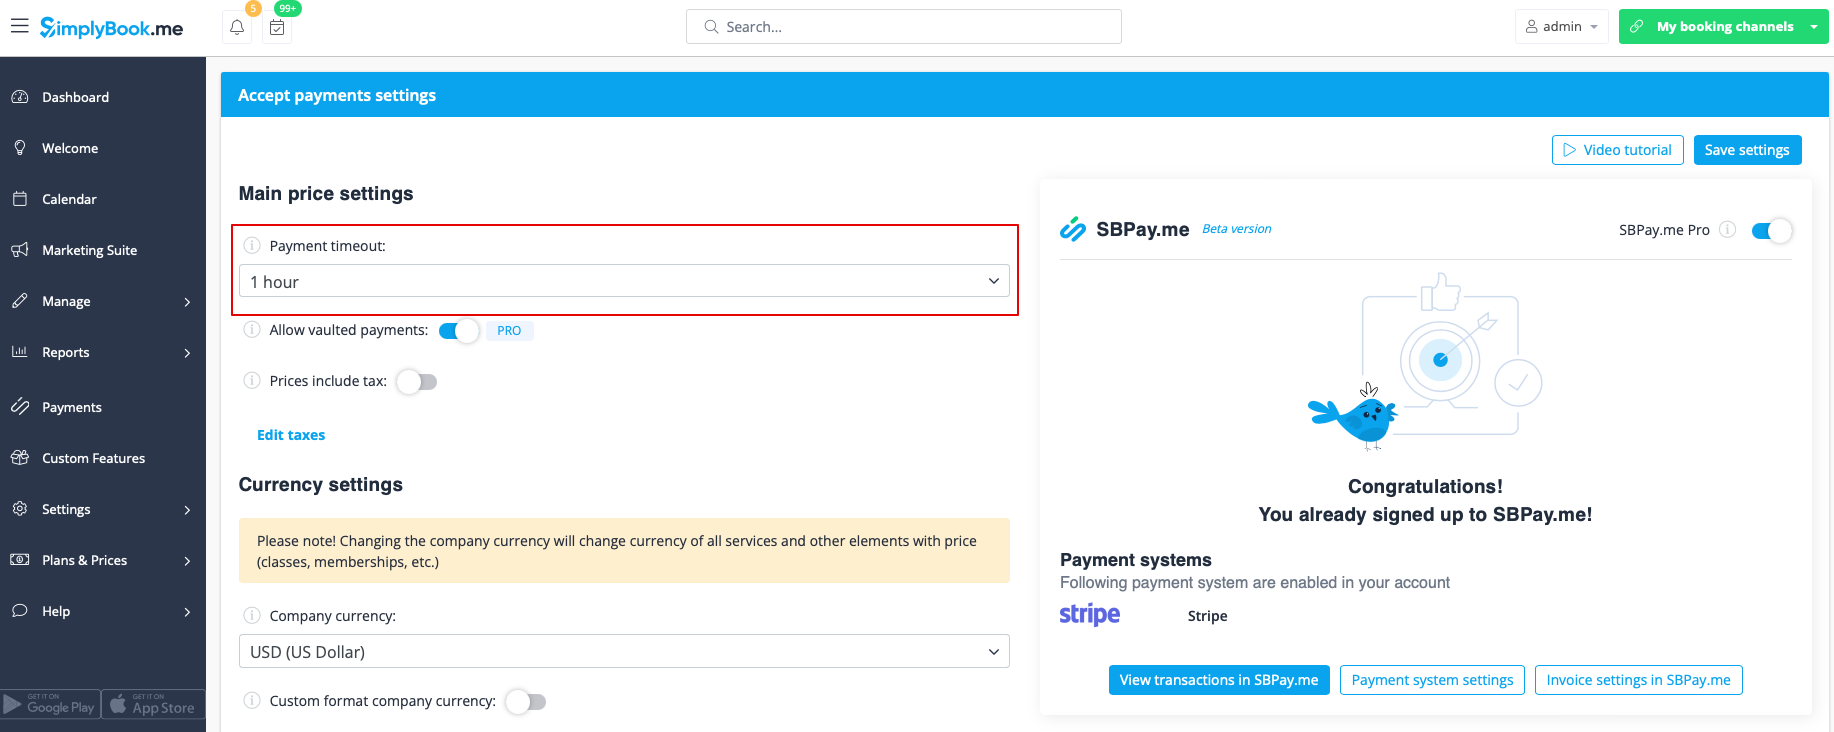
Payment Timeout
This setting allows to determine the duration within which a payment transaction must be completed before it expires. If not paid within the defined period, the associated transaction and booking/s will be canceled automatically.
The recommended period is at least 1 hour to give clients enough time to complete the payment and for the payment system to send us the confirmation.
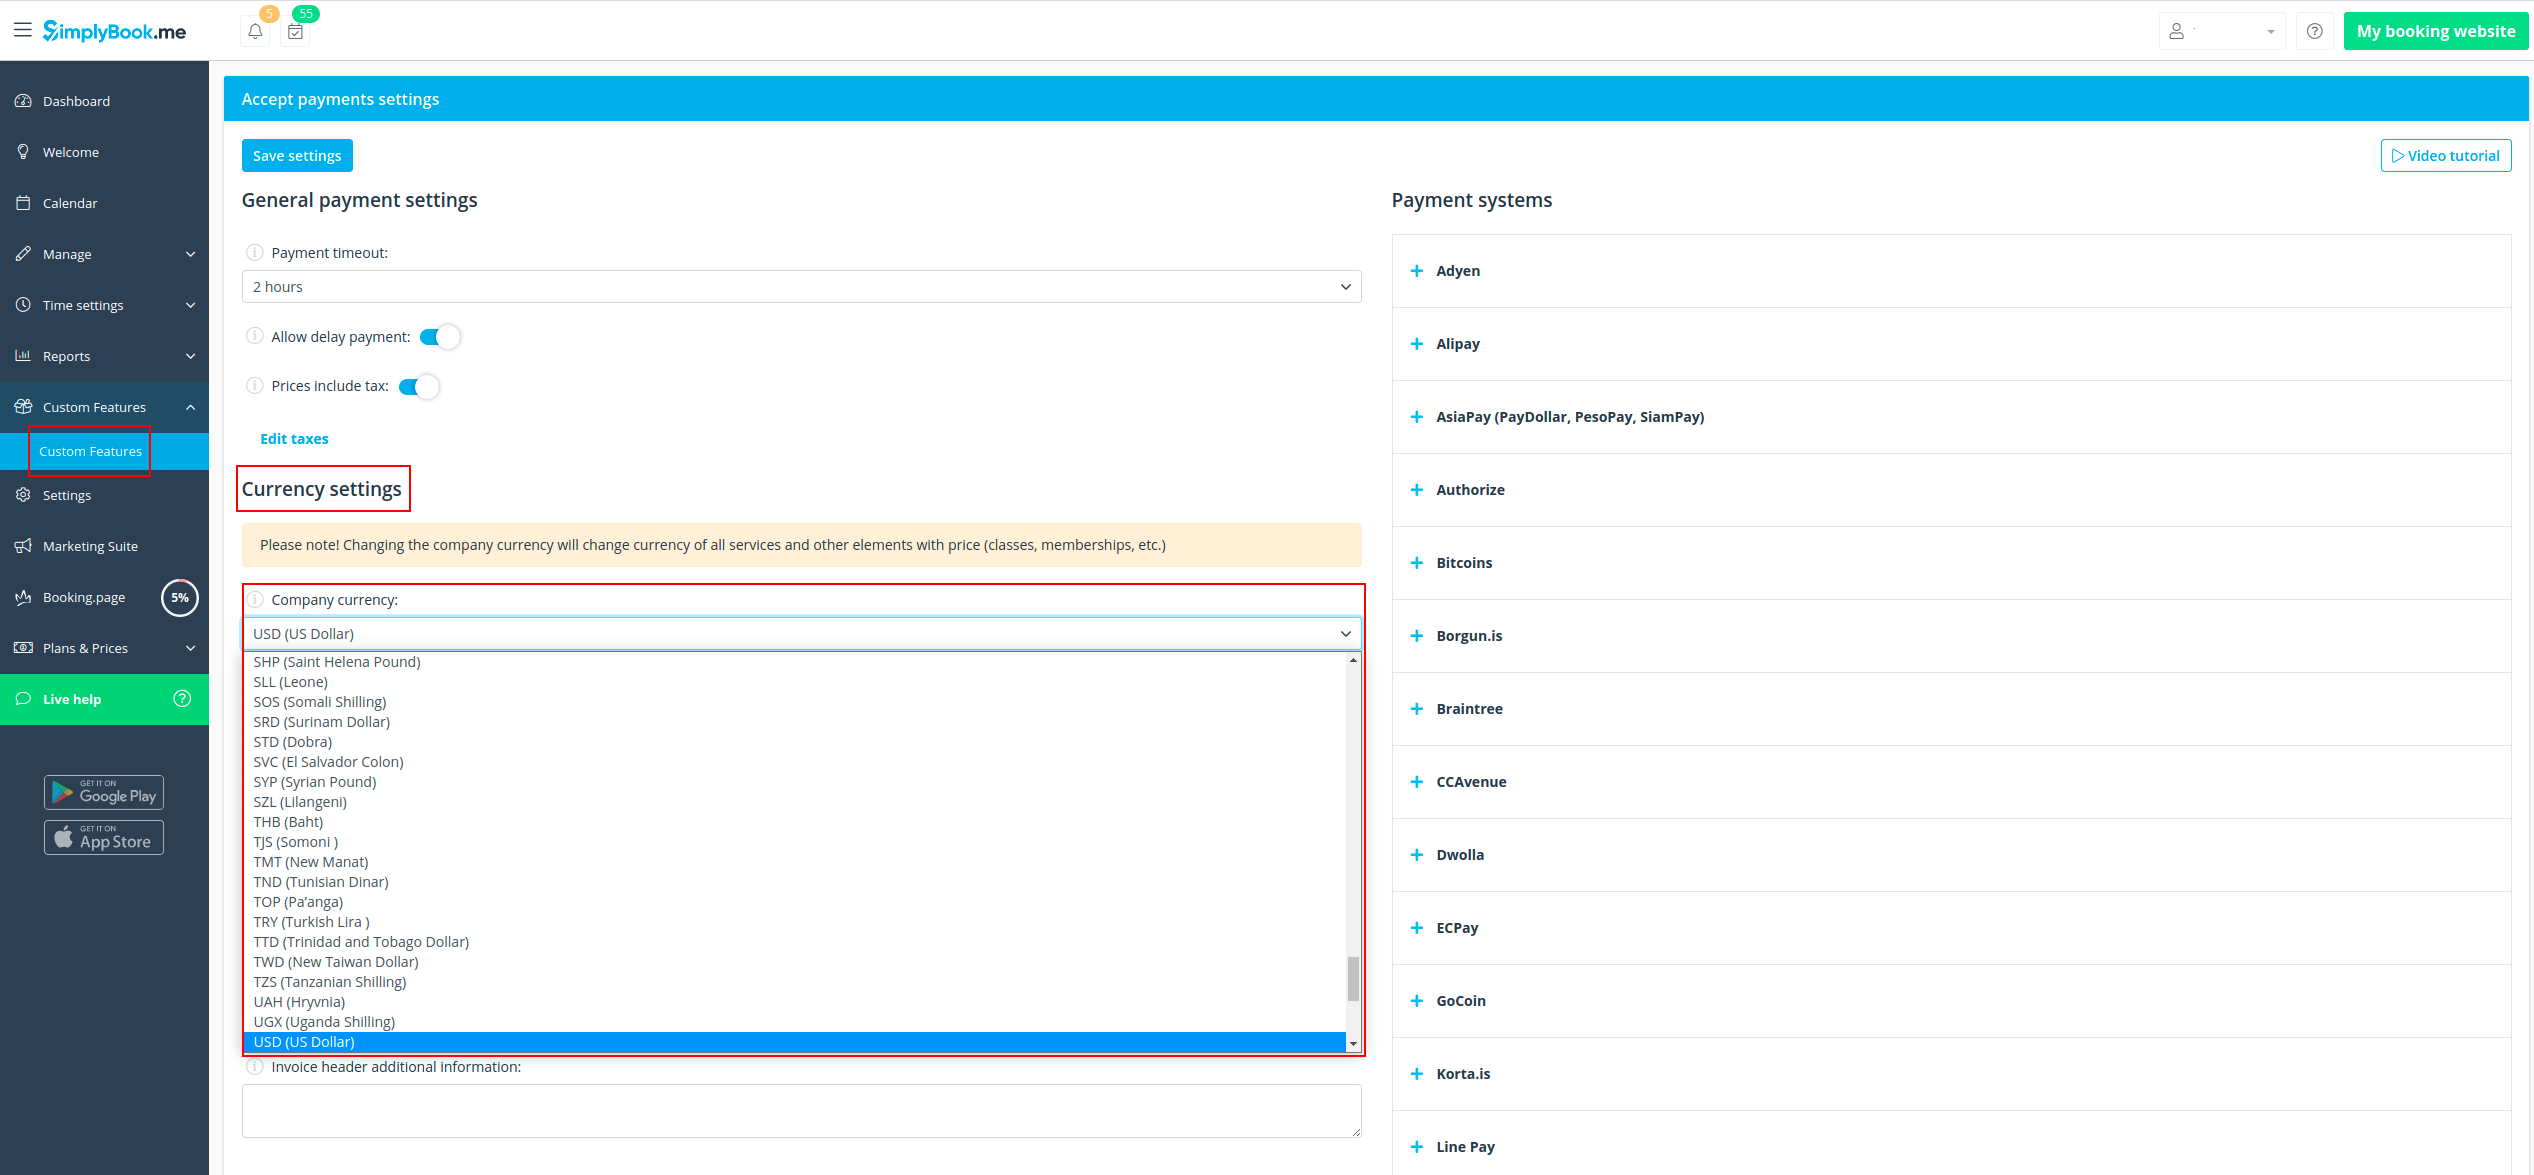
How to change currency
You can adjust the currency in the settings of Accept payments custom feature.
Please note! Some payment processors do not support all currencies. Before setting the currency, check if the selected payment processor supports it.
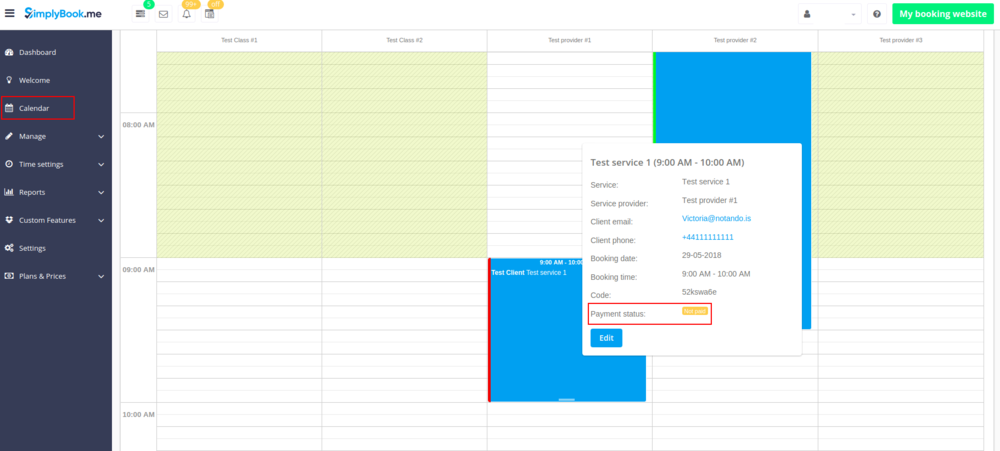
What is "Pay later" option
When your clients are transferred to the payment page after Details tab, they usually have several options: your payment processor (one or several) and Pay Later. Pay Later in most cases means that client will pay right on the place when he/she arrives to the appointment. In your Dashboard, when you click on the appointment, such booking in the service price field will have a note "Pay Later".
Additionally, you can enable the Auto process payment for Pay Later payment processor to automatically set the Paid status for the service bookings where Pay Later was chosen as the payment method. Note that this option does not apply to memberships, gift cards, or packages.
As well you can activate Skip payment confirmation step option. This is particularly useful for those who only wish to display prices without processing payments online. If enabled, this step will be omitted.
If you want to disable Pay later option please navigate to Payments in the left-side menu (i.e. SBPay.me interface) -> Payment processors and deactivate Pay later option there.
Payment links
(available with Premium subscription (i.e. SBPay.me PRO version)
With this option you can now easily send payment links via emails or sms to your clients to pay onsite or offsite for some order/booking or unpaid remainder amount when deposits were used.
Check more details on how to use it here
Vaulted Payments
(available with Premium subscription (i.e. SBPay.me PRO version)
This option enables clients to securely store their card details as a preferred payment method. With vaulted payments, clients can seamlessly pay for future orders without re-entering their payment information, enhancing convenience and expediting transactions. From the admin side, you will be able to charge the saved payment method of your clients.
Check more details on how it works here
Refunds
(available with Premium subscription.
It may happen that you need to give the money back to your customer due to some reason and now it is possible to easily manage such cases with SBPay.me Pro integration.
Check more details on how it works here
How to customize the client invoices
It may be necessary to show or hide some data or change the look for the invoices that the system sends to clients after they make a purchase on your booking website.
Using SBPay.me Invoices feature can adjust the following items:
Check more details here here
Notifications
There are several types of the payment-related notifications that can be sent to you and/or your clients. Within the paid subscriptions you can customize notification templates using provided variables.
The following notifications are available:
- Payment failed notification (can be sent to client and/or to company);
- Payment link for Delay payment method (with SBPay.me Pro only);
- Refund confirmation (with SBPay.me Pro only).
How the whole payments process works
- 1. A client goes through the booking process and presses Book Now at the end. Or he/she selects some memberships/package/gift card, etc. to buy.
- 2. He is directed to summary step to choose a payment method. At this stage unconfirmed booking appears in the admin calendar marked red as not paid to reserve this time so that no other person can accidentally book the same slot and there will be no double-bookings. As well an order with the New status appears in Payment transactions report.
- 3. After that, the client has 2 options:
- 3.1. to pay and the payment processor will send us confirmation that client has paid and we will automatically approve the transaction on our side (booking will be marked with green color and the order with paid status).
- 3.1. to pay and the payment processor will send us confirmation that client has paid and we will automatically approve the transaction on our side (booking will be marked with green color and the order with paid status).
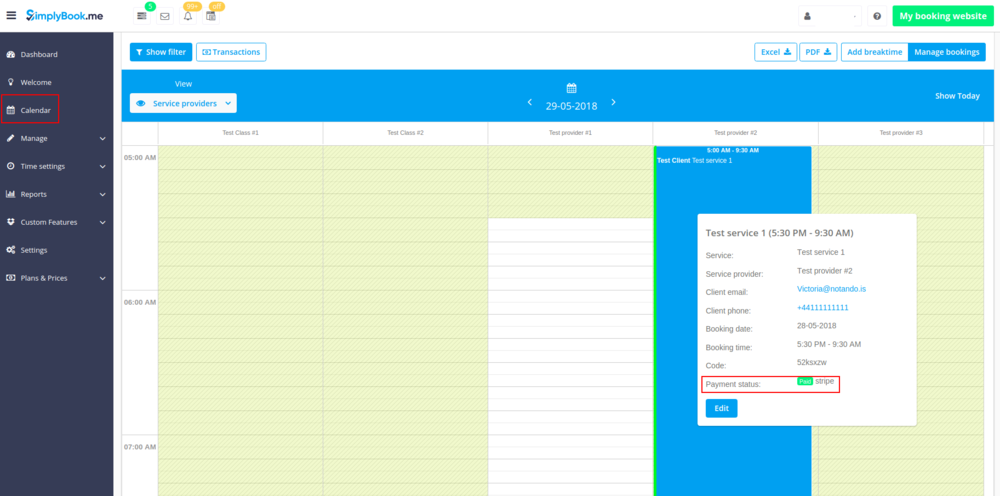
- 3.2. to not finish paying: the client is directed to the payment system, but then he closes the page, closes the browser, or simply leaves it open without any actions for a long period of time. In this case, the system will wait until timeout you set up in the settings of Accept payments custom feature will end and will cancel the non-paid booking/transaction because it was never finished. You can set the emails to be sent to client and/or you to be notified about the timed out bookings.
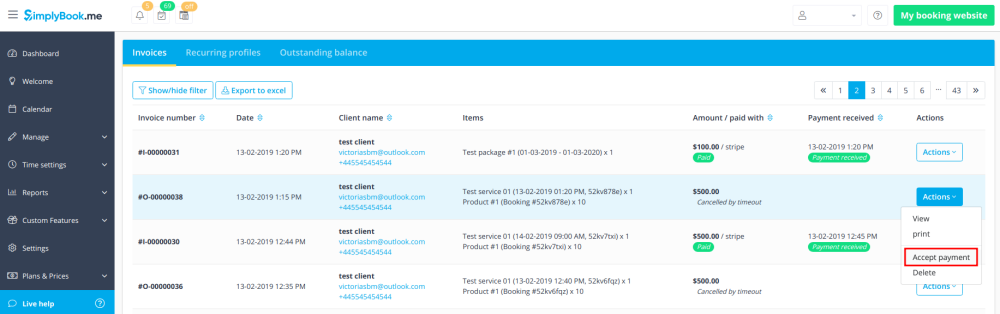
- Same happens if the client paid, but paid later than timeout. In this case, if you receive a notification from PayPal/Stripe/etc. that client paid for the booking/order but as it was too late you can go to Payments -> Transactions or Reports -> Payment transactions within SimplyBook.me interface and approve this booking manually.
- 3.2. to not finish paying: the client is directed to the payment system, but then he closes the page, closes the browser, or simply leaves it open without any actions for a long period of time. In this case, the system will wait until timeout you set up in the settings of Accept payments custom feature will end and will cancel the non-paid booking/transaction because it was never finished. You can set the emails to be sent to client and/or you to be notified about the timed out bookings.