Difference between revisions of "Accept payments custom feature/es"
(Created page with "=Tiempo de espera de pago=") |
(Created page with "Este ajuste permite determinar la duración dentro de la cual una transacción de pago debe completarse antes de que expire. Si no se paga dentro del período definido, la tra...") |
||
| Line 94: | Line 94: | ||
=Tiempo de espera de pago= | =Tiempo de espera de pago= | ||
| − | + | Este ajuste permite determinar la duración dentro de la cual una transacción de pago debe completarse antes de que expire. Si no se paga dentro del período definido, la transacción asociada y las reservas se cancelarán automáticamente.<br> | |
| − | + | El período recomendado es de al menos 1 hora para dar a los clientes suficiente tiempo para completar el pago y para que el sistema de pago nos envíe la confirmación. | |
| − | |||
[[File:Payment timeout setting path.png|1200px|center|link=https://help.simplybook.me/images/8/89/Payment_timeout_setting_path.png]] | [[File:Payment timeout setting path.png|1200px|center|link=https://help.simplybook.me/images/8/89/Payment_timeout_setting_path.png]] | ||
<br><br> | <br><br> | ||
| − | |||
<div lang="en" dir="ltr" class="mw-content-ltr"> | <div lang="en" dir="ltr" class="mw-content-ltr"> | ||
Revision as of 13:43, 12 March 2024

El plugin de Aceptar Pagos te permite aceptar pagos de tus clientes en línea. Puedes establecer el precio para tu servicio/suscripción/paquete, etc. y cuando tus clientes realicen una reserva/compra, se les pedirá que paguen para confirmar su compra. Puedes aceptar pagos a través de una variedad de procesadores de pago. Todos los pagos en línea son procesados por el gateway de pago de tu elección y, si es necesario emitir un reembolso a un cliente, se puede hacer si tienes integración con SBPay.me PRO o manualmente desde la cuenta de administrador de tu procesador de pagos."
Para consultar las puertas de enlace disponibles por país, siga este enlace.
Vídeotutorial ![]()
SBPay.me PRO integration video tutorial ![]()
¡Ten en cuenta! Los plugins de Suscripción, Paquetes, Complementos de Servicio, Productos en Venta, Cupones y Tarjetas de Regalo no funcionarán si el Plugin de Aceptar Pagos no está activado.
How to enable
1. Habilita el plugin de Aceptar Pagos en la sección de Plugin.
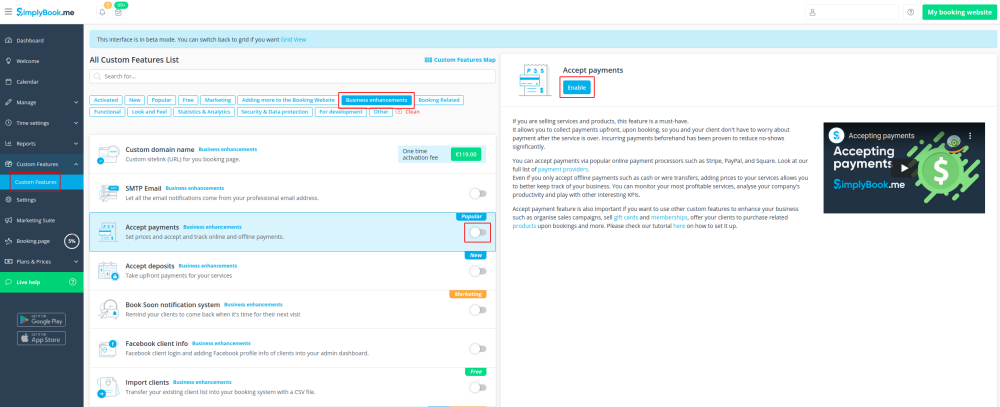
2. Una vez habilitado, haz clic en el botón Ajustes.
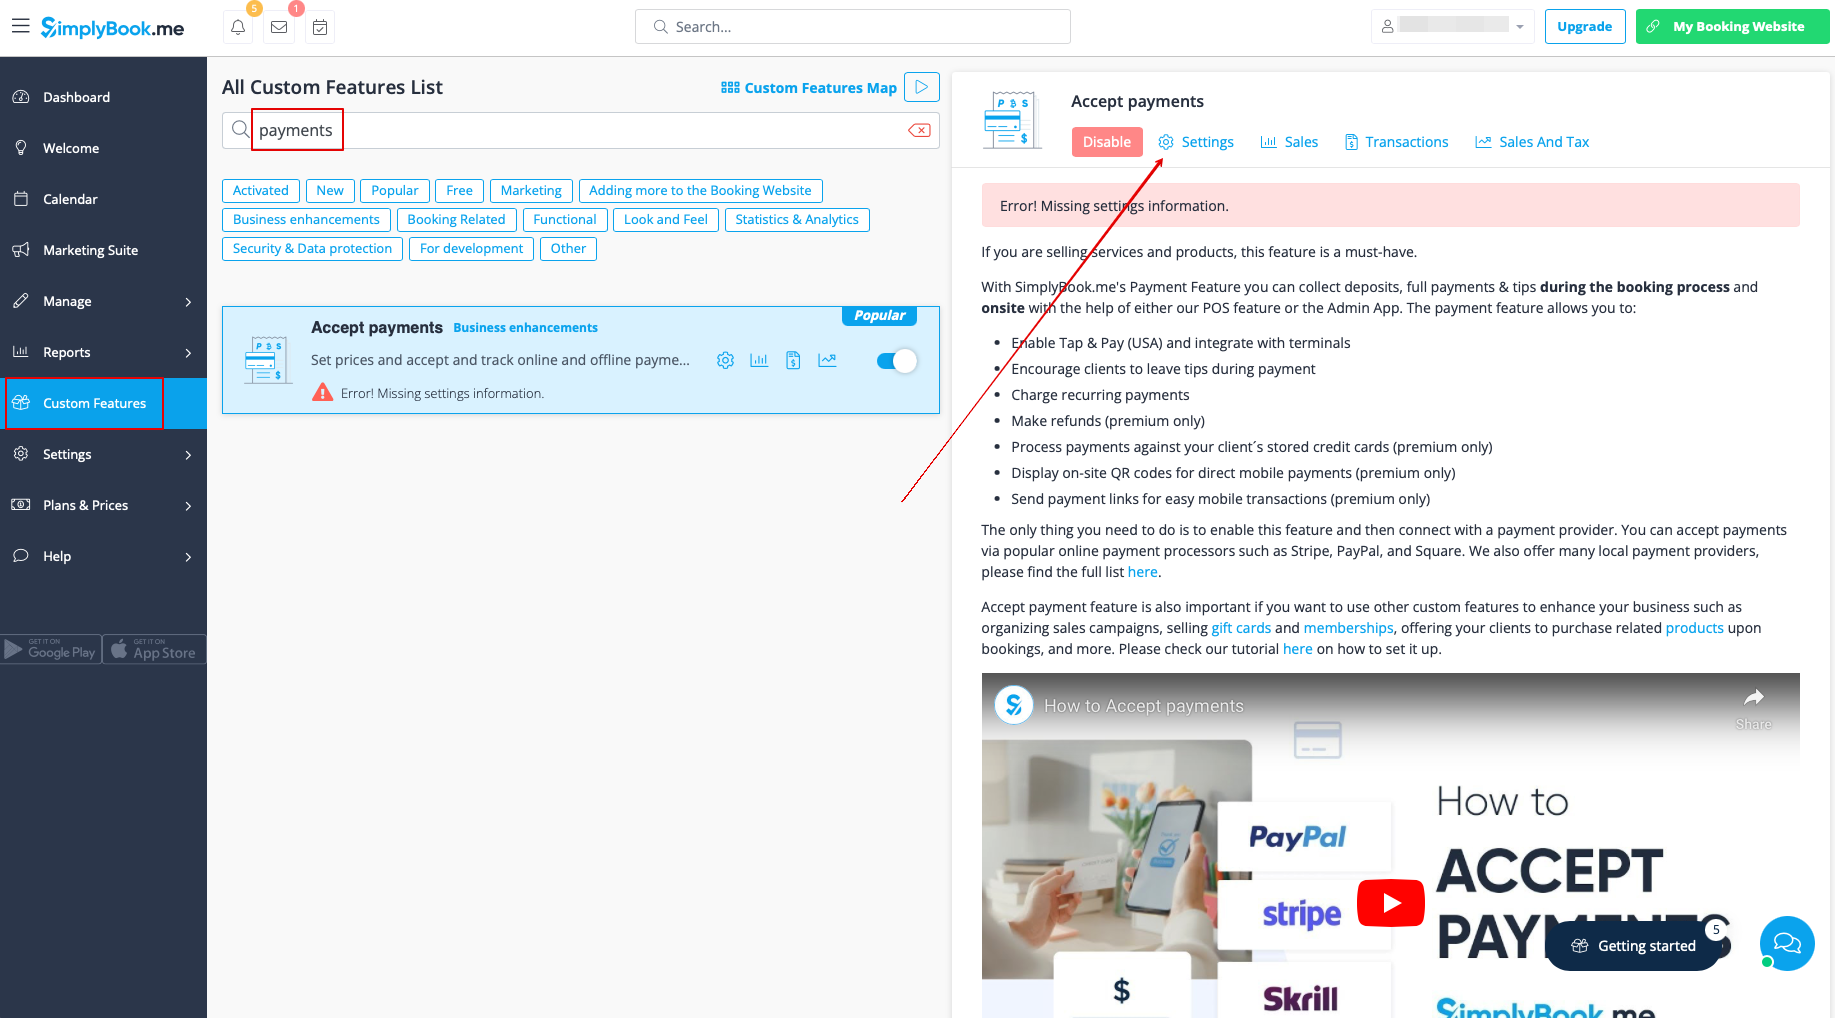
3. Ajusta la información de tu empresa en el siguiente formulario si es necesario.
(Se completará automáticamente con los detalles de la empresa que ya tienes en tu sistema).
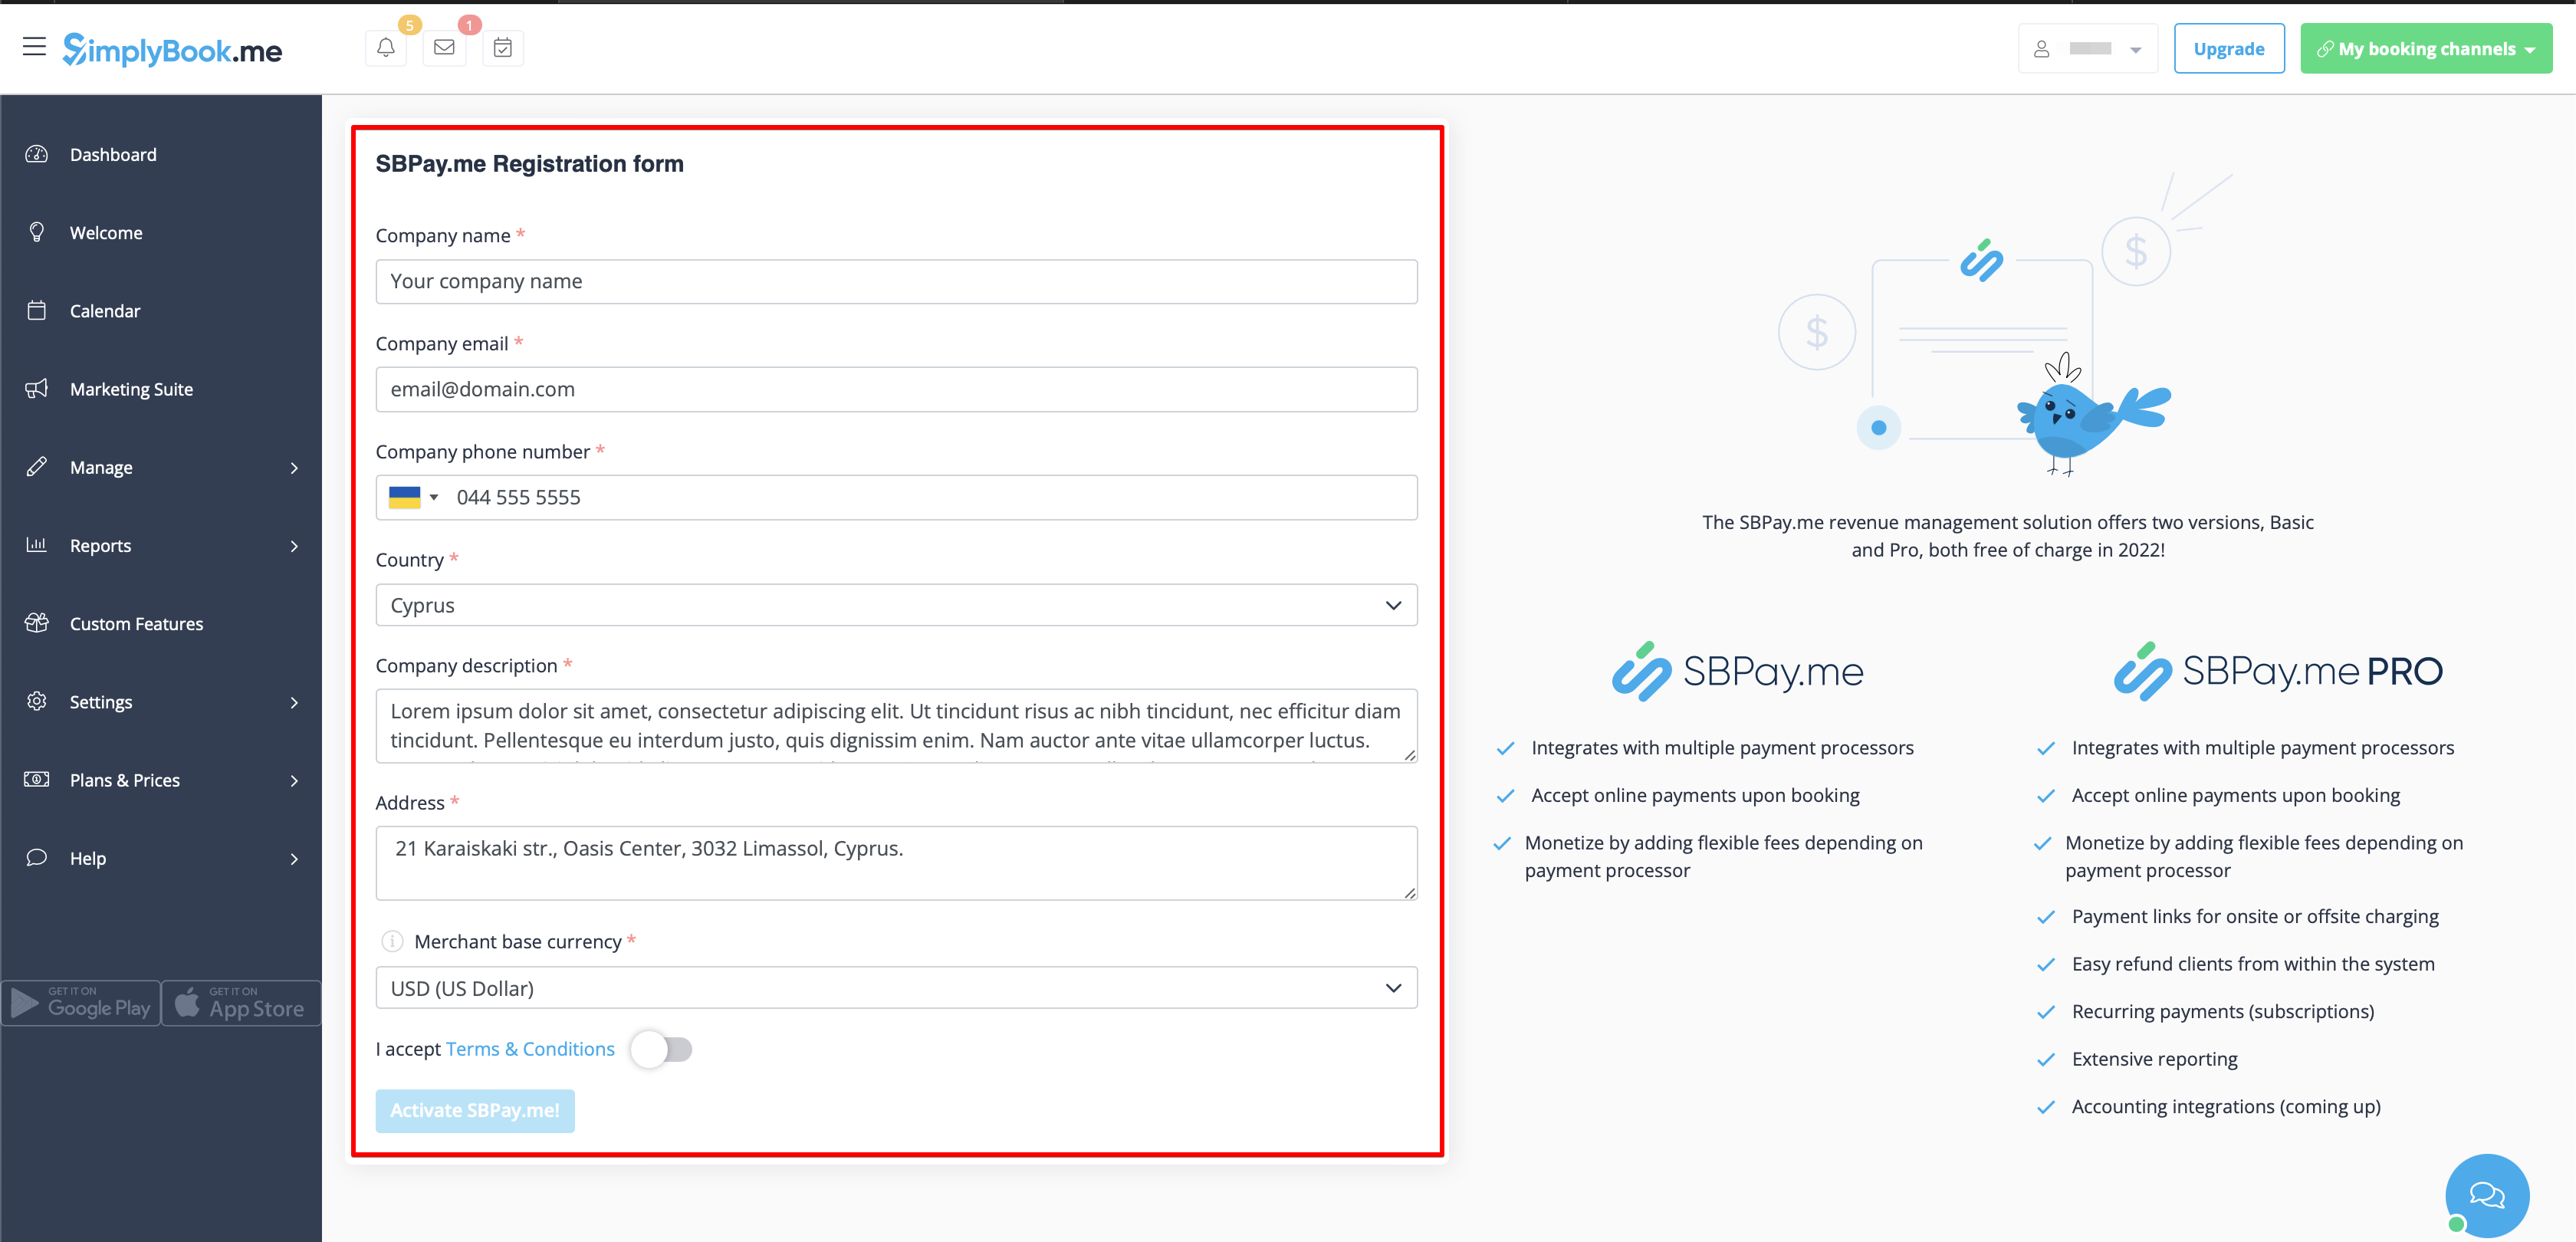
4. Haz clic en el botón Activate SBPay.me.
- ¡Por favor, ten en cuenta! La mayoría de tus ajustes y configuraciones relacionadas con pagos se manejarán a través de SBPay.me, que se vuelve accesible al habilitar el plugin de Aceptar Pagos a través del elemento Pagos en el menú de navegación. Por favor, consulta más información aquí.
Dónde establecer precios
Con SimplyBook.me, puedes aceptar pagos por reservas de servicios/clases, paquetes, membresías, tarjetas de regalo, productos y complementos.
Por favor, revisa los siguientes puntos para establecer precios para los elementos deseados:
1. Servicios/Clases:
- Dirígete a Administrar -> Servicios/Clases.
- Haz clic en el Servicio específico y accede a Detalles del Servicio/Clase.
- Desplázate hacia abajo hasta el campo Precio para establecer el precio del servicio.
2. Paquetes:
- Ve a Administrar -> Paquetes.
- Haz clic en el Paquete deseado y accede a Detalles del Paquete.
- Establece el precio en el campo Precio para el paquete.
3. Membresías:
- Dirígete a Ajustes -> Suscripción.
- Accede a Detalles de la Suscripción y localiza Primer Pago para establecer el precio inicial.
- Si la Suscripción es recurrente, también establece el precio en el campo Precio Recurrente. Puedes encontrar más detalles sobre cómo configurar Suscripción aquí.
4. Complementos de Servicio:
- Navega hacia Ajustes -> Complementos de Servicio.
- Haz clic en el Complemento de Servicio específico y accede a Detalles del Complemento de Servicio.
- Ajusta el precio en el campo Precio del Complemento.
5. Productos en Venta:
- Ve a Administrar -> Productos en Venta.
- Haz clic en el Producto en Venta deseado y accede a Detalles del Producto.
- Especifica el precio en el campo Precio del Producto.
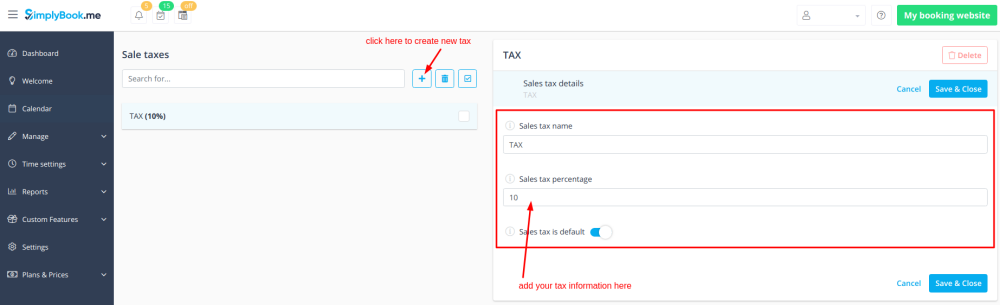
Cómo agregar impuestos
1. Agrega las opciones de impuestos necesarias en Ajustes -> Impuestos -> +.
Elige la predeterminada si es necesario; se establecerá automáticamente para cada nuevo elemento de venta que crees en el sistema.
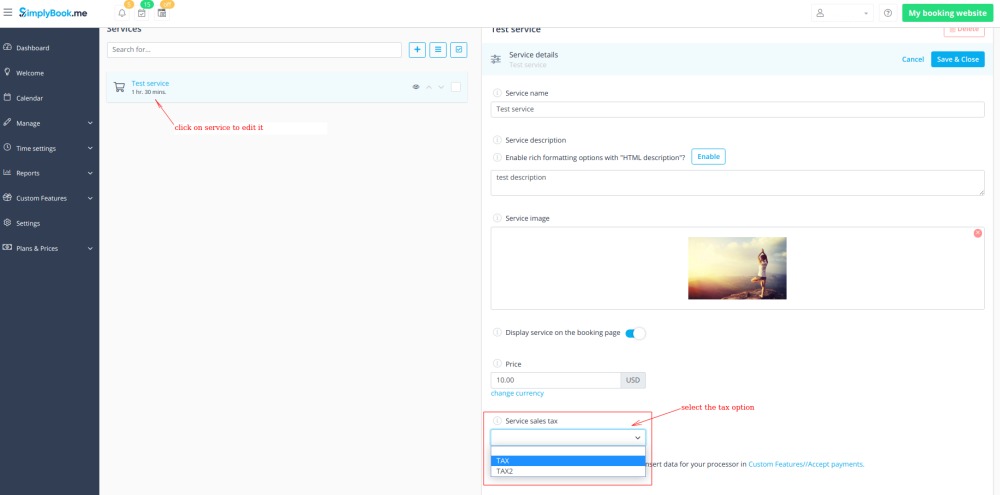
2. Navega a Ajustes -> Servicios y selecciona la opción de impuestos para cada servicio.
Si tienes otros elementos como Clases, Paquetes, Membresías, Productos para la venta, Complementos de servicio, Tarjetas de regalo y necesitas que los impuestos se apliquen también allí, por favor, ve a la página de gestión correspondiente y selecciona los impuestos pre-creados para cada elemento.
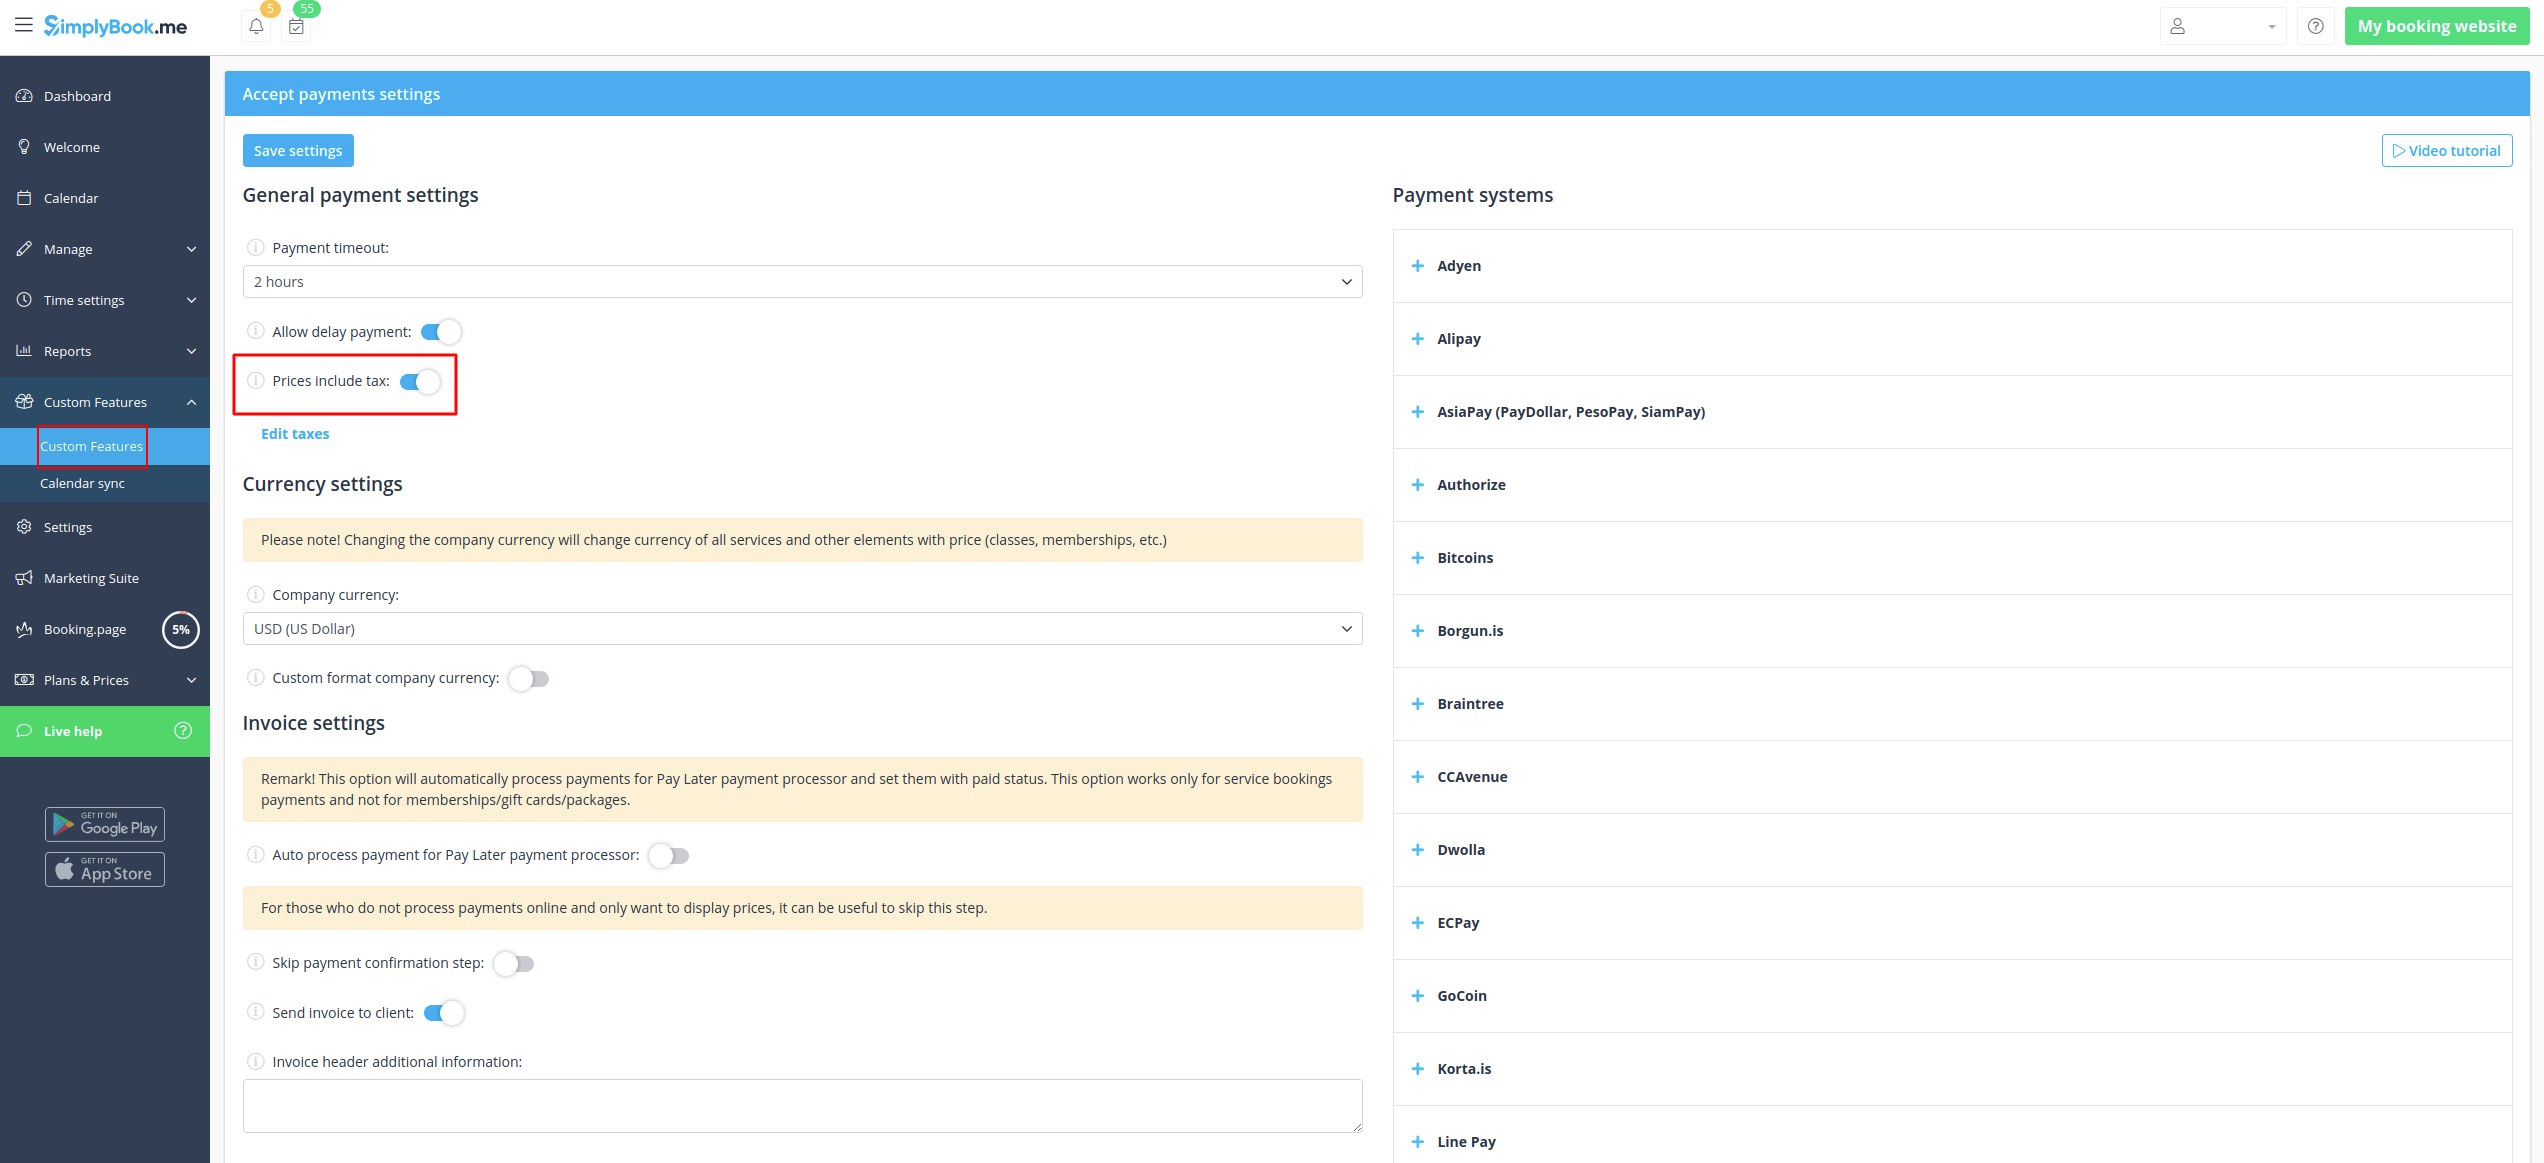
3. En Plugins -> Aceptar pagos -> Ajustes, elija si el monto del impuesto debe agregarse al precio que ha establecido por servicio (u otro elemento) o si ya está incluido mediante el interruptor Los precios incluyen impuestos.
Si habilita el interruptor, significará que el monto que ha establecido por servicio ya incluye impuestos.
En caso de deshabilitar el interruptor, el sistema añadirá automáticamente el porcentaje de impuesto seleccionado a los precios de los elementos.
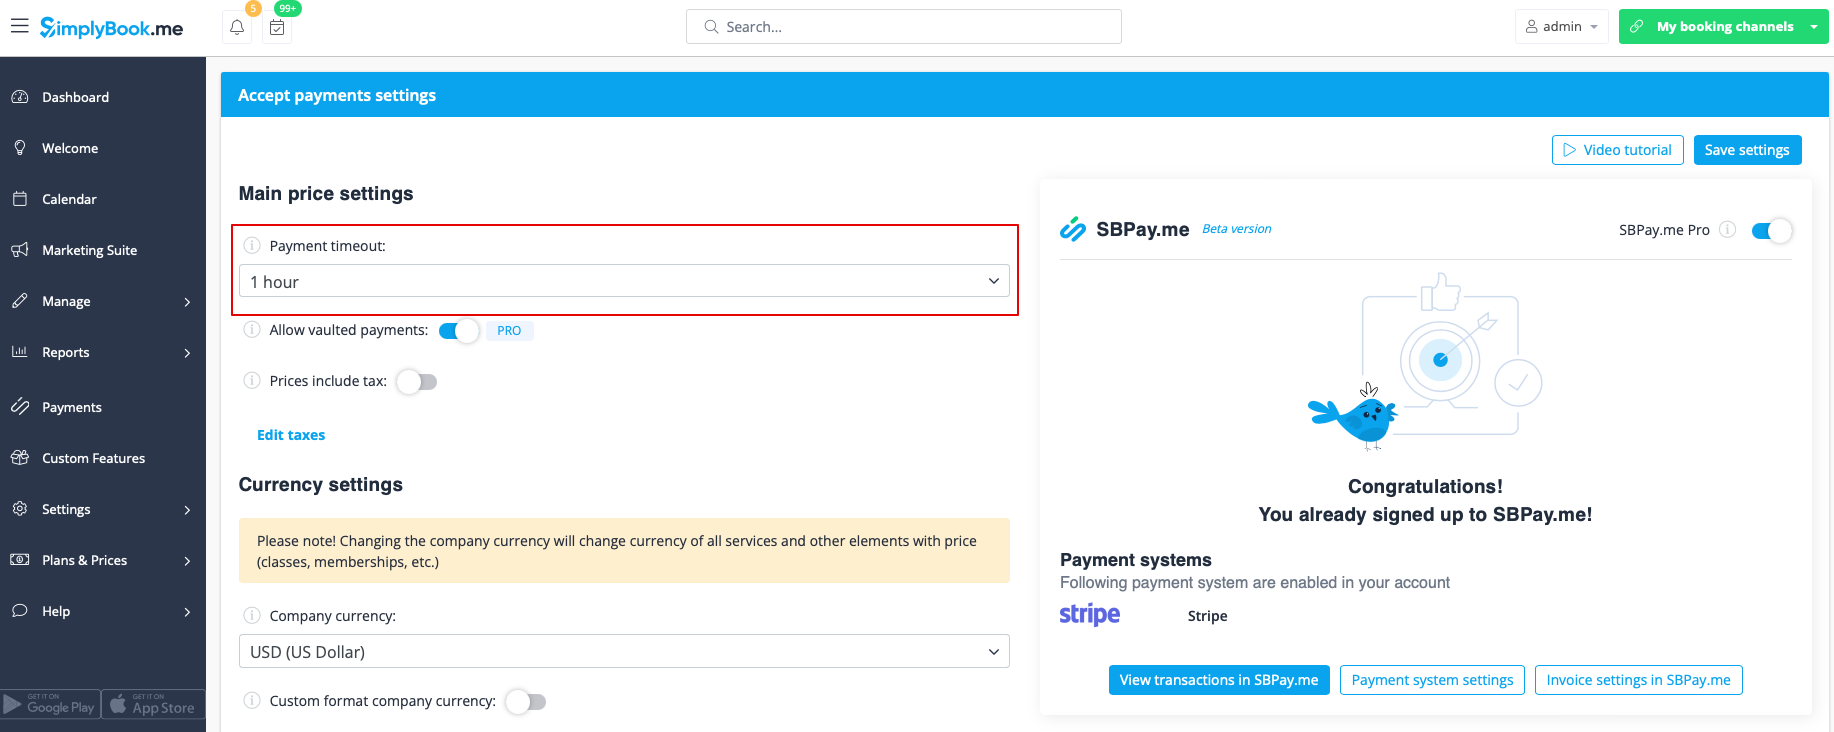
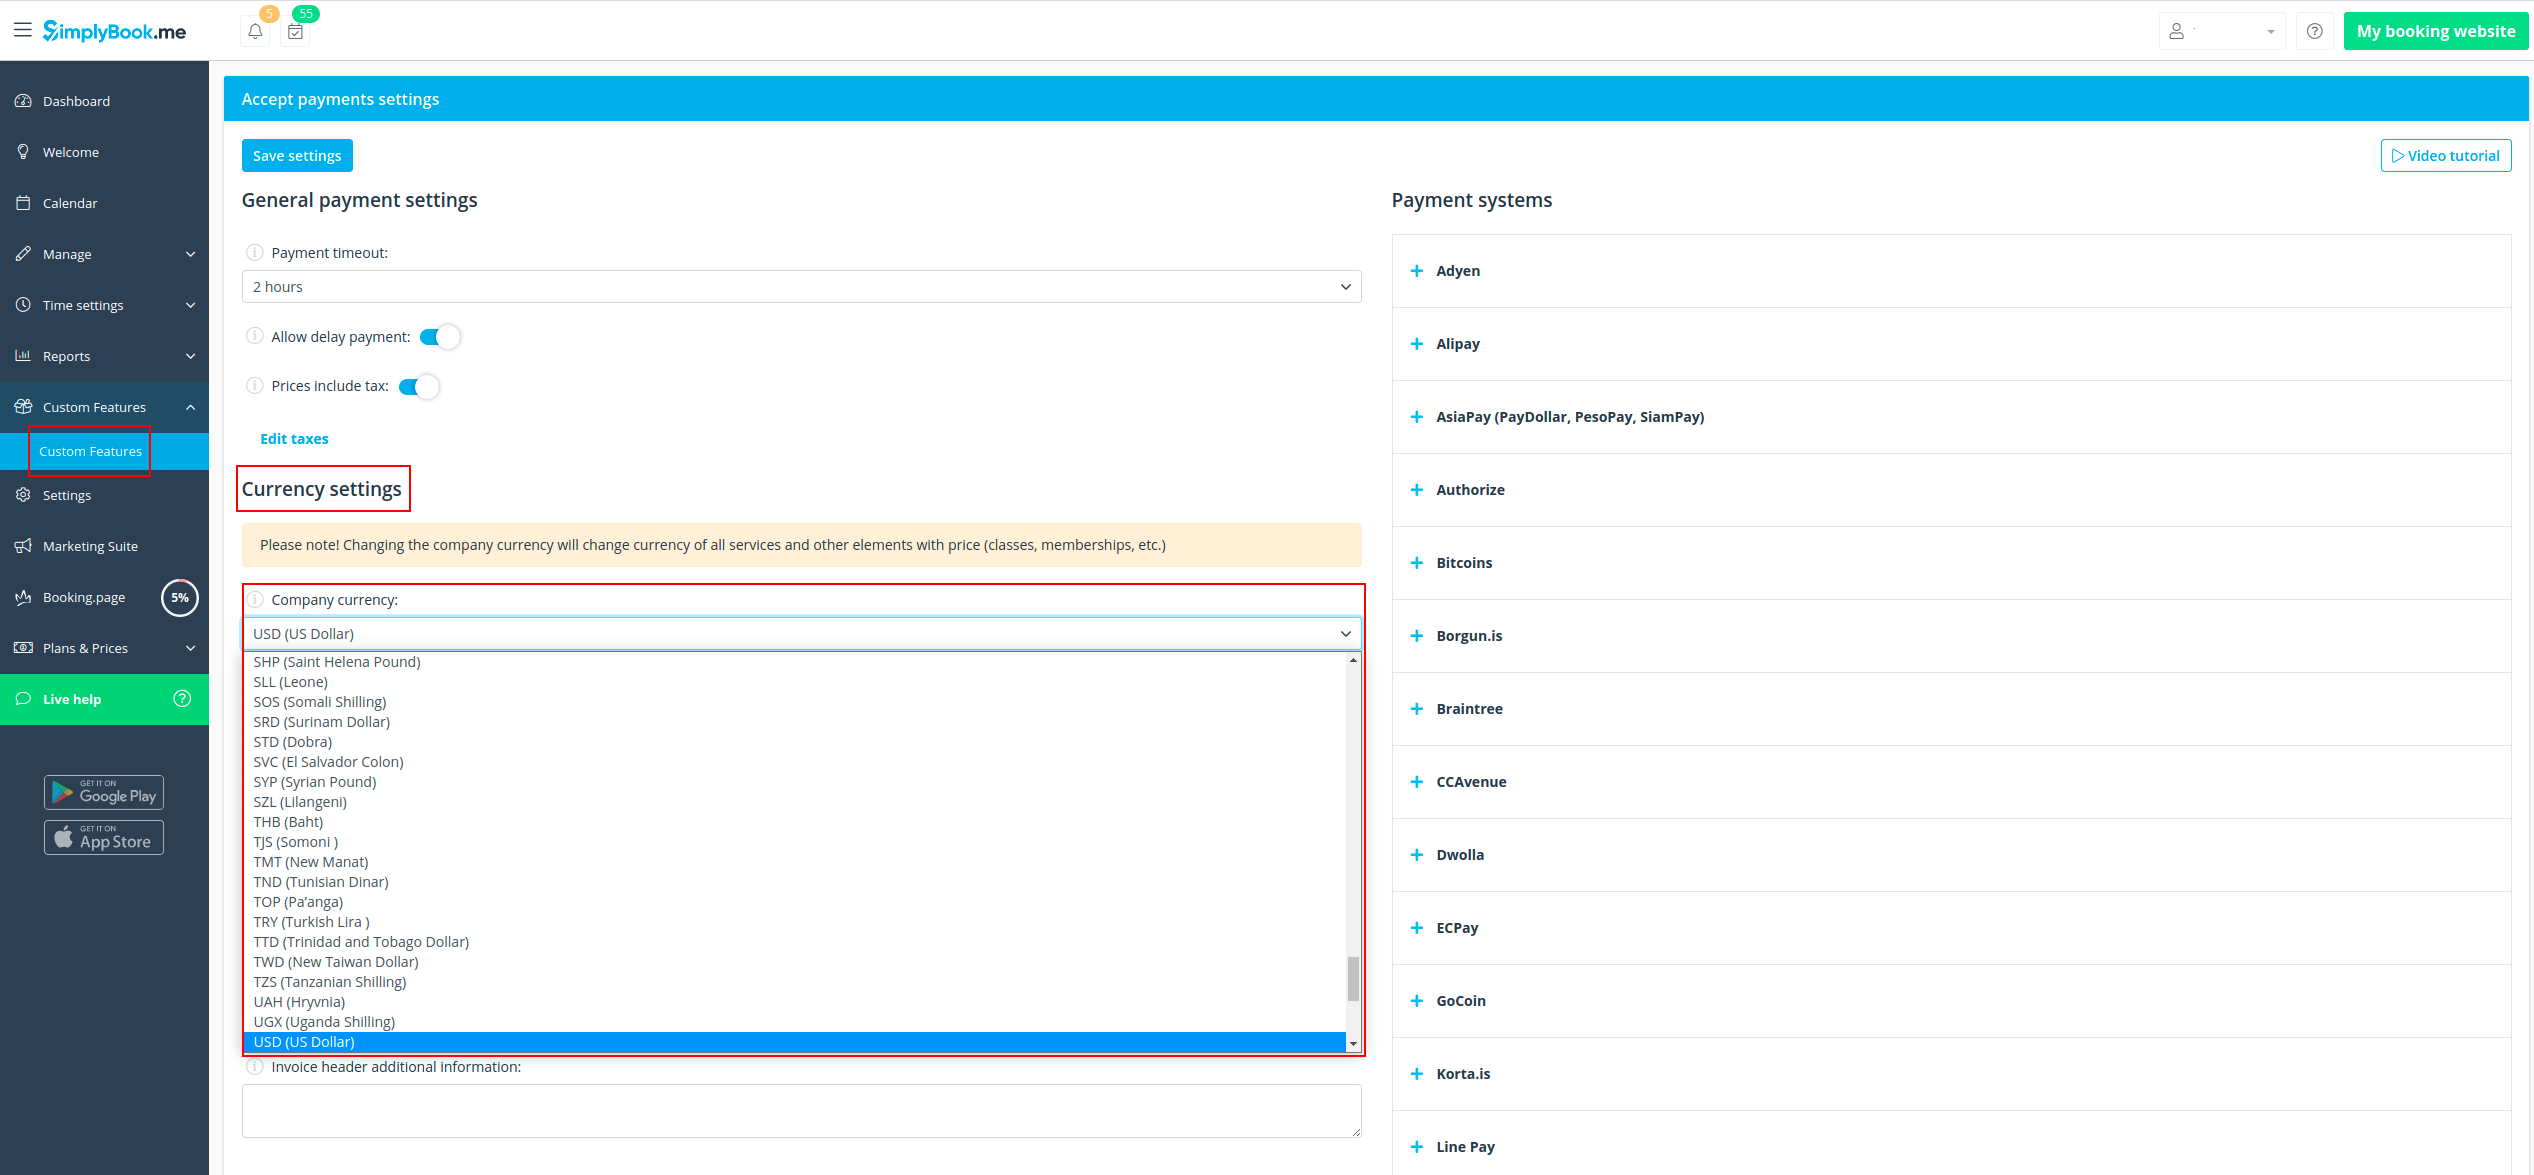
Tiempo de espera de pago
Este ajuste permite determinar la duración dentro de la cual una transacción de pago debe completarse antes de que expire. Si no se paga dentro del período definido, la transacción asociada y las reservas se cancelarán automáticamente.
El período recomendado es de al menos 1 hora para dar a los clientes suficiente tiempo para completar el pago y para que el sistema de pago nos envíe la confirmación.
How to change currency
You can adjust the currency in the settings of Accept payments custom feature.
Please note! Some payment processors do not support all currencies. Before setting the currency, check if the selected payment processor supports it.
What is "Pay later" option
When your clients are transferred to the payment page after Details tab, they usually have several options: your payment processor (one or several) and Pay Later. Pay Later in most cases means that client will pay right on the place when he/she arrives to the appointment. In your Dashboard, when you click on the appointment, such booking in the service price field will have a note "Pay Later".
Additionally, you can enable the Auto process payment for Pay Later payment processor to automatically set the Paid status for the service bookings where Pay Later was chosen as the payment method. Note that this option does not apply to memberships, gift cards, or packages.
As well you can activate Skip payment confirmation step option. This is particularly useful for those who only wish to display prices without processing payments online. If enabled, this step will be omitted.
If you want to disable Pay later option please navigate to Payments in the left-side menu (i.e. SBPay.me interface) -> Payment processors and deactivate Pay later option there.
Payment links
(available with Premium subscription (i.e. SBPay.me PRO version)
With this option you can now easily send payment links via emails or sms to your clients to pay onsite or offsite for some order/booking or unpaid remainder amount when deposits were used.
Check more details on how to use it here
Vaulted Payments
(available with Premium subscription (i.e. SBPay.me PRO version)
This option enables clients to securely store their card details as a preferred payment method. With vaulted payments, clients can seamlessly pay for future orders without re-entering their payment information, enhancing convenience and expediting transactions. From the admin side, you will be able to charge the saved payment method of your clients.
Check more details on how it works here
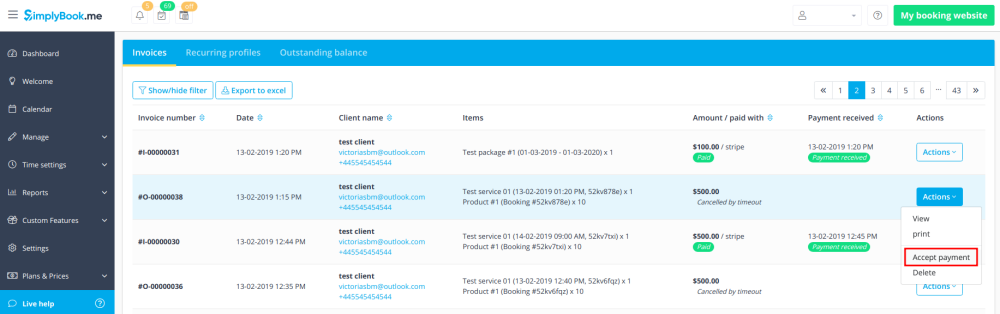
Refunds
(available with Premium subscription.
It may happen that you need to give the money back to your customer due to some reason and now it is possible to easily manage such cases with SBPay.me Pro integration.
Check more details on how it works here
How to customize the client invoices
It may be necessary to show or hide some data or change the look for the invoices that the system sends to clients after they make a purchase on your booking website.
Using SBPay.me Invoices feature can adjust the following items:
Check more details here here
Notifications
There are several types of the payment-related notifications that can be sent to you and/or your clients. Within the paid subscriptions you can customize notification templates using provided variables.
The following notifications are available:
- Payment failed notification (can be sent to client and/or to company);
- Payment link for Delay payment method (with SBPay.me Pro only);
- Refund confirmation (with SBPay.me Pro only).
How the whole payments process works
- 1. A client goes through the booking process and presses Book Now at the end. Or he/she selects some memberships/package/gift card, etc. to buy.
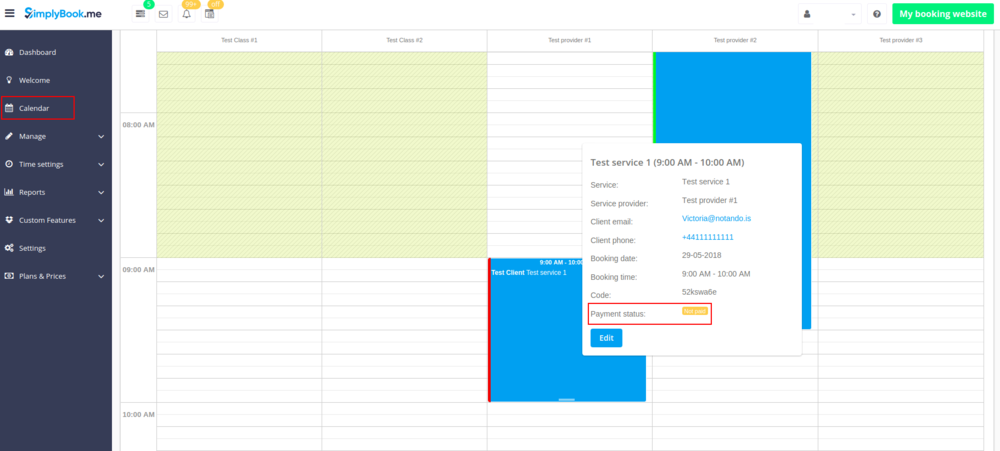
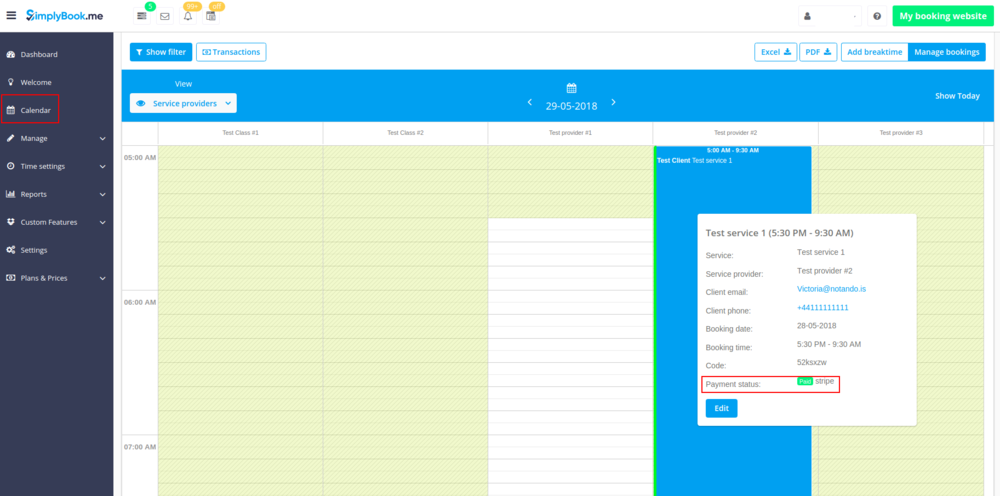
- 2. He is directed to summary step to choose a payment method. At this stage unconfirmed booking appears in the admin calendar marked red as not paid to reserve this time so that no other person can accidentally book the same slot and there will be no double-bookings. As well an order with the New status appears in Payment transactions report.
- 3. After that, the client has 2 options:
- 3.1. to pay and the payment processor will send us confirmation that client has paid and we will automatically approve the transaction on our side (booking will be marked with green color and the order with paid status).
- 3.1. to pay and the payment processor will send us confirmation that client has paid and we will automatically approve the transaction on our side (booking will be marked with green color and the order with paid status).
- 3.2. to not finish paying: the client is directed to the payment system, but then he closes the page, closes the browser, or simply leaves it open without any actions for a long period of time. In this case, the system will wait until timeout you set up in the settings of Accept payments custom feature will end and will cancel the non-paid booking/transaction because it was never finished. You can set the emails to be sent to client and/or you to be notified about the timed out bookings.
- Same happens if the client paid, but paid later than timeout. In this case, if you receive a notification from PayPal/Stripe/etc. that client paid for the booking/order but as it was too late you can go to Payments -> Transactions or Reports -> Payment transactions within SimplyBook.me interface and approve this booking manually.
- 3.2. to not finish paying: the client is directed to the payment system, but then he closes the page, closes the browser, or simply leaves it open without any actions for a long period of time. In this case, the system will wait until timeout you set up in the settings of Accept payments custom feature will end and will cancel the non-paid booking/transaction because it was never finished. You can set the emails to be sent to client and/or you to be notified about the timed out bookings.