Difference between revisions of "Adding services, providers and availability(new interface)"
| Line 43: | Line 43: | ||
You will be able to check it on "Advanced schedule" section. | You will be able to check it on "Advanced schedule" section. | ||
<br><br> | <br><br> | ||
| − | [[File:Services - company schedule.png | center]] | + | <nomobile>[[File:Services - company schedule.png | center]]</nomobile> |
| + | <mobileonly>[[File:M service advanced schedule- company default.png | center]]</mobileonly> | ||
<br><br> | <br><br> | ||
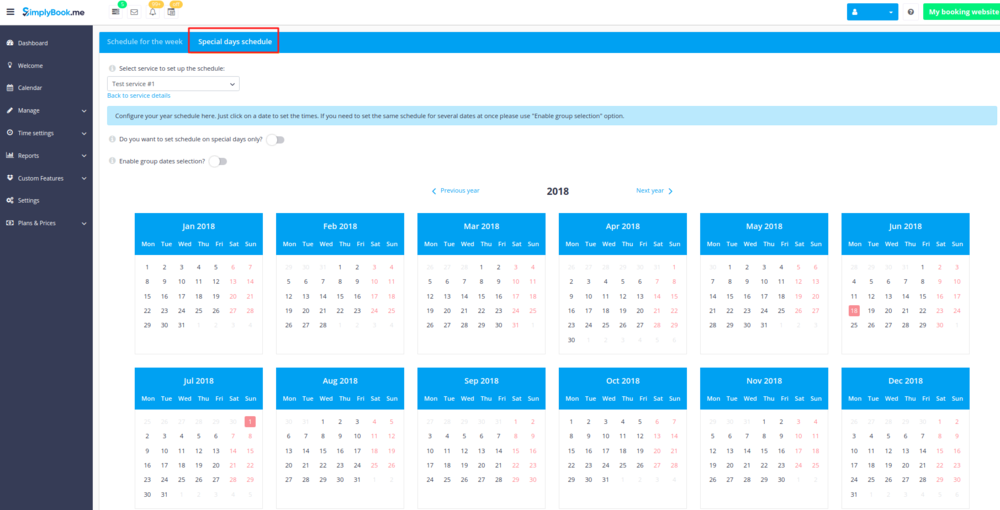
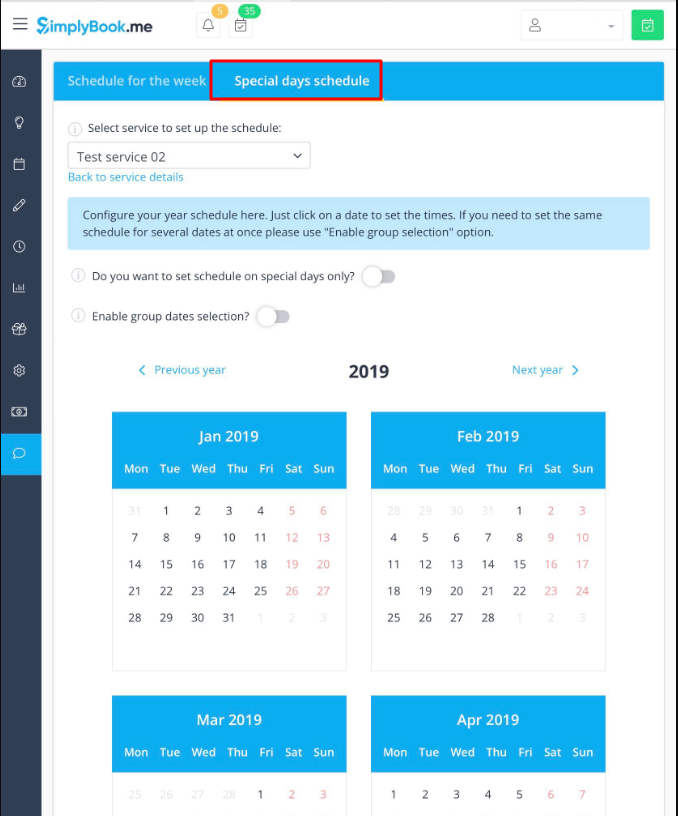
If you need to set some exceptions in service schedule for holidays or other needs please choose “Special days” tab there and set times for desired dates. | If you need to set some exceptions in service schedule for holidays or other needs please choose “Special days” tab there and set times for desired dates. | ||
<br><br> | <br><br> | ||
| − | [[File: Service special days.png | center]] | + | <nomobile>[[File: Service special days.png | center]]</nomobile> |
| + | <mobileonly>[[File:M service special dayschedule.png | center]]</mobileonly> | ||
<br><br> | <br><br> | ||
===How to set service as one-time event=== | ===How to set service as one-time event=== | ||
| Line 54: | Line 56: | ||
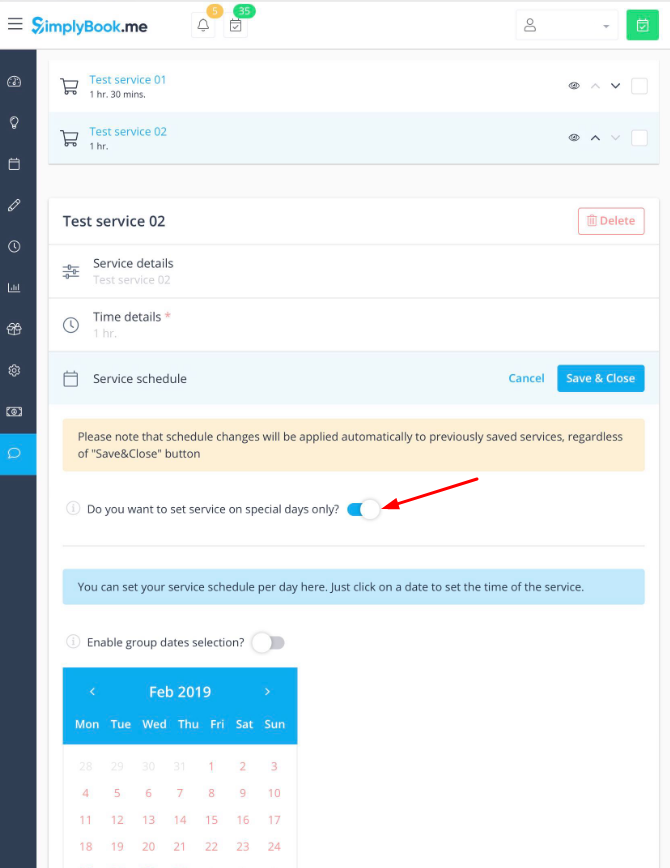
Switch to “Service schedule” tab, and enable the option "Do you want to set service on special days only?" | Switch to “Service schedule” tab, and enable the option "Do you want to set service on special days only?" | ||
<br><br> | <br><br> | ||
| − | [[File: Special days only new.png | center]] | + | <nomobile>[[File: Special days only new.png | center]]</nomobile> |
| + | <mobileonly>[[File:M service special days only.png | center]]</mobileonly> | ||
<br><br> | <br><br> | ||
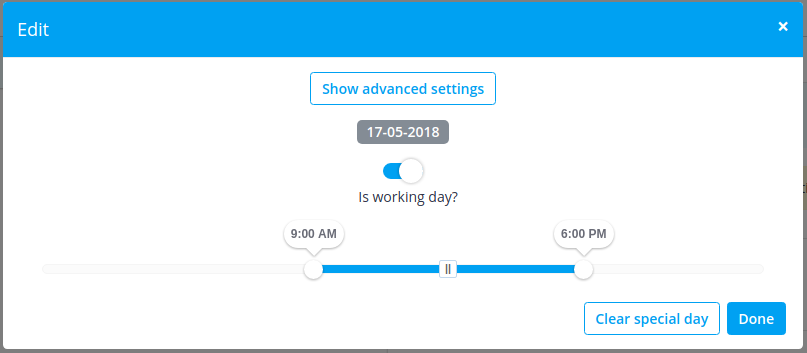
and use the calendar, click on the dates that you want to open and set the schedule for these dates by moving the sliders(bright blue zone is open time). | and use the calendar, click on the dates that you want to open and set the schedule for these dates by moving the sliders(bright blue zone is open time). | ||
<br><br> | <br><br> | ||
| − | [[File: Special day setup.png | center]] | + | <nomobile>[[File: Special day setup.png | center]]</nomobile> |
| + | <mobileonly>[[File:M service special days times.png | center]]</mobileonly> | ||
<br><br> | <br><br> | ||
If you need to select several dates at once please switch on "Enable group dates selection?", select the dates to edit and click on "Setup schedule" to set the times. | If you need to select several dates at once please switch on "Enable group dates selection?", select the dates to edit and click on "Setup schedule" to set the times. | ||
| − | [[File: Several dates at once.png | center]] | + | <nomobile>[[File: Several dates at once.png | center]]</nomobile> |
| + | <mobileonly>[[File:M service group dates selection.png | center]]</mobileonly> | ||
<br><br> | <br><br> | ||
===What if I need to group my services in categories=== | ===What if I need to group my services in categories=== | ||
| Line 67: | Line 72: | ||
In Manage//Services switch to “Service categories” tab and enable [[Custom_Features#Service_Categories | “Service Categories” Custom Feature]]. | In Manage//Services switch to “Service categories” tab and enable [[Custom_Features#Service_Categories | “Service Categories” Custom Feature]]. | ||
<br><br> | <br><br> | ||
| − | [[File: Enable service categories.png | center]] | + | <nomobile>[[File: Enable service categories.png | center]]</nomobile> |
| + | <mobileonly>[[File:M service categories enable from services.png | center]]</mobileonly> | ||
<br><br> | <br><br> | ||
To create a category click on “+” and choose “Add category” option there, set category name, description, add picture if necessary and set its position on the booking page. <br>Save settings. | To create a category click on “+” and choose “Add category” option there, set category name, description, add picture if necessary and set its position on the booking page. <br>Save settings. | ||
<br><br> | <br><br> | ||
| − | [[File:Create new category.png | center]] | + | <nomobile>[[File:Create new category.png | center]]</nomobile> |
| + | <mobileonly>[[File:M crate new category.png | center]]</mobileonly> | ||
<br><br> | <br><br> | ||
Switch to “Category services” tab to attach services to this category”. | Switch to “Category services” tab to attach services to this category”. | ||
<br><br> | <br><br> | ||
| − | [[File:Attach service to category.png | center]] | + | <nomobile>[[File:Attach service to category.png | center]]</nomobile> |
| + | <mobileonly>[[File:M attach services to category.png | center]]</mobileonly> | ||
<br><br> | <br><br> | ||
===What if I need to require some additional information from my clients at checkout=== | ===What if I need to require some additional information from my clients at checkout=== | ||
| Line 82: | Line 90: | ||
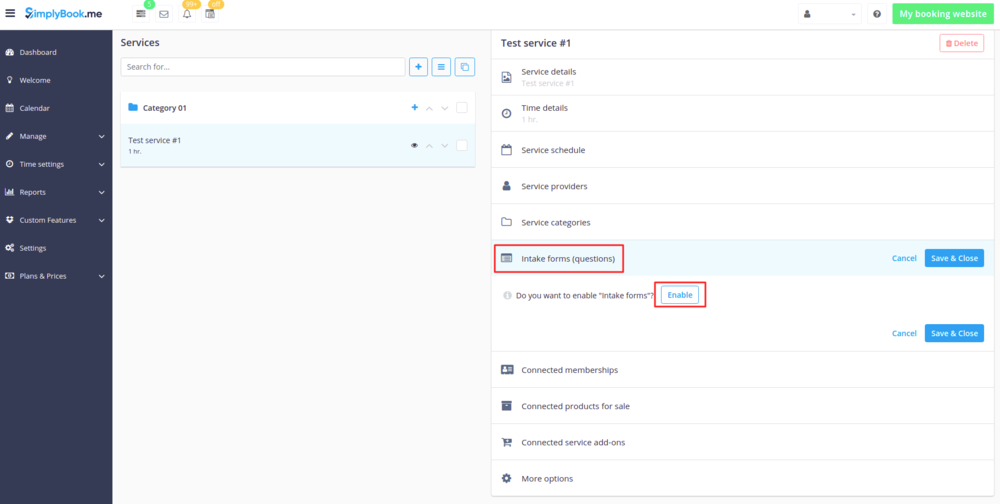
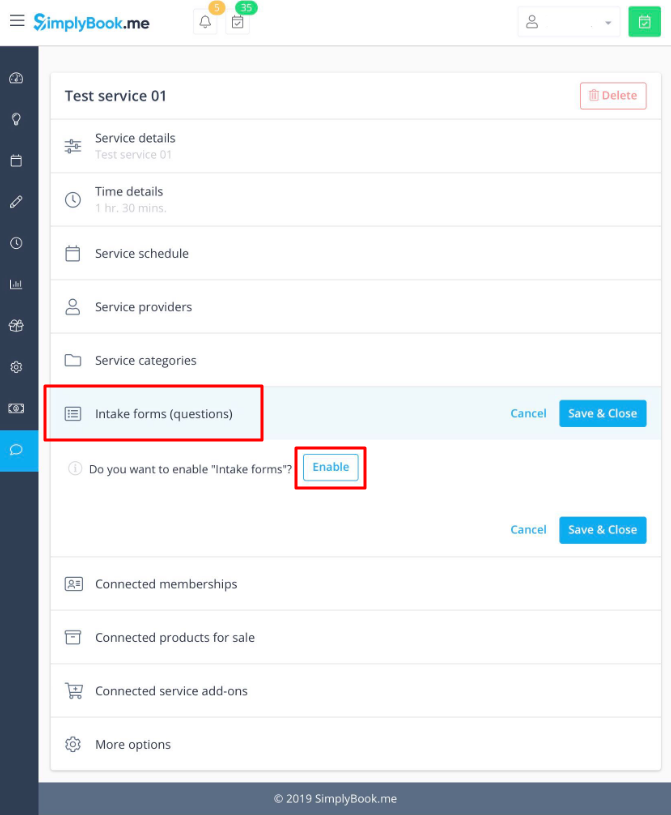
To enable it please switch to “Intake forms (questions)” tab and click on gray button. | To enable it please switch to “Intake forms (questions)” tab and click on gray button. | ||
<br><br> | <br><br> | ||
| − | [[File:Enable intake forms.png | center]] | + | <nomobile>[[File:Enable intake forms.png | center]]</nomobile> |
| + | <mobileonly>[[File:M intake forms enable from services.png | center]]</mobileonly> | ||
<br><br> | <br><br> | ||
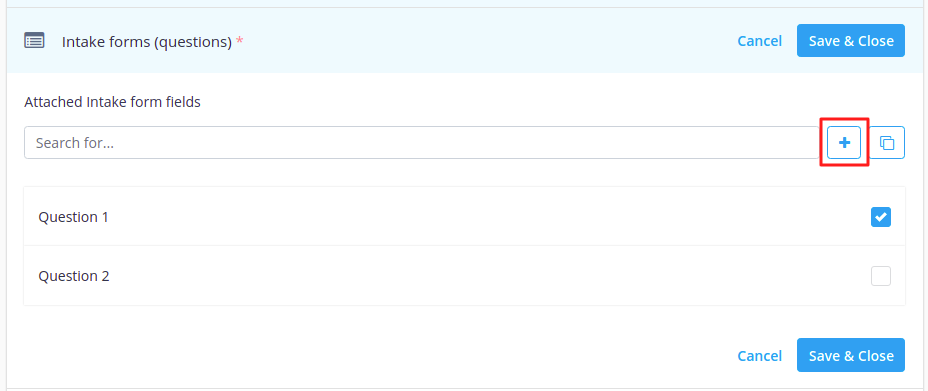
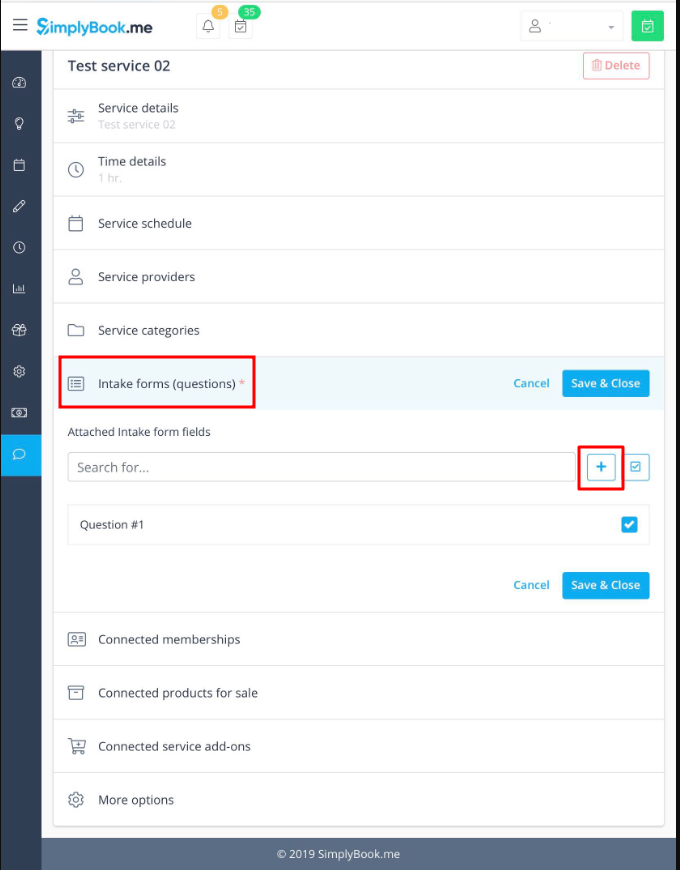
After it is activated click on “+” button to be redirected to page where you will be able to create necessary questions. | After it is activated click on “+” button to be redirected to page where you will be able to create necessary questions. | ||
<br><br> | <br><br> | ||
| − | [[File: Create new intake form.png | center]] | + | <nomobile>[[File: Create new intake form.png | center]]</nomobile> |
| + | <mobileonly>[[File:M create new intake form from services.png | center]]</mobileonly> | ||
<br><br> | <br><br> | ||
===How to limit bookings per service=== | ===How to limit bookings per service=== | ||
| Line 93: | Line 103: | ||
Then put a limit for this service in corresponding box. Save settings. | Then put a limit for this service in corresponding box. Save settings. | ||
<br><br> | <br><br> | ||
| − | [[File:Enable limit bookings.png | center]] | + | <nomobile>[[File:Enable limit bookings.png | center]]</nomobile> |
| + | <mobileonly>[[File:M limit bookings enable from services.png | center]]</mobileonly> | ||
<br><br> | <br><br> | ||
If you need to limit booking for the whole system please put desired limit in Custom features//Limit bookings//Settings. | If you need to limit booking for the whole system please put desired limit in Custom features//Limit bookings//Settings. | ||
| Line 101: | Line 112: | ||
In Manage//Services switch to “More options” tab to enable [[Custom_Features#Flexible_Notifications | “Flexible notifications” Custom Feature]] and create necessary templates. | In Manage//Services switch to “More options” tab to enable [[Custom_Features#Flexible_Notifications | “Flexible notifications” Custom Feature]] and create necessary templates. | ||
<br><br> | <br><br> | ||
| − | [[File: Enable flexible notifications.png | center]] | + | <nomobile>[[File: Enable flexible notifications.png | center]]</nomobile> |
| + | <mobileonly>[[File:M flexible notifications enable from services.png | center]]</mobileonly> | ||
<br><br> | <br><br> | ||
===How can I promote my service=== | ===How can I promote my service=== | ||
| Line 107: | Line 119: | ||
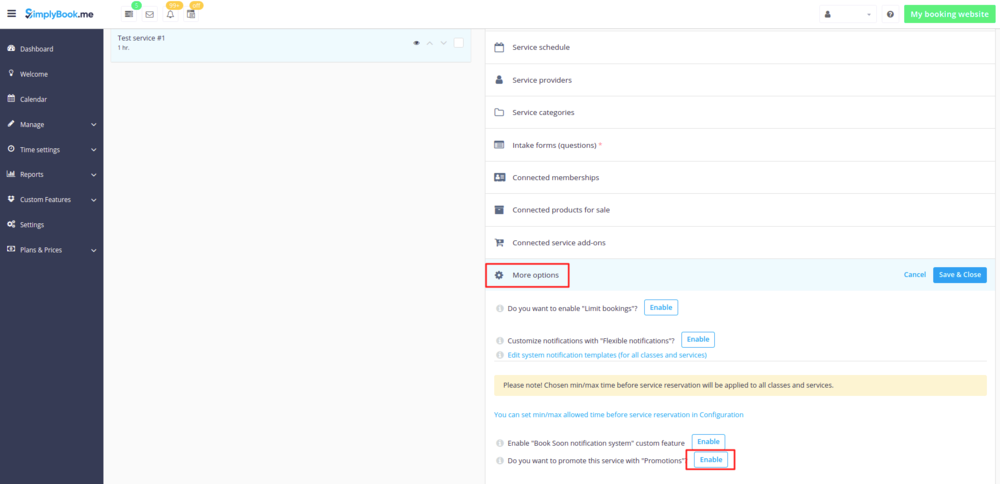
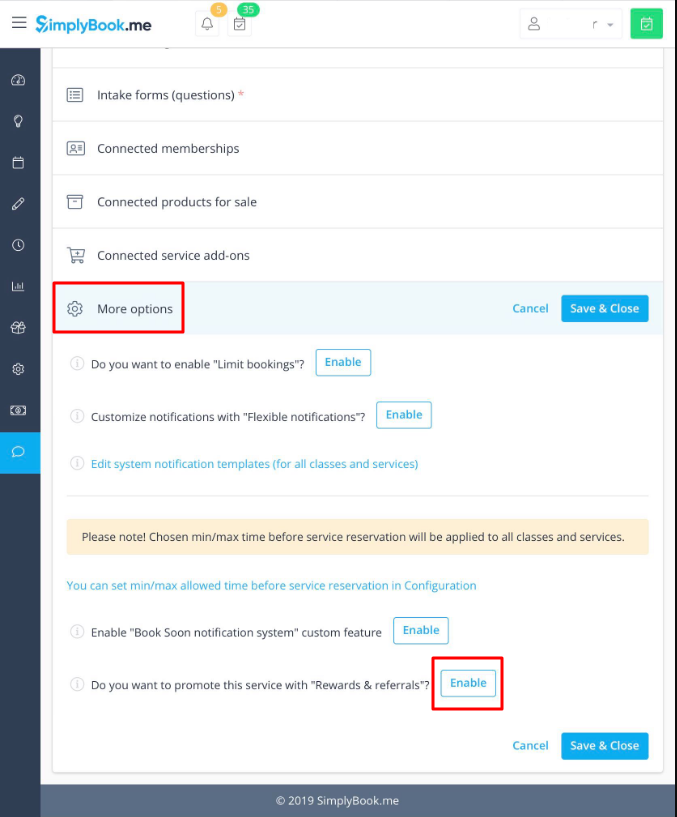
In Manage//Services switch to “More options” tab to enable [[Custom_Features#Rewards_and_Referrals | “Rewards and Referrals” Custom Feature]] and create promotions to reward your clients. | In Manage//Services switch to “More options” tab to enable [[Custom_Features#Rewards_and_Referrals | “Rewards and Referrals” Custom Feature]] and create promotions to reward your clients. | ||
<br><br> | <br><br> | ||
| − | [[File: Enable promotions.png | center]] | + | <nomobile>[[File: Enable promotions.png | center]]</nomobile> |
| + | <mobileonly>[[File:M rewards and referrals enable from services.png | center]]</mobileonly> | ||
<br><br> | <br><br> | ||
| Line 114: | Line 127: | ||
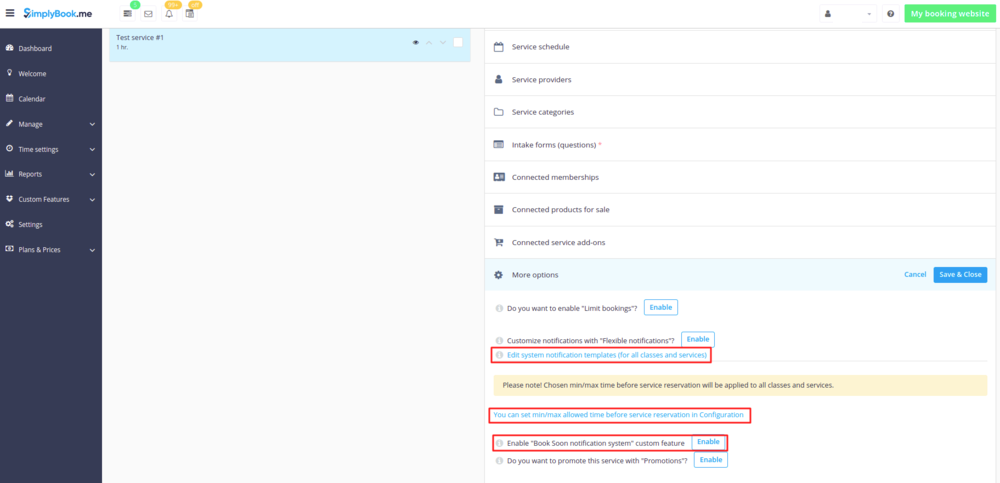
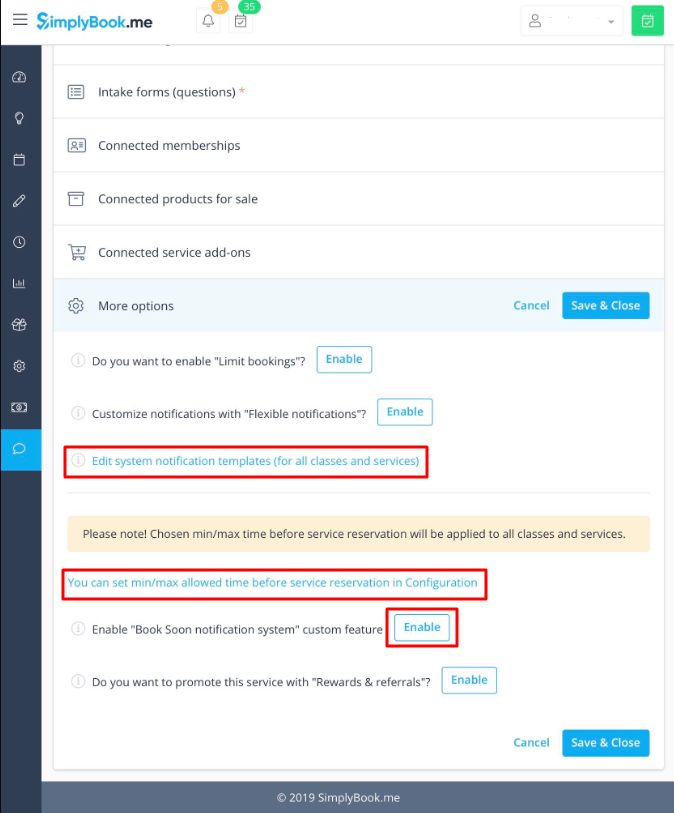
You can use it to get to general notifications settings, settings related to system maximum and minimum allowed time before service reservation and set reminders for your clients to book again with [[Custom_Features#Book_Soon_Notification_System| Book Soon Custom Feature]]. | You can use it to get to general notifications settings, settings related to system maximum and minimum allowed time before service reservation and set reminders for your clients to book again with [[Custom_Features#Book_Soon_Notification_System| Book Soon Custom Feature]]. | ||
<br><br> | <br><br> | ||
| − | [[File:More options possibilities - services.png | center]] | + | <nomobile>[[File:More options possibilities - services.png | center]]</nomobile> |
| + | <mobileonly>[[File:M more options possibilities.png | center]]</mobileonly> | ||
<br><br> | <br><br> | ||
| Line 128: | Line 142: | ||
In Manage//Providers press +" icon. | In Manage//Providers press +" icon. | ||
<br><br> | <br><br> | ||
| − | [[File: Create new provider.png | center]] | + | <nomobile>[[File: Create new provider.png | center]]</nomobile> |
| + | <mobileonly>[[File:M create new provider.png | center]]</mobileonly> | ||
<br><br> | <br><br> | ||
In right-side menu insert the name insert the name of your service provider, set number of clients he/she can serve at a time and write service provider description.<br>You can also upload picture and set his/her phone number and email address if necessary. <br>Save settings. | In right-side menu insert the name insert the name of your service provider, set number of clients he/she can serve at a time and write service provider description.<br>You can also upload picture and set his/her phone number and email address if necessary. <br>Save settings. | ||
<br><br> | <br><br> | ||
| − | [[File: Add provider description new.png | center]] | + | <nomobile>[[File: Add provider description new.png | center]]</nomobile> |
| + | <mobileonly>[[File:M add provider description.png | center]]</mobileonly> | ||
<br><br> | <br><br> | ||
===How to attach services to provider=== | ===How to attach services to provider=== | ||
| Line 138: | Line 154: | ||
In Manage//Providers switch to “Services, attached to this service provider” tab and check the boxes with services this provider will perform. <br>Save settings. | In Manage//Providers switch to “Services, attached to this service provider” tab and check the boxes with services this provider will perform. <br>Save settings. | ||
<br><br> | <br><br> | ||
| − | [[File: Attach provider to services.png | center]] | + | <nomobile>[[File: Attach provider to services.png | center]]</nomobile> |
| + | <mobileonly>[[File:M attach services to provider.png | center]]</mobileonly> | ||
<br><br> | <br><br> | ||
===How to set schedule for provider=== | ===How to set schedule for provider=== | ||
| Line 144: | Line 161: | ||
You can set regular schedule for providers in Manage//Providers, choose necessary provider on the left and switch to “Service provider schedule” tab. <br>For example, if you work Monday-Friday 9a.m - 5p.m you simply set schedule for those dates by moving the sliders to desired positions(bright blue line will mean available time). <br>To make day of the week working/off use the switchers near days' names. | You can set regular schedule for providers in Manage//Providers, choose necessary provider on the left and switch to “Service provider schedule” tab. <br>For example, if you work Monday-Friday 9a.m - 5p.m you simply set schedule for those dates by moving the sliders to desired positions(bright blue line will mean available time). <br>To make day of the week working/off use the switchers near days' names. | ||
<br><br> | <br><br> | ||
| − | [[File: Provider schedule v3.png | center]] | + | <nomobile>[[File: Provider schedule v3.png | center]]</nomobile> |
| + | <mobileonly>[[File:M set provider schedule.png | center]]</mobileonly> | ||
<br> | <br> | ||
[[File:Provider schedule details.png | center]] | [[File:Provider schedule details.png | center]] | ||
| Line 152: | Line 170: | ||
You can set schedule for some specific date for provider in Manage//Providers, choose necessary provider on the left and switch to “Service provider schedule” tab, choose "Show advanced settings" option and then "Special days" tab. <br>For example, if you work differently on certain date or have day off, you can click on the date and set schedule by clicking on the corresponding slots to make them available (bright blue)/not available (light blue). | You can set schedule for some specific date for provider in Manage//Providers, choose necessary provider on the left and switch to “Service provider schedule” tab, choose "Show advanced settings" option and then "Special days" tab. <br>For example, if you work differently on certain date or have day off, you can click on the date and set schedule by clicking on the corresponding slots to make them available (bright blue)/not available (light blue). | ||
<br><br> | <br><br> | ||
| − | [[File:Provider special days v3.png | center]] | + | <nomobile>[[File:Provider special days v3.png | center]]</nomobile> |
| + | <mobileonly>[[File:M provider special days.png | center]]</mobileonly> | ||
<br><br> | <br><br> | ||
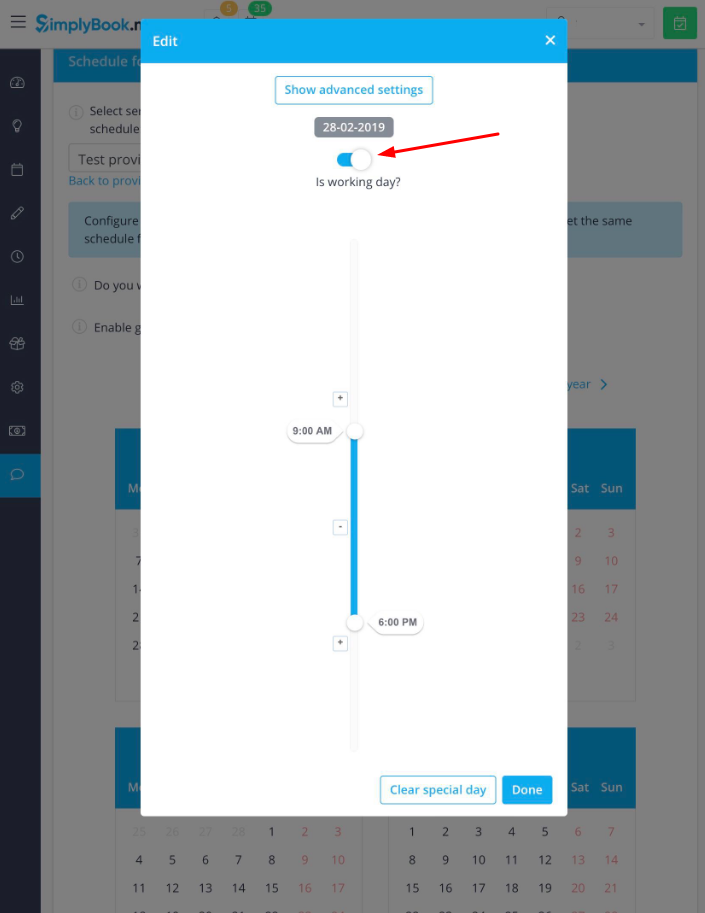
To make some date working/off-day, click on the date and use "Is working day?" switcher near the schedule that appears in pop-up. <br> | To make some date working/off-day, click on the date and use "Is working day?" switcher near the schedule that appears in pop-up. <br> | ||
| − | [[File: Special day editing.png | center]] | + | <nomobile>[[File: Special day editing.png | center]]</nomobile> |
| + | <mobileonly>[[File:M provider add special day.png | center]]</mobileonly> | ||
<br><br> | <br><br> | ||
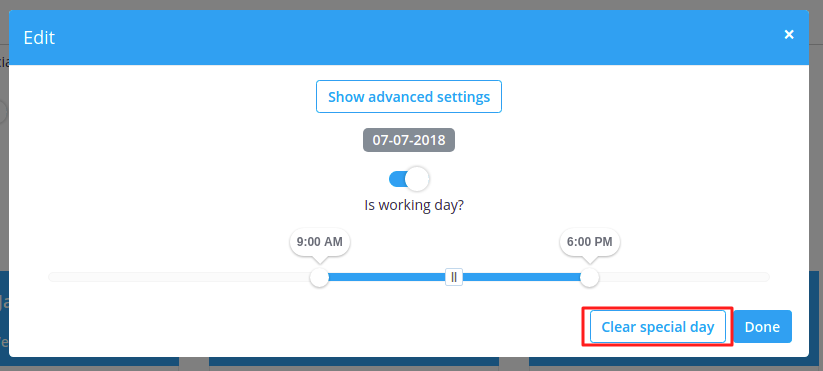
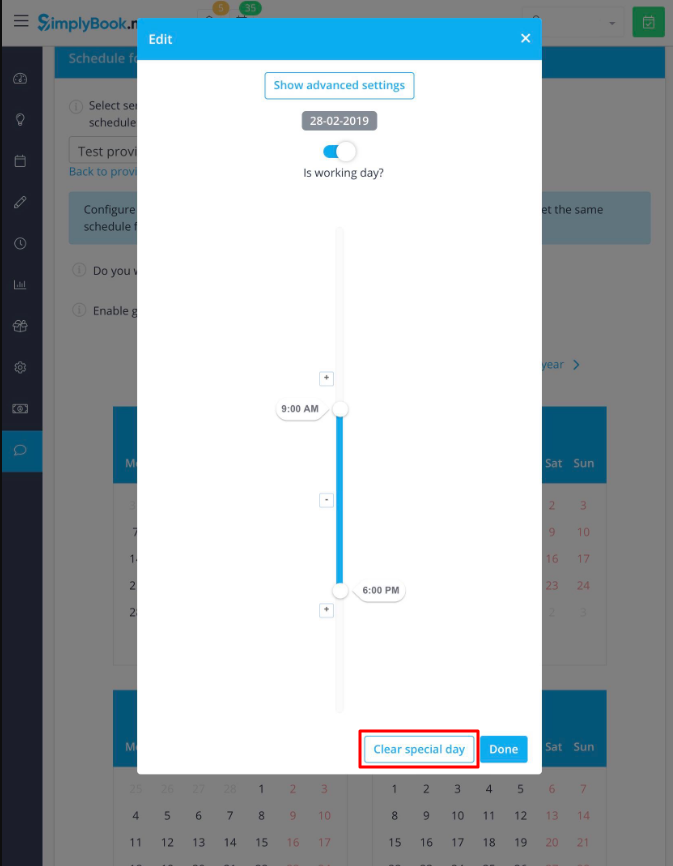
If you need to remove special day settings for some date, click on the date and press white button "clear special day". | If you need to remove special day settings for some date, click on the date and press white button "clear special day". | ||
<br><br> | <br><br> | ||
| − | [[File: Clear special day.png | center]] | + | <nomobile>[[File: Clear special day.png | center]]</nomobile> |
| + | <mobileonly>[[File:M provider clear special day.png | center]]</mobileonly> | ||
<br><br> | <br><br> | ||
===How can I sync provider’s bookings with Google or Outlook calendar=== | ===How can I sync provider’s bookings with Google or Outlook calendar=== | ||
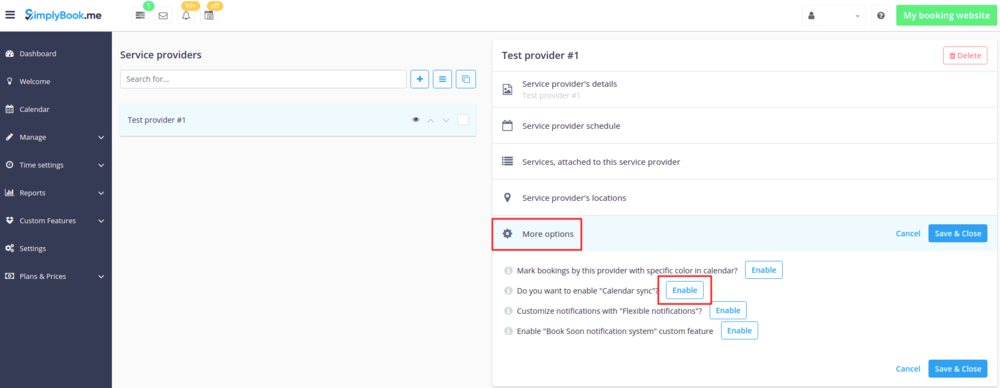
| Line 166: | Line 187: | ||
[[Custom_Features#Calendar_Sync |Here]] is more info how to use it. | [[Custom_Features#Calendar_Sync |Here]] is more info how to use it. | ||
<br><br> | <br><br> | ||
| − | [[File: Enable calendar sync.png | center]]<br> | + | <nomobile>[[File: Enable calendar sync.png | center]]</nomobile> |
| − | [[File:Calendar sync setup path.png | center]]<br> | + | <mobileonly>[[File:M enable calendar sync from provider page.png | center]]</mobileonly><br> |
| + | <nomobile>[[File:Calendar sync setup path.png | center]]</nomobile> | ||
| + | <mobileonly>[[File:M provider calendar sync option.png | center]]</mobileonly> | ||
| + | <br> | ||
<br><br> | <br><br> | ||
===What if my providers work on different locations=== | ===What if my providers work on different locations=== | ||
| Line 173: | Line 197: | ||
You can enable [[Custom_Features#Multiple_Locations | “Multiple Locations” Custom Feature]] in Manage//Providers//Service provider's locations tab, then click on “+” to create new location and choose “Add location" option, set location name, description, its position on the booking page and specify address if necessary. <br>Save settings. | You can enable [[Custom_Features#Multiple_Locations | “Multiple Locations” Custom Feature]] in Manage//Providers//Service provider's locations tab, then click on “+” to create new location and choose “Add location" option, set location name, description, its position on the booking page and specify address if necessary. <br>Save settings. | ||
<br><br> | <br><br> | ||
| − | [[File:Enable locations.png | center]]<br> | + | <nomobile>[[File:Enable locations.png | center]]</nomobile> |
| − | [[File:Create new location.png | center]]<br> | + | <mobileonly>[[File:M enable locations from provider page.png | center]]</mobileonly> |
| − | [[File:Creating location.png | center]] | + | <br> |
| + | <nomobile>[[File:Create new location.png | center]]</nomobile> | ||
| + | <mobileonly>[[File:M create locations from provider page.png | center]]</mobileonly> | ||
| + | <br> | ||
| + | <nomobile>[[File:Creating location.png | center]]</nomobile> | ||
| + | <mobileonly>[[File:M add locationdetails.png | center]]</mobileonly> | ||
<br><br> | <br><br> | ||
Switch to “Location providers” tab to attach providers to this location by checking corresponding boxes. Save settings. | Switch to “Location providers” tab to attach providers to this location by checking corresponding boxes. Save settings. | ||
<br><br> | <br><br> | ||
| − | [[File: Attach providers to location v3.png | center]] | + | <nomobile>[[File: Attach providers to location v3.png | center]]</nomobile> |
| + | <mobileonly>[[File:M attach providers to location.png | center]]</mobileonly> | ||
<br><br> | <br><br> | ||
===What can I set with “More options” tab=== | ===What can I set with “More options” tab=== | ||
| Line 185: | Line 215: | ||
You can set there a specific color for provider’s bookings in Calendar with [[Custom_Features#Provider.27s_Color_Coding | Providers Color Coding Custom Feature]]. | You can set there a specific color for provider’s bookings in Calendar with [[Custom_Features#Provider.27s_Color_Coding | Providers Color Coding Custom Feature]]. | ||
<br><br> | <br><br> | ||
| − | [[File:More options - provider color coding.png | center]] | + | <nomobile>[[File:More options - provider color coding.png | center]]</nomobile> |
| + | <mobileonly>[[File:M more options-provider color coding.png | center]]</mobileonly> | ||
<br><br> | <br><br> | ||
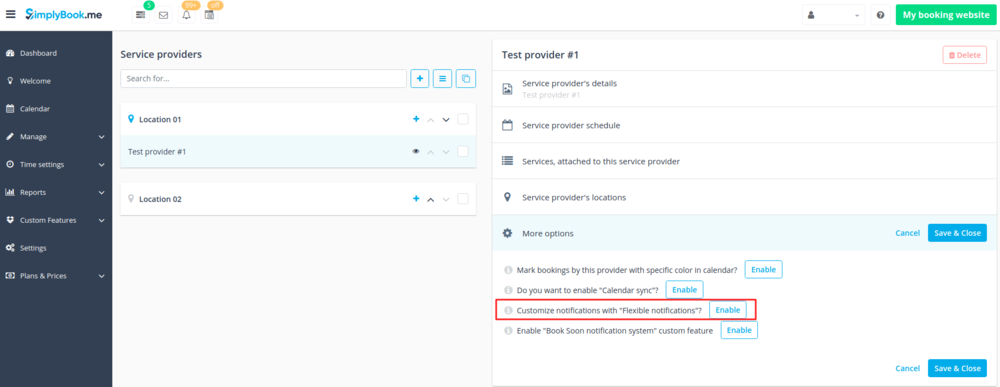
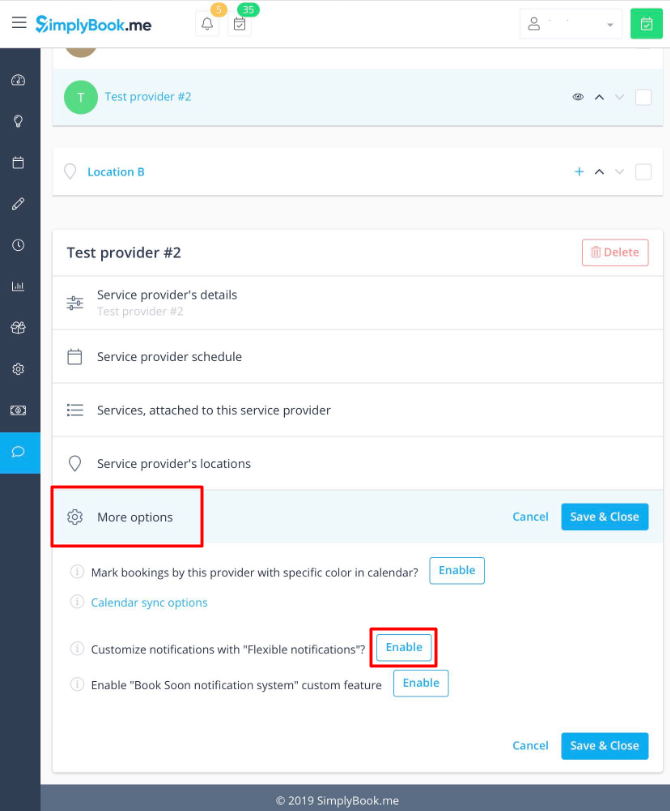
Set specific notifications related to this provider bookings with [[Custom_Features#Flexible_Notifications | Flexible Notifications Custom Feature]]. | Set specific notifications related to this provider bookings with [[Custom_Features#Flexible_Notifications | Flexible Notifications Custom Feature]]. | ||
<br><br> | <br><br> | ||
| − | [[File:More options- flex notifications.png | center]] | + | <nomobile>[[File:More options- flex notifications.png | center]]</nomobile> |
| + | <mobileonly>[[File:M more options-flexible notifications.png | center]]</mobileonly> | ||
<br><br> | <br><br> | ||
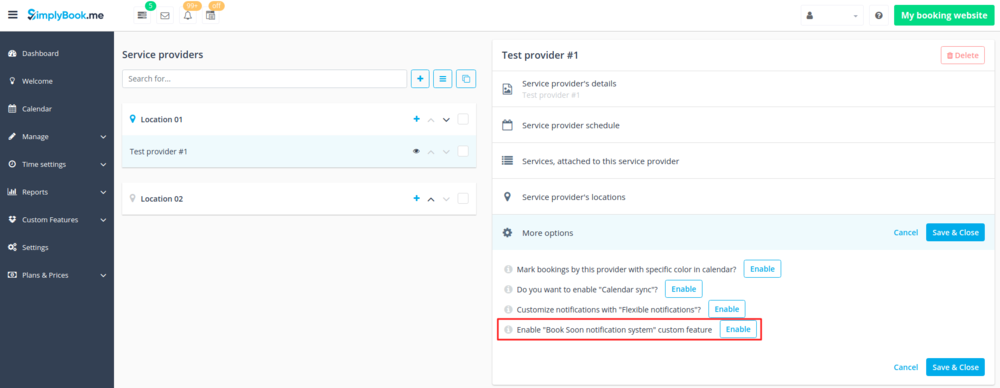
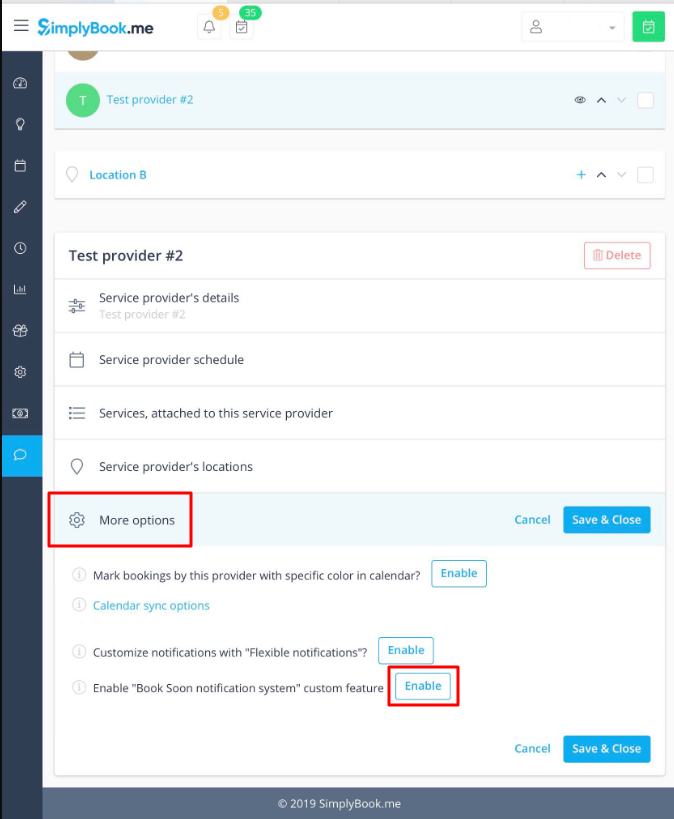
Or set reminders to book again to your clients with [[Custom_Features#Book_Soon_Notification_System | Book Soon Custom Feature]]. | Or set reminders to book again to your clients with [[Custom_Features#Book_Soon_Notification_System | Book Soon Custom Feature]]. | ||
<br><br> | <br><br> | ||
| − | [[File:More options - book soon.png | center]] | + | <nomobile>[[File:More options - book soon.png | center]]</nomobile> |
| + | <mobileonly>[[File:M more options-book soon.png | center]]</mobileonly> | ||
<br><br> | <br><br> | ||
| Line 218: | Line 251: | ||
It is regular schedule you have on a weekly basis. If you are the only provider, you can set it in Time Settings // Company opening hours. If you have several providers, you can set their regular schedule in Manage//Providers, choose necessary provider on the left and switch to “Service provider schedule” tab or in Time settings // Provider schedule. For example, if you work Monday-Friday 9a.m - 5p.m you simply set schedule for those dates by clicking on the corresponding slots. To make day of the week working/off use switcher near weekday names. | It is regular schedule you have on a weekly basis. If you are the only provider, you can set it in Time Settings // Company opening hours. If you have several providers, you can set their regular schedule in Manage//Providers, choose necessary provider on the left and switch to “Service provider schedule” tab or in Time settings // Provider schedule. For example, if you work Monday-Friday 9a.m - 5p.m you simply set schedule for those dates by clicking on the corresponding slots. To make day of the week working/off use switcher near weekday names. | ||
<br><br> | <br><br> | ||
| − | [[File:Company week schedule.png | center]] | + | <nomobile>[[File:Company week schedule.png | center]]</nomobile> |
| + | <mobileonly>[[File:M company weekly schedule.png | center]]</mobileonly> | ||
<br><br> | <br><br> | ||
| Line 225: | Line 259: | ||
Contrary to Opening hours, which is regular schedule, Special Days is schedule by date. If you do not have regular schedule or plan one-time event, you can use Special days to open/close only specific dates. To set specific schedule for company (Time settings // Company special days) or provider (Manage//Providers, choose necessary provider on the left and switch to “Service provider's special days” tab or Time settings // Provider special days) click on the date and insert the schedule you need or make it a day off. This feature can be used if you plan to open in a months and want to prevent bookings until then (make all days off before the opening date) or to insert national holidays in your schedule. Special days of the company are highlighted with yellow, providers' and services’ special days are highlighted with red. | Contrary to Opening hours, which is regular schedule, Special Days is schedule by date. If you do not have regular schedule or plan one-time event, you can use Special days to open/close only specific dates. To set specific schedule for company (Time settings // Company special days) or provider (Manage//Providers, choose necessary provider on the left and switch to “Service provider's special days” tab or Time settings // Provider special days) click on the date and insert the schedule you need or make it a day off. This feature can be used if you plan to open in a months and want to prevent bookings until then (make all days off before the opening date) or to insert national holidays in your schedule. Special days of the company are highlighted with yellow, providers' and services’ special days are highlighted with red. | ||
<br><br> | <br><br> | ||
| − | [[File:Special days view.png | center]] | + | <nomobile>[[File:Special days view.png | center]]</nomobile> |
| + | <mobileonly>[[File:M company special days.png | center]]</mobileonly> | ||
<br><br> | <br><br> | ||
''Note!'' Providers'/Services' working hours should be within opening hours of the company! If you can't open specific times for provider/service, please open those times for the company first and then for provider/service. | ''Note!'' Providers'/Services' working hours should be within opening hours of the company! If you can't open specific times for provider/service, please open those times for the company first and then for provider/service. | ||
<br><br> | <br><br> | ||
Revision as of 11:29, 14 February 2019
Adding services
How to create a service
- See video tutorial here
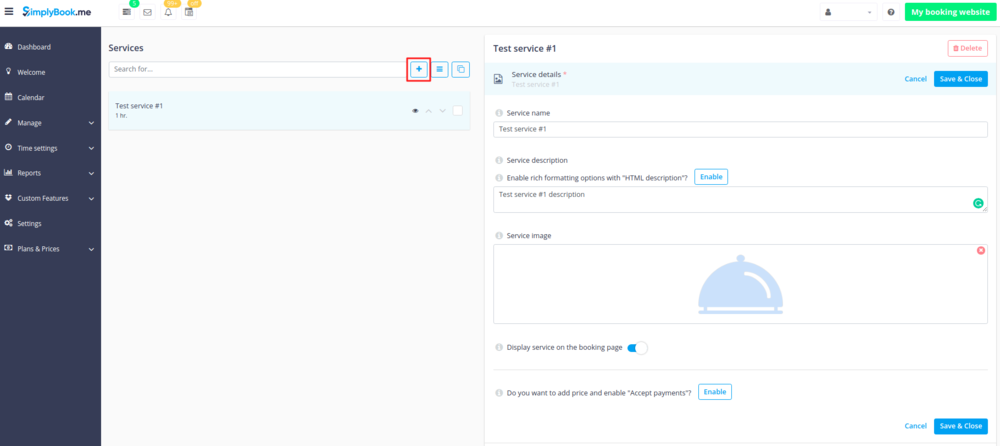
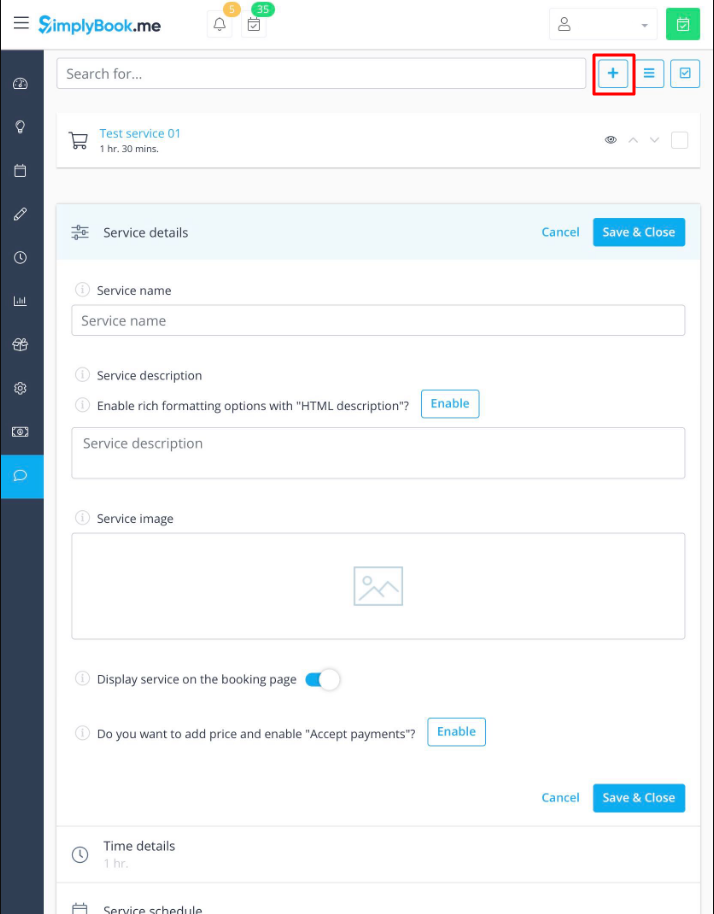
In Manage//Services press "+" icon.
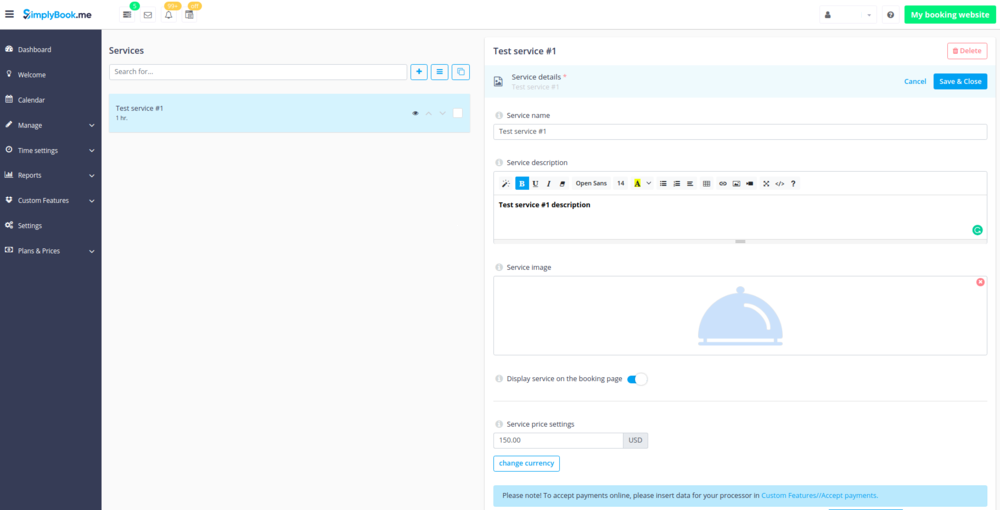
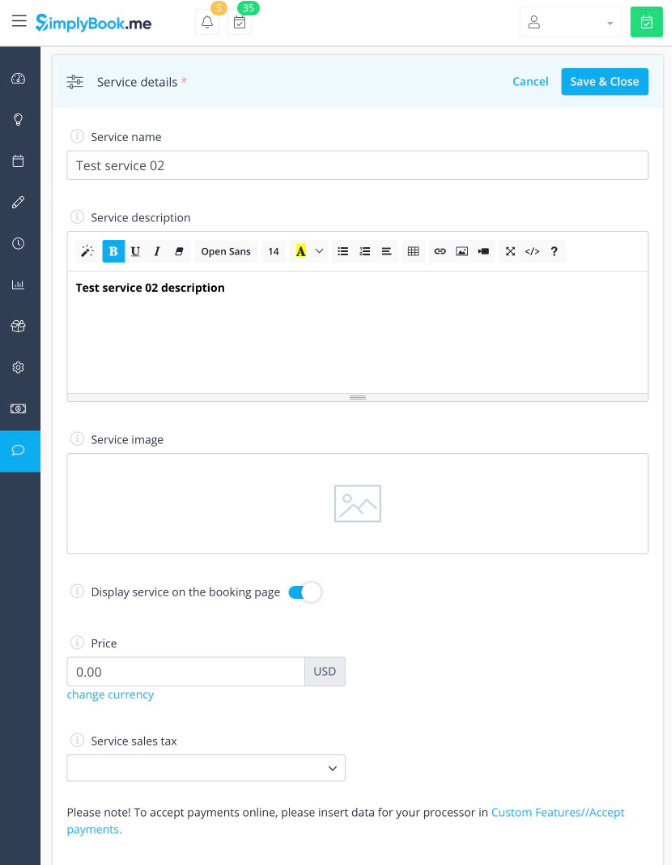
In right-side menu insert the name of your service and add service description.
It is possible to use HTML formatting for service description to change the font, its color, etc.
You can also upload picture of a service, and activate prices to accept payments on-line.
How to set service duration
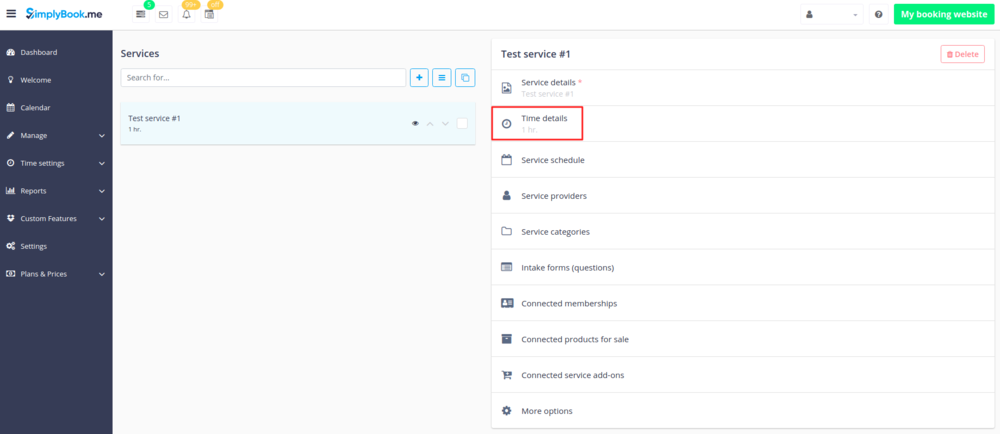
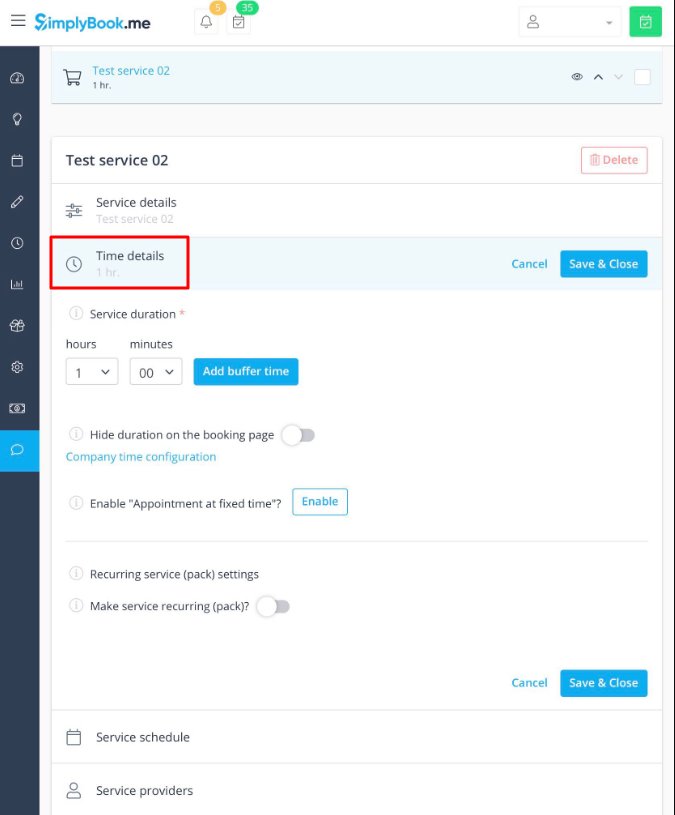
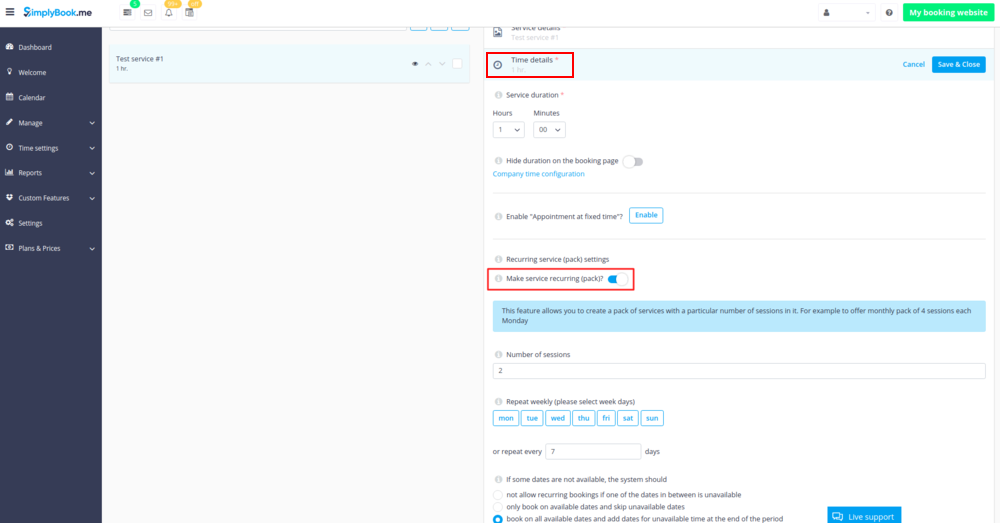
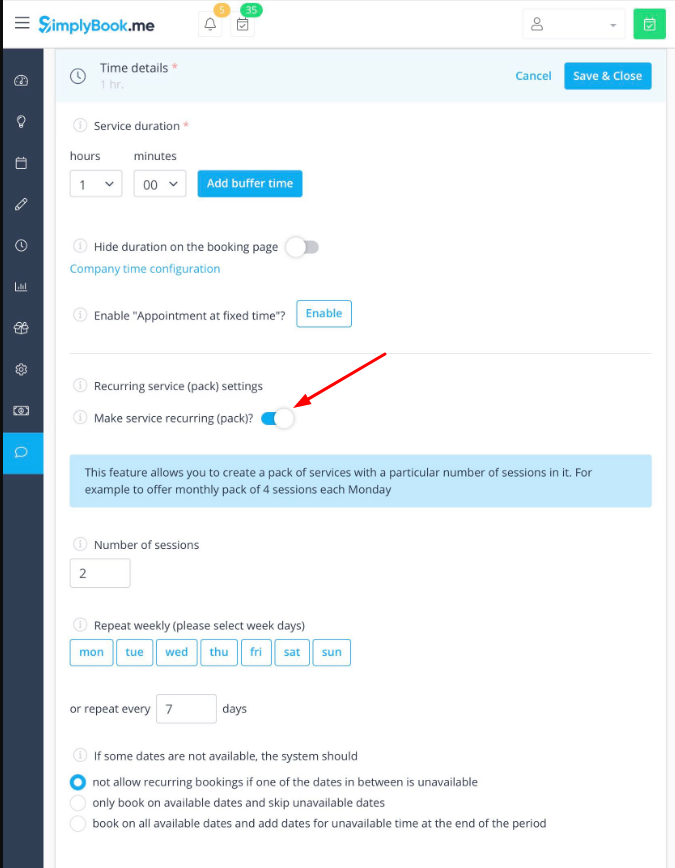
In Manage//Services in right-side menu choose “Time details” tab to set duration for your service.
It is possible to set service as recurring here.
As well you can set fixed starting times for your service. Please check more about Appointment at Fixed Time Custom Feature here.
How to set specific schedule for service
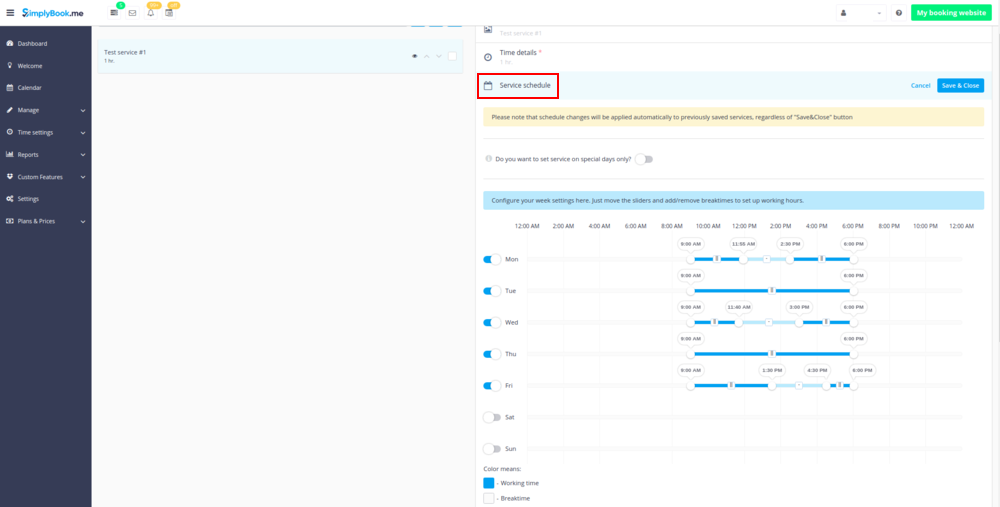
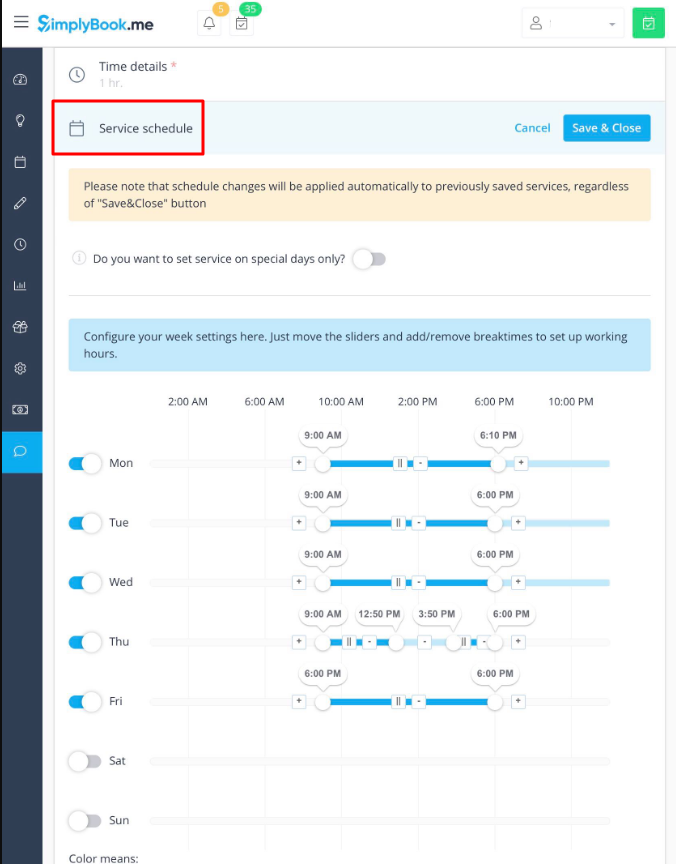
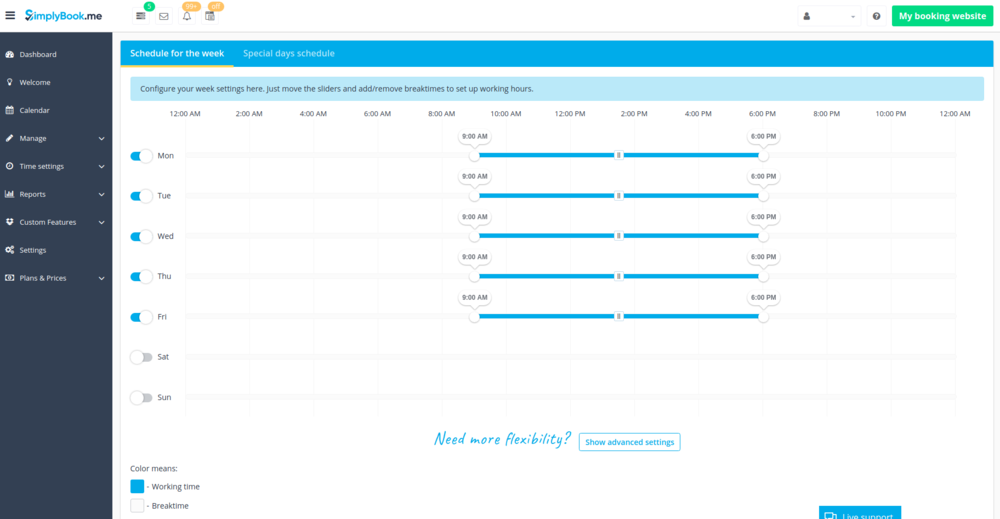
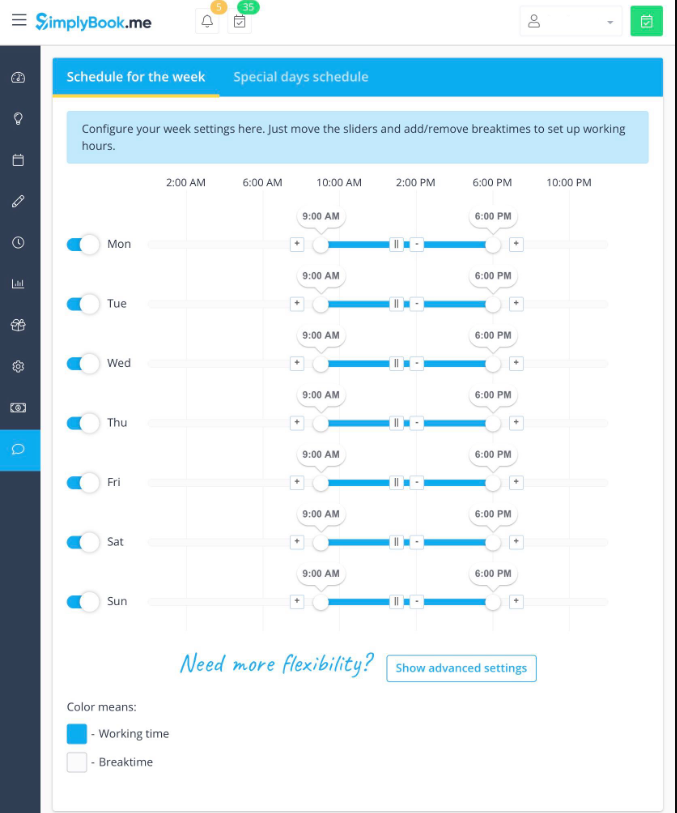
In Manage//Services//Service schedule tab move the sliders to set
open times for this service if it differs from usual company schedule.
Or click on "Show advanced settings" if using the slots view is more convenient for you.
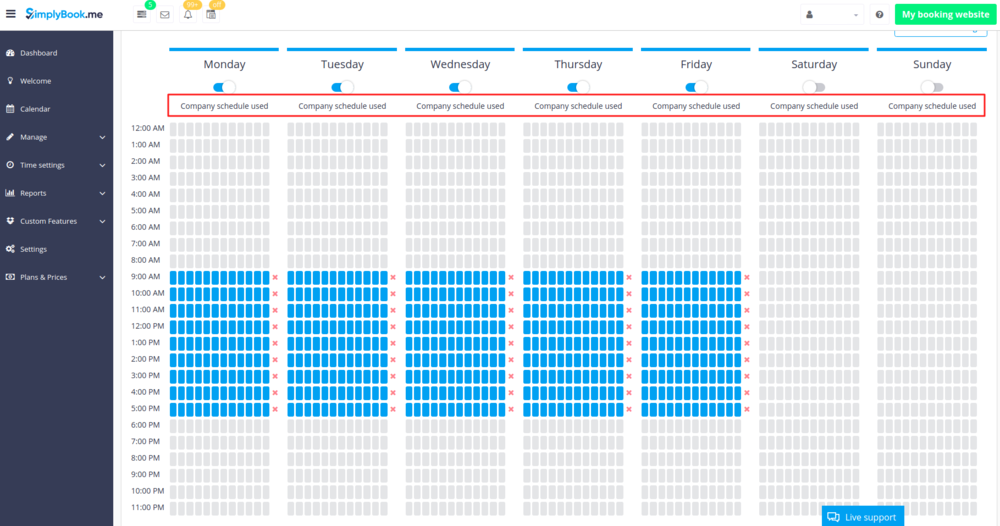
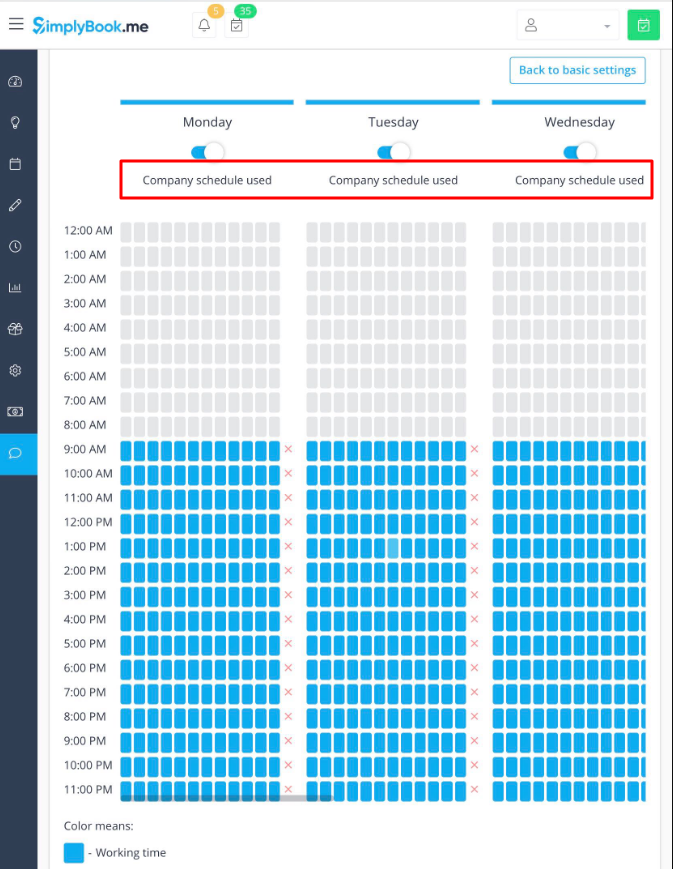
If the service has the same schedule as company you do not have to change anything there, it will be applied automatically.
You will be able to check it on "Advanced schedule" section.
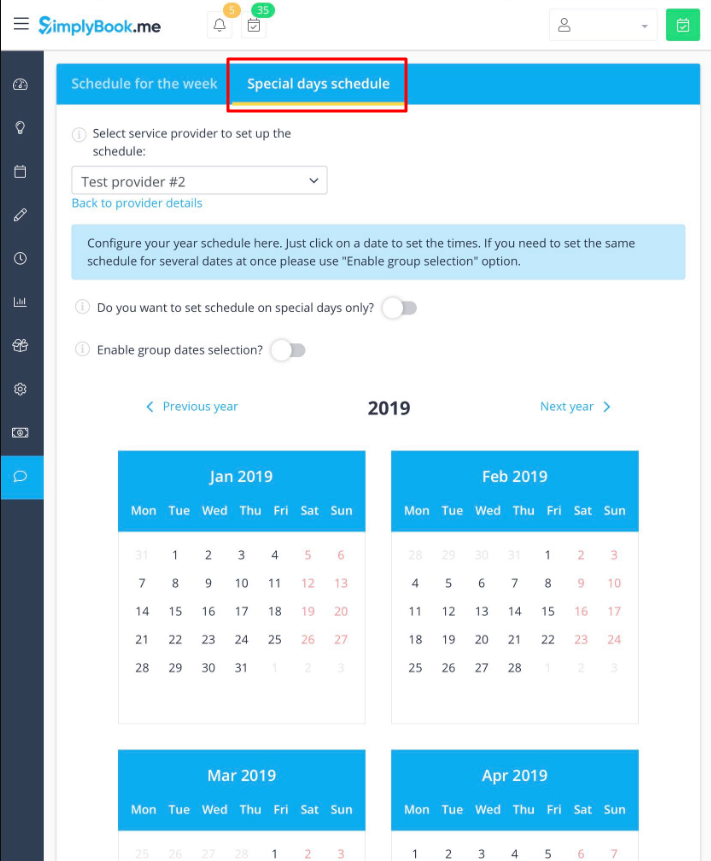
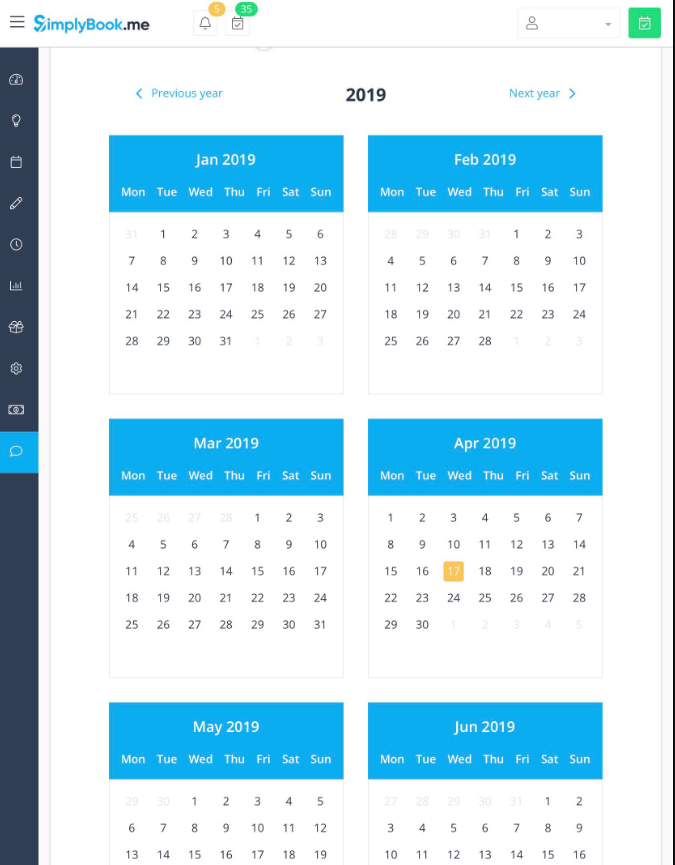
If you need to set some exceptions in service schedule for holidays or other needs please choose “Special days” tab there and set times for desired dates.
How to set service as one-time event
In Manage//Services press "+" icon, insert name of your service and set description. Save settings.
Switch to “Service schedule” tab, and enable the option "Do you want to set service on special days only?"
and use the calendar, click on the dates that you want to open and set the schedule for these dates by moving the sliders(bright blue zone is open time).
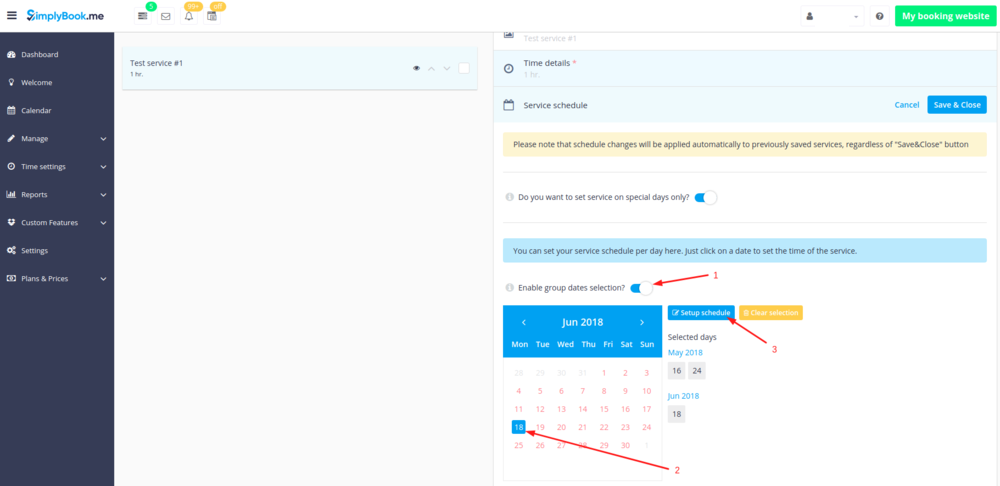
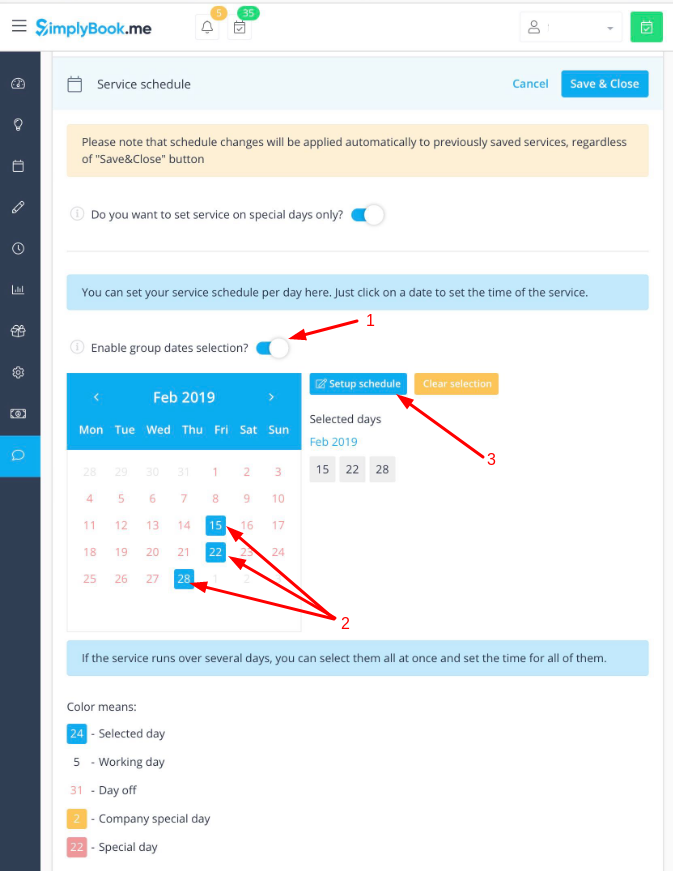
If you need to select several dates at once please switch on "Enable group dates selection?", select the dates to edit and click on "Setup schedule" to set the times.
What if I need to group my services in categories
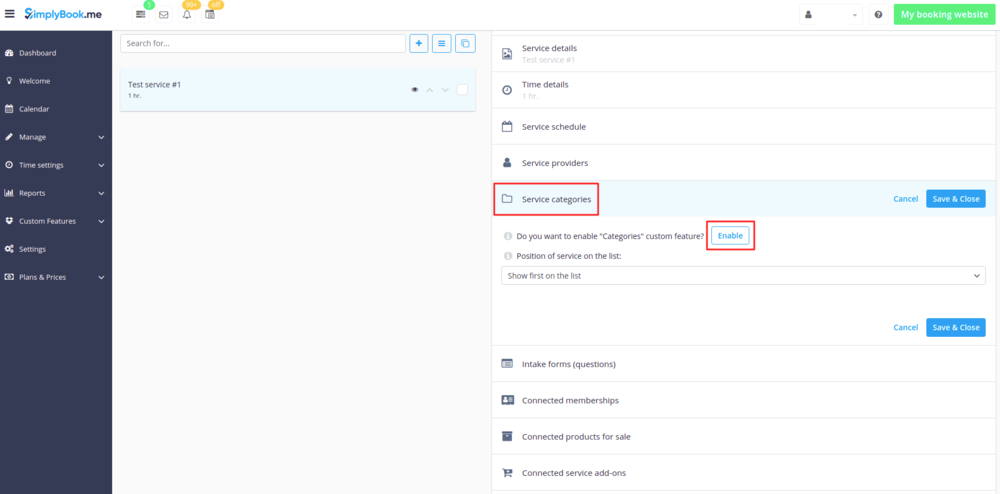
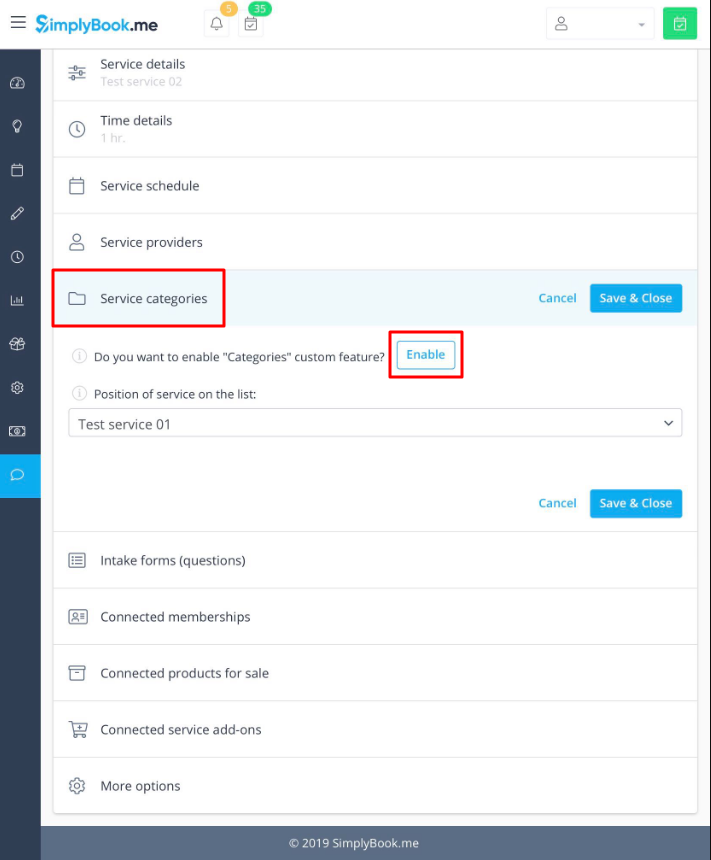
In Manage//Services switch to “Service categories” tab and enable “Service Categories” Custom Feature.
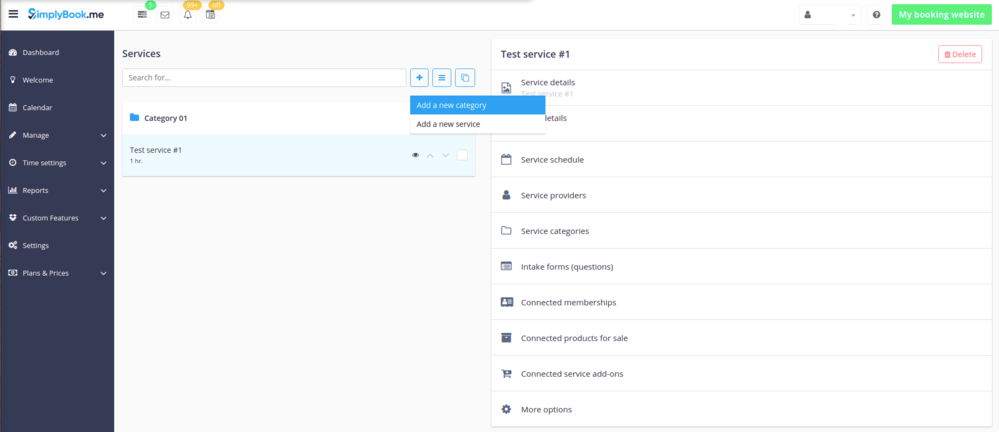
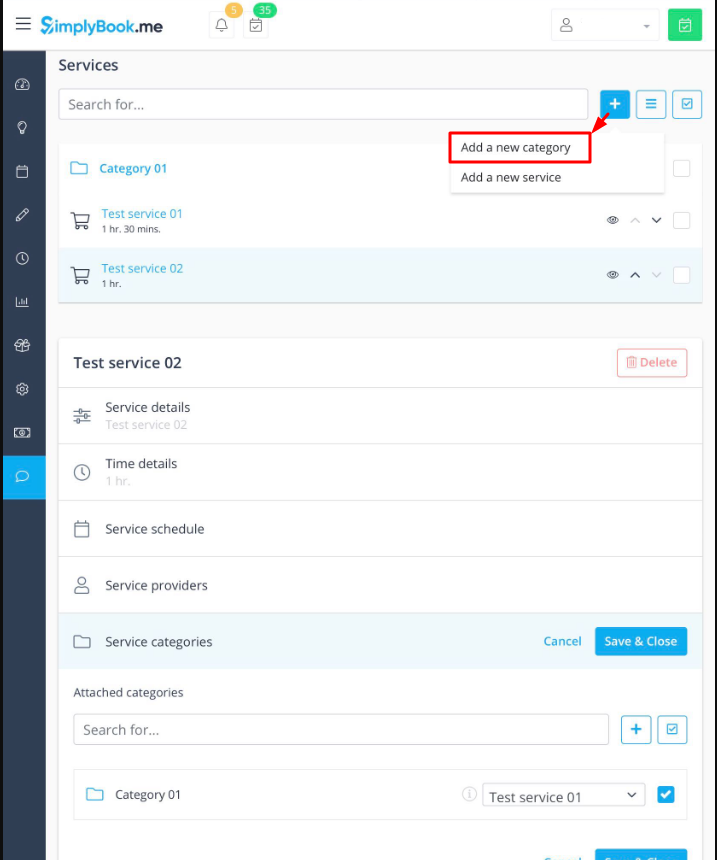
To create a category click on “+” and choose “Add category” option there, set category name, description, add picture if necessary and set its position on the booking page.
Save settings.
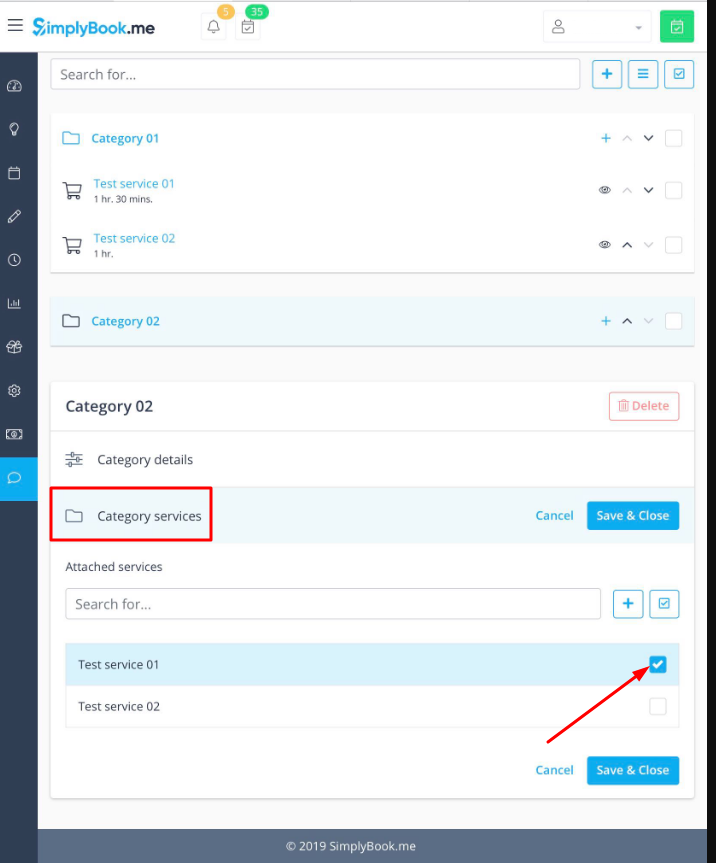
Switch to “Category services” tab to attach services to this category”.
What if I need to require some additional information from my clients at checkout
You can use Intake Forms Custom Feature.
To enable it please switch to “Intake forms (questions)” tab and click on gray button.
After it is activated click on “+” button to be redirected to page where you will be able to create necessary questions.
How to limit bookings per service
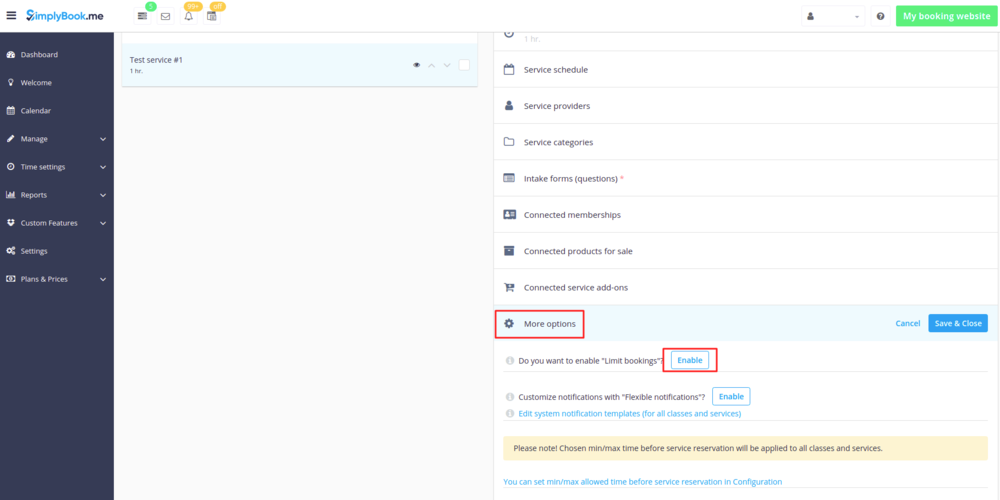
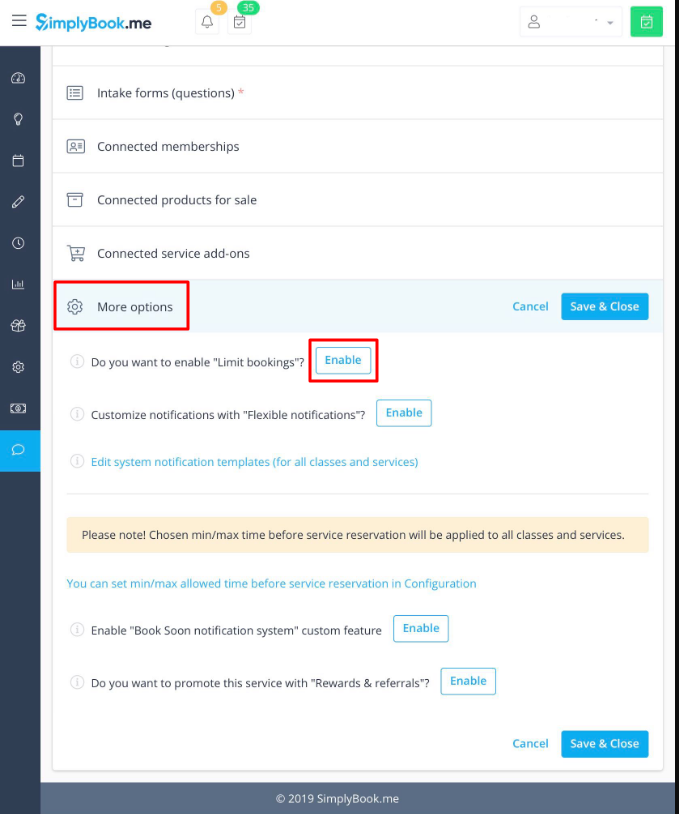
In Manage//Services switch to “More options” tab to enable “Limit bookings” Custom Feature.
Then put a limit for this service in corresponding box. Save settings.
If you need to limit booking for the whole system please put desired limit in Custom features//Limit bookings//Settings.
How to set specific notifications per service
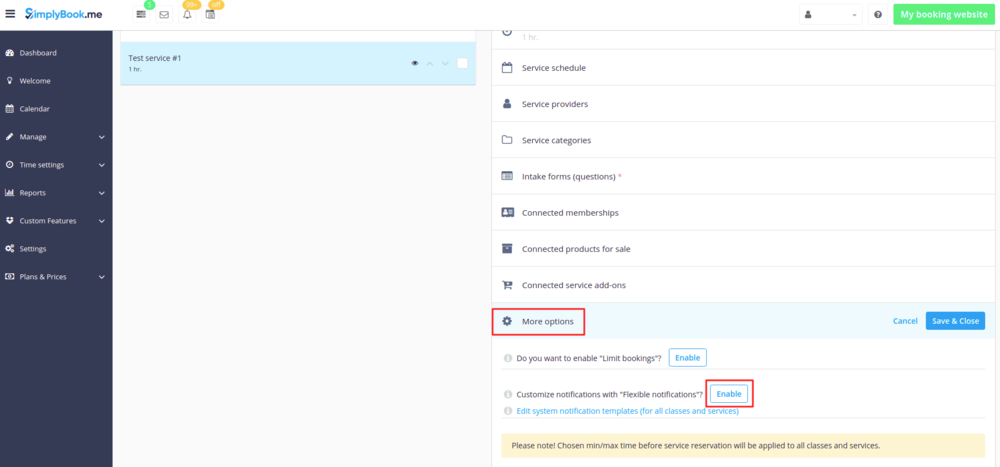
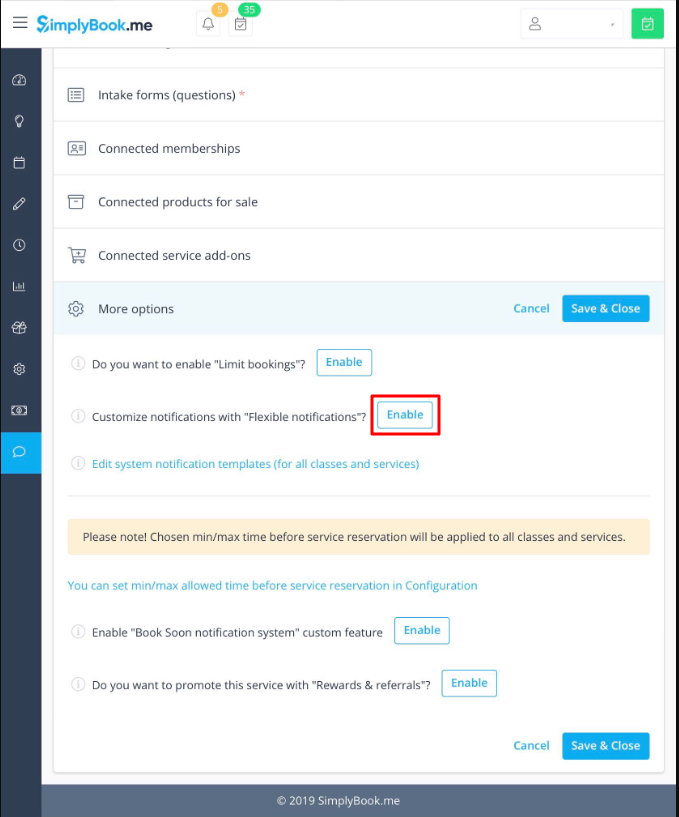
In Manage//Services switch to “More options” tab to enable “Flexible notifications” Custom Feature and create necessary templates.
How can I promote my service
In Manage//Services switch to “More options” tab to enable “Rewards and Referrals” Custom Feature and create promotions to reward your clients.
What else can I set with “More options” tab
You can use it to get to general notifications settings, settings related to system maximum and minimum allowed time before service reservation and set reminders for your clients to book again with Book Soon Custom Feature.
Adding Providers
How to add a provider
- See video tutorial here
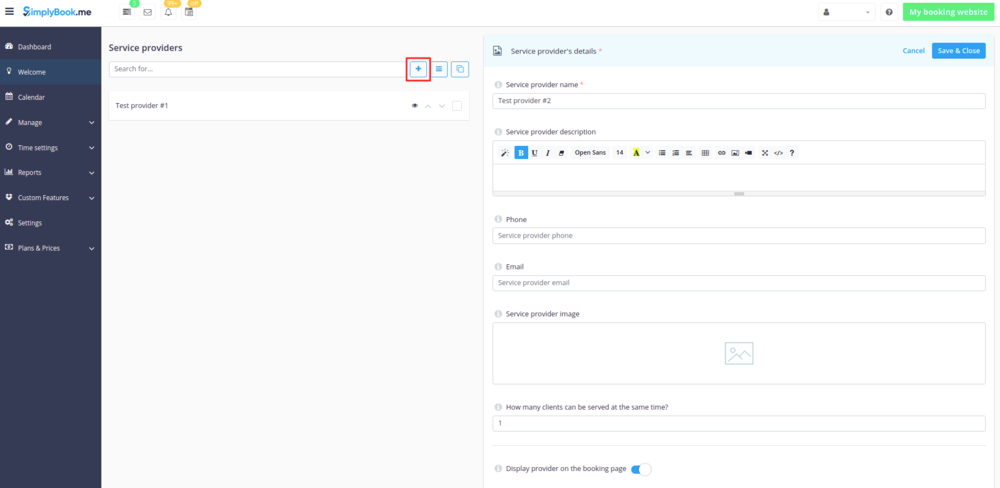
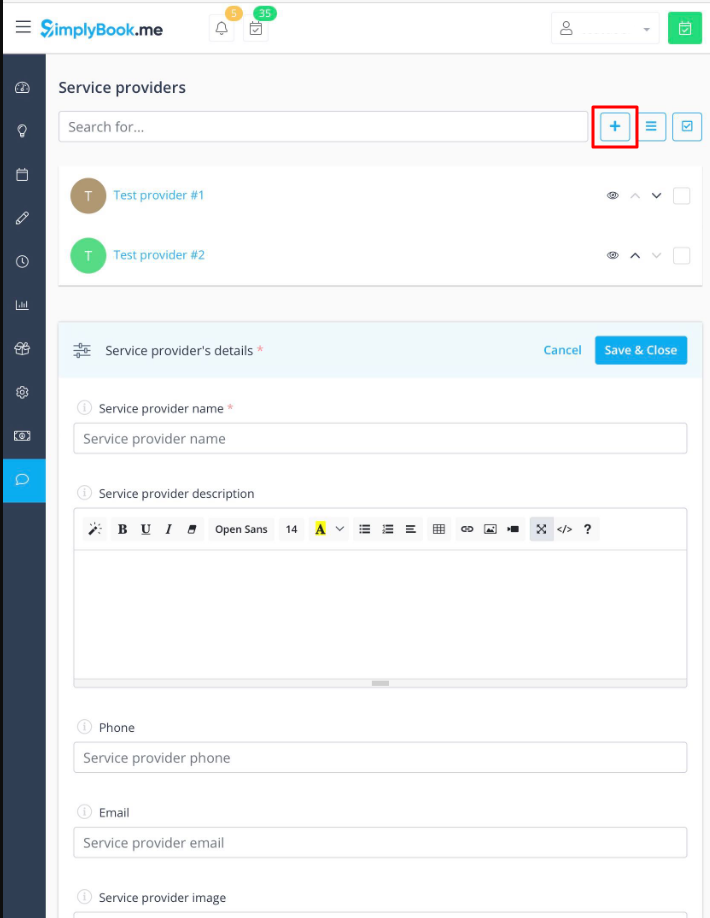
In Manage//Providers press +" icon.
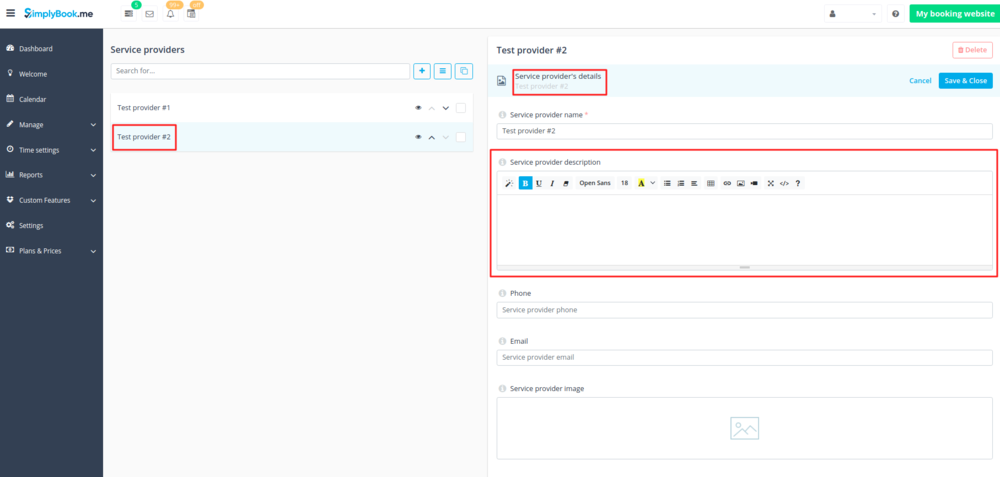
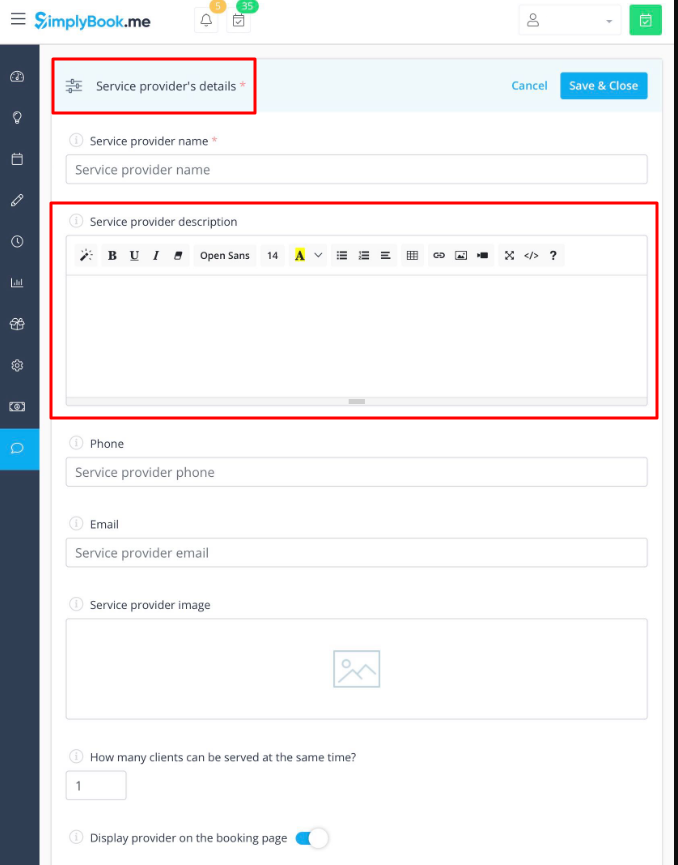
In right-side menu insert the name insert the name of your service provider, set number of clients he/she can serve at a time and write service provider description.
You can also upload picture and set his/her phone number and email address if necessary.
Save settings.
How to attach services to provider
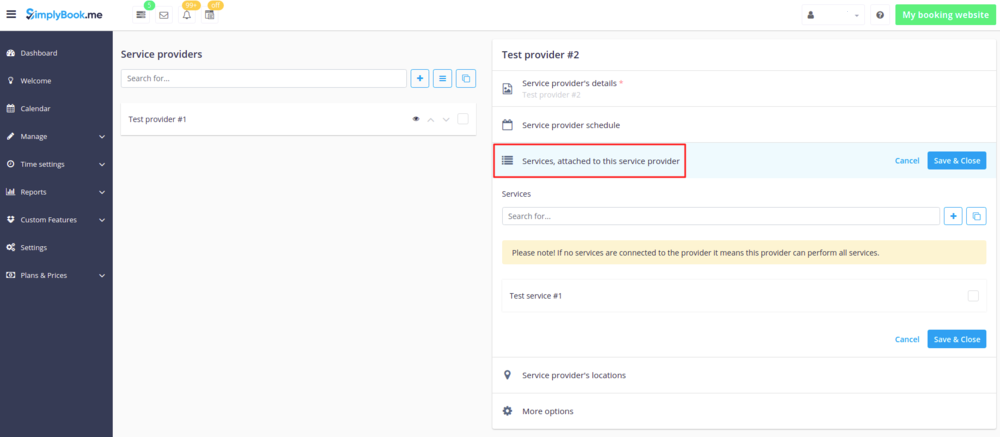
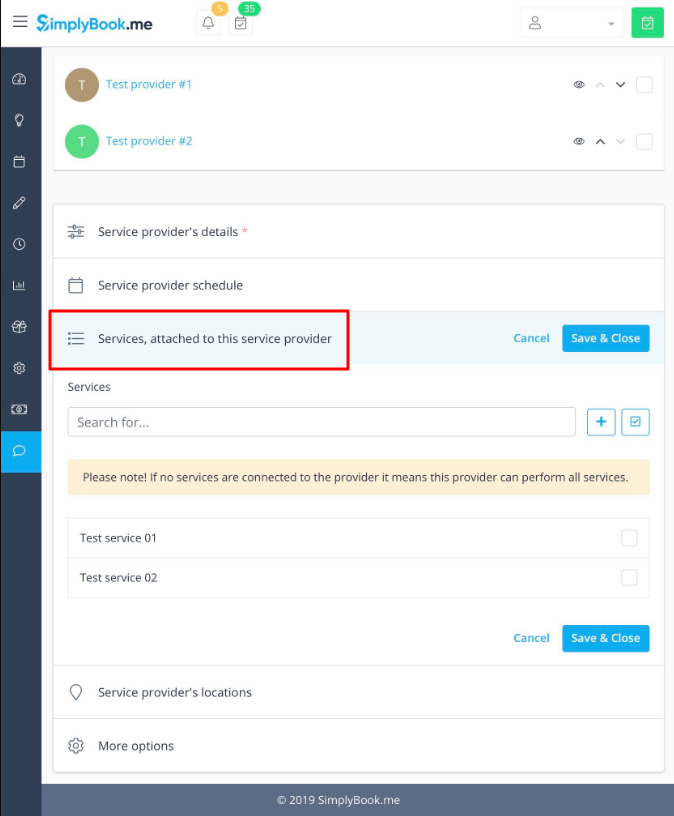
In Manage//Providers switch to “Services, attached to this service provider” tab and check the boxes with services this provider will perform.
Save settings.
How to set schedule for provider
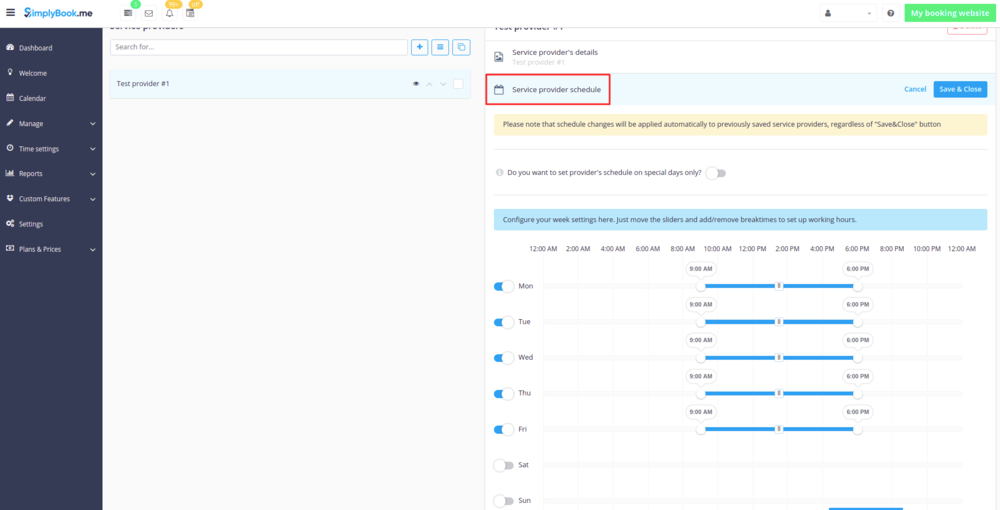
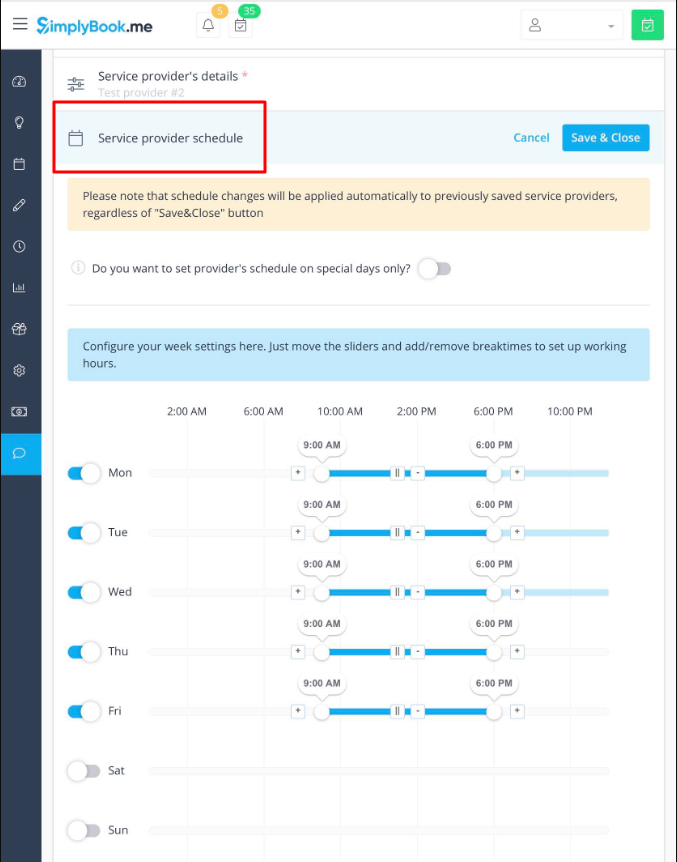
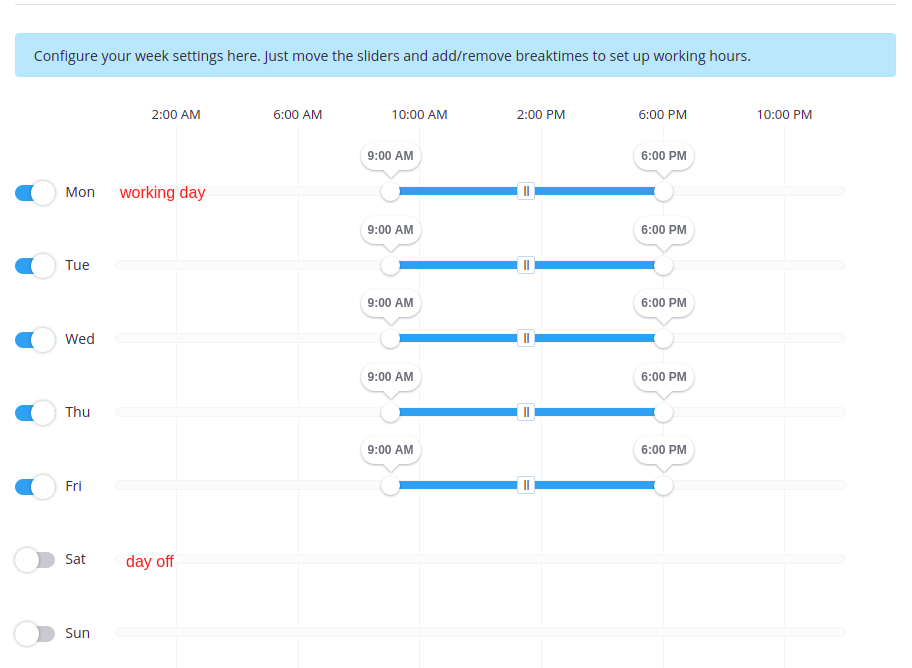
You can set regular schedule for providers in Manage//Providers, choose necessary provider on the left and switch to “Service provider schedule” tab.
For example, if you work Monday-Friday 9a.m - 5p.m you simply set schedule for those dates by moving the sliders to desired positions(bright blue line will mean available time).
To make day of the week working/off use the switchers near days' names.
How to set schedule for holidays and other specific dates
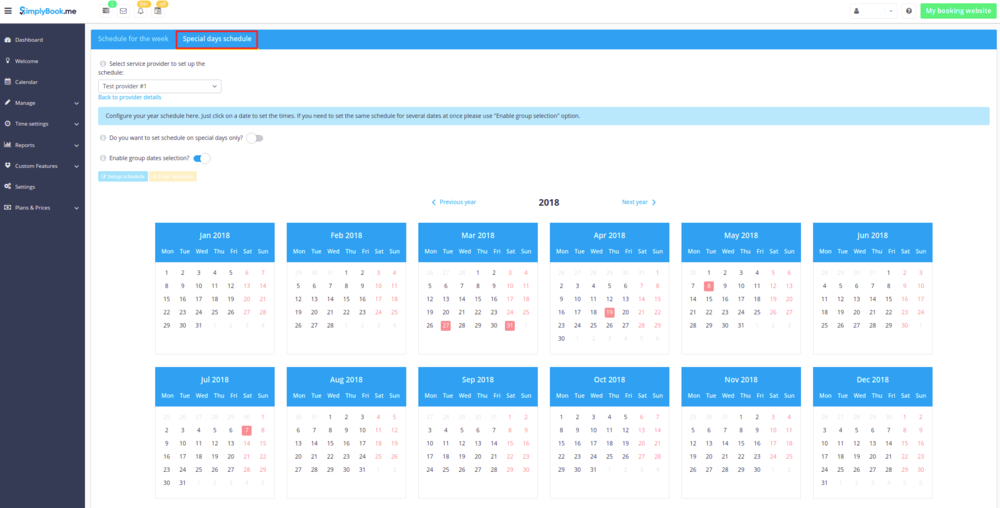
You can set schedule for some specific date for provider in Manage//Providers, choose necessary provider on the left and switch to “Service provider schedule” tab, choose "Show advanced settings" option and then "Special days" tab.
For example, if you work differently on certain date or have day off, you can click on the date and set schedule by clicking on the corresponding slots to make them available (bright blue)/not available (light blue).
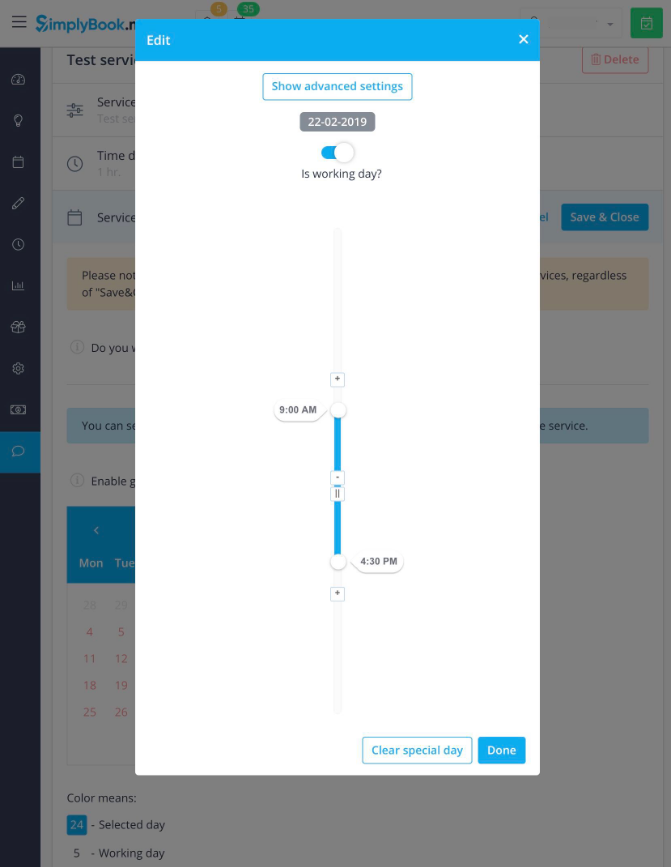
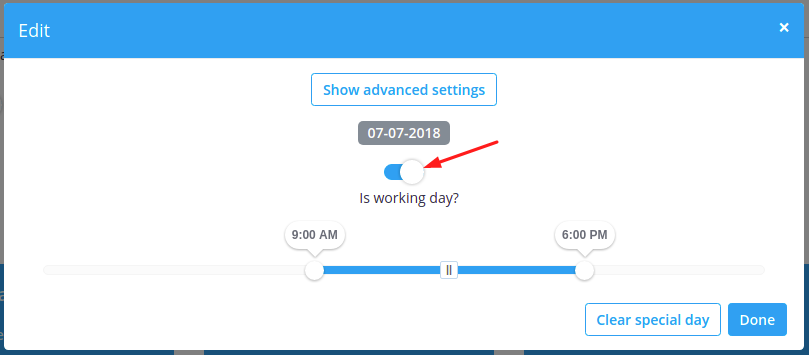
To make some date working/off-day, click on the date and use "Is working day?" switcher near the schedule that appears in pop-up.
If you need to remove special day settings for some date, click on the date and press white button "clear special day".
How can I sync provider’s bookings with Google or Outlook calendar
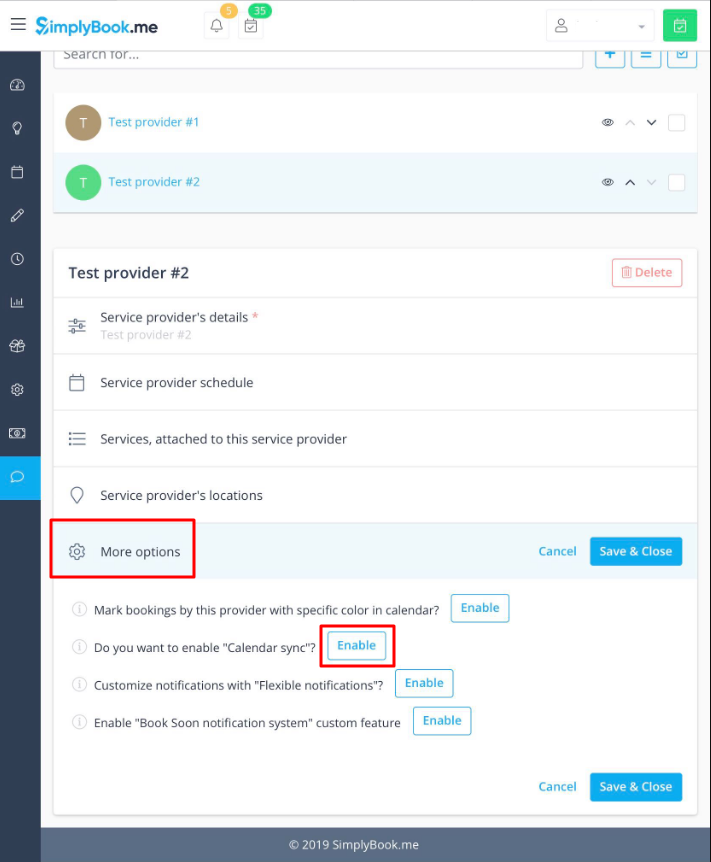
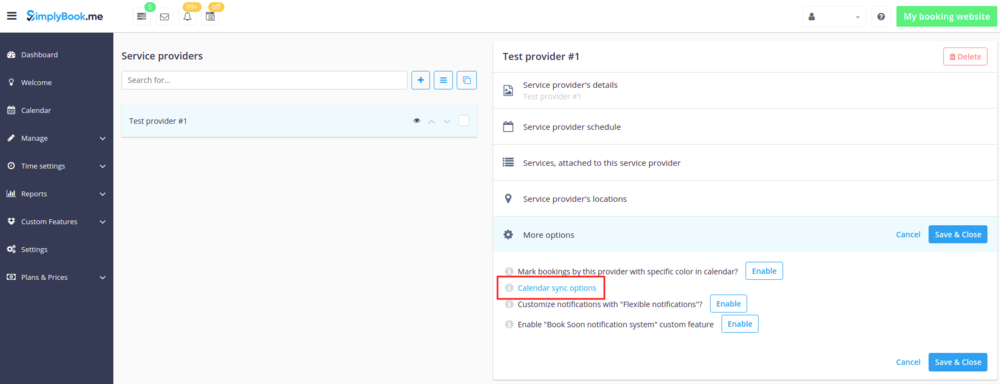
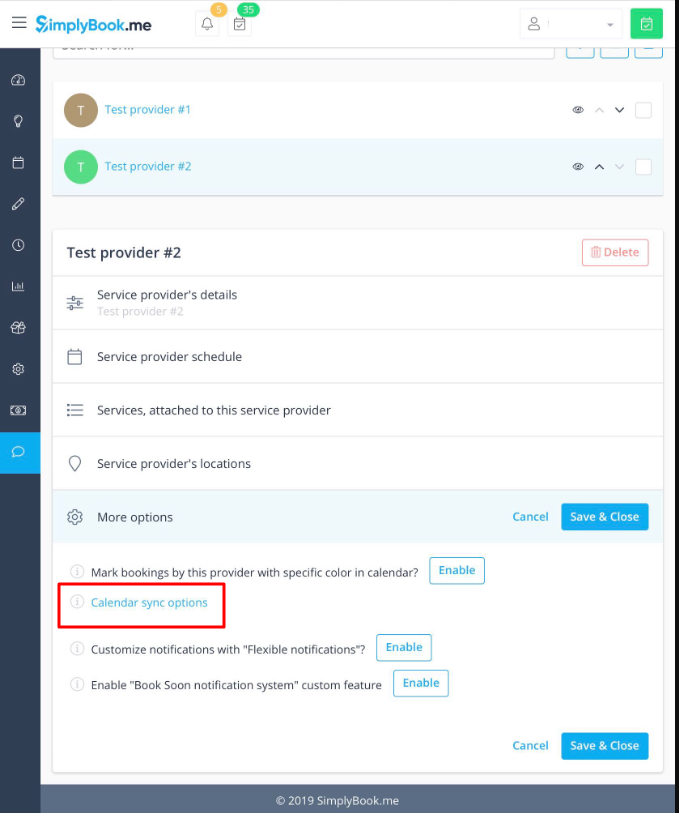
You can enable Calendar Sync Custom Feature in Manage//Providers//More options and click on “Calendar sync options” button to connect calendar.
Here is more info how to use it.
What if my providers work on different locations
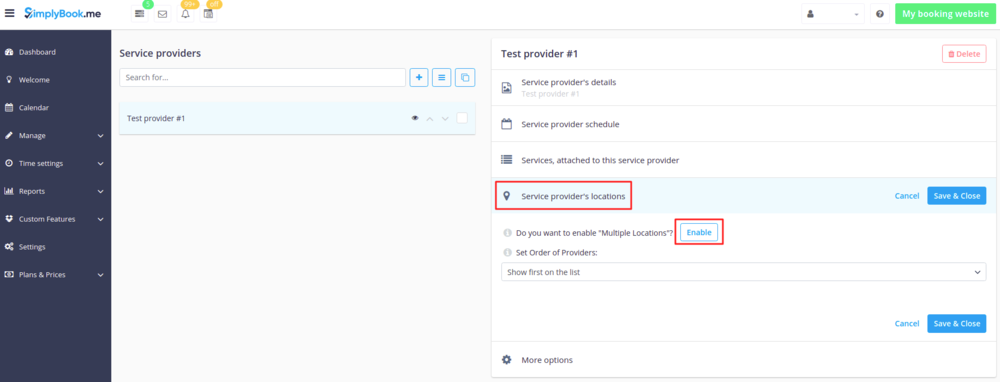
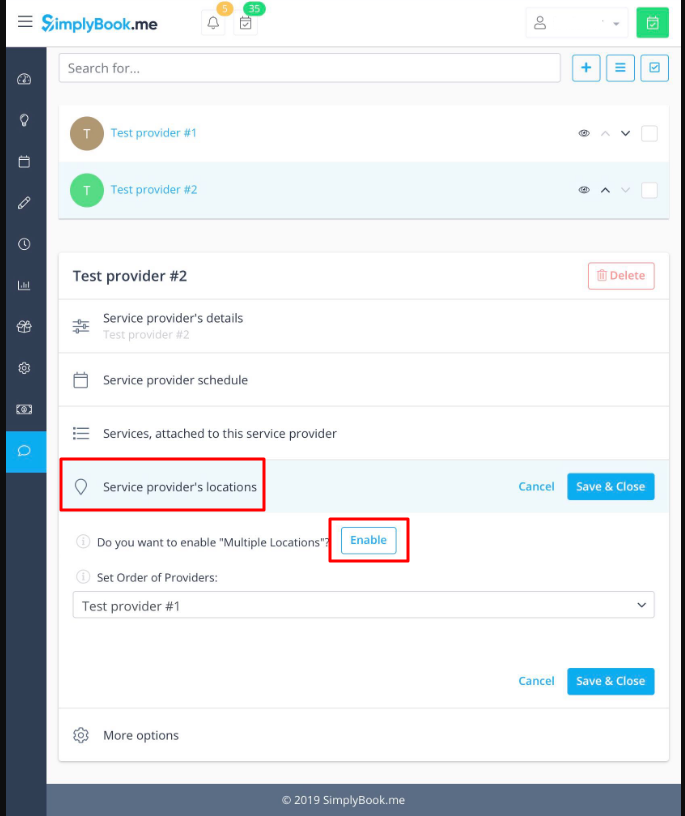
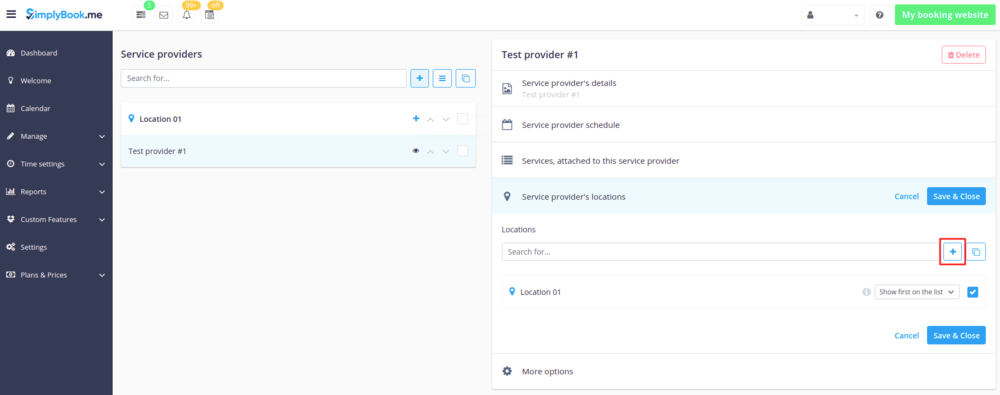
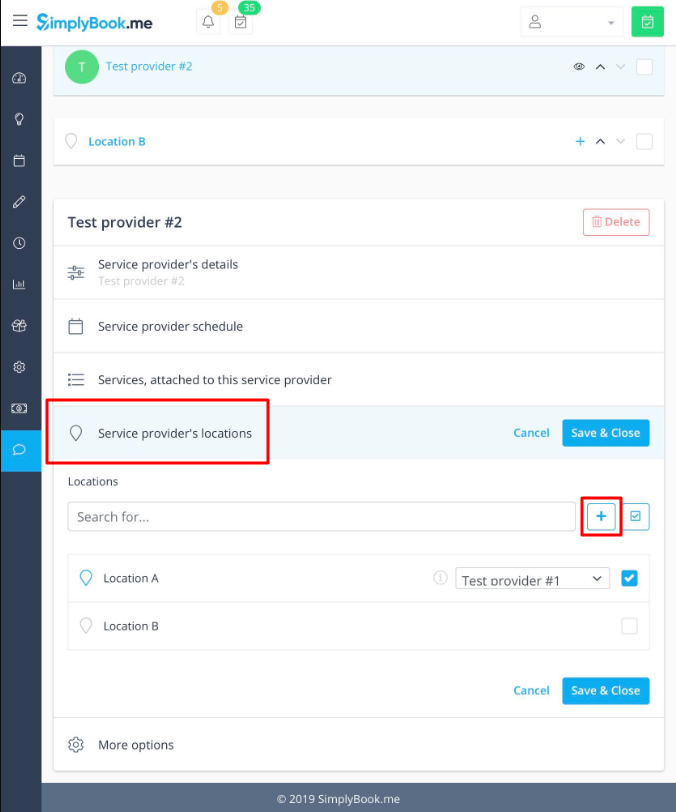
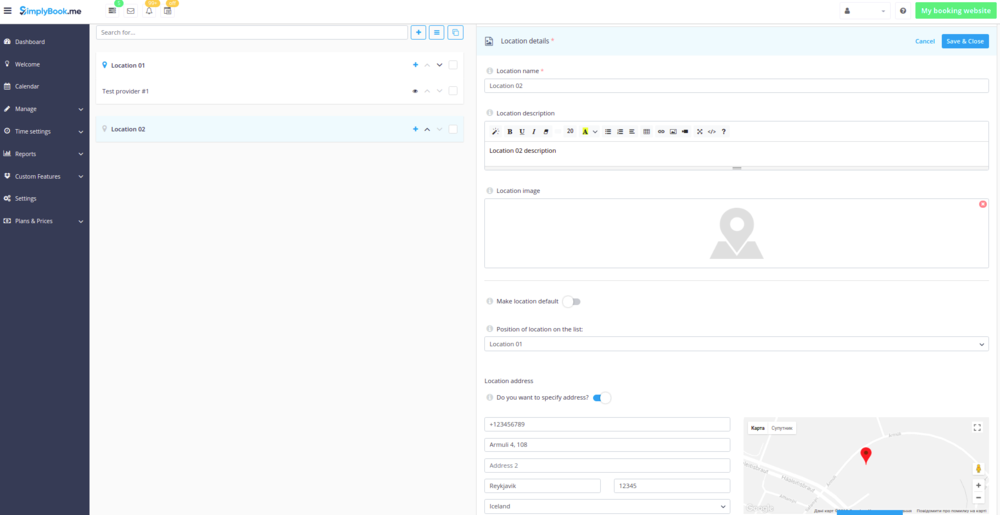
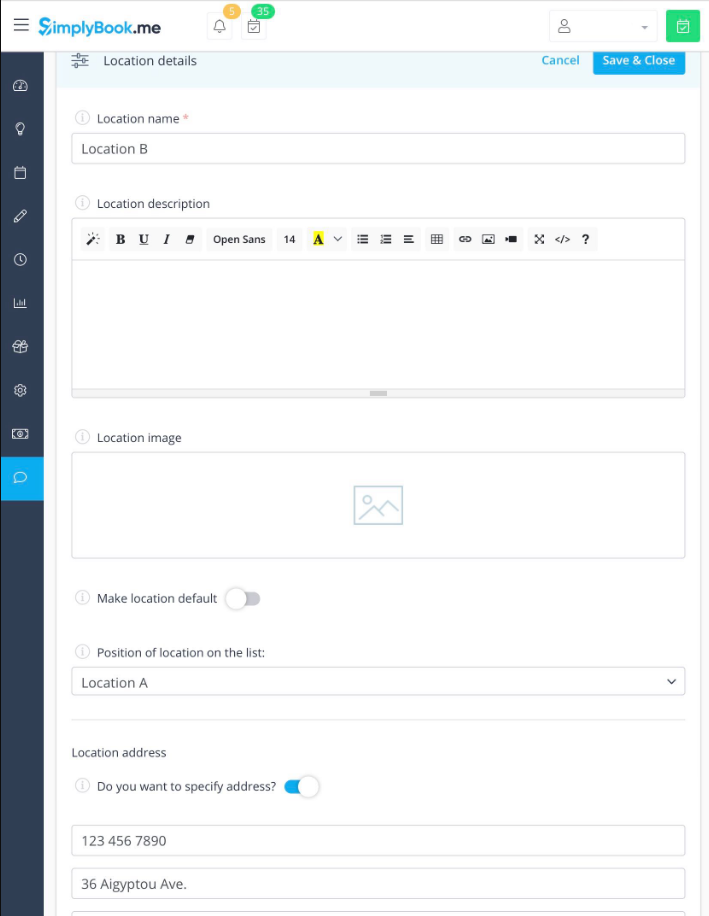
You can enable “Multiple Locations” Custom Feature in Manage//Providers//Service provider's locations tab, then click on “+” to create new location and choose “Add location" option, set location name, description, its position on the booking page and specify address if necessary.
Save settings.
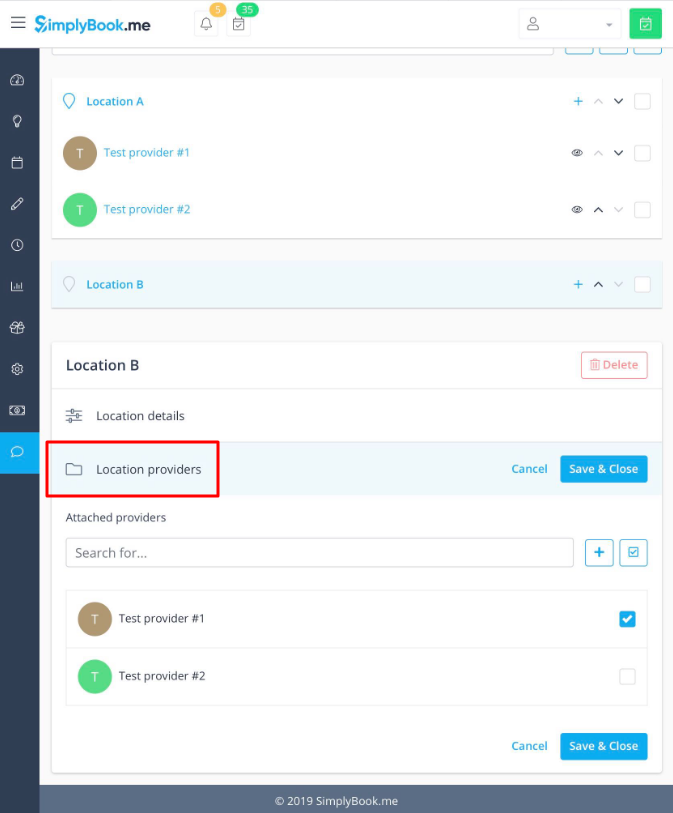
Switch to “Location providers” tab to attach providers to this location by checking corresponding boxes. Save settings.
What can I set with “More options” tab
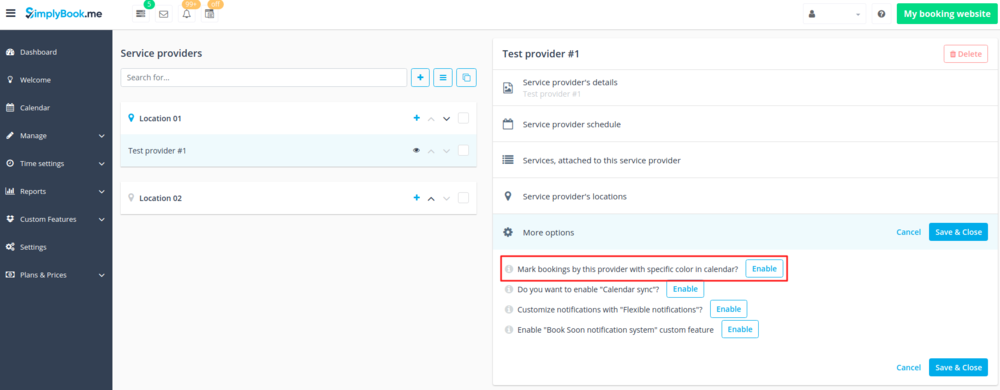
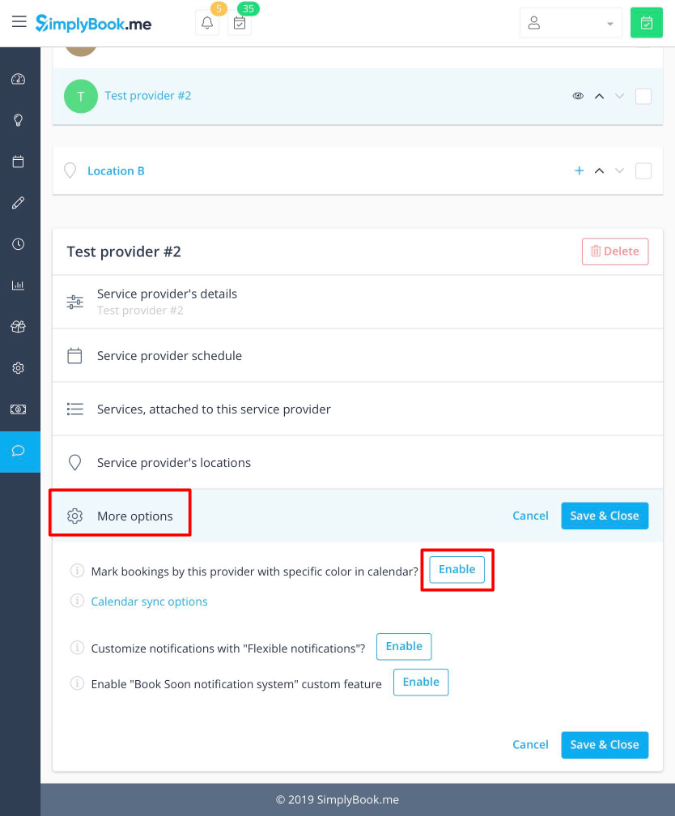
You can set there a specific color for provider’s bookings in Calendar with Providers Color Coding Custom Feature.
Set specific notifications related to this provider bookings with Flexible Notifications Custom Feature.
Or set reminders to book again to your clients with Book Soon Custom Feature.
I have both schedules for services and for providers
If you have both schedules for services and for providers, then only intersection of available time for service and for provider will be available for booking.
For example, service is available 9-12, provider is available 11-17, then only time 11-12 will be available for booking because earlier provider is not working and no one can perform the service and later, the service is not available.
See instructions how to create schedules for services
See instructions how to create schedules for providers
Note! Providers'/Services' working hours should be within opening hours of the company! If you can't open specific times for provider/service, please open those times for the company first and then for provider/service.
Opening hours vs special days
There are 2 types of time settings:
Opening hours
It is regular schedule you have on a weekly basis. If you are the only provider, you can set it in Time Settings // Company opening hours. If you have several providers, you can set their regular schedule in Manage//Providers, choose necessary provider on the left and switch to “Service provider schedule” tab or in Time settings // Provider schedule. For example, if you work Monday-Friday 9a.m - 5p.m you simply set schedule for those dates by clicking on the corresponding slots. To make day of the week working/off use switcher near weekday names.
Special days
Contrary to Opening hours, which is regular schedule, Special Days is schedule by date. If you do not have regular schedule or plan one-time event, you can use Special days to open/close only specific dates. To set specific schedule for company (Time settings // Company special days) or provider (Manage//Providers, choose necessary provider on the left and switch to “Service provider's special days” tab or Time settings // Provider special days) click on the date and insert the schedule you need or make it a day off. This feature can be used if you plan to open in a months and want to prevent bookings until then (make all days off before the opening date) or to insert national holidays in your schedule. Special days of the company are highlighted with yellow, providers' and services’ special days are highlighted with red.
Note! Providers'/Services' working hours should be within opening hours of the company! If you can't open specific times for provider/service, please open those times for the company first and then for provider/service.
