Created page with "Il vous permet d'utiliser votre propre serveur SMTP afin que tous les e-mails envoyés depuis le système SimplyBook.me en votre nom proviennent de votre propre adresse e-mail..." Tags: Mobile edit Mobile web edit |
Created page with ":1. Activer <span style="background-color:#d4f8e5; padding:5px; border-radius:5px;">Code QR du ticket</span> sur votre <span style="background-color:#d4f8e5; padding:5px; bord..." Tags: Mobile edit Mobile web edit |
||
| Line 3,002: | Line 3,002: | ||
;Comment utiliser | ;Comment utiliser | ||
:1. Activer <span style="background-color:#d4f8e5; padding:5px; border-radius:5px;">Code QR du ticket</span> sur votre <span style="background-color:#d4f8e5; padding:5px; border-radius:5px;">Fonctionnalités personnalisées</span> -> <span style="background-color:#d4f8e5; padding:5px; border-radius:5px;">Autre</span> section. | |||
:1. | |||
[[File:Ticket qr enable path.png|1000px|border|center]] | [[File:Ticket qr enable path.png|1000px|border|center]] | ||
<br><br> | <br><br> | ||
:2. | :2. Sélectionnez <span style="background-color:#d4f8e5; padding:5px; border-radius:5px;">Capacité de correction de code QR<span> si nécessaire. | ||
[[ | [[Fichier :Ticket qr correction adjust.png|1000px|border|center]] | ||
<br><br> | <br><br> | ||
:3. | :3. Accédez à <span style="background-color:#d4f8e5; padding:5px; border-radius:5px;">Modifier le modèle</span> page. | ||
[[File:Ticket qr edit template path.png|1000px|border|center]] | [[File:Ticket qr edit template path.png|1000px|border|center]] | ||
<br><br> | <br><br> | ||
:4. | :4. Ajustez le modèle à vos besoins à l'aide de l'<span style="background-color:#d4f8e5; padding:5px; border-radius:5px;">Editor</span> et les variables disponibles <span style="background-color:#d4f8e5; padding:5px; border-radius:5px;">variables</span> sur la droite. | ||
[[File:Ticket qr edit template process.png|1000px|border|center]] | [[File:Ticket qr edit template process.png|1000px|border|center]] | ||
<br><br> | <br><br> | ||
:5. | :5. Ajoutez <span style="background-color:#d4f8e5; padding:5px; border-radius:5px;">URL du modèle QR</span> variable au modèle de ticket dans <span style="background-color:#d4f8e5; padding:5px; border-radius:5px;">Fonctionnalités personnalisées</span> -> <span style="background-color:#d4f8e5; padding:5px; border-radius:5px;">Billets</span> -> <span style="background-color:#d4f8e5; padding:5px; border-radius:5px;">Billet personnalisé.</span> | ||
:( | :(veuillez également vous assurer que vous avez un ticket personnalisé attaché aux services nécessaires dans <span style="background-color:#d4f8e5; padding:5px; border-radius:5px;">Manage</span> -> <span style="background-color:#d4f8e5; padding:5px; border-radius:5px;">Services</span> -> sélectionnez le service nécessaire -> <span style="background-color :#d4f8e5; padding:5px; border-radius:5px;">Tickets</span>) | ||
[[File:Ticket add custom qr.png|1000px|border|center]] | [[File:Ticket add custom qr.png|1000px|border|center]] | ||
<br><br> | <br><br> | ||
<br><br> | <br><br> | ||
------- | ------- | ||
= | =Billets= | ||
[[ | [[Fichier :Icône de billets.png| gauche]] <br> | ||
Émettez des billets pour les services, les cours et les événements. Les billets peuvent être imprimés ou affichés depuis l'écran mobile par les clients, puis scannés à l'aide de l'application d'administration SimplyBook.me, ou insérés manuellement dans la section Valider les billets de SimplyBook.me. Si vous avez des connaissances HTML/CSS et un forfait Premium, vous pouvez personnaliser l'apparence de vos billets. | |||
<br><br> | <br><br> | ||
Tutoriel vidéo [[File:Youtube-Logo.png|link=https://youtu.be/Ge3IGjgLDE8]] | |||
<span style="background-color:#ffe9e9; padding:5px; border-radius:5px;">'''Veuillez noter :'''</span> | |||
<span style="background-color:#ffe9e9; padding:5px; border-radius:5px;">''' | *<span style="background-color:#ffe9e9; padding:5px; border-radius:5px;">cette fonctionnalité n'est pas compatible avec <span style="background-color:#cdeffc; padding:5px; border-radius:5px;">[[Fonctionnalité personnalisée Accepter les dépôts|Accepter les dépôts]] ;</span></span> | ||
*<span style="background-color:#ffe9e9; padding:5px; border-radius:5px;"> | *<span style="background-color:#ffe9e9; padding:5px; border-radius:5px;">les tickets sont joints au format PDF à l'e-mail de confirmation du client ;</span> | ||
*<span style="background-color:#ffe9e9; padding:5px; border-radius:5px;"> | *<span style="background-color:#ffe9e9; padding:5px; border-radius:5px;">si <span style="background-color:#d4f8e5; padding:5px; border-radius:5px ;">Payer plus tard</span> est activé dans <span style="background-color:#cdeffc; padding:5px; border-radius:5px;">[[Fonctionnalité personnalisée Accepter les paiements|Accepter les paiements]]</span> fonctionnalité, le client la sélectionne lors de la réservation,<br></span> | ||
*<span style="background-color:#ffe9e9; padding:5px; border-radius:5px;"> | :<span style="background-color:#ffe9e9; padding:5px; border-radius:5px;">les tickets seront envoyés dans le modèle d'e-mail séparé une fois que l'administrateur aura accepté le paiement dans <span style="background -color:#d4f8e5; padding:5px; border-radius:5px;">Transactions de paiement</span> rapport.<br></span> | ||
:<span style="background-color:#ffe9e9; padding:5px; border-radius:5px;"> | :<span style="background-color:#ffe9e9; padding:5px; border-radius:5px;">Il peut être modifié dans <span style="background-color:#d4f8e5; padding:5px; border -radius:5px;">Fonctionnalités personnalisées</span> -> <span style="background-color:#d4f8e5; padding:5px; border-radius:5px;">Billets.</span></span> | ||
:<span style="background-color:#ffe9e9; padding:5px; border-radius:5px;"> | |||
[[File:Pay later template.png|border|center]] | [[File:Pay later template.png|border|center]] | ||
<br><br> | <br><br> | ||
*<span style="background-color:#ffe9e9; padding:5px; border-radius:5px;"> | *<span style="background-color:#ffe9e9; padding:5px; border-radius:5px;">les tickets sont limités : chaque abonnement comprend un nombre défini de tickets par mois (140 en période d'essai). Pour vérifier le nombre de billets que vous avez, rendez-vous sur <span style="background-color:#d4f8e5; padding:5px; border-radius:5px;">Plans&Prix</span> -> <span style="background-color:#d4f8e5; padding:5px; border-radius:5px;">Abonnements</span> et faites défiler vers le bas de la page. Pour acheter plus de billets, veuillez accéder à <span style="background-color:#d4f8e5; padding:5px; border-radius:5px;">Plans&Prix</span> -> <span style="background-color:#d4f8e5; padding:5px; border-radius:5px;">Éléments supplémentaires.</span></span> | ||
[[File:Ticket pack purchase.png| | [[File:Ticket pack purchase.png|frontière|centre]] | ||
<br><br> | <br><br> | ||
<br><br> | <br><br> | ||
;Comment utiliser | |||
; | |||
:1. Activez cette fonctionnalité sur votre <span style="background-color:#d4f8e5; padding:5px; border-radius:5px;">Fonctionnalités personnalisées</span> page. | |||
:1. | |||
[[File:Tickets enable path.png|border|center]] | [[File:Tickets enable path.png|border|center]] | ||
<br><br> | <br><br> | ||
:2. | :2. Accédez à <span style="background-color:#d4f8e5; padding:5px; border-radius:5px;">Gérer</span> en utilisant le lien près de la fonctionnalité activée ou accédez à <span style="background-color:#d4f8e5; padding:5px; border-radius:5px;">Manage</span> -> <span style="background-color:#d4f8e5; padding:5px; border-radius:5px;">Services</span> section. | ||
[[File:Tickets manage path.png |border|center]] | [[File:Tickets manage path.png |border|center]] | ||
<br><br> | <br><br> | ||
:3. | :3. Sélectionnez le service pour lequel vous souhaitez vendre les billets en un clic et accédez à <span style="background-color:#d4f8e5; padding:5px; border-radius:5px;">Tickets</span> languette. | ||
<br><br> | <br><br> | ||
:4. <span style="background-color:#d4f8e5; padding:5px; border-radius:5px;"> | :4. <span style="background-color:#d4f8e5; padding:5px; border-radius:5px;">Activer</span> émission des billets et connectez le modèle en cliquant dessus. Enregistrer les paramètres. | ||
:( | :(Il existe un modèle par défaut, mais avec le plan Premium, vous pouvez créer le vôtre). | ||
[[ | [[Fichier : Attacher le ticket au service.png|border|center]] | ||
<br><br> | <br><br> | ||
:5. | :5. Lorsque l'heure de l'événement arrive et que vous devez valider les billets, veuillez vous rendre sur <span style="background-color:#d4f8e5; padding:5px; border-radius:5px;">Fonctionnalités personnalisées</span> -> <span style="background-color:#d4f8e5; padding:5px; border-radius:5px;">Billets</span> -> <span style="background-color:#d4f8e5; padding:5px; border-radius:5px;">Valider le ticket.</span> | ||
( | (ou accédez-y depuis la page Calendrier) | ||
[[File:Validate tickets path.png|border|center]] | [[File:Validate tickets path.png|border|center]] | ||
<br><br> | <br><br> | ||
:6. | :6. Recherchez le billet par son numéro unique (peut être utilisé sur ordinateur et mobile) ou scannez le code QR (ouvrez cette page à partir d'un appareil mobile). | ||
: | :Vérifiez les informations de réservation si nécessaire et cliquez sur <span style="background-color:#d4f8e5; padding:5px; border-radius:5px;">Valider le ticket</span> | ||
[[File:Validate ticket steps pc.png|border|center]] | [[File:Validate ticket steps pc.png|border|center]] | ||
<br><br> | <br><br> | ||
[[ | [[Fichier : Valider le ticket mobile manuellement find.png|border|center]] | ||
<br><br> | <br><br> | ||
: | :sept. Si vous avez l'application d'administration SimplyBook.me, vous pouvez facilement numériser et enregistrer des billets depuis <span style="background-color:#d4f8e5; padding:5px; border-radius:5px;">Dashboard.</ durée> | ||
[[File:Scan ticket path in app.png|border|center]] | [[File:Scan ticket path in app.png|border|center]] | ||
<br><br> | <br><br> | ||
:8. | :8. Les codes des billets peuvent être trouvés dans les réservations associées sur <span style="background-color:#d4f8e5; padding:5px; border-radius:5px;">Calendrier</span> ou dans <span style="background-color:#d4f8e5; padding:5px; border-radius:5px;">Détails de la réservation</span> rapport. | ||
: | : Vous pouvez également imprimer des billets à partir de là. | ||
[[File: | [[File:Informations sur les billets dans calendar.png|border|center]] | ||
[[File: | [[File:Informations sur les billets dans reports.png|border|center]] | ||
<br><br> | <br><br> | ||
:9. ( | :9. (facultatif) Si vous disposez d'un forfait Premium et que vous connaissez HTML/CSS ou que quelqu'un peut vous aider, vous pouvez créer un modèle de ticket personnalisé dans <span style="background-color:#d4f8e5; padding:5px; border-radius : 5px;">Fonctionnalités personnalisées</span> -> <span style="background-color:#d4f8e5; padding:5px; border-radius:5px;">Billets</span> -> <span style="background-color:#d4f8e5; padding:5px; border-radius:5px;">Billet personnalisé.</span> | ||
[[File:Custom ticket look example.png|border|center]] | [[File:Custom ticket look example.png|border|center]] | ||
<br><br> | <br><br> | ||
: | :dix. Du côté client, ils peuvent obtenir des billets sur la page de confirmation de rendez-vous/paiement lorsque le processus de réservation est terminé. | ||
: | :Ou ils peuvent accéder à <span style="background-color:#d4f8e5; padding:5px; border-radius:5px;">Mes réservations</span> et utilisez le bouton correspondant pour télécharger le billet PDF et l'imprimer. | ||
[[File:Ticket client | [[File:Ticket côté client 1.png|border|center]] | ||
[[File:Tickets client | [[File:Tickets côté client 2.png|border|center]] | ||
<br><br><br><br> | <br><br><br><br> | ||
------- | ------- | ||
= | =Rapport de vaccination= | ||
[[File:Vaccination icon.png|left]] | [[File:Vaccination icon.png|left]] La fonction personnalisée de vaccination donne un aperçu rapide des créneaux réservés et disponibles dans votre système, permettant ainsi de voir la charge généralement par jour/semaine/mois ou une plage de dates (jusqu'à 90 jours ) ainsi que par certains fournisseurs ou services. Vous pouvez facilement voir les surchargés et les plus libres pour les gérer en conséquence. Une autre option qui vous aide à planifier avec succès le processus de vaccination est l'onglet "Deuxième rendez-vous" : il indique si un certain patient a déjà pris rendez-vous pour une deuxième dose de vaccin ainsi que ses coordonnées, la date et l'heure des rendez-vous vous permettant pour contacter rapidement ceux qui ont encore besoin d'un autre organisme de prise de rendez-vous. Les deux onglets de rapport offrent un excellent moyen de gérer et d'organiser les ressources temporelles et les équipes de vaccination de la manière la plus efficace pour faire vacciner autant de personnes que possible. | ||
<br><br> | <br><br> | ||
;Comment utiliser | |||
; | |||
:1. Activez l'élément correspondant sur votre <span style="background-color:#d4f8e5; padding:5px; border-radius:5px;">Fonctionnalités personnalisées</span> page. | |||
:1. | |||
[[File:Vaccination enable path.png|1200px|border|center]] | [[File:Vaccination enable path.png|1200px|border|center]] | ||
<br><br> | <br><br> | ||
:2. | :2. Sélectionnez le critère de regroupement des rendez-vous. Par défaut, ils seront regroupés par <span style="background-color:#d4f8e5; padding:5px; border-radius:5px;">client record(id),</span> mais vous pouvez également choisir de regrouper par <span style="background-color:#d4f8e5; padding:5px; border-radius:5px;">email</span> ou <span style="background-color:#d4f8e5; padding:5px; border-radius:5px;">numéro de téléphone.</span> Et, bien sûr, vous pouvez modifier ces préférences à tout moment. | ||
:( | :(facultatif) Si vous utilisez <span style="background-color:#cdeffc; padding:5px; border-radius:5px;">[[Intake_Forms_custom_feature|Intake form]]</span> et/ou <span style="background-color:#cdeffc; padding:5px; border-radius:5px;">[[Fonctionnalité personnalisée des champs client|Champs client]]</span> fonctionnalités, vous pouvez choisir de regrouper les réservations en fonction de la réponse à l'un de ces champs. | ||
[[File: | [[File:Groupe de rapport de vaccination par.png|1200px|border|center]] | ||
<br><br> | <br><br> | ||
:3. | :3. Après avoir accédé à <span style="background-color:#d4f8e5; padding:5px; border-radius:5px;">Slots<span> rapport, vous pouvez voir le total des créneaux actuellement libres et réservés ainsi que le pourcentage d'occupation du temps par fournisseur ou service. | ||
: | :Veuillez utiliser <span style="background-color:#d4f8e5; padding:5px; border-radius:5px;">les sélecteurs</span> pour afficher les données par <span style="background-color:#d4f8e5; padding:5px; border-radius:5px;">jour/semaine/mois</span> ou une <span style="background-color:#d4f8e5; padding:5px; border-radius:5px;">plage de dates.</span> | ||
:'''<span style="background-color:#ffe9e9; padding:5px; border-radius:5px;"> | :'''<span style="background-color:#ffe9e9; padding:5px; border-radius:5px;">Veuillez noter :</span> | ||
<span style="background-color:#ffe9e9; padding:5px; border-radius:5px;">La période maximale pouvant être sélectionnée pour la plage de dates est de 90 jours. Si vous choisissez la plus grande période, elle sera automatiquement corrigée automatiquement.</span> | |||
<span style="background-color:#ffe9e9; padding:5px; border-radius:5px;">En vue journalière, le nombre de créneaux par fournisseur est basé sur votre paramètre de délai (c'est-à-dire si le délai est de 5 minutes et le temps l'horaire d'ouverture est de 9 h 00 à 10 h 00, vous verrez alors 12 plages horaires par fournisseur s'il sert un client à la fois),</span><br> | |||
:<span style="background-color:#ffe9e9; padding:5px; border-radius:5px;"> | :<span style="background-color:#ffe9e9; padding:5px; border-radius:5px;">alors que par service, cela dépend de la durée du service sélectionné (c'est-à-dire si la durée du service est de 30 minutes et l'heure d'ouverture dans le calendrier est de 9h00 à 10h00, vous verrez 2 créneaux).</span><br> | ||
<br><br> | <br><br> | ||
; | ;Le nombre d'emplacements affichés est généralement influencé par | ||
le nombre de fournisseurs ajoutés dans le système ; | |||
leurs horaires; | |||
nombre de clients qu'ils peuvent servir à la fois. | |||
<br><br> | <br><br> | ||
; | ;Les caractéristiques suivantes n'influencent pas les statistiques | ||
*<span style="background-color:#cdeffc; padding:5px; border-radius:5px;">[[Limit_Bookings_custom_feature| | *<span style="background-color:#cdeffc; padding:5px; border-radius:5px;">[[Limit_Bookings_custom_feature|Limiter les réservations]];</span> | ||
*<span style="background-color:#cdeffc; padding:5px; border-radius:5px;">[[Related_Resources_custom_feature| | *<span style="background-color:#cdeffc; padding:5px; border-radius:5px;">[[Related_Resources_custom_feature|Ressources associées]] ; </span> | ||
*<span style="background-color:#cdeffc; padding:5px; border-radius:5px;">[[Calendar_Sync_custom_feature| | *<span style="background-color:#cdeffc; padding:5px; border-radius:5px;">[[Calendar_Sync_custom_feature|Synchronisation du calendrier]];</span> | ||
*<span style="background-color:#cdeffc; padding:5px; border-radius:5px;">[[Classes_custom_feature|Classes]]</span> | *<span style="background-color:#cdeffc; padding:5px; border-radius:5px;">[[Classes_custom_feature|Classes]]</span> ne sont pas affichés dans le rapport | ||
[[File:Vaccination report slots tab.png|1200px|border|center]] | [[File:Vaccination report slots tab.png|1200px|border|center]] | ||
<br><br> | <br><br> | ||
:4. | :4. Lorsque vous accédez à <span style="background-color:#d4f8e5; padding:5px; border-radius:5px;">Deuxième rendez-vous</span> vous pouvez voir les clients qui ont déjà réservé au moins un rendez-vous non annulé dans le système.<br> | ||
: | : Les lignes seront regroupées selon les paramètres de <span style="background-color:#d4f8e5; padding:5px; border-radius:5px;">#2.</span> | ||
: | : Dans le cas où le client spécifique a plus d'un rendez-vous, ces enregistrements seront marqués comme ayant un deuxième rendez-vous en place et la deuxième colonne contiendra la date de sa dernière réservation. | ||
: | :En utilisant <span style="background-color:#d4f8e5; padding:5px; border-radius:5px;">View</span> vous permet d'accéder aux coordonnées de chaque client ainsi qu'à la liste de ses rendez-vous. | ||
[[File:Vaccination report second | [[File:Vaccination report second rendez-vous tab.png|1200px|border|center]] | ||
<br><br> | <br><br> | ||
: | :Tutoriel vidéo sur la création d'un compte pour la vaccination [[File:Youtube-Logo.png|link=https://youtu.be/_9qrKUWfyVo]] | ||
<br><br><br><br> | <br><br><br><br> | ||
------- | ------- | ||
= | =Compteur de visiteurs= | ||
<br> | <br> | ||
[[File:Visitor counter new icon.png | [[File:Visitor counter new icon.png ‎|left]] | ||
<div lang="en" dir="ltr" class="mw-content-ltr"> | <div lang="en" dir="ltr" class="mw-content-ltr"> | ||
Revision as of 09:14, 29 September 2022
PAGE UNDER DEVELOPMENT
Les fonctionnalités personnalisées sont des fonctionnalités supplémentaires du système qui vous aideront à améliorer votre entreprise. Veuillez consulter la liste des fonctionnalités personnalisées ci-dessous ainsi que leurs descriptions et instructions d'utilisation.
Présentation vidéo ![]()
Vous pouvez également avoir besoin de :
- TOP 10 des fonctionnalités personnalisées par catégorie d'activité
- Les fonctionnalités personnalisées dépendent d'autres fonctionnalités personnalisées
- Quelles fonctionnalités personnalisées ne fonctionnent pas ensemble
- Fonctionnalités personnalisées par catégorie de fonctionnalité
Contenu
Accepter les dépôts
left
Utilisez les dépôts pour augmenter la probabilité que les clients viennent pour le service et assurez-vous qu'au cas où ils ne se présenteraient pas, vous pouvez conserver le dépôt. Notez que certains clients peuvent contacter directement leur banque pour obtenir le remboursement des dépôts, auquel cas il n'y a pas grand-chose à faire, mais de tels cas devraient être rares.
Veuillez noter :
- Lorsque vous activez la fonction Accepter les dépôts Accepter les paiements sera également activé.
- Les montants des dépôts ne peuvent être définis que par service et/ou classes.
- Cette fonctionnalité n'est pas compatible avec Tickets et Code QR du ticket.< ;/span>
- Si le client souhaite appliquer un code promotionnel ou un package lors de l'achat, il doit payer le prix total uniquement car ces articles ne peuvent pas être appliqués avec des dépôts.
- Comment utiliser
- 1. Pour activer cette fonctionnalité, accédez à Fonctionnalités personnalisées page, Améliorations commerciales section, cliquez sur Accepter les dépôts et déplacez le sélecteur vers On position ou appuyez sur Activer bouton sur le côté droit de la page.
- 2. Vous pouvez configurer le système pour permettre aux clients de payer des acomptes uniquement via le site de réservation en désactivant Autoriser les clients à payer le plein tarif< ;/span> sur le côté droit de la page.
- Dans ce cas, si le montant du dépôt est indiqué par service/class le client paiera ce montant pour confirmer sa réservation.
- Si seul le montant total est défini par service/classe, les clients paieront le prix total.
- Dans le cas où Autoriser les clients à payer le plein tarif est activé (état par défaut) et que le montant de l'acompte est indiqué par service/classe, les clients auront le choix de payer soit le prix total, soit l'acompte à la caisse.
- 3. Pour définir les montants des dépôts en fonction de vos services, veuillez accéder à Manage -> Services(Classes) ou utilisez Manage près de ce titre de fonctionnalité personnalisée.
- 4. Cliquez sur le nom du service/de la classe de l'élément souhaité pour ouvrir Détails du service/de la classe tabulation et déplacement Activer le dépôt commutateur en position active.
- 5. Indiquez le montant que vous souhaitez recevoir en acompte pour cet article dans la case correspondante (il doit être inférieur au prix réel, mais supérieur à 0) et enregistrez les paramètres.
- 6. Après avoir enregistré tous les paramètres, les services auront deux prix affichés sur le site de réservation : le montant total et l'acompte.

- sept. Lorsque les clients paient le montant de l'acompte en ligne pour confirmer leur réservation, deux commandes/factures seront créées dans le système : une pour l'acompte et la seconde pour le montant restant
- (il sera affiché comme en attente jusqu'à ce que le client paie sur le lieu de rendez-vous et que vous l'approuviez manuellement).
- Vous pouvez les gérer dans Rapports -> Transactions de paiement.
- Ou via Point de vente interface:
Accepter les paiements
La fonction personnalisée Accepter les paiements vous permet d'accepter les paiements de vos clients en ligne. Vous pouvez fixer le prix de votre service et lorsque vos clients effectueront une réservation, ils seront redirigés vers la page de paiement.
Vous pouvez accepter des paiements via une variété de processeurs de paiement. Tous les paiements en ligne sont traités par la passerelle de paiement de votre choix et s'il est nécessaire d'émettre un remboursement à un client, cela ne peut être fait qu'à partir du compte administrateur de votre processeur de paiement manuellement car Simplybook ne traite aucun paiement au premier place.
Pour vérifier les passerelles disponibles par pays, veuillez suivre /paiements ce lien.
Tutoriel vidéo ![]()
SBPay.me PRO tutoriel vidéo d'intégration ![]()
Comment utiliser
- 1. Activer Accepter les paiements fonction personnalisée dans Fonctionnalités personnalisées section.
- 2. Pour ajouter les détails de votre processeur de paiement, accédez à Paramètres pour cette fonctionnalité.
- 3. Sur le côté droit, vous verrez la liste des processeurs disponibles. Veuillez trouver celui que vous souhaitez et ajouter vos informations d'identification.

- 3.1 (Facultatif) Définissez votre Délai d'expiration du paiement dans la section gauche de cette fonction, nous recommandons pas moins de 20 à 30 minutes.
- 4. Dans Gérer -> Services -> (sélectionnez le service à modifier) -> Détails du service -> Prix fixer le prix de votre service.
- 5. Ajoutez les informations de facturation au bloc correspondant et vos clients recevront des factures pour tout achat effectué dans votre système. Vous pouvez également désactiver l'envoi de factures à vos clients si nécessaire.
frontière| centre
Comment fonctionne la fonctionnalité personnalisée Accepter les paiements
- 1. Un client suit le processus de réservation et appuie sur Réserver à la fin.
- 2. Il est dirigé vers le système de paiement et une réservation non confirmée apparaît dans le calendrier administratif marqué en rouge comme non payé pour réserver cette fois afin qu'aucune autre personne ne puisse accidentellement réserver le même créneau et qu'il n'y ait pas de double réservation.
- 3. Après cela, le client a 2 options :
- 3.1. payez et le processeur de paiement nous enverra la confirmation que le client a payé et nous l'approuverons automatiquement de notre côté (la réservation sera marquée de couleur verte).
- 3.1. payez et le processeur de paiement nous enverra la confirmation que le client a payé et nous l'approuverons automatiquement de notre côté (la réservation sera marquée de couleur verte).
- 3.2. ne finissez pas de payer : le client est dirigé vers le système de paiement, mais il ferme ensuite la page, ferme le navigateur ou le laisse simplement ouvert sans aucune action pendant une longue période. Dans ce cas, le système attendra le délai d'expiration que vous avez défini dans les paramètres de Accepter les paiements la fonctionnalité personnalisée prendra fin et annulera la réservation non payée car elle n'a jamais été terminée. Vous pouvez définir les e-mails à envoyer au client et/ou vous avertir des réservations expirées.
- La même chose se produit si le client a payé, mais a payé plus tard que le délai d'attente. Dans ce cas, si vous recevez une notification de PayPal/Stripe/etc. ce client a payé la réservation, mais comme il était trop tard, vous pouvez accéder à Reports -> Transactions de paiement et approuver cette réservation manuellement.
- 3.2. ne finissez pas de payer : le client est dirigé vers le système de paiement, mais il ferme ensuite la page, ferme le navigateur ou le laisse simplement ouvert sans aucune action pendant une longue période. Dans ce cas, le système attendra le délai d'expiration que vous avez défini dans les paramètres de Accepter les paiements la fonctionnalité personnalisée prendra fin et annulera la réservation non payée car elle n'a jamais été terminée. Vous pouvez définir les e-mails à envoyer au client et/ou vous avertir des réservations expirées.
Qu'est-ce que l'option "Autoriser le paiement différé"
Lorsque vos clients sont transférés vers la page de paiement après Details , ils ont généralement plusieurs options : votre processeur de paiement (un ou plusieurs) et Payer plus tard. Payer plus tard signifie que le client paiera directement sur place lorsqu'il arrivera au rendez-vous. Dans votre Dashboard, lorsque vous cliquez sur le rendez-vous, cette réservation dans le champ prix du service aura une note "Pay Later". Si vous souhaitez désactiver Payer plus tard , réglez le sélecteur sur Off position pour Autoriser le paiement différé dans les paramètres de Accepter les paiements fonctionnalité personnalisée.
Comment changer la devise des paiements
Vous pouvez modifier la devise dans les paramètres de Accepter les paiements fonction personnalisée.
Veuillez noter ! Certains processeurs de paiement ne prennent pas en charge toutes les devises. Avant de définir la devise, vérifiez si le processeur de paiement sélectionné la prend en charge.

Comment ajouter une taxe aux services
- 1. Ajoutez les options de taxes nécessaires dans Manage -> Taxes -> +
- Choisissez celui par défaut si nécessaire - il sera automatiquement défini pour chaque nouvel article de vente que vous créerez dans le système.

- 2. Accédez à Gérer -> Services et sélectionnez l'option de taxe pour chaque service.
- Si vous avez d'autres éléments comme Classes, Packages, Appartenances, Produits en vente, Service add-ons, Cartes cadeaux et avez besoin que des taxes y soient également appliquées, veuillez vous rendre sur la page de gestion correspondante et sélectionner parmi les taxes pré-créées pour chaque article.

- 3. Dans Fonctionnalités personnalisées -> Accepter les paiements -> Paramètres choisissez si le montant de la taxe doit être ajouté au prix que vous avez défini par service (ou autre article) ou s'il est déjà inclus en utilisant le sélecteur Les prix incluent les taxes.
- Si vous activez le sélecteur, cela signifie que le montant que vous avez défini par service est déjà avec les taxes.
- Si vous désactivez le sélecteur, le système ajoutera automatiquement le pourcentage de taxe sélectionné aux prix des articles
Puis-je utiliser un autre processeur de paiement qui n'est pas répertorié dans la fonction personnalisée Accepter les paiements
Dans ce cas, veuillez contacter le support et nous nous ferons un plaisir de vérifier les possibilités de l'ajouter à notre système. Le support peut vous demander de fournir une documentation technique relative à ce processeur de paiement pour vérifier s'il existe une possibilité d'une telle intégration.
Comment personnaliser les factures clients
Il peut être nécessaire d'afficher ou de masquer certaines données ou de modifier l'apparence des factures que le système envoie aux clients après avoir effectué un achat sur votre site de réservation.
Vous pouvez régler les éléments suivants :
1. Adresse de la société.
S'il est ajouté dans Settings -> Informations sur la société et configuré pour être affiché sur le site de réservation, il apparaîtra également sur les factures.
Si vous avez besoin de le masquer, cochez simplement Ne pas afficher l'e-mail sur le site de réservation là, enregistrez les paramètres et il n'apparaîtra ni sur le site ni sur les factures.
2. Numéro de TVA de l'entreprise.
S'il est ajouté dans Settings -> Informations sur la société il sera également présent sur les factures.
3. Adresse du client.
Pour que l'adresse client soit affichée, veuillez activer la fonction personnalisée Client Login, activez à la fois Afficher l'adresse sur la page de réservation et Rendre le champ d'enregistrement obligatoire de l'adresse dans Accessibilité section. Enregistrer les paramètres.

4. Formulaires d'admission et Champs client
Vous pouvez ajouter certains formulaires à afficher dans le bloc d'informations client.
S'il s'agit d'un formulaire d'admission, veuillez accéder à Manage -> Formulaires d'admission -> cliquez sur le formulaire nécessaire pour sélectionner -> activer Ajouter un champ à la facture, enregistrer les paramètres.
Ou si vous souhaitez ajouter un formulaire client, accédez à Manage -> Champs client -> cliquez sur le champ souhaité pour le modifier -> activer Ajouter un champ à la facture, enregistrer.
En conséquence, le titre du formulaire et la réponse du client seront reflétés dans la facture.
1200px|border|center
5. Conception de facture.
Vous pouvez sélectionner l'un des trois modèles de facture disponibles.
Veuillez choisir le modèle par défaut, blanc ou foncé dans Fonctionnalités personnalisées -> Accepter les paiements -> Paramètres -> Sélectionnez le modèle de facture -> choisissez l'apparence souhaitée et enregistrez les paramètres.
1200px|border|center
Tout sélecteur d'employés
Vous pouvez utiliser cette fonction personnalisée pour ajouter un fournisseur de services appelé "Tout fournisseur" à la page de réservation, et si le client choisit ce fournisseur, tous les horaires des fournisseurs disponibles s'afficheront.
Vous pouvez également utiliser cette fonctionnalité personnalisée pour :
   • Masquez l'étape de l'employé sur la page de réservation.
   • Allouer automatiquement tout fournisseur disponible pour le service sélectionné de manière aléatoire.
De cette façon, le client choisit uniquement le service et l'heure, ce qui simplifie le processus de réservation.
- Comment utiliser
- 1. Activez la fonctionnalité personnalisée "Tout sélecteur d'employé" dans la section Fonctionnalités personnalisées.

- 2. Accédez aux paramètres sur la droite pour ajuster le titre et la description de l'option "Tout employé" à vos besoins.

- 3. Si vous avez besoin de masquer des prestataires du site de réservation et/ou de les attribuer au hasard, veuillez cocher les cases correspondantes.
API
gauche
Avec l'aide de cette fonctionnalité personnalisée, vous pouvez concevoir vos propres solutions allant de simples widgets à des applications multifonctionnelles.
Utilisez-le pour autoriser l'API Simplybook avec la clé API.
- Comment utiliser
- 1. Accédez à Fonctionnalités personnalisées section à l'aide du menu de gauche de votre interface d'administration,
- recherchez la fonctionnalité correspondante et activez-la.

- 2. Accédez à Paramètres à droite pour accéder aux clés API.

- 3. (facultatif) Utilisez URL de rappel et d'autres options disponibles pour votre propre développement.
Rendez-vous à Heure Fixe
Cette fonction personnalisée permet une flexibilité avancée pour vos heures de début de rendez-vous pour tous les services à la fois ou pour chaque service. La fonction personnalisée peut être utilisée pour définir l'heure et/ou les minutes exactes dans une heure où vos services sont disponibles (par exemple 10h00, 14h30, 16h25). Il peut être utilisé pour définir l'heure de début, puis choisir un intervalle fixe ou multiple en minutes lorsque vos services sont disponibles (par exemple multiple de 15 min 10h00, 10h15, 10h30, 10h45).
- Veuillez noter ! Cette fonctionnalité fonctionne avec les "créneaux" timelines : créneaux hebdomadaires ou modernes ; et ne fonctionne avec aucun type timeline flexible.
- Comment utiliser
- 1. Ouvrez la page des fonctionnalités personnalisées dans votre compte et cliquez sur "Activer" près de l'option Rendez-vous à heure fixe.
- 2. Pour régler les heures, allez dans "Paramètres" à côté.
- 3. Sur la page que vous voyez, veuillez sélectionner le service dont vous souhaitez modifier les heures de début ou sélectionnez "Tous les services" si toutes les heures sont les mêmes.
- Et choisissez les horaires souhaités à l'aide des cases correspondantes.
Approuver les réservations
La fonction personnalisée Approuver les réservations est essentielle si vous devez consulter les détails des clients avant de pouvoir approuver leur réservation. Il vous permet de vérifier les informations fournies par les clients avant d'accepter leurs réservations. Lorsque vos clients réservent un rendez-vous, à la fin, ils verront un avis indiquant que l'e-mail de confirmation sera envoyé lorsque leur réservation sera approuvée.
Veuillez noter !
- Si vous avez Fonction personnalisée Accepter les paiements activée, les réservations payées seront approuvées automatiquement, seuls les services gratuits et les réservations avec l'option "Payer plus tard" peuvent être approuvées/rejetées.
- Si le client a réservé en utilisant Fonction personnalisée de réservations multiples (ou d'autres réservations par lots), tous les rendez-vous du pack de réservations multiples sont approuvés si une session est approuvée. La solution consiste à modifier les réservations que vous souhaitez reprogrammer et à annuler les réservations que vous souhaitez d'abord refuser, puis à approuver le pack.
- Comment utiliser
- 1. Activez la fonction personnalisée Approuver les réservations dans votre section Fonctions personnalisées.

- 2. Accédez à Calendrier//Réservations en attente pour vérifier les réservations en attente d'approbation et les accepter ou les refuser.
- Le client ne recevra l'e-mail de confirmation qu'après votre approbation.
- Si vous refusez la réservation, il n'y aura aucune notification au client.

Système de notification de réservation prochaine
Assurez-vous que vos clients reviennent ! Cette fonctionnalité personnalisée rappellera à vos clients de revenir car vous pouvez leur envoyer un message x-nombre de jours après leur rendez-vous. Par exemple, vous pouvez composer votre propre message et envoyer un rappel toujours 30 jours après un rendez-vous.
Veuillez noter !
- Cette fonctionnalité personnalisée est disponible uniquement avec les abonnements payants.
- Les clients doivent être abonnés à vos supports marketing pour pouvoir recevoir ces notifications.
- Comment utiliser
- 1. Activez cette fonctionnalité personnalisée sur votre page de fonctionnalités personnalisées.
- 2. Allez dans "Paramètres" près de cette option.

- 3. Dans les paramètres, appuyez sur "Ajouter nouveau".
- 4. Configurez les notifications par e-mail et/ou SMS en écrivant l'objet et le texte.
- Vous pouvez utiliser les variables suivantes dans votre message : [client_name], [client_phone], [client_email], [event](pour le nom du service), [unit](pour le nom du fournisseur), [code], [date_start] , [heure_début].
- 5. Dans le champ "Notifications de réservation prochainement", nommez cette notification pour la distinguer des autres notifications que vous voudrez peut-être créer à l'avenir.
- 6. Définir les jours de délai de notification (nombre de jours après le rendez-vous où la notification doit être envoyée)
- sept. Sélectionnez le service et le fournisseur pour lesquels la notification sera appliquée (facultatif).
Synchronisation du calendrier
gauche
La fonction personnalisée de synchronisation du calendrier est utilisée pour la synchronisation bidirectionnelle avec les calendriers Google et Outlook. Vous pouvez exporter les réservations de SimplyBook vers les calendriers Google ou Outlook et également bloquer les heures occupées par l'événement Google/Outlook Calendar dans votre tableau de bord SimplyBook.
Veuillez noter que cette fonctionnalité ne fonctionne qu'avec les calendriers Web - elle peut ne pas fonctionner avec les calendriers Microsoft Exchange.
- Tutoriel vidéo disponible

Comment utiliser
- 1. Activez la fonction de synchronisation du calendrier dans la section Fonction personnalisée.

- 2. Allez dans "Paramètres" près de cette option.

- 3. Cliquez sur "Connecter un nouveau calendrier" et connectez un compte Google ou Outlook.

- 4. Sélectionnez le calendrier souhaité et connectez-y les fournisseurs nécessaires.
- 5. Appuyez sur "exporter" pour exporter vos anciennes réservations vers le calendrier Google ou Outlook pour que le processus de synchronisation démarre.
- 6. Cochez la case "synchroniser les heures d'occupation" si vous souhaitez bloquer les heures dans le tableau de bord [1] occupées par les événements Google/Outlook Calendar.
- (Google calendrier uniquement) Activez "Créer un lien Google Meet" si vous souhaitez que le système génère des conférences Google Meet pour les rendez-vous et envoie des invitations à vos clients.
1200px|border| centre
Veuillez noter que si "synchroniser le temps occupé" est coché et que vous avez configuré votre fournisseur pour accepter plus d'un client à la fois, il ne sera pas possible d'effectuer plus d'une réservation comme réservation sera exporté vers Google/Oultook en tant que "temps occupé" et bloquera ce temps de la réservation.
Si vous devez accepter plus d'une réservation à la fois pour votre fournisseur, veuillez décocher la case "synchroniser les heures d'occupation".
- sept. Vous pourrez voir les événements du calendrier Google/Outlook qui bloquent l'heure dans SimplyBook uniquement dans la Vue du fournisseur de services dans le calendrier (parce que vous connectez le calendrier au fournisseur). Rien ne sera visible dans la vue Jour et Semaine car ces vues sont pour tous les fournisseurs (si vous avez plusieurs fournisseurs, il serait impossible d'afficher tous les événements Google/Outlook dans 1 calendrier).

Veuillez noter Pendant le processus de synchronisation, aucun détail d'événement n'est importé de votre calendrier externe. Les événements sont représentés par des blocs bleus sur la page Calendrier uniquement.
Simplybook ne se synchronise pas avec le calendrier Google/Outlook
Raisons possibles:
- 1. veuillez noter que la synchronisation peut prendre jusqu'à 10 minutes ;
- 2. si Google/Outlook met à jour l'application de calendrier, appuyez à nouveau sur le bouton "Exporter" pour synchroniser ;
- 3. le mauvais calendrier a été choisi (dans Fonctionnalités personnalisées//Synchronisation du calendrier//Paramètres//Veuillez sélectionner le calendrier) ou vous utilisez le calendrier du serveur Microsoft Exchange ;
- 4. les fuseaux horaires de votre calendrier Google/Outlook et de votre compte SimplyBook.me ne coïncident pas.
- 5. Les événements du calendrier Google doivent être marqués comme "occupés" pour une synchronisation bidirectionnelle, les événements du calendrier Outlook ne doivent pas être marqués comme "libres" pour bloquer les horaires sur la page de réservation.
Exemple tiré de l'agenda Google :
Exemple de calendrier Outlook :
centre
L'événement SimplyBook.me est répertorié deux fois dans l'agenda Google
Cela peut être dû au paramètre de calendrier Google pour ajouter automatiquement des événements à partir de vos e-mails. Par conséquent, si vous recevez des e-mails de confirmation avec les détails de la réservation, Google les ajoute automatiquement à votre calendrier. Pour désactiver cette option : cliquez sur l'icône Paramètres dans le coin supérieur droit de l'agenda Google // Paramètres et décochez la case à côté de l'option "Ajouter automatiquement des événements de Gmail à mon agenda".
Politique d'annulation
Vous pouvez limiter le temps pendant lequel les clients peuvent annuler des rendez-vous à l'aide de la fonction personnalisée de politique d'annulation. Définissez simplement le nombre d'heures avant le rendez-vous lorsque l'annulation est possible ou interdisez les annulations du tout. Si le client essaie d'annuler un rendez-vous au-delà de la limite, il verra un avertissement indiquant que la réservation ne peut pas être annulée.
Fonctionnalité personnalisée gratuite !
- Comment utiliser
- 1. Activez la politique d'annulation sur votre page Fonctionnalités personnalisées.

- 2. Accédez à ses paramètres sur la droite.

- 3. Ajoutez votre texte dans le champ correspondant et sélectionnez la période pendant laquelle les réservations peuvent être annulées
- (vous pouvez y utiliser des balises HTML pour formater le texte selon vos besoins).
- 4. Vous pouvez également demander à vos clients le motif d'annulation et rendre cette option obligatoire ou non.
Cours
gauche Maintenant, SimplyBook.me permet une nouvelle option pour la planification des cours et des événements, quel que soit le type d'entreprise que vous avez. Une toute nouvelle fonctionnalité vous permet d'avoir tous vos cours/événements dans une section séparée afin que vous ne les mélangez jamais avec des services simples. Ou vous pouvez utiliser uniquement l'interface classes/événements. De plus, cette fonctionnalité personnalisée permet d'avoir presque tous les paramètres nécessaires à la planification des cours/événements sur une seule page, ce qui rend le processus de configuration simple et rapide.
Tutoriel vidéo disponible ![]()
Pour activer cette option, rendez-vous sur la page Fonctionnalités personnalisées, sélectionnez la section « Connexe à la réservation » et cliquez sur « Activer » près de la fonction « Cours ».

Veuillez consulter des instructions plus détaillées sur la création de classes ici.
Et un tutoriel vidéo sur la façon de vendre des cours liés à l'adhésion ici
Nettoyer l'historique
Utilisez cette fonction personnalisée pour nettoyer toutes les anciennes réservations du système. Vous pouvez définir le moment où les réservations doivent être supprimées, puis la fonctionnalité personnalisée veillera à ne jamais enregistrer de réservations plus anciennes que celles définies par votre définition. Veuillez l'utiliser avec précaution car nous ne pouvons pas récupérer les réservations supprimées pour vous ! Cela fonctionne et supprime les réservations sélectionnées jusqu'à ce que vous désactiviez cette fonctionnalité.
Fonctionnalité personnalisée gratuite !
Veuillez noter ! :
- Cette fonctionnalité personnalisée n'est pas compatible avec : Coupons & Cartes-cadeaux, Packages et Adhésion
- Il commence à fonctionner le lendemain après son activation et supprime les réservations une fois par jour tous les jours jusqu'à ce que vous désactivez-le.
- Si vous avez des clients sans réservation à l'avenir, leurs enregistrements seront également supprimés avec leur dernière réservation.
- Comment utiliser
- 1. Activez cette fonctionnalité dans votre section Fonctionnalités personnalisées.

- 2. Accédez aux paramètres sur la droite pour définir vos préférences et sélectionnez l'heure à laquelle les réservations doivent être supprimées.

Champs client
Obtenez des informations des clients lors de l'inscription qui se rapportent au client. Un exemple de telles informations pourrait être « Nom du conjoint » ou « Date de naissance », car il s'agit d'informations fixes qui ne changent généralement pas entre les réservations.
Veuillez noter ! Lorsque vous activez la fonctionnalité personnalisée Champs client Client Login sera également activé.
- Comment utiliser
- 1. Activer Champs client Fonction personnalisée sur la Fonctionnalités personnalisées page.

- 2. Accédez à ses paramètres en cliquant sur Manage lien.
- 3. Ici, vous verrez les champs d'enregistrement de connexion client par défaut. Vous pouvez cliquer sur l'un d'eux pour le renommer si nécessaire.
- Appuyez sur + bouton pour créer un nouveau formulaire.

- 4. Dans le champ Titre de la question écrivez la question à laquelle vous voulez que vos clients répondent.
- 5. Choisissez le type de champ :
- chiffres uniquement - permet de saisir uniquement des chiffres. Utile lorsque vous avez besoin de connaître l'âge, la taille ou toute autre information qui ne nécessitera que des chiffres.
- une seule ligne - généralement utilisé pour les réponses courtes
- plusieurs lignes - utilisez ce type de fichier si vous attendez de longues explications de vos clients
- case à cocher - crée une case à cocher que les clients doivent cocher ou laisser décochée.
- sélection déroulante - crée une liste déroulante avec la possibilité de choisir une seule option. Afin de créer ce champ, vous devrez créer une liste de valeurs dans la section "Options déroulantes et option par défaut". Vous pouvez également sélectionner la valeur par défaut qui sera attribuée si rien n'est choisi dans la liste.
- date - crée une option de sélection de date avec le calendrier.
- HTML personnalisé - permet d'ajouter des séparateurs visuels ou du texte supplémentaire près du champ client. Ne peut pas être utilisé pour l'entrée client.
- 6. Faites-le plutôt obligatoire ou non à l'aide de Ce champ doit-il être facultatif commutateur.
- Ajouter aux factures si vous souhaitez que son titre et la réponse du client y soient reflétés.
- Enregistrez le formulaire lorsque vous avez terminé.
- sept. Vous pouvez également réorganiser tous les formulaires à votre goût en utilisant les flèches sur le bloc de gauche ou en définissant la position dans le mode d'édition de formulaire sur le côté droit.

- 8. Si vous souhaitez inclure des informations de formulaire client dans les modèles d'e-mail, recherchez les formulaires client variables et ajoutez-les aux modèles dans Settings -> Paramètres e-mail et SMS.
- (Ou utilisez Flexible Notifications fonctionnalité pour les modèles personnalisés par service et /ou fournisseur)

- 9. Les clients pourront alors remplir leurs réponses lors de sign up sur le site de réservation et modifier leurs données dans les profils clients.


- 10. Depuis votre page d'administration, vous pourrez afficher et modifier les réponses des clients dans Manage -> Clients -> Modifier pour le client correspondant.

- et exporter les réponses vers un fichier Excel au format Reports -> Clients -> Exporter vers Excel.

- Ou dans Gérer -> Clients -> Exporter vers Excel.
- Ou avec les informations de réservation dans Reports -> Détails de la réservation -> Exporter vers Excel.
Connexion client
Utilisez cette fonctionnalité personnalisée pour permettre aux clients de s'inscrire en ligne, d'effectuer rapidement des réservations et de consulter leur historique de réservation. Vous pouvez empêcher et débloquer les clients d'effectuer des réservations sur votre page de réservation et également désactiver ou activer la possibilité pour les clients de créer un compte. Si vous fermez pour les inscriptions de clients, seuls les clients que vous avez enregistrés et auxquels vous avez accordé l'accès peuvent effectuer des réservations.
- Comment utiliser
- 1. Activez cette option sur votre page Fonctionnalités personnalisées.

- 2. Accédez aux paramètres à droite pour :
- activer/désactiver l'inscription sur la page de réservation,
- demandez à vos clients leur adresse sur la page de réservation,
- rendre le champ téléphonique obligatoire ou non,
- masquer le "rapport de données personnelles" du profil du client
- définir des modèles de notification sur la création d'un nouvel utilisateur, la réinitialisation et la modification du mot de passe.

Pour avoir réservations uniquement de clients qui existent déjà dans le système veuillez décocher la case "Autoriser les clients à s'inscrire sur place".
Si elle est cochée, n'importe qui pourra s'inscrire et faire une réservation.

Pour bloquer/débloquer certains clients de la réservation, veuillez vous rendre dans Gérer//Clients et cliquer sur les boutons "Bloquer" ou "Débloquer".

Veuillez noter ! Si vous bloquez le client, il ne recevra pas d'informations sur vos promotions également.
Si vous avez plusieurs profils pour un même client et que vous avez besoin de fusionner des clients veuillez suivre ces instructions :
- 1) Allez dans Gérer//Clients, et cliquez sur "Fusionner les clients" en haut.

- 2) Cochez ensuite les cases avec les clients nécessaires et cliquez sur "Fusionner"

Veuillez noter ! Si vous avez des clients non fusionnés, ils ne pourront pas se connecter/s'inscrire sur votre site de réservation pour effectuer et voir des réservations.
Application mobile client
Permettez à vos clients de télécharger votre propre application client personnalisée. Avec l'application sur leur mobile, ils peuvent facilement réserver, reschedule, achetez packages, memberships et cartes cadeaux ainsi qu'accéder à votre entreprise directement à partir de leurs téléphones.
L'application Client est disponible pour tous les utilisateurs payants de SimplyBook.me qui utilisent Client Login,< ;/span> et si vous avez un abonnement premium, vous pouvez le personnaliser avec votre propre logo et la couleur de votre marque. Demandez à vos clients d'accéder à votre site de réservation sur un appareil mobile, et à partir de là, ils seront invités à télécharger l'application sur leur mobile.
C'est aussi simple que ça!
- Veuillez noter !
- Il s'agit de la version bêta ;
- Lorsque vous activez cette fonctionnalité Connexion client la fonctionnalité personnalisée sera également activée ;
- Il fonctionne actuellement avec des cours hebdomadaires, modernes et flexibles calendar layouts uniquement ;
- La fonctionnalité suivante n'est actuellement pas présente dans l'application client : Actualités, Galerie de photos,, Avis, Page personnalisée, Google translate, changement de mode de la page principale, affichage de l'heure de fin, masquage des images lors des étapes de réservation, orientation RTL, Contact widget, ajustements de couleur des emplacements occupés et disponibles.</span> ;
- Tutoriels vidéo disponibles
- Comment configurer l'application mobile Client
- Comment utiliser l'application mobile Client
- Comment configurer l'application mobile Client
- Comment utiliser
- 1. Activer Application mobile client sur votre Fonctionnalités personnalisées page dans Améliorations commerciales section.

- 2. Et il est prêt à l'emploi. Certaines options de rapport deviennent disponibles.

- 3.(disponible uniquement pour les abonnements Premium) Ajoutez votre propre nom d'application, définissez la couleur de la marque, sélectionnez le calendar layout, téléchargez le logo et les images de la bannière.
- Il est important d'utiliser une image carrée pour le logo, les différentes dimensions ne seront pas enregistrées.
- Nous vous recommandons également d'utiliser des couleurs plus claires et/ou plus sombres pour l'arrière-plan pour une meilleure expérience client.

- 4. Envoyez l'URL de votre site de réservation (la bannière n'apparaît pas sur les widgets) à vos clients afin qu'ils puissent installer l'application sur leur téléphone en cliquant sur le bannière.
- (La bannière d'installation d'invitation peut ne pas s'afficher dans les navigateurs mobiles intégrés, il est recommandé d'utiliser Chrome à la place)
- Veuillez noter ! Les utilisateurs d'appareils iOS devront ouvrir votre site de réservation dans la version complète de Safari pour avoir la bannière d'invitation à l'installation, puis utilisez simplement Ajouter à l'écran d'accueil option.

- 5. En conséquence, ils pourront réserver en ligne, voir leurs rendez-vous (cette option est disponible même en mode hors ligne), <span style="background-color:#cdeffc; padding:5px; border-radius:5px;"> ;reschedule ou les annuler, achetez gift cards, memberships et packages, afficher invoices et mettre à jour ses propres informations si nécessaire.

- Notifications push
- Les utilisateurs de téléphones Android peuvent également recevoir des notifications push sur les nouvelles réservations ou les annulations sur leurs appareils.
- Pour cela, il ne sera nécessaire d'activer les notifications dans l'application qu'après l'inscription/la connexion et dans une boîte de dialogue système standard.

- Si les notifications sont activées, mais que les messages push ne viennent pas, il est nécessaire de vérifier si Système Chrome notifications sont activés dans les paramètres de l'appareil.

- Les appareils iOS n'autorisent pas actuellement les notifications push dans les navigateurs et c'est pourquoi il ne sera malheureusement pas possible de les obtenir sur ces téléphones.
• Du côté administrateur, il est possible de voir toutes les notifications push envoyées aux clients dans Reports</ durée> -> Application client -> Notifications ainsi que s'ils ont été reçus et cliqués par le client.

Reprogrammation client
La fonction personnalisée de replanification du client vous permet d'inclure des liens de replanification dans les messages de notification à vos clients et le bouton de replanification sur le site de réservation. Les clients peuvent utiliser ces options pour trouver une nouvelle heure pour leur réservation si dans la période de report autorisée.
- Veuillez noter ! :
- Les clients peuvent uniquement modifier la date et/ou l'heure du rendez-vous ;
- Si vous avez activé Tout employé fonction personnalisée et qu'elle a été utilisée lors du processus de réservation, le fournisseur ne sera pas modifié lors de la reprogrammation du côté client. Si le changement de fournisseur (ou la sélection aléatoire) est nécessaire, veuillez demander aux clients d'annuler et de réserver à nouveau.
- Cette fonctionnalité n'est pas compatible avec Approuver les réservations fonction personnalisée ;
- Il n'est pas possible de reprogrammer des rendez-vous récurrents et de groupe ;
- Si carte-cadeau, coupon ou membership ont été appliqués lors du processus de réservation initial, il n'est pas possible de reprogrammer par le client ;
- Certains calendrier layouts changement sur la page de reprogrammation (prestataire flexible devient flexible ; prestataire moderne devient moderne ; cours hebdomadaires devient créneaux hebdomadaires ; cours quotidiens ' est remplacé par moderne).
- Comment utiliser
- 1. Activer Replanification client sur votre Fonctionnalités personnalisées page.

- 2. Sélectionnez la replanification de la période de restriction dans ses paramètres.

- 3. (facultatif) Ajoutez [reschedule_link] variable aux notifications client dans Settings -> Paramètres e-mail et SMS(ou Flexible Notifications paramètres si vous avez des modèles personnalisés par service/fournisseur).

- 4. En conséquence, les clients pourront utiliser Reschedule sur le site de réservation Mes réservations page ou en utilisant le lien des notifications par e-mail.

Widget de contact
Activez cette fonction personnalisée si vous devez ajouter un widget Réserver et contacter à votre propre site Web ou simplement ajouter un formulaire de contact au site Web de réservation. Grâce à cette fonctionnalité personnalisée, vos clients pourront réserver directement depuis votre site Web et également vous envoyer un contact avec des informations détaillées.
- Comment utiliser
- 1. Pour activer cette option, veuillez cliquer sur "Activer" près de l'option correspondante sur votre page de fonctionnalités personnalisées.

- 2. Veuillez choisir "Paramètres" pour configurer l'apparence du widget et générer le code nécessaire.

- Voir les instructions comment ajouter un widget de réservation à votre site Web
- 3. Pour vérifier les messages reçus de vos clients, accédez à Rapports -> SMS (messages texte) -> ; Contacter wodget

Coupons & Cartes-cadeaux
![]()
Créez et vendez des cartes-cadeaux, et envoyez des coupons à vos clients avec Coupons & Fonctionnalité personnalisée des cartes-cadeaux ! Vous pouvez faire des réductions en % et en montant fixe et vendre des chèques-cadeaux. Utilisez cette fonctionnalité étonnante pour promouvoir votre entreprise. Personnalisez vos promotions avec des dates, des messages et des codes définis.
- Veuillez consulter notre tutoriel vidéo sur l'utilisation de cette fonctionnalité ici.
Veuillez noter!
   • Cette fonctionnalité personnalisée ne peut pas être utilisée avec  Nettoyer l'historique.
   • Lorsque vous activez cette fonctionnalité  Accepter les paiements sera également activé.
   • Les remises à montant fixe peuvent être utilisées pour plusieurs achats jusqu'à ce que le montant total de la remise soit utilisé.
   • Les clients doivent être abonnés à vos supports marketing pour pouvoir recevoir ces notifications.
   • Si vous utilisez cette fonctionnalité avec  Réservations multiples,  Réservations de groupe ou services récurrents la réduction sera appliquée à l'ensemble de l'achat (toutes les sessions sélectionnées).
- Comment utiliser
- 1. Activez cette fonctionnalité personnalisée dans la section Améliorations professionnelles de votre page Fonctionnalités personnalisées.
- 2. Accédez à "Gérer" sur la droite ou allez à Gérer//Coupons et cartes-cadeaux.
- 3. Cliquez sur l'icône "+" pour créer une promotion ou une carte cadeau.

- 4. Remplissez les détails principaux dans le menu qui apparaît sur le côté droit.
- 5. Ajoutez des détails que vos clients verront.

- 6. Définissez la période de validité de la promotion ou de la carte-cadeau.

- sept. De plus, vous pouvez associer votre promotion/carte-cadeau à des services, des abonnements, des produits à vendre et/ou des services complémentaires spécifiques.
- 8. Enregistrez vos paramètres. Si nécessaire, vous pouvez maintenant émettre les cartes-cadeaux et/ou envoyer des messages de promotion à vos clients existants en cliquant sur le bouton "Émettre une carte-cadeau"/"Envoyer un message de coupon" à côté de l'article souhaité.
- Ou créez-y un lot de cartes-cadeaux non personnalisées.
- 9. Vous pouvez également définir des modèles pour que les clients reçoivent des notifications par e-mail et/ou SMS lorsqu'ils achètent eux-mêmes une carte-cadeau sur le site de réservation.
:Pour ce faire, veuillez accéder aux fonctionnalités personnalisées//Coupons et cartes-cadeaux, à droite de la page.
CSS personnalisé
Créez votre propre interface de réservation avec cette fonctionnalité CSS personnalisée. Il permet de changer les styles des différents éléments, de les masquer, de changer les polices, les couleurs, les tailles de police, etc. Si vous connaissez le codage CSS, veuillez utiliser les outils du navigateur pour trouver les identifiants des éléments et écrire des règles dans les paramètres de la fonction personnalisée, Si vous n'avez pas de connaissances approfondies en CSS, veuillez contacter le support et ils essaieront de trouver la meilleure solution pour vous.
Fonctionnalité personnalisée gratuite !
- Comment utiliser
- 1. Activez cette option sur votre page Fonctionnalités personnalisées.

- 2. Cliquez sur "Paramètres" pour cette fonctionnalité.
- 3. Ajoutez le(s) code(s) pour ajuster les styles à l'onglet "Pages de réservation CSS" si vous souhaitez modifier la page de réservation
- ou "Widget CSS" si vous modifiez un widget sur votre site Web.
centre
Voir les demandes les plus courantes sur la suppression d'éléments avec CSS ici (téléphone, champs de messagerie, onglets sociaux, notre temps, etc.)
Domaine personnalisé
Cette option permet de définir votre propre lien de site (URL) pour votre page de réservation avec une connexion effectuée via une couche sécurisée. Si vous possédez votre propre nom de domaine, vous pouvez maintenant simplement utiliser le site de réservation avec ce nom ou un sous-domaine de ce nom (/v2/ une partie de l'URL du site de réservation ne peut pas être modifiée).
Veuillez noter ! Cette fonctionnalité n'est pas compatible avec la Facebook Client Info custom feature.
- Comment utiliser
- 1. Activez cette fonctionnalité par paiement unique (vous verrez le prix exact dans votre compte) sur votre page de fonctionnalités personnalisées.

- 2. Accédez à ses "Paramètres" en sélectionnant l'option correspondante sur le côté droit de la page.

- 3. Ensuite, dans votre contrôleur de domaine, vous devez trouver où vous définissez les enregistrements DNS et définissez l'enregistrement A sur IP mentionné dans les paramètres de cette fonctionnalité.
- Veuillez noter ! L'enregistrement AAAA (IPv6) ne doit pas être défini, sinon le certificat SSL ne peut pas être émis.
centre
:Une fois les enregistrements A définis, entrez le nom de domaine que vous souhaitez utiliser dans ses paramètres et enregistrez-le.
- Ensuite, nous recevrons automatiquement la demande et appliquerons les paramètres de notre côté (cela peut prendre un certain temps - généralement entre 24 et 48h). Dès qu'ils sont appliqués, votre nom de domaine commence à fonctionner pour le site de réservation.
- Si vous souhaitez changer le nom de domaine personnalisé en un nom différent de celui défini avant de pouvoir le faire pour un prix supplémentaire, car de nouveaux certificats SSL doivent être créés. Pour plus d'informations, veuillez contacter l'assistance.
Courriel personnalisé
Souhaitez-vous envoyer à vos clients et à votre personnel des notifications par e-mail attrayantes avec votre propre marque personnalisable, des liens, des boutons et de nombreuses autres options ? L'activation de cette fonctionnalité personnalisée vous donne accès à l'éditeur HTML où vous pouvez facilement faire glisser et déposer divers blocs de contenu, ajouter des images, du texte, des coordonnées, etc. N'oubliez pas que le contenu lié à la réservation ou à l'achat, ainsi que l'ajout du correspondant les variables doivent être éditées soit dans Paramètres -> Paramètres d'e-mail et de SMS si vous utilisez des modèles de notification de rendez-vous courants, ou dans les paramètres de fonctionnalités personnalisées spécifiques si vous avez des notifications personnalisées.
Veuillez noter ! Cette fonctionnalité personnalisée est disponible uniquement avec les abonnements payants.
Tutoriel vidéo disponible ![]()
Veuillez noter !
La personnalisation actuellement disponible est présente pour les modèles d'e-mail suivants :
   • Principales notifications liées aux réservations depuis Paramètres -> Paramètres e-mail et SMS ;
   • Facture les e-mails de la fonctionnalité personnalisée Accepter les paiements ;
   • Réservations de groupe notifications de fonctionnalités personnalisées ;
   • Réservations multiples notifications de fonctionnalités personnalisées ;
   • Connexion client notifications de fonctionnalités personnalisées ;
   • Adhésion notifications de fonctionnalités personnalisées ;
   • Packages notifications de fonctionnalités personnalisées ;
   • Tickets notifications de fonctionnalités personnalisées ;
   • Coupons & Cartes-cadeaux notifications de fonctionnalités personnalisées (à la fois : achat côté client sur la page des fonctionnalités personnalisées et émission manuelle côté administrateur dans la gestion des coupons et des cartes-cadeaux) ;
   • Test médical notifications de fonctionnalités personnalisées ;
   • Fonction personnalisée Réserver bientôt notifications.
- Comment utiliser
- 1. Activer E-mail personnalisé sur votre Fonctionnalités personnalisées page, Apparence section.

- 2. Cliquez sur Créer un modèle lien pour accéder à l'éditeur et pouvoir configurer votre premier modèle.

- 3. Veuillez sélectionner Créer à partir de modèles si vous souhaitez sélectionner l'une de nos belles options prédéfinies ou Créer un nouveau vide pour commencer à ajouter tous les éléments à partir de zéro.
: Ajoutez un nom de modèle pour le type de modèle vide (les modèles prédéfinis peuvent être renommés lors de l'édition) et appuyez sur Create< /span> bouton pour accéder au mode d'édition.


- 4. Ajoutez/modifiez des blocs de texte, ajoutez des images, des liens, des menus, des colonnes, téléchargez le logo de votre entreprise, utilisez les couleurs de la marque et bien plus encore avec l'éditeur intégré.
- Veuillez utiliser les outils sur le côté droit de la page et la visualisation au centre, faites glisser et déposez, ajustez les éléments souhaités pour obtenir le look nécessaire.
- 5. Vous pouvez également passer à Mobile mode pour ajuster l'apparence des e-mails pour les téléphones mobiles.

- 6. Il est important d'ajouter {{content}} balise à l'endroit souhaité dans le modèle, comme dans les vrais e-mails, il sera remplacé par les informations relatives à la réservation/achat.
- Sans cette balise, la personnalisation ne sera pas appliquée à la notification et elle sera envoyée en texte brut.
- Veuillez noter ! Toutes les variables liées aux rendez-vous ou aux achats ne doivent être utilisées que soit dans Settings -> Paramètres e-mail et SMS ou dans la fonction personnalisée options.

- (facultatif) Vous pouvez également utiliser {{name}}< /span> et {{email}} balises ici au cas où vous auriez besoin de refléter le nom et/ou l'adresse e-mail du destinataire séparément du contenu principal de la notification.
- Veuillez noter ! Les modèles sont régulièrement enregistrés automatiquement, vous n'avez donc pas besoin d'enregistrer manuellement eux.

- sept. Utilisez le Aperçu option en bas pour vérifier le look.

- 8. (facultatif) Si vous avez besoin de conceptions similaires avec quelques modifications mineures uniquement ou avec un contenu différent, veuillez utiliser Clone</span> ; option pour faire une copie du modèle précédemment enregistré.

- 9. Une fois que tous les modèles nécessaires sont prêts, veuillez revenir à Fonctionnalités personnalisées -> Apparence -> E-mail personnalisé.

- dix. Dans le tout premier bloc, vous verrez votre entreprise adresse e-mail par défaut. Vous pouvez le laisser tel quel ou en définir un autre pour le test.

- 11. Dans le(s) bloc(s) suivant(s), veuillez sélectionnez le modèle pour chaque type de notification.
- 12. Envoyez des testez les e-mails pour vérifier l'apparence avec un exemple de contenu.

- 13. Si vous souhaitez définir le même modèle pour tous les types de notifications dans un bloc, veuillez utiliser le de droite options de menu.

- 14. Si vous avez diverses fonctionnalités personnalisées avec vos propres types de notification activés, vous pourrez voir le blocks</span> ; dans E-mail personnalisé paramètres.
- Veuillez ouvrir chaque bloc et définissez les modèles pour les notifications que vous souhaitez personnaliser.
- Enregistrer les paramètres une fois terminé.

- 15. Il est également possible d'utiliser des e-mails personnalisés lorsque vous devez envoyer manuellement des e-mails depuis Reports -> Détails des réservations ou Rapports -> Clients.
- Cochez simplement les cases souhaitées, cliquez sur Envoyer un e-mail et choisissez le modèle à appliquer dans la première liste déroulante de la fenêtre contextuelle. Ajoutez un sujet et du contenu. Envoyez le message.

Page personnalisée
la gauche
Cette fonctionnalité personnalisée vous permet d'ajouter vos propres pages statiques personnalisées à votre site Web de réservation, de réorganiser toutes les pages du site de réservation dans le menu principal, de masquer les éléments de menu et d'ajouter des liens personnalisés au menu principal.
Comment utiliser l'option de création de page
- 1. Activez la fonctionnalité "Page personnalisée" sur votre Page de fonctionnalités personnalisées -> Ajout de plus à la section "Site de réservation".

- 2. Allez dans "Gérer" pour configurer les pages souhaitées.

- 3. Sur la page suivante, vous pourrez voir les onglets de la page de réservation du système.
- (Ceux qui sont actuellement désactivés sont grisés.)
- Les pages système ne peuvent pas être modifiées dans cette interface. Vous devrez naviguer vers la section correspondante en utilisant les liens fournis.
- 4. Vous pouvez utiliser les flèches pour réorganiser les onglets et les icônes "Œil" pour masquer et afficher les pages.
- Veuillez noter que si vous masquez la page, il sera toujours possible d'y accéder en utilisant le lien direct.

- 5. Si vous souhaitez ajouter une nouvelle page personnalisée, veuillez cliquer sur l'icône "+" en haut et choisissez l'option "Ajouter une page personnalisée".

- 6. Sur le côté droit, le menu de création de page apparaîtra. Veuillez ajouter le titre et le contenu de la page souhaitée.
- Vous pouvez utiliser l'éditeur HTML intégré pour ajouter des éléments ou si vous avez des connaissances en codage HTML, vous pouvez passer en mode code en utilisant l'icône "</>".
- Attention, il est nécessaire de désactiver le mode de codage avant d'enregistrer la page pour que le code soit enregistré correctement.

Comment utiliser l'ajout de liens
Il peut arriver que vous deviez rediriger vos clients vers une autre page (ex. votre site web, etc.).
Dans ce cas, "Ajouter un lien à la barre de menu" vous aidera.
- 1. Cliquez sur l'icône "+" en haut et choisissez l'option "Ajouter un lien à la barre de menus".
- 2. Ajoutez le titre que vous souhaitez afficher dans l'en-tête de la page de réservation dans le champ "Texte du lien personnalisé à afficher" et indiquez le lien lui-même dans le champ correspondant.
- 3. Vous pouvez également choisir si le lien doit être ouvert dans le nouvel onglet du navigateur ou dans le même.
- Pour cela veuillez choisir "self" si vous souhaitez que la page soit ouverte dans le même onglet ou "vide" si vous souhaitez qu'elle soit ouverte dans l'onglet séparé du Paramètre "Choisissez comment le lien sera ouvert".
Rapport quotidien
Rapport quotidien
Chaque jour, cette fonctionnalité personnalisée vous enverra un statut mis à jour de toutes les réservations de la journée. Vous recevrez également une liste avec vos réservations actives pour la semaine à venir.
Dans les paramètres de cette fonction personnalisée, vous pouvez décider si vous souhaitez inclure les nouvelles réservations d'aujourd'hui, les réservations annulées d'aujourd'hui, décider de la période pour les réservations à venir comme 1 jour, 3, 7, 14, 21, 30 jours et définir l'heure de notification.
te fonctionnalité sur votre page Fonctionnalités personnalisées.

- 2. Accédez aux paramètres à droite pour gérer les options disponibles.

- 3. Ajustez les préférences et enregistrez.
- Le système enverra le rapport correspondant à l'adresse e-mail de votre entreprise que vous avez indiquée dans Paramètres//Informations sur l'entreprise//Informations de base.
Afficher les espaces restants
Affichez le nombre de places restantes lorsque vous acceptez plusieurs clients par créneau, comme pour les cours et les événements. Vous pouvez également choisir d'afficher le nombre total de places ainsi que le nombre de places restantes.
Veuillez noter!
   • Cette fonctionnalité n'est pas compatible avec Limiter les réservations ;
   • Fonctionne pour les calendar layouts suivants uniquement : créneaux hebdomadaires, cours modernes, hebdomadaires et quotidiens, fournisseur moderne.
   • Le temps bloqué par Calendar sync n'influence pas le nombre de plages horaires.
- Tutoriel vidéo disponible
- Comment utiliser
- 1. Activez Afficher les espaces restants dans votre section Fonctionnalités personnalisées.

- 2. (facultatif) Activez l'option correspondante pour afficher le nombre total d'espaces avec ceux restants.

- 3. En conséquence, les clients pourront voir le nombre d'espaces restants pour chaque créneau horaire (et le total si "Afficher le nombre total d'espaces par créneau" est activé).

Validateur de réservation externe
Vous pouvez valider les réservations à l'aide d'un script externe. Le script peut vérifier les variables de la réservation, et seulement si les conditions sont remplies, la réservation est traitée. De plus, le script de validation peut ramener des informations qui peuvent être injectées dans les variables du formulaire d'admission.
Veuillez noter !
- Des compétences en développement sont nécessaires pour utiliser cette fonctionnalité.
- Formulaires d'admission la fonctionnalité personnalisée sera activée avec celle-ci.
- Comment utiliser
- 1. Activer External Booking Validator fonction personnalisée sur votre Fonctionnalités personnalisées page, Autre section.

- 2. Créez votre propre script de validation avec vos propres conditions souhaitées.
:Par exemple, vous pouvez exiger certaines réponses des clients à un ou plusieurs intake forms< /span> pour que la réservation soit soumise à votre système.
- 3. Insérez votre script dans cette fonctionnalité settings sur la Fonctionnalités personnalisées page et enregistrez.

- Un exemple de script est disponible ici.
Réservations Facebook et Instagram
![]()
Connectez votre système de réservation SimplyBook.me à votre page Facebook Business et à votre profil Instagram. De cette façon, vous pouvez réserver encore plus de clients en ayant un bouton "Réserver" à la fois sur votre page Facebook Business et votre profil Instagram - le tout parfaitement intégré à votre SimplyBook système de réservation.
Veuillez noter !
- Il est possible de connecter l'option de réservation aux pages Facebook Business et Instagram Business. Cette fonctionnalité ne peut pas être ajoutée à une page personnelle.
- L'option de réservation n'est pas affichée sur la version Instagram de bureau et ne peut être utilisée que via des applications mobiles.</span> ;
- Le thème Bookingtroll est utilisé par défaut pour le widget de réservation. Si vous souhaitez modifier le style, veuillez passer à Premium pour sélectionner le thème souhaité et pouvoir utiliser CSS personnalisé ajustements.
- L'apparence du widget peut varier en fonction des préférences Facebook pour différents appareils et applications
- Cette fonctionnalité n'est pas compatible avec Facebook Pixel fonction personnalisée.
- Tutoriel vidéo disponible
Comment ajouter et utiliser l'option de réservation sur la page d'entreprise Facebook/Instagram
- 1. Activer Facebook & Réservations Instagram fonction personnalisée sur votre Fonctionnalités personnalisées page.

- 2. Connectez-vous à votre ou vos comptes professionnels Facebook/Instagram dans un autre onglet du navigateur.
- 3. Revenez à l'interface de SimplyBook.me et cliquez sur Settings près de Facebook & Réservations Instagram.
- 4. Cliquez sur Connectez-vous avec Facebook bouton sur la page que vous voyez.
- 5. Vous serez redirigé vers Facebook interface pour gérer les autorisations et la connexion à SimplyBook.me.
- Veuillez suivre les étapes 1 à 5 affichées ci-dessous.
- (Si vous avez un profil d'entreprise Instagram connecté à votre page d'entreprise Facebook, vous pourrez également le connecter à cet endroit
- et Livre apparaîtra automatiquement ici)

- 6. Vos services seront désormais affichés sur votre page Facebook avec Livre à côté d'eux ou Réserver maintenant sous la bannière de la page qui redirigera vos clients vers votre site de réservation.
- (les options de représentation dépendent de votre page Facebook professionnelle)

- sept. Vous pouvez également ajouter une option de réservation aux publications de votre page Facebook afin que les clients puissent réserver rapidement vos services.

Comment supprimer le bouton Livre des pages Facebook/Instagram
- 1. Accédez à Fonctionnalités personnalisées -> Facebook & Réservations Instagram -> Paramètres du côté de SimplyBook.me.
- 2. Cliquez sur Déconnexion en haut de la page.

Comment ajouter et utiliser l'option de réservation sur Instagram uniquement
- 1. Ouvrez votre Instagram application mobile et connectez-vous à votre page d'entreprise.
- 2. Accédez à votre profil et sélectionnez pour le modifier.
- 3. Suivez les étapes 1 à 10 ci-dessous pour ajouter Book bouton qui conduira les clients vers votre site de réservation :

Comment supprimer l'option Réserver de la page professionnelle d'Instagram
- 1. Ouvrez votre Instagram mobile et accédez à la modification de votre profile.
- Suivez les étapes 1 à 4 ci-dessous pour supprimer Book bouton:

Informations client Facebook
- 1. Activer External Booking Validator fonction personnalisée sur votre Fonctionnalités personnalisées page, Autre section.
- 2. Créez votre propre script de validation avec vos propres conditions souhaitées.
:Par exemple, vous pouvez exiger certaines réponses des clients à un ou plusieurs intake forms< /span> pour que la réservation soit soumise à votre système.
- 3. Insérez votre script dans cette fonctionnalité settings sur la Fonctionnalités personnalisées page et enregistrez.
- Un exemple de script est disponible ici.
Réservations Facebook et Instagram
![]()
Connectez votre système de réservation SimplyBook.me à votre page Facebook Business et à votre profil Instagram. De cette façon, vous pouvez réserver encore plus de clients en ayant un bouton "Réserver" à la fois sur votre page Facebook Business et votre profil Instagram - le tout parfaitement intégré à votre SimplyBook système de réservation.
Veuillez noter !
- Il est possible de connecter l'option de réservation aux pages Facebook Business et Instagram Business. Cette fonctionnalité ne peut pas être ajoutée à une page personnelle.
- L'option de réservation n'est pas affichée sur la version Instagram de bureau et ne peut être utilisée que via des applications mobiles.</span> ;
- Le thème Bookingtroll est utilisé par défaut pour le widget de réservation. Si vous souhaitez modifier le style, veuillez passer à Premium pour sélectionner le thème souhaité et pouvoir utiliser CSS personnalisé ajustements.
- L'apparence du widget peut varier en fonction des préférences Facebook pour différents appareils et applications
- Cette fonctionnalité n'est pas compatible avec Facebook Pixel fonction personnalisée.
- Tutoriel vidéo disponible
Comment ajouter et utiliser l'option de réservation sur la page d'entreprise Facebook/Instagram
- 1. Activer Facebook & Réservations Instagram fonction personnalisée sur votre Fonctionnalités personnalisées page.
- 2. Connectez-vous à votre ou vos comptes professionnels Facebook/Instagram dans un autre onglet du navigateur.
- 3. Revenez à l'interface de SimplyBook.me et cliquez sur Settings près de Facebook & Réservations Instagram.
- 4. Cliquez sur Connectez-vous avec Facebook bouton sur la page que vous voyez.
- 5. Vous serez redirigé vers Facebook interface pour gérer les autorisations et la connexion à SimplyBook.me.
- Veuillez suivre les étapes 1 à 5 affichées ci-dessous.
- (Si vous avez un profil d'entreprise Instagram connecté à votre page d'entreprise Facebook, vous pourrez également le connecter à cet endroit
- et Livre apparaîtra automatiquement ici)
- 6. Vos services seront désormais affichés sur votre page Facebook avec Livre à côté d'eux ou Réserver maintenant sous la bannière de la page qui redirigera vos clients vers votre site de réservation.
- (les options de représentation dépendent de votre page Facebook professionnelle)
- sept. Vous pouvez également ajouter une option de réservation aux publications de votre page Facebook afin que les clients puissent réserver rapidement vos services.
Comment supprimer le bouton Livre des pages Facebook/Instagram
- 1. Accédez à Fonctionnalités personnalisées -> Facebook & Réservations Instagram -> Paramètres du côté de SimplyBook.me.
- 2. Cliquez sur Déconnexion en haut de la page.
Comment ajouter et utiliser l'option de réservation sur Instagram uniquement
- 1. Ouvrez votre Instagram application mobile et connectez-vous à votre page d'entreprise.
- 2. Accédez à votre profil et sélectionnez pour le modifier.
- 3. Suivez les étapes 1 à 10 ci-dessous pour ajouter Book bouton qui conduira les clients vers votre site de réservation :
Comment supprimer l'option Réserver de la page professionnelle d'Instagram
- 1. Ouvrez votre Instagram mobile et accédez à la modification de votre profile.
- Suivez les étapes 1 à 4 ci-dessous pour supprimer Book bouton:
Informations client Facebook
- Comment utiliser
- 1. Activez cette option sur votre page de fonctionnalités personnalisées.

- 2. Et les clients pourront se connecter avec leurs profils Facebook sur le site de réservation.

Facebook Pixel
Gérez les analyses de votre site de réservation avec Facebook Pixel
Veuillez noter ! Cette fonctionnalité personnalisée n'est pas compatible avec Facebook and Instagram Bookings
- Comment utiliser
- 1. Activer Facebook Pixel sur votre Fonctionnalités personnalisées page, Statistiques et analyses section.

- 2. Accédez à Sources de données sur votre Facebook page entreprise et sélectionnez le pixel précédemment sélectionné ou créez-en un nouveau</span> ; en cliquant sur Connecter les sources de données bouton.
- 3. Copiez le code de pixel à 16 chiffres.

- 4. Collez-le dans le champ Pixel ID champ sur SimplyBook.me côté. Enregistrer les paramètres.

- 5. (facultatif) Vous pouvez tester les événements en utilisant l'onglet correspondant sur votre page professionnelle Facebook.
: Collez simplement l'URL de votre site Web de réservation, accédez-y et parcourez les pages pour créer l'activité.
- Visualisez les urls, les événements et leurs paramètres. Il est possible de voir des pages vues simples, de programmer et d'acheter des événements.


- 6. Dans la section Overview L'onglet Facebook vous permettra de voir les événements réels avec les détails dans les paramètres.

Téléchargeur de fichiers - Google Drive
Activez cette fonctionnalité personnalisée pour permettre à vos clients de télécharger des documents signés ou d'autres informations directement sur votre compte Google Drive.
Veuillez noter !
- Cette fonctionnalité n'est pas entièrement prise en charge dans l'application d'administration. Si vous l'utilisez et avez besoin de créer des réservations à partir de là, veuillez rendre les champs de fichier facultatifs car il n'est actuellement pas possible de télécharger des fichiers dans l'application. Cependant, vous pourrez voir les noms de fichiers dans les rendez-vous déjà pris.
- La taille du fichier téléchargé doit être inférieure à 5 Mo et ne peut pas être une archive ou un fichier exécutable.
- Comment utiliser
1. Activez cette option sur votre Fonctionnalités personnalisées -> Ajout d'éléments supplémentaires au site Web de réservation Catégorie.

2. Sur le côté droit de la page, vous verrez ses paramètres. Cliquez sur Autoriser pour vous connecter à votre Google Drive et donner les autorisations demandées.

3. Une fois la connexion établie, vous pourrez voir son état et utiliser le lien vers le dossier des fichiers sur votre Google Drive à partir de la même page Fonctionnalités personnalisées.
4. Accédez à Gérer -> Formulaires d'admission ou Gérer -> Champs client (ou activez une ou les deux fonctionnalités si nécessaire) et créez File Uploader - Google Drive formulaire.
Rendez-le obligatoire ou non selon vos besoins.
1200px|center
5. Après avoir créé les formulaires souhaités, les clients pourront télécharger leurs fichiers pendant le processus de réservation (Formulaires d'admission)
ou inscrivez-vous (Champs client)
6. Du côté administrateur, vous pourrez voir et télécharger les fichiers soit dans la fenêtre contextuelle de réservation sur la page Calendrier s'il s'agit d'un intake form

ou depuis Gérer -> Clients -> modifiez l'enregistrement du client si vous l'avez en tant que champ client.

Et, bien sûr, vous pourrez télécharger manuellement les fichiers lors de la nouvelle réservation ou de la création/modification du dossier client du côté administrateur si nécessaire.
Notifications flexibles
![]()
La fonction personnalisée de notifications flexibles vous permet de personnaliser les messages par service, par fournisseur ou en utilisant une combinaison de services et de fournisseurs. Cela signifie que certains services peuvent avoir un message différent du message général de rappel sortant pour d'autres services. Un certain fournisseur peut également souhaiter inclure des instructions différentes pour les clients qui réservent un certain service. La fonction personnalisée de notifications flexibles vous offre toute la flexibilité dont vous pourriez avoir besoin dans de tels cas !
Veuillez noter ! Cette fonctionnalité personnalisée est disponible uniquement avec les abonnements payants.
- Comment utiliser
- 1. Accédez à la section Fonctionnalités personnalisées//Réservation, recherchez la fonctionnalité personnalisée de notifications flexibles et appuyez sur "Activer".

- 2. Cliquez sur "Gérer" à côté de cette fonctionnalité.

- 3. Sur la page que vous voyez, appuyez sur "Nouveaux paramètres de modèle flexible".
- 4. Dans le nouveau modèle, sélectionnez les services et/ou sélectionnez les fournisseurs auxquels les modèles personnalisés seront appliqués. Sélectionnez ensuite le type de notification pour ajouter/modifier le modèle et modifiez le texte. Veuillez utiliser des variables à droite pour les inclure dans vos modèles si nécessaire.
Google Adwords et Analytics
Utilisez la fonctionnalité personnalisée de Google Analytics pour voir combien de clients visitent votre site quotidiennement et pendant les campagnes de promotion. Utilisez les analyses d'adwords pour compter combien de personnes réservent réellement après avoir cliqué sur une publicité adwords.
- Comment utiliser
- 1. Activez la fonctionnalité "Google Adwords et Analytics" sur votre page de fonctionnalités personnalisées.
- 2. Accédez aux paramètres sur la droite.
- 3. Remplissez les cases avec les informations correspondantes.
- Où trouver les détails
- 1. L'identifiant Google Analytics se trouve dans vos comptes Google Analytics.
- Accédez à l'accueil Analytics et cliquez sur "Toutes les données du site Web" dans le coin supérieur gauche.

- 2. Dans la fenêtre contextuelle, vous verrez votre identifiant Analytics
- Il doit être au format : UA-XXXXXXXX-X Où XXXXXXX-X est un nombre.
- Un exemple de cet identifiant serait : UA-70295750-1
- Pour commencer à suivre les visiteurs, il vous suffit de définir votre identifiant de compte Analytics.
devez configurer un identifiant de conversion de campagne AdWords et insérer cet identifiant dans la fonction personnalisée de SimplyBook.me.
- 1. Connectez-vous à votre compte Ads sur https://ads.google.com
- 2. Cliquez sur Outils et sélectionnez Conversions

- 3. Cliquez sur + pour créer des conversions et sélectionnez Conversions de sites Web.
- 4. Configurez les options.
centre
Valeur de conversion Google est la valeur de conversion que vous attribuez à un client qui atteint votre cible. Il peut, par exemple, être fixé à 20 pour 20 $ par conversion si le prix moyen de votre service est de 20 $. Nous l'avons défini par défaut sur 1, ce qui peut signifier une valeur de 1 $ par conversion, mais vous devez la remplacer par la valeur qui vous convient.
- 5. Sélectionnez pour insérer la balise vous-même.
- 6. Ensuite, vous verrez un code comme celui-ci :
<!- Extrait d'événement pour la page de conversion de test ->

<script>

gtag('événement', 'conversion', {'send_to': 'AW-XXXXXXXXX/YYYYYYYY-YYYYYYYYYYY'});

</script>
où XXXXXXXXX est votre identifiant de conversion (valeur google_conversion_id) et
YYYYYYYY-YYYYYYYYYYY est le libellé de conversion (valeur google_conversion_label)
- sept. Utilisez ces détails pour ajouter aux champs correspondants de ces paramètres de fonctionnalité personnalisée.
Google Authenticator
left
Ajoutez de la sécurité à votre compte. Vous pouvez utiliser une authentification en 2 étapes lors de la connexion à votre compte pour empêcher tout accès non autorisé. Lors de la saisie du mot de passe, il vous sera demandé d'insérer le code de connexion à 6 chiffres de votre authentificateur Google ou d'une application tierce.
Vous pouvez utiliser cette fonctionnalité personnalisée avec ou sans la fonctionnalité HIPAA en fonction de vos besoins et des exigences de votre entreprise.
- Veuillez noter ! Si cette fonctionnalité est activée, nos agents d'assistance ne pourront pas accéder aux paramètres de votre compte.
- De plus, il ne sera pas possible de connecter le compte à Zapier.
Comment l'utiliser en tant qu'administrateur
- 1. Ouvrez la page « Fonctions personnalisées » à l'aide du menu de gauche de votre interface d'administration et recherchez « Sécurité et amp ; Rubrique Protection des données. Cliquez simplement sur "Activer" près de "Google Authenticator"

- 2. Pour définir l'authentification en 2 étapes, accédez à Gérer // Utilisateurs à l'aide du menu de gauche ou cliquez sur « Configurer l'authentification en 2 étapes » près de cette fonctionnalité personnalisée.

- 3. Sur la page Gérer // Utilisateurs, cliquez sur "+" et créez tous les utilisateurs système souhaités pour pouvoir les connecter à l'authentification en 2 étapes.
- 4. Téléchargez l'application "Google Authenticator" sur Google Play ou App Store. Vous pouvez simplement scanner le code QR dans Gérer//Utilisateurs//sélectionner l'utilisateur//Google Authenticator et accéder immédiatement à la page de l'application.
- 5. Dans la même section, scannez le code QR avec l'application Google Authenticator sur votre smartphone, entrez le code que vous voyez dans l'application et cliquez sur le bouton "Connecter".
- 6. Terminé! Cet utilisateur peut désormais se connecter de manière plus sécurisée !
- Le processus de connexion ressemblera à ceci :
- - ouvrez le site Simplybook.me ou un lien direct comme companyname.simplybook.me
- - remplissez tous les détails nécessaires et le mot de passe
- - entrez le code à 6 chiffres de la fonction Google Authenticator

Si vous prévoyez d'autoriser vos employés à se connecter eux-mêmes, créez-les au préalable en tant qu'utilisateurs et autorisez-les à se connecter sans authentification en 2 étapes dans Fonctionnalités personnalisées//Google authenticationator//Paramètres//Paramètres.

Comment connecter Google Authenticator si vous êtes un utilisateur
- 1. La fonctionnalité personnalisée de Google Authenticator doit être préalablement activée par l'administrateur, comme décrit ci-dessus.
- 2. Ouvrez la page "Bienvenue" en utilisant le menu de gauche et scannez le code pour télécharger l'application si vous ne l'avez pas encore fait.

- 3. Cliquez sur le lien "Connecter/Modifier", scannez le code, entrez le code que vous obtenez et enregistrez les paramètres.
- 4. À partir de maintenant, vous vous connecterez de manière plus sécurisée !
- Le processus de connexion ressemblera à ceci :
- - ouvrez le site Simplybook.me ou un lien direct comme https://companyname.simplybook.me
- - remplissez tous les détails nécessaires et le mot de passe
- - entrez le code à 6 chiffres de la fonction Google Authenticator
Google Entreprise
gauche
Augmentez facilement la visibilité de votre entreprise sur Internet grâce à la fonctionnalité Google My Business. Cela ne coûte rien mais augmente la visibilité dans la recherche et rend votre entreprise visible sur Google Maps.
Fonctionnalité personnalisée gratuite !
Tutoriel vidéo ![]()
Google Entreprise
- Comment utiliser
- 1. Activez cette fonctionnalité personnalisée sur votre Fonctionnalités personnalisées page.

- 2. Accédez à Paramètres pour créer un compte Google Business si vous n'en avez pas encore, ou connectez un compte Google Business déjà existant.

- 3. Donnez les autorisations nécessaires pour qu'il soit possible de voir et de modifier votre ou vos emplacements dans SimplyBook.me.
- 4. Si vous avez déjà des emplacements dans Google Business, vous pourrez les voir sur le côté gauche de la page.

- 5. Cliquez simplement sur l'un d'eux si vous avez besoin d'apporter des modifications et activez l'option Mettre à jour l'adresse dans le profil</ span>, apportez les modifications nécessaires et enregistrez à nouveau l'emplacement pour que les informations soient mises à jour du côté de Google

- ou choisissez + possibilité d'ajouter une nouvelle adresse professionnelle.
- 6. Après avoir ajouté l'adresse, cliquez sur Enregistrer et fermer et vous aurez la possibilité de procéder à la vérification de l'emplacement de l'entreprise du côté de Google (cela peut prendre un certain temps).
:Vous pouvez également fermer la fenêtre contextuelle et revenir à l'étape de vérification plus tard (il y aura Vérifier maintenant< /span> bouton pour chaque emplacement commercial enregistré et synchronisé).
: Dès que votre emplacement est vérifié par Google (vous verrez les étapes du processus de vérification tout en suivant les instructions de Google), votre entreprise apparaîtra dans la recherche et sur Google Maps.
frontière| centre
- sept. Lorsque vous enregistrez l'emplacement, les informations suivantes sont transmises à Google concernant votre entreprise :
- titre de l'emplacement de l'entreprise ;
- horaires de travail de l'entreprise ;
- numéro de téléphone de l'entreprise ;
- lien vers le site de réservation ;
- catégorie d'entreprise (comme les catégories Google diffèrent, celle qui correspond le mieux sera trouvée).

- Veuillez noter, si vous avez modifié certaines de ces informations dans votre compte SimplyBook.me vous devrez réenregistrer l'emplacement de l'entreprise dans les paramètres de la fonctionnalité Google Business pour que les détails soient mis à jour du côté de Google.
- 8. Vous pouvez également modifier les détails de l'emplacement de votre entreprise du côté de Google si nécessaire. Cliquez simplement sur Edit on GMB bouton en haut (apparaît pour les emplacements enregistrés et synchronisés).

- 9. Si certains emplacements ne sont plus pertinents pour votre entreprise, vous pouvez facilement les supprimer dans les paramètres de cette fonctionnalité. Cliquez simplement sur Supprimer sur GMB option.

Réservez avec Google
Ajoutez un Réservez en ligne bouton vers votre fiche Google Business. Permettez à vos clients de vous trouver facilement sur Google et de réserver vos services directement via la recherche Google, Google Maps ou Google Assistant, optimisés par le système de réservation SimplyBook.me.
- Remarque :
- La réservation avec Google n'est actuellement disponible que pour les pays pris en charge répertoriés ici;
- Actuellement, il n'est pas possible d'utiliser cette option pour les catégories d'activité suivantes : centre médical, établissement d'enseignement, bureau gouvernemental , ingénieur, clinique médicale, dentiste, cabinet médical, centre de formation, société de gestion d'événements, administration municipale, ambassade, avocat généraliste, agence de garde d'enfants, université, collège, école, bibliothèque, institution financière.
- Il est nécessaire d'avoir Accept Payments fonctionnalité personnalisée activée (Payer plus tard (autoriser le paiement différé) l'option doit toujours être de style On) et les prix doivent être ajoutés pour tous les services/cours que vous souhaitez afficher et réserver via Google Maps ;
- Tous les services/classes doivent avoir des descriptions à afficher du côté de Google ;
- Si vous utilisez Formulaires d'admission fonctionnalité, aucun formulaire obligatoire ne doit être ajouté aux services que vous souhaitez rendre disponibles pour la réservation ;
- Si un service est recurring ou connecté à Membership il ne sera pas affiché dans Réserver avec Google ;
- Si vous utilisez la fonctionnalité personnalisée obsolète de Google Calendar Sync, il ne sera pas possible d'utiliser Réserver avec Google.< /span>
- Comment utiliser
- 1. Ajoutez et vérifiez vos adresses Google Business soit via SimplyBook.me plate-forme (partie précédente de ce didacticiel)< ;/span> ou en utilisant votre l'interface Google Business et réenregistrez-le(s) dans Paramètres des fonctionnalités personnalisées de Google Business.

- 2. Accédez à Réservez sur Google Maps et déplacez le sélecteur Synchronisation avec Reserve with Google à un poste actif.

- 2. (facultatif) Si vous utilisez Plusieurs emplacements fonctionnalité personnalisée, connectez votre Google Businesses aux emplacements SimplyBook.me souhaités.
- Veuillez noter ! Il est possible de connecter un emplacement SimplyBook.me à un Google Business .
- Si vous n'utilisez pas Plusieurs emplacements l'emplacement principal de votre entreprise peut être connecté à un seul compte Google Business.

- 3. Enregistrer réglages. Maintenant, la synchronisation a lieu et après avoir rechargez la page il sera possible de voir la liste des services qui seront transmises à Reserve with Google pour la réservation.
:Par défaut, nous rassemblons toutes les informations et transmettons la mise à jour à Google une fois par jour, mais vous pouvez utiliser Informations de mise à jour< ;/span> pour préparer manuellement les informations à transférer si des modifications de paramètres ont été apportées à votre compte (par exemple, si vous avez créé un nouveau service).

Google Gestionnaire de balises
left
Cette fonctionnalité permet de gérer les balises JavaScript de suivi et d'optimisation marketing sur votre site. Vous pouvez ajouter et mettre à jour des balises AdWords, Google Analytics, Floodlight et autres que Google.
- Comment utiliser
- 1. Activez la fonctionnalité personnalisée de Google Tag Manager dans votre section Fonctionnalités personnalisées.

- 2. Inscrivez-vous à un site Google Tag Manager
- 3. Â Créez un nouveau conteneur et configurez-le.
- 4. Insérez l'ID du conteneur sur la page d'administration de SimplyBook.me -> Fonctions personnalisées -> Gestionnaire de balises Google -> sur le côté droit.

Google Traduction
left
Vous avez besoin d'afficher votre site de réservation en plusieurs langues pour le confort de vos clients ? Nous avons maintenant la fonctionnalité personnalisée de Google Translate qui rend cela possible. Il vous permet d'ajouter la traduction automatique de Google Translate à votre site de réservation et chaque client pourra choisir la langue qui lui convient.
- Comment utiliser
- 1. Pour activer cette option, accédez à Fonctionnalités personnalisées//Ajouter d'autres éléments au site Web de réservation.

- 2. Pour accéder aux options disponibles pour cette fonctionnalité, cliquez sur le bouton "Paramètres".

- 3. Cochez les cases avec les langues que vous souhaitez que vos clients puissent choisir sur le site de réservation.
- 4. Sélectionnez le mode d'affichage à votre goût.

- 5. Enregistrer les paramètres. Tout est prêt à l'emploi ! Voici à quoi cela peut ressembler sur votre page de réservation en utilisant l'un des thèmes.
Une autre possibilité de traduction en utilisant un service tiers ici
Réservations de groupe
Les réservations de groupe sont utiles lorsque vous avez besoin que vos clients puissent prendre rendez-vous ou réserver pour plusieurs personnes en même temps. Cette fonction personnalisée crée un menu de sélection avec le nombre de participants dans le groupe. Avec cette fonctionnalité personnalisée, vous pouvez également utiliser fonctionnalité personnalisée de paiement en même temps afin que le paiement total pour tous les participants soit payé en un seul versement au moment du départ, même si seul le chef de groupe/organisateur est inscrit. Si vous utilisez Produits à vendre ou Service Add-Ons fonctionnalités, le nombre d'articles sera également multiplié par le nombre de participants sélectionnés.
- Comment utiliser
- 1. Assurez-vous que le fournisseur de services est configuré pour accepter X plusieurs clients en même temps (ou plus selon vos besoins). Pour cela, allez dans Gérer//Fournisseurs de services//sélectionnez le fournisseur nécessaire//Détails du fournisseur de services//Combien de clients ce fournisseur peut-il servir en même temps ? et définissez le nombre X de clients.

- 2. Activez la fonctionnalité personnalisée de réservations de groupe sur votre page de fonctionnalités personnalisées

- 3. Accédez à ses paramètres sur la droite.

- 4. Ici, vous pouvez spécifier combien de personnes peuvent être réservées dans la même réservation, par le même client et modifier les modèles de notification liés à cette fonctionnalité.

- (facultatif) Vous pouvez également indiquer le nombre minimum de réservations de groupe autorisées si cela est requis pour vos services et, par conséquent, les clients ne pourront pas sélectionner le nombre inférieur de sessions à l'étape de service du processus de réservation.<br< ;
- Il est possible de fixer ce nombre minimum pour tous les services dont vous disposez. Ensuite, veuillez le faire dans Fonctionnalités personnalisées -> Réservations de groupe -> côté droit de la page -> Réservations minimales autorisées à la fois

- Ou vous pouvez définir un certain nombre par service/classe dans Gérer -> Services/Cours -> sélectionner le service/la classe -> Plus d'options -> Réservations minimales autorisées à la fois

À quoi cela ressemblera-t-il sur la page de réservation :
- Les clients pourront utiliser les flèches pour choisir le nombre de participants (le look peut différer selon le thème que vous avez).
HIPAA
gauche
Disponible avec les abonnements Standard et Premium (anciennement Gold et Platinum).
La fonction de personnalisation des informations personnelles est conçue pour aider les utilisateurs de SimplyBook.me à protéger les données de leurs clients et patients. Il ne remplace pas les propres procédures de sécurité de l'utilisateur mais améliore la sécurité des données SimplyBook.me en utilisant une double authentification lors du processus de connexion pour tous les utilisateurs qui accèdent au système (les utilisateurs doivent enregistrer leur numéro de téléphone portable pour recevoir l'authentification code SMS (vous avez besoin de crédits SMS pour cela) ou connectez Google Authenticator en utilisant la fonction personnalisée correspondante). Cette fonctionnalité personnalisée inclut un paramètre « Timeout » qui déconnecte automatiquement l'utilisateur pour réduire le risque d'accès au système par des utilisateurs non autorisés.
Le système bloque tous les accès pour le personnel d'assistance de SimplyBook, ce qui réduit encore l'accès des personnes non liées au système. Il est possible de réduire davantage l'exposition des informations personnelles aux personnes non autorisées en utilisant les Fonction personnalisée de nettoyage de l'historique. De cette façon, les anciennes données sont supprimées et ne sont donc pas accessibles.
Veuillez noter!
Cette fonctionnalité personnalisée ne remplace PAS les contrôles de sécurité de l'utilisateur SimplyBook.me qui doivent également être en place pour la protection des données des clients et des patients. Veuillez vous référer à la documentation pertinente dans votre pays et obtenir l'aide de conseillers qualifiés dans le domaine de la protection des données des clients/patients.
- Les variables [service] et [client] dans les modèles de notification ne fonctionnent pas lorsque cette fonctionnalité personnalisée est activée pour des raisons de sécurité.
Il n'est pas possible de connecter le compte à Zapier si vous utilisez la fonction HIPAA.
Cette fonctionnalité personnalisée ne peut pas être activée sans Fonctionnalité personnalisée de Google Authenticator.
- Comment utiliser
- 1. Activez les fonctionnalités HIPAA sur votre page Fonctionnalités personnalisées.
- Lorsque vous activez cette fonctionnalité Fonction personnalisée SSL et Google Authenticator sera également activé pour renforcer la sécurité côté client.

- 2. Accédez à ses paramètres sur la droite pour définir le délai d'expiration et l'adresse e-mail pour être informé des nouvelles connexions.

- 3. Ajoutez les numéros de téléphone de vos utilisateurs dans Gérer//Utilisateurs//sélectionnez l'utilisateur//Détails de l'utilisateur.
- 4. Configurez et validez l'administrateur principal Google Authenticator dans Gérer//Utilisateurs//sélectionnez l'utilisateur//Google Authenticator.
- (téléchargez l'application sur votre téléphone depuis Google Play ou App Store si vous ne l'avez pas encore,
- scannez le code QR avec l'application Google Authenticator sur votre smartphone, entrez le code que vous voyez dans l'application et cliquez sur le bouton "Connecter".)

- 5. Validez le numéro de téléphone de l'administrateur principal pour disposer d'une méthode d'authentification de secours en deux étapes.
- Comment valider le numéro de téléphone
- 1. Veuillez accéder à Gérer//Utilisateurs//utilisateur administrateur principal//Détails de l'utilisateur.
- Cliquez sur le bouton "Générer un code de contrôle pour valider le téléphone" sous le champ du numéro de téléphone.
- 2. Vous recevrez un sms avec le code, entrez le code dans le champ "Code de validation" et appuyez sur "Confirmer le code de contrôle".

- 3. Recevez un message de réussite indiquant que le code est confirmé.
- Comme méthode de sauvegarde supplémentaire, vous pouvez télécharger le fichier avec des codes à usage unique pour une authentification en deux étapes dans l'onglet "Google Authenticator" sur la page Gérer//Utilisateurs.
Champ de description HTML pour les événements
Permet d'insérer une mise en forme HTML (couleur d'arrière-plan et de police, gras, italique, souligné, alignement et autres éléments HTML) pour les champs de description Service, Fournisseurs de services, Emplacements et Catégories.
Fonctionnalité personnalisée gratuite !
- Comment utiliser
- 1. Activez cette fonctionnalité sur votre page Fonctionnalités personnalisées.

- 2. Accédez à la section Gérer à l'aide du menu de gauche et sélectionnez Services/Fournisseurs/Classes/Adhésions/Produits à vendre en fonction de l'article auquel vous souhaitez ajouter/modifier la description.
- Sélectionnez l'élément et le premier onglet avec le nom et les détails.
- Modifiez la description et enregistrez les paramètres
Importer des clients
left
Utilisez cette fonctionnalité si vous avez besoin d'ajouter la liste des clients à votre système en quelques clics seulement. Téléchargez simplement un fichier CSV contenant les données de vos clients, puis sélectionnez les en-têtes des colonnes correspondantes, et vous aurez une liste mise à jour des clients dans votre registre de clients.
Fonctionnalité personnalisée gratuite !
- Attention ! Il est interdit d'importer une liste de clients avec des e-mails et des informations client là où les clients ne vous ont pas spécifiquement accordé le droit de le faire.
- Veuillez noter que cette fonctionnalité n'est disponible qu'avec les abonnements Standard et Premium (anciennement Advanced, Gold et Platinum).
- Il n'est possible d'importer que 500 clients par défaut. Si vous avez besoin d'en importer plus, veuillez contacter le support pour plus de détails.
Comment utiliser cette option :
- 1. Activez la fonctionnalité personnalisée "Importer des clients" sur votre page de fonctionnalités personnalisées :

- 2. Préparez votre fichier Excel.
- - Aucun texte au-dessus de la liste des clients ne doit être écrit
- - Assurez-vous que toutes les cellules sont correctement affichées
- - Enregistrer le fichier au format .csv avec une séparation par virgule.
- 3. Allez dans Gérer//Clients//Importer depuis CSV ou cliquez simplement sur "Paramètres" près de cette fonctionnalité personnalisée.
- 4. Appuyez sur "Choisir un fichier" et sélectionnez le fichier préparé.
- 5. Attribuez des valeurs aux colonnes à partir des listes déroulantes de la barre supérieure (au-dessus de chaque colonne, marquées de flèches noires). Attribuez "nom", "email" et "téléphone".
- 6. Appuyez sur "Confirmer l'importation des clients".
- Veuillez noter que seuls 10 clients seront affichés dans l'aperçu, mais après l'importation, tous les clients seront affichés.
- Si vous ne pouvez pas importer de clients, veuillez vérifier les raisons possibles
- 1. Le format du fichier .csv est incorrect. Il doit être enregistré au format .csv avec une séparation par virgule ou tabulation.
- 2. Il y a du texte au-dessus des données ou des colonnes inutiles qui empêchent une importation réussie. Veuillez supprimer le texte.
- 3. Les valeurs ne sont pas attribuées. Utilisez les menus déroulants au-dessus des colonnes pour attribuer des valeurs "nom", "email", "téléphone", etc.
Aperçus
Cette fonctionnalité personnalisée crée une variété de graphiques avec des indicateurs de performance clés dans votre nouveau tableau de bord financier.
Disponibilité des prestataires, total des réservations, paiement par prestataire, etc.
- Comment utiliser
- 1. Activer Insights sur votre Fonctionnalités personnalisées page.

- 2. Accédez à Dashboard pour vérifier les graphiques et les tableaux.

Partage de photos Instagram
gauche
Activez la fonction de partage de photos Instagram et affichez automatiquement vos photos sur le site de réservation pour le rendre plus vivant et amusant pour vos visiteurs. Prenez des photos avec votre application Instagram et affichez les résultats sur votre page de réservation.
Comment utiliser:
- 1. Pour activer cette fonctionnalité personnalisée, rendez-vous sur la page des fonctionnalités personnalisées et cliquez sur "Activer" près de l'option "Partage de photos Instagram".

- 2. Ensuite, veuillez choisir "Paramètres" à côté de cette fonctionnalité personnalisée

- 3. Vous arriverez sur la page où vous pourrez connecter votre compte Instagram.
- Cliquez simplement sur "Autorisation", saisissez votre nom d'utilisateur et votre mot de passe Instagram.

- 4. Si vous avez de nombreuses publications sur votre compte Instagram, vous pouvez définir le nombre d'images à afficher par page.
Vous l'avez défini maintenant et vos images Instagram seront affichées sur un onglet séparé sur le site de réservation.

Veuillez noter!
Lorsque vous ajoutez des images à votre Instagram, elles seront mises à jour sur la page de réservation dans l'heure qui suit.
Si vous souhaitez que cela se produise plus tôt, veuillez cliquer sur "Actualiser maintenant" sur cette page "Paramètres" de la fonctionnalité personnalisée.
centre
Si la publication Instagram se compose de plusieurs images/photos, seule la première sera affichée sur le site de réservation.
Formulaires d'admission
La fonction personnalisée des formulaires d'admission vous permet de demander plus d'informations à vos clients pendant le processus de réservation. Vous pouvez poser plusieurs questions et y répondre dans de nombreux types de champs, tels que des lignes de texte, des listes déroulantes, des zones de texte, etc.
- Comment utiliser
- 1. Activer la fonctionnalité personnalisée des formulaires d'admission dans la fonctionnalité personnalisée // Ajouter plus à la page de réservation.
- 2. Accédez à sa gestion ou à la page Gérer//Formulaires d'admission.
- 3. Appuyez sur le bouton "+" dans les paramètres de la fonctionnalité personnalisée pour créer un nouveau formulaire.
- 4. Dans le champ "Titre de la question", écrivez la question à laquelle vous souhaitez que vos clients répondent. Par exemple : Âge, préférences, Avez-vous des problèmes de santé ?, etc.
- 5. Choisissez le type de champ :
- chiffres uniquement - permet de saisir uniquement des chiffres. Utile lorsque vous avez besoin de connaître l'âge, la taille ou toute autre information qui ne nécessitera que des chiffres.
- une seule ligne - généralement utilisé pour les réponses courtes
- plusieurs lignes - utilisez ce type de fichier si vous attendez de longues explications de vos clients
- case à cocher - crée une case à cocher que les clients doivent cocher ou laisser décochée. Utile pour les questions nécessitant une réponse binaire, par exemple "J'aurai besoin de services supplémentaires".
- sélection déroulante - crée une liste déroulante avec la possibilité de choisir une seule option. Afin de créer ce champ, vous devrez créer une liste de valeurs dans la section "Options déroulantes et option par défaut". Vous pouvez également sélectionner la valeur par défaut qui sera attribuée si rien n'est choisi dans la liste.
- date - crée une option de sélection de date avec le calendrier.
- barcode - permet de numériser des codes-barres via l'application mobile d'administration et d'obtenir les valeurs de la numérisation. Permet également la saisie de texte simple comme dans les formulaires d'admission à une seule ligne.
- HTML personnalisé - permet d'ajouter des séparateurs visuels ou du texte supplémentaire près du formulaire d'admission. Ne peut pas être utilisé pour l'entrée client.
- 6. Rendez-le plutôt obligatoire ou non à l'aide du switcher "optionnel".
: Incluez le champ (le titre et la réponse seront inclus) aux factures client si vous en avez besoin et si vous utilisez la fonctionnalité personnalisée Accepter les paiements.
- sept. Si vous souhaitez associer le formulaire à certains services, choisissez l'onglet "Services, attachés à ce champ" et cochez les cases à côté des services correspondants.
- 8. Si vous souhaitez inclure des informations sur le formulaire d'admission dans les modèles d'e-mail, recherchez les variables des formulaires d'admission et ajoutez-les aux modèles dans Paramètres//Paramètres d'e-mail et SMS.
Kiosque

La fonction personnalisée de kiosque vous permet d'accepter des réservations sur votre site de réservation client afin que les données soient effacées entre les réservations. Cela rend les problèmes de confidentialité moins préoccupants.
Vous pouvez définir l'heure à laquelle le client sera redirigé vers la page d'accueil du site de réservation ou vers le début des étapes de réservation des services si vous utilisez le widget après avoir terminé la réservation ou si la page est laissée inactive.
Veuillez noter ! Cette fonctionnalité n'est pas compatible avec Ramenez-moi à la maison, Telegram Notifications et Réunions vidéo en ligne fonctionnalités personnalisées.
- Comment utiliser
- 1. Activez cette fonctionnalité sur votre Fonctionnalités personnalisées page, Autre section.

- 2. Sélectionnez si vous souhaitez effacer les données du client à chaque nouvelle réservation, définissez un délai de redirection après la fin de la réservation et en cas d'inactivité sur le site de réservation du côté des paramètres de la page.

Enregistrez vos préférences et le tour est joué !
Limiter les réservations
Cette fonction personnalisée vous permet de restreindre la quantité de réservations pouvant être réservées en même temps. Cette fonction personnalisée est utile lorsque vos services nécessitent des éléments supplémentaires comme un fauteuil dentaire ou une salle dans le studio, etc. (Une autre façon de limiter le nombre de réservations en raison des ressources limitées consiste à utiliser la fonction Related Resources à la place). Lorsque la limite de réservation est atteinte, l'intervalle de temps correspondant ressemblera à une pause sur la page de réservation (et dans l'interface d'administration si vous n'avez pas configuré pour ignorer ces restrictions pour l'administrateur). Il est généralement possible de limiter le nombre de réservations en même temps, et vous pouvez également définir une certaine limite pour chaque service séparément.
Par exemple, vous avez 2 prestataires et 1 chambre et vos deux prestataires sont disponibles à 10h00.
Chacun des prestataires est configuré pour servir 1 personne à la fois et au total, 2 personnes peuvent réserver un service à 10h00.
Mais vous devez limiter ce nombre à 1 personne, car une seule chambre est disponible.
Vous devez activer la fonctionnalité personnalisée Limit Bookings et la définir sur 1.
De cette manière, lorsque quelqu'un réserve 10h00, cette heure sera fermée pour un autre fournisseur.
Veuillez noter ! Cette fonctionnalité n'est pas compatible avec les Afficher les espaces restants
- Comment utiliser
- 1. Activez cette fonctionnalité personnalisée sur votre page Fonctionnalités personnalisées.

- 2. Accédez à ses paramètres sur la droite si vous devez limiter le nombre de réservations à la fois pour l'ensemble du système.

- 3. Indiquez le montant nécessaire dans la case correspondante.
- 4. Si vous devez définir la limite pour certains services, accédez à la page Gérer//Services (Classes), choisissez l'onglet Plus d'options et définissez le nombre souhaité par service/classe.
Bot de ligne

La fonction personnalisée Line Bot permet à vos clients de réserver vos services via Line Messenger et fonctionne également dans l'application mobile Line. Le bot de réservation se connecte à votre emploi du temps sur SimplyBook.me</ durée> et guide votre client tout au long du processus de réservation.
Prend en charge service categories, multiple locations, intake forms, paiements en ligne(mais les taxes ne sont pas calculées), connexion client (mais sans adresse client).
Veuillez noter :
- In service/provider/category/emplacement descriptions un nombre limité de symboles peut être affiché.
- Dans formulaires d'admission options déroulantes 20 symboles au maximum peuvent être affichés.
- Il n'est pas possible de masquer les images sur les étapes de réservation.
- Comment utiliser
- 1. Accédez à SimplyBook.me côté administrateur, fonctions personnalisées page et activez Line bot fonction personnalisée.

- 2. Accédez à ses paramètres sur la droite.

- 3. Connectez-vous à LINE Developers page</span> ; et créez Fournisseur en suivant les instructions qui y sont indiquées.
- 4. Créez ensuite nouveau canal, en ajoutant les détails nécessaires, en les confirmant et en acceptant les conditions d'utilisation de LINE et autres options requises.

- 5. Une application sera créée, veuillez cliquer dessus pour accéder aux informations d'identification de la chaîne.
- 6. Passez à SimplyBook.me côté administrateur avec les paramètres de la fonctionnalité Line Bot et copiez URL de rappel De là.

- sept. Ajoutez cette URL à URL Webhook boîte dans Paramètres de messagerie section de LINE Developers channel page.
- 8. Activez Utilisez les webhooks.

- 9. Émettez Jeton d'accès au canal (longue durée de vie) et insérez-le dans Simplybook.me feature settings en Jeton d'accès boîte.

- dix. Passez à Utilisation des fonctionnalités LINE@ et désactivez réponses automatiques selon l'exemple suivant.


- 11. Copiez ID de canal et Channel secret et insérez-les dans les boîtes de paramètres correspondantes du côté de SimplyBook.me. Enregistrer les paramètres.


- 12. Une fois le bot approuvé du côté LINE, vos clients pourront réserver en l'utilisant. En attendant, vous pouvez ajouter des testeurs ou essayer votre bot en utilisant l'application mobile LINE.
Système de fidélité
![]()
Laissez les clients gagner des points pour les services/classes réservation et leur permettre d'échanger contre des cartes-cadeaux. Vous pouvez définir un nombre de points différent pour chaque service/class et 3-4 heures après la réunion, les bonus seront automatiquement ajoutés au solde du client. Dès que le client aura accumulé le nombre de points nécessaires, il pourra les échanger contre une carte-cadeau, qui pourra ensuite être utilisée pour d'autres achats sur votre site de réservation ou comme cadeau à quelqu'un.
Tutoriel vidéo ![]()
Veuillez noter !
- Lorsque vous activez le système de fidélité, les fonctionnalités personnalisées suivantes seront également activées : Accept Payments, Client Login, Coupons et amp; Cartes-cadeaux.
- Les clients doivent être abonnés à vos supports marketing pour pouvoir recevoir ces notifications.
- Comment utiliser
Pour activer Système de fidélité veuillez accéder à votre Fonctionnalités personnalisées page, sélectionnez Améliorations commerciales et cliquez sur Activer ou utilisez le sélecteur près de l'entité respective.

Une fois activé, vous pouvez modifier immédiatement les modèles de notifications associés, sur le côté droit de la page. Veuillez utiliser les variables suggérées si nécessaire.
Deux types de notifications sont disponibles : pour l'ajout automatisé de points et la mise à jour manuelle du solde du client.

Pour définir les quantités de points, veuillez accéder à Manage -> Services (ou utilisez le lien Services près de la fonctionnalité personnalisée) ou Gérer -> Classes (si vous les utilisez et souhaitez faire partie du programme de fidélité).
Créer un nouveau service/class si nécessaire ou cliquez sur celui existant pour le modifier, sélectionnez Loyalty System languette.

Activez le sélecteur pour connecter le service/class au système de fidélité et indiquez le montant de points que le client gagnera pour ce service/class réservation dans la case qui apparaît. Enregistrer les paramètres.

Ensuite, accédez à Manage -> Coupons & Cartes-cadeaux page à l'aide du menu de gauche, créez une nouvelle carte-cadeau ou cliquez sur la carte existante pour la modifier et choisissez Fidélité Système languette.
Activez le sélecteur pour permettre aux clients d'acheter cette carte-cadeau contre des bonus. Définissez la quantité nécessaire à gagner dans la case qui apparaît. Enregistrer les paramètres.
Du côté client, ils peuvent voir le nombre de points gagnés ainsi que l'historique d'utilisation des bonus dans le profil client< ;/span> ou accédez à l'onglet spécifique tab du site de réservation.


Dès que le client a suffisamment de points, le bouton Sélectionner par points devient actif sur les cartes-cadeaux sur le site de réservation et cette carte-cadeau peut être achetée en échange de ces points.
En conséquence, le client recevra la carte-cadeau par e-mail ou pourra copier son code dans onglet Cartes-cadeaux< ;/span> -> Vos cartes-cadeaux et utilisez comme d'habitude une carte-cadeau pour un autre achat ou faites un cadeau à quelqu'un.

Du côté administrateur, vous pouvez également afficher tous les points gagnés et dépensés dans Reports -> Rapport sur les points de fidélité. Veuillez utiliser le filtre si nécessaire pour voir certains résultats sélectionnés, exportez les données vers Excel ou .csv.

À l'aide de ce rapport, vous pouvez également gérer manuellement le nombre de points par client.
Veuillez cliquer sur Ajouter des points en haut, utilisez le champ de recherche dans la fenêtre contextuelle qui apparaît pour trouver le client souhaité, indiquez le montantà ajouter ou à déduire dans le Montant des points de récompense case (pour déduire, veuillez simplement ajouter "-" avant le montant), ajoutez quelques < span style="background-color:#d4f8e5; padding:5px; border-radius:5px;">description (cela sera également reflété côté client) et appuyez sur Ajouter. Le client recevra la notification de la mise à jour du solde.
Vous pouvez également utiliser l'option Ajouter plus de bonus au client dans Actions par la ligne de rapport spécifique pour une mise à jour plus rapide du solde car le client sera déjà présélectionné dans ce cas,

Si vous avez besoin d'afficher l'historique des points pour un client particulier, veuillez utiliser Reports -> Clients et cliquez sur le montant des bonus en surbrillance dans le tableau pour accéder à la fenêtre contextuelle de l'historique des bonus.
Rends-moi occupé
Cette fonctionnalité donnera l'impression que les créneaux horaires sont occupés lorsque les clients visitent votre site tout en faisant des disponibilités afin qu'ils puissent trouver quelque chose à réserver. Vous pouvez décider du nombre de créneaux disponibles chaque jour.
Veuillez noter !
- Cette fonctionnalité n'est pas compatible avec les calendar layout types : fournisseur flexible, hebdomadaire et flexible.
- Si vous avez activé l'affichage du site Web de réservation dans le fuseau horaire du client et qu'il est différent du fuseau horaire de l'entreprise, cela pourrait entraîner plus de créneaux horaires affichés par jour que défini dans les paramètres de cette fonctionnalité personnalisée.
- Comment utiliser
- 1. Activez cette fonctionnalité sur votre Fonctionnalités personnalisées -> Connexe aux réservations section.
- 2. Indiquez le nombre de plages horaires vous souhaitez afficher comme disponible sur votre site de réservation par jour.
- C'est le nombre de plages horaires à afficher par date pour chaque couple service + prestataire.
1200px|center|link=https://help.simplybook.me/images/9/9f/Look_busy_slots_setting2.png
- 3. Voici quelques exemples de ce à quoi cela peut ressembler du côté client.
- Lorsqu'un créneau horaire est réservé, le système ouvrira automatiquement le suivant en fonction du planning que vous avez défini dans votre compte.
- modern mise en page du calendrier :
- emplacements hebdomadaires mise en page du calendrier :
Test médical
![]()
La fonction de test médical vous permet d'enregistrer facilement les personnes pour les tests et de leur envoyer l'accès aux résultats une fois que les résultats de leurs tests sont prêts. A leur arrivée, leur billet est scanné et ils obtiennent un statut arrivé. Ce ticket peut être imprimé et apposé sur le tube à essai de la personne. Lorsque les résultats sont prêts, le ticket peut être scanné pour un traitement rapide des résultats qui seront envoyés à une personne par e-mail et/ou SMS. Les résultats peuvent être ajoutés dans un message, ou la personne peut être invitée à se connecter à son compte sur le site de réservation pour obtenir les résultats et un formulaire PDF téléchargeable avec la marque de l'entreprise.
Veuillez noter !
Lorsque vous activez la fonctionnalité personnalisée Test médical Tickets sera également activée ;
Cette fonctionnalité personnalisée n'est disponible qu'avec certains abonnements. Veuillez vérifier les détails de votre forfait dans votre compte Plans&Prix -> Abonnements ou contactez l'assistance pour vérifier si elle est incluse.
- Comment utiliser
- 1. Activer Test médical fonction personnalisée sur votre Fonctionnalités personnalisées page, Autre section (ou utilisez la recherche là-bas).

- 2. Sur le côté droit de la page, sélectionnez vos préférences pour l'affichage des résultats.
- Il est obligatoire d'activer Client Login fonctionnalité personnalisée ou Joignez les résultats au format PDF à l'e-mail option. Sinon, la fonctionnalité ne fonctionnera pas.

- 3. Indiquez si vous souhaitez que vos clients soient informés de certains résultat du test et ajustez les modèles dessous.

- 4. Accédez à Formulaire de résultats pour commencer à travailler avec le processus de test en cliquant sur Valider le ticket sur le bouton Calendrier ou en sélectionnant Formulaire de résultats près de cette fonctionnalité dans le Fonctionnalités personnalisées interface.
- 5. Sur cette page, vous verrez le formulaire de recherche de billets. Veuillez utiliser code de billet ou de réservation pour trouver les détails de rendez-vous nécessaires.
- Si vous utilisez un navigateur mobile et que vous avez autorisé l'accès à la caméra, vous pouvez également scanner le code QR du ticket du client.< /span>
- Si vous avez application mobile d'administration veuillez utiliser Scan QR y fonctionner.
- 6. Une fois que le client est venu pour le test, vous avez scanné son ticket, veuillez validez-le à enregistrer et les possibilités suivantes à apparaître.

- sept. Dès que les matériaux de test sont prélevés sur le client, appuyez sur Imprimer l'étiquette, imprimez-le (des imprimantes spéciales sont recommandées) et collez-le au tube à essai.
- Le rendez-vous aura le statut "Travail en cours - résultats non prêts".

Exemple d'étiquette de tube à essai :<br> ;

- 8. Lorsque vous recevez les résultats, ouvrez à nouveau cette interface, scannez le QR de l'étiquette du tube à essai pour trouver le rendez-vous.

- 9. Sélectionnez l'une des trois options result options.
:En conséquence, le statut du rendez-vous sera mis à jour en fonction de votre sélection.
- À ce stade, le client recevra la notification indiquant que les résultats sont prêts si vous l'avez activé dans #3.

Vous pouvez également imprimer les résultats du test si nécessaire.

- dix. Tous les tickets avec les statuts des résultats des tests médicaux peuvent être visualisés et exportés dans Reports -> Rapport sur les tickets.

Adhésion
Cette fonctionnalité personnalisée vous permet d'avoir des services que seuls les membres peuvent réserver à condition qu'ils aient un abonnement payant actif. Cela peut être appliqué à une sélection ou à tous les services, uniquement aux classes ou similaires.
Ici vous pouvez vérifier plus de cas où l'adhésion peut être utile.
Consultez le didacticiel vidéo ![]() pour savoir comment le configurer.
pour savoir comment le configurer.
Une page de démonstration avec des cours liés à l'adhésion est disponible ici.
Veuillez noter !
- Cette fonctionnalité n'est pas compatible avec Nettoyer l'historique.
- Connexion client et Accepter les paiements les fonctionnalités personnalisées seront également automatiquement activées.
- Comment utiliser
- 1. Pour activer cette fonctionnalité, accédez à Fonctionnalités personnalisées section à l'aide du menu de gauche de votre interface d'administration, recherchez Membership et cliquez sur Activer ou utilisez le switcher.

- 2. Accédez à Gérer -> Membres ou utilisez Manage bouton sur Fonctionnalités personnalisées près de cette fonctionnalité pour ajouter un nouvel abonnement à votre système.
- Cliquez sur + sur la page que vous voyez.
: Ajoutez un titre d'adhésion, définissez une description, téléchargez une image, sélectionnez la durée souhaitée et décidez de la limite de sessions incluses.
- Si nécessaire, définissez la date fixe à laquelle l'adhésion doit commencer, sinon elle commencera le jour où le client effectue l'achat (par défaut) ou il sera également possible de sélectionner la date de début du côté client.
- Si nécessaire, définissez la date fixe à laquelle l'adhésion doit commencer, sinon elle commencera le jour où le client effectue l'achat (par défaut) ou il sera également possible de sélectionner la date de début du côté client.
:* Restreindre le nombre de réservations futures que le client peut effectuer dans le cadre de l'adhésion afin de réduire le risque que le même client réserve tous les créneaux si vous le souhaitez.
- Définissez le prix de l'abonnement si nécessaire.
- Si vous souhaitez autoriser la répétition de l'adhésion, veuillez activer Est récurrent et définissez le prix récurrent (il peut être identique ou différent du premier prix).
- Définissez le prix de l'abonnement si nécessaire.
- Veuillez noter ! Le renouvellement automatique de l'adhésion peut fonctionner côté client via Stripe (intégration précédente) et processeurs de paiement Adyen uniquement.

- 3. N'oubliez pas de joignez l'appartenance aux services/classes pour restreindre la réservation aux seuls membres.

- 4. Bien sûr, vous devrez informer vos clients de l'achat de l'abonnement ou envoyer les informations relatives à son renouvellement.
: Pour ajuster vos modèles, accédez à Fonctionnalités personnalisées -> Appartenance -> cliquez sur son nom sur la gauche pour ouvrir les options de droite et voir la liste des notifications disponibles :

- Vous pouvez utiliser les variables pour ajouter automatiquement les informations correspondantes à chaque notification par e-mail/SMS.

- 5. (facultatif) Vous devrez peut-être abonner certains clients du côté administrateur s'ils ont déjà payé ou si vous leur avez accordé une période gratuite.
- Vous pouvez le faire à partir du même Manage -> Membres en cliquant sur Émettre l'adhésion près du nom de l'adhésion ou dans le coin supérieur droit de la fenêtre d'édition de l'adhésion.

- 6. (facultatif) Vous avez le choix entre plusieurs options d'émission :
- - vous pouvez définir l'appartenance date de début(la date actuelle est définie par défaut) ;
- - vous pouvez générer une invoice si vous en avez besoin à des fins comptables ;
- - vous pouvez émettre une adhésion sans facture ;
- - si vous sélectionnez l'émission avec la facture et que l'adhésion est récurrente, il est possible de définir le mode manuel ou automatique mode récurrent< ;/span> et définissez le nombre de répétitions pour l'automatique,
- afin que la nouvelle facture soit générée à chaque fois que l'abonnement est prolongé si la prolongation automatique est activée.
- Sinon, une offre sera créée dans Rapports//Opérations de paiement et l'adhésion sera prolongée lorsque vous l'approuverez ou vous pourrez la prolonger manuellement dans Rapports//Opérations de paiement//Profils récurrents.;
- Veuillez noter ! Nous ne facturerons aucun frais en relation avec vos clients. comptes, cette option prolonge uniquement les abonnements des clients pour les nouvelles périodes.
- Si vous devez facturer vos clients, veuillez le faire du côté de votre processeur de paiement.< br> ;
- - vous pouvez également choisir plusieurs clients à la fois pour émettre l'adhésion.

- sept. Lorsque les adhésions sont achetées ou émises, il existe plusieurs endroits pour vérifier les informations relatives :
- - Rapports -> Paiements d'adhésion - contient les informations de chaque période d'adhésion présente dans le système (chaque période récurrente sera affichée sur une ligne distincte).
- Vous pouvez annuler l'adhésion du client spécifique ici si nécessaire.

- - Rapports -> Transactions de paiement -> Factures - contient toutes les factures présentes dans le système, adhésions comprises.
- Veuillez noter ! Si vous supprimez la facture liée à l'achat d'un abonnement, l'abonnement correspondant sera être annulée.
- - Rapports -> Transactions de paiement -> Profils récurrents - affiche tous les profils récurrents d'adhésion créés soit par les clients, soit du côté administrateur.
: Il permet d'annuler les profils récurrents (créés par les clients et l'administrateur) ou de prolonger les adhésions récurrentes émises uniquement du côté administrateur.
- Veuillez noter ! Si un seul et même client a déjà le profil récurrent pour certains abonnements il n'est pas possible de créer un nouveau profil récurrent pour le même abonnement pour ce client.
- Vous pouvez soit annuler le profil récurrent actuel et en créer un nouveau, soit émettre une autre adhésion à ce client.</ durée>
- 8. Du côté client, les clients verront l'onglet adhésions sur le site de réservation
: avec la liste de toutes les options que vous avez définies comme disponibles et les services associés auront des étiquettes cliquables "Abonnement requis"
- qui conduisent à l'achat de l'abonnement correspondant.

- 9. (facultatif) Vous pouvez également ajouter un widget d'adhésion personnalisé à votre site Web si nécessaire en suivant ces instructions.
Plusieurs réservations
Permet aux clients de réserver plus d'un service avant leur départ et de payer toutes les réservations en un seul paiement. Cette fonction personnalisée ajoute le bouton "Ajouter un autre service" à l'étape "Détails" sur la page de réservation. Cette fonctionnalité permet aux clients de réserver plusieurs services/cours à différents moments ou jours de la semaine.
- Veuillez noter!
- Le bouton "Ajouter un autre service" ne s'affichera pas si plusieurs participants sont sélectionnés avec réservation de groupe ou si le service est récurrent.
Cette fonctionnalité ne peut pas être activée avec Liste d'attente
- Comment utiliser
- 1. Activez la fonctionnalité personnalisée de réservations multiples sur votre page de fonctionnalités personnalisées.

- 2. Vous pouvez modifier les modèles de notification associés sur le côté droit de la page.

- 3. Voici à quoi cela ressemblera côté client dans l'un des thèmes.
Plusieurs emplacements
Permet de créer plusieurs emplacements de service et de les mettre en relation avec différents prestataires de services (membres du personnel). Les emplacements seront affichés comme première étape sur le site de réservation.
Comment utiliser
Activez la fonctionnalité personnalisée de plusieurs emplacements dans la section Fonctionnalité personnalisée//Ajout d'éléments supplémentaires au site Web de réservation.

Ajoutez des emplacements soit dans les paramètres de la fonctionnalité personnalisée, soit dans Gérer//Fournisseurs de services//Ajouter un emplacement.

Cliquez sur l'onglet "Fournisseurs de localisation" pour l'emplacement correspondant et cochez les cases nécessaires pour connecter les fournisseurs de services à l'emplacement.
(Facultatif) Dans Paramètres // Paramètres généraux // Paramètres d'e-mail et de SMS, insérez les variables suivantes dans vos modèles d'e-mail :

- [emplacement] - valeur du champ "Nom de l'emplacement"
- [location_address] - valeur du champ "Location address"
- [location_phone] - valeur du champ "Téléphone de localisation"
Comment définir le calendrier pour l'emplacement
Vous pouvez définir un horaire individuel pour le fournisseur, puis associer le fournisseur à l'emplacement. Ainsi, les heures de travail du fournisseur liées à l'emplacement s'appliqueront automatiquement à l'emplacement.
- 1. Pour définir un horaire individuel pour le fournisseur, accédez à Paramètres // Fournisseurs de services // Heures de travail ou à Gérer // Fournisseurs de services // Horaires des fournisseurs de services et vous pouvez définir des heures d'ouverture, des pauses et des jours spéciaux pour ces employés spécifiques. Veillez simplement à ce que les heures d'ouverture des employés soient comprises dans les heures d'ouverture de l'entreprise.
- 2. Pour associer le fournisseur et l'emplacement, accédez à Gérer // Fournisseurs de services // Emplacements du fournisseur de services et cochez les cases avec le ou les emplacements auxquels le fournisseur doit être lié.
'Comment puis-je relier le service à l'emplacement
Les emplacements ne peuvent être associés qu'à des fournisseurs de services. Par conséquent, si vous devez associer un service à un emplacement particulier, vous devez d'abord associer ce service au fournisseur de services :
- 1. Dans Gérer//Fournisseurs de services//Services, attaché à ce fournisseur de services, cochez les cases avec les services liés à ce fournisseur.
- 2. Dans Gérer // Fournisseurs de services // Emplacements du fournisseur de services et cochez les cases avec le ou les emplacements auxquels le fournisseur doit être associé.
L'exemple de la vue client
Actualités
Donnez une nouvelle vie à votre site Web en gérant les actualités sur votre page principale dans notre système de réservation.
Vous pouvez publier des nouvelles ou un blog sur votre site de réservation pour tenir vos clients au courant de ce qui se passe dans l'entreprise.
- Comment utiliser
- 1. Activez cette fonctionnalité personnalisée sur votre page Fonctionnalités personnalisées, en ajoutant plus à la section Site de réservation.

- 2. Cliquez sur "Gérer" à côté de cette option.

- 3. Créez les messages sur la page que vous voyez en cliquant sur le bouton "+".

Réunions vidéo en ligne
Utilisez cette fonctionnalité pour créer facilement des liens de réunion pour vos clients et les rencontrer en ligne par vidéo ou par téléphone
Nous vous recommandons également d'activer la fonctionnalité de connexion client pour une expérience client fluide lors de la participation aux réunions, car il peut y avoir des erreurs s'ils essaient pour rejoindre une session de navigateur distincte.
Veuillez noter ! Cette fonctionnalité n'est pas compatible avec Kiosk fonction personnalisée.
Tutoriel vidéo disponible ![]()
Comment régler
- 1. Activer Réunions en ligne fonctionnalité personnalisée dans votre compte SimplyBook.me.

- 2. Connectez-vous à Portail Microsoft Azure et votre Microsoft Teams avec l'utilisateur qui est membre de votre organisation dans MS Azure.
- (Ou créez les comptes ici)
- Veuillez noter ! Il n'est pas possible de connecter un compte Microsoft Teams personnel/privé au système, il doit être lié à une organisation via Microsoft Azure.
- 3. Ajoutez Microsoft Teams dans MS Azure -> Azure Active Directory -> Applications d'entreprise.

- Et ajoutez votre utilisateur (ou celui dont vous avez besoin pour vous connecter à SimplyBook.me) dans Enterprise applications< /span> -> Microsoft Teams -> Utilisateurs et groupes sur côté MS Azure.

- 4. Du côté de SimplyBook.me, veuillez cliquer sur Meeting services bloquer et choisir Autorisation près de Microsoft Teams†.
- Connectez votre compte Microsoft.
- 5. Pour les services/classes que vous souhaitez organiser des réunions en ligne, basculez l'option Activer en tant que service/classe de réunion en ligne</span> ; activé dans Gérer -> Services -> cliquez sur le nom du service -> Plus d'options
(dans Gérer -> Classes< /span> -> cliquez sur le nom de la classe -> Plus d'options si vous utilisez Fonctionnalité des classes)


- 6. Lorsque les clients réservent un tel service/cours, il y aura un lien de réunion en ligne sur Ma page de réservations pour la réservation associée. Lorsque l'heure du rendez-vous arrive, les clients pourront le suivre pour accéder à la réunion.
- Pour le côté administrateur, il sera possible de suivre le lien depuis le formulaire contextuel d'informations de réservation dans Calendrier ou dans Rapports -> Détails de la réservation.

- sept. (facultatif) Vous pouvez ajouter un lien de réunions en ligne vers les modèles de notification des fournisseurs et des clients afin que les deux parties les reçoivent avec les détails de la réservation.
Pour ce faire, accédez à Paramètres -> Paramètres e-mail et SMS (ou Fonctionnalités personnalisées -> Notifications flexibles -> Gérer si vous avez des notifications personnalisées par service et/ou fournisseur).

Étapes supplémentaires pour le cas où vous devez autoriser vos fournisseurs à avoir leur propre connexion de compte MS Teams
- 8. Par défaut, votre compte MS Teams que vous avez connecté dans Step#6 seront utilisés pour générer des liens de réunions et organiser des réunions, mais si vous avez plusieurs employés dans votre entreprise, ils sont ajoutés à SimplyBook.me en tant que fournisseurs et utilisateurs et vous souhaitez qu'ils utilisent leurs propres comptes MS Teams pour leurs services/cours en ligne, veuillez assurez-vous de les avoir -directory/fundamentals/add-users-azure-active-directory?context=azure/active-directory/users-groups-roles/context/ugr-context ajouté en tant qu'utilisateurs dans MS Azure avec accès à cette application ainsi que /ajouter-des-membres-à-une-équipe-dans-les-équipes-aff2249d-b456-4bc3-81e7-52327b6b38e9 membres sur côté MS Teams.
- (vous pouvez ajouter des utilisateurs dans l'interface MS Azure avec un domaine interne ou inviter à l'aide d'adresses e-mail existantes)
- 9. Ensuite, ils doivent se connecter au système SimplyBook.me sous leurs identifiants et connectez leurs comptes dans Manage -> Vidéos en ligne.

- dix. Une fois qu'ils auront connecté leurs propres comptes, vous pourrez voir ces informations dans Fonctionnalités personnalisées -> Réunions en ligne -> Fournisseurs de réunion&Services de réunion.
- Veuillez noter ! Il n'est possible de démarrer manuellement une réunion que pour les utilisateurs qui ont administrateur, employé senior ou employé junior (connecté à un fournisseur spécifique) rights.</ span>
Comment fonctionne le processus de réunion
- 1. Une fois que tout est configuré et que le client réserve le service/la classe liés aux réunions en ligne, le client et le fournisseur (ou l'entreprise, selon vos paramètres) obtiendront les liens vers la réunion.
- Soit depuis les notifications par email si vous avez ajouté les variables correspondantes aux templates.
- Ou le prestataire peut accéder à la page de rendez-vous directement depuis la réservation sur Calendar tandis que le client depuis l'onglet "Mes réservations" du site de réservation.

- 2. Par défaut, la réunion démarre automatiquement pour les deux parties à l'heure réservée.
- 3. De plus, le fournisseur peut démarrer manuellement la réunion si nécessaire en utilisant le bouton correspondant.
- 4. Après cela, la redirection vers le logiciel Microsoft Teams a lieu et tous les participants peuvent se joindre.
- (Il n'est pas obligatoire pour les clients d'avoir un compte MS Teams. Pour rejoindre, ils n'auront qu'à renseigner leur nom après avoir ouvert l'url de la réunion dans leur navigateur)

Forfaits
la gauche Avec la fonctionnalité personnalisée Packages, vous pouvez créer un package de plusieurs services ou, si vous vendez également des articles supplémentaires, combiner des services avec des produits, des modules complémentaires et des classes. Les clients peuvent acheter des forfaits sur votre page de réservation ou avec les Fonction PDV. Chaque forfait peut être défini avec une limite générale d'articles et un nombre quelconque de services et de produits, et vous pouvez définir la validité sur n'importe quelle période disponible. Une fois que les clients ont acheté un forfait, ils peuvent réserver un service à tout moment en payant avec leurs crédits de forfait. Ils peuvent toujours vérifier le nombre d'occurrences restantes dans chaque paquet.
- Veuillez noter:
dès que vous activez cette fonctionnalité personnalisée, Connexion client et Les fonctionnalités Accepter les paiements seront également activées. si le rendez-vous acheté avec les crédits du forfait est ensuite annulé, les crédits ne sont pas restitués au solde du client.
Tutoriel vidéo disponible ![]()
Comment utiliser
- 1. Pour activer cette fonction personnalisée, veuillez accéder à votre page Fonctionnalités personnalisées, accédez à la section « Liées à la réservation » et cliquez sur « Activer ».

- 2. Ensuite, choisissez l'option "Gérer" près de la fonctionnalité personnalisée ou accédez à Packages dans la section Gérer du menu de gauche.

- 3. Cliquez simplement sur le bouton "+" pour créer un nouveau package. Le formulaire apparaîtra sur le côté droit de la page.

<mobileonly>
</mobileseulement>
- 4. Insérez le nom du package, ajoutez une description (vous pouvez même utiliser le formatage HTML pour une meilleure apparence) et une image.
- A ce stade, vous pouvez également définir le prix du forfait : vous pouvez spécifier le coût du forfait défini (si vous souhaitez faire une remise, par exemple) ou
- ignorez la case de prix pour calculer ultérieurement le montant total de tous les éléments inclus dans le forfait.
- Attention, il n'est pas possible de créer un package sans prix.

<mobileonly>

</mobileseulement>
- 5. Définissez la période de validité du package,
: activer et définir la limite générale pour les éléments inclus (facultatif, sera appliqué aux services, add-ons et produits liés au package)
- et définir le nombre de sets disponibles à la vente (illimité par défaut).
<mobileonly>

</mobileseulement>
- 6. Passez à l'ajout de services, de produits et de modules complémentaires au package
- (vous devez toujours les définir en plus de la limite générale si vous l'utilisez pour inclure les éléments souhaités dans le pack, sinon il ne sera pas possible d'utiliser le package lors du processus de réservation de service/classe).
- Vous verrez trois sections correspondantes ci-dessous.
<mobileonly> centre</mobileseulement>
- sept. Veuillez sélectionner la section "Services", cochez les cases avec les éléments nécessaires et définissez la quantité qui sera disponible à la réservation dans le forfait.
<mobileonly>

</mobileseulement>
- 8. Si vous utilisez les fonctionnalités Products for sale et/ou Service Add-ons sélectionnez simplement les onglets correspondants et ajoutez des éléments de la même manière.
<mobileonly>
</mobileseulement>
- 9. Après avoir ajouté toutes les options et si vous n'avez pas encore défini de prix forfaitaire, revenez à l'onglet "Détails" et utilisez le bouton "Calculer le prix" pour que le système récapitule automatiquement tous les prix des éléments pour vous.
<mobileonly>

</mobileseulement>
- dix. Vous pouvez maintenant cliquer sur "Enregistrer et émettre le package" pour l'émettre à certains clients ou simplement tout enregistrer et permettre à vos clients d'acheter ce package sur votre site de réservation.
- Si vous attribuez un forfait du côté administrateur ou si le client achète un forfait sur le site de réservation, il recevra une notification d'activation du forfait
- La facture sera envoyée uniquement dans le cas de l'achat et du paiement effectué du côté client.
- 11. Accédez à Rapports // Colis émis pour vérifier l'historique des commandes de colis, les données clients, ainsi que le nombre d'articles restants.
- Utilisez des filtres pour une analyse plus approfondie.
- Ici, vous pouvez également annuler le forfait pour le client spécifique si nécessaire.

<mobileonly>

</mobileseulement>
L'utilisation des forfaits dans la fonction POS
- 1. Assurez-vous d'avoir activé la fonction personnalisée POS.

- 2. Accédez à l'interface POS, cliquez sur le bouton "Nouvelle vente".

<mobileonly>

</mobileseulement>
- 3. Sélectionnez le client sur le côté droit de la page pour activer le bouton "Package".

<mobileonly>

</mobileseulement>
- 4. Choisissez l'article et définissez la date de début. La date de fin sera automatiquement définie en fonction de la durée du forfait après avoir enregistré la sélection.

<mobileonly>

</mobileseulement>
- Veuillez noter, si le forfait est masqué sur la page de réservation, il sera toujours disponible dans l'interface du point de vente car il fait partie du côté administrateur visible pour l'utilisateur du point de vente.
- 5. Passez à la caisse après avoir ajouté tous les services/produits/add-ons/adhésions/cartes-cadeaux nécessaires au panier.

<mobileonly>

</mobileseulement>
- 6. Vous avez peut-être un client qui a déjà acheté un forfait auparavant et qui souhaite l'utiliser.
- Vous pourrez voir s'il existe un forfait applicable une fois que les services nécessaires auront été ajoutés au panier.
- Ensuite, vous pourrez cliquer sur le bouton « Utiliser les forfaits » afin que les articles sélectionnés soient entièrement ou partiellement payés avec cet ensemble lors de la validation de votre commande.

Fonctionnement du site de réservation
- 1. Les clients pourront accéder à l'onglet "Forfaits" sur votre site de réservation.
- Attention, le client doit être connecté pour voir ses achats.
<mobileonly>
</mobileseulement>
- 2. Ils trouveront un ensemble adapté, choisiront une date de début et achèteront le forfait.
<mobileonly>
</mobileseulement>
- (s'ils sélectionnent l'option "payer plus tard" lors du paiement, vous devrez d'abord approuver leur achat du côté administrateur. Ensuite, ils pourront réserver/acheter les articles inclus)
- 3. Lorsque le client a déjà le forfait acheté et réserve les services/produits/add-ons séparés, il pourra couvrir ces éléments avec les crédits de ses forfaits (si inclus dans les forfaits) ou les payer de manière régulière .
<mobileonly>
</mobileseulement>
Paramètres de sécurité du mot de passe
![]()
La fonction personnalisée Paramètres de sécurité du mot de passe permet de définir les exigences de mot de passe pour les utilisateurs et les clients du système. Cela peut encore durcir le système pour une éventuelle intrusion. En quelques étapes seulement, vous pouvez rendre votre système plus sécurisé !
Fonctionnalité personnalisée gratuite !
- Comment utiliser
- 1. Activez l'option Paramètres de sécurité par mot de passe sur votre page Fonctionnalités personnalisées.

- 2. Accédez à ses paramètres sur le côté droit de la page.

- 3. Vous pouvez maintenant définir les exigences de mot de passe pour les utilisateurs de votre système dans le bloc de gauche.

- 4. (est ignoré si vous utilisez déjà Fonction personnalisée de connexion client) Si vous souhaitez que vos clients puissent se connecter en toute sécurité, veuillez activer Connexion client option ici.

- 5. Configurez les exigences de mot de passe pour vos clients dans le bloc de droite et enregistrez les paramètres.

Galerie de photos
Avec la fonction personnalisée Galerie de photos, vous pouvez télécharger les photos de vos services pour attirer plus de clients. Parcourez simplement les photos et elles apparaîtront sur votre page de réservation.
- Comment utiliser
- 1. Activez l'option Galerie de photos sur votre page Fonctionnalités personnalisées.

- 2. Cliquez sur "Paramètres" à côté.

- 3. Téléchargez les images sur la page que vous voyez, ajoutez des descriptions si nécessaire et elles apparaîtront dans l'onglet séparé sur le site de réservation.
Point de vente
![]() La fonction personnalisée de point de vente permet aux utilisateurs du système de créer et de suivre les ventes de réservations et de vendre des adhésions, des produits et des chèques-cadeaux à des clients existants ou nouveaux. Vous pouvez vérifier l'historique des achats du client, approuver les transactions en attente et imprimer les factures. Le tout dans une interface conviviale pour les mobiles !
La fonction personnalisée de point de vente permet aux utilisateurs du système de créer et de suivre les ventes de réservations et de vendre des adhésions, des produits et des chèques-cadeaux à des clients existants ou nouveaux. Vous pouvez vérifier l'historique des achats du client, approuver les transactions en attente et imprimer les factures. Le tout dans une interface conviviale pour les mobiles !
Veuillez noter ! La fonction personnalisée Accepter les paiements sera également activée lorsque vous activez la fonction PoS.
Pourquoi devriez-vous utiliser le système de point de vente ![]()
Tutoriel vidéo ![]()
- Comment utiliser
- 1. Activez la fonctionnalité personnalisée du point de vente sur votre page Fonctionnalités personnalisées, section "Autre".

- 2. Cliquez sur "Aller au point de vente" près de cette fonctionnalité ou dans le coin supérieur droit de votre interface d'administration sous "Mes canaux de réservation".

- 3. Vous verrez la page de démarrage de la vente. (Si vous devez revenir ici à un moment donné, veuillez utiliser l'icône "Accueil" dans le coin supérieur gauche.)

- 4. Par défaut, le client invité est sélectionné, mais vous pouvez sélectionner un client parmi ceux déjà existants dans votre système.

- 5. Ou ajoutez un nouveau client directement à partir de l'interface POS.

- 6. Sélectionnez l'option "Nouvelle vente" pour vendre un service/un abonnement/un package/un produit/un module complémentaire.
- sept. Si vous avez sélectionné l'option de service, une nouvelle réservation sera créée. Veuillez choisir le service/la classe, le fournisseur, la date et l'heure que vous souhaitez réserver. Ajoutez produit(s), add-on(s) si besoin et cliquez sur « Enregistrer ».
- 8. À l'étape suivante, vous pouvez ajouter plus d'options au panier (côté gauche de la page) ou confirmer toutes les sélections en cliquant sur le bouton "Commander" (côté droit de la page).

- 9. Sélectionnez le mode de paiement pour confirmer la commande.

- dix. Si vous avez choisi "Carte de crédit/Virement bancaire/Espèces", la commande sera automatiquement confirmée, ce qui signifie que vous avez reçu l'argent en utilisant les options mentionnées.
- Si vous avez sélectionné "Payer plus tard", la commande sera affichée comme "en attente". Vous pourrez cliquer à nouveau sur "Commander" et sélectionner un autre mode de paiement pour confirmer la vente.

- 11. Vous pouvez aller à la page "Accueil" et utiliser des filtres pour voir les commandes d'aujourd'hui/à venir/expirées/sans réservation/en attente/payées, etc. Il est possible de cliquer sur la commande pour voir les détails/imprimer la facture.

Produits à vendre
la gauche
Lorsque vos clients réservent les services, il leur sera proposé d'ajouter des produits pertinents à leur achat. Quelqu'un qui achète une coupe de cheveux pourrait par exemple se voir proposer d'acheter du gel coiffant en même temps.
Utilisez-le à votre avantage pour vendre plus !
- Veuillez noter ! Cette fonctionnalité personnalisée ne peut pas être utilisée sans Accepter les paiements fonctionnalité personnalisée, c'est pourquoi cette option sera automatiquement activée dès que vous basculerez sur "Produits à vendre".
Comment utiliser :<br> ;
- 1. Pour activer cette option, rendez-vous sur votre page Fonctionnalités personnalisées et cliquez sur "Activer" près de l'option "Produits à vendre".

- 2. Cliquez sur le bouton "Gérer" qui y apparaîtra ou sélectionnez la section "Gérer // Produits à vendre" et vous arriverez sur une page où vous pourrez créer tous les produits nécessaires.

- 3. Cliquez sur l'icône "+" pour créer un nouveau produit, définissez son nom, son image, sa description si nécessaire et son prix.
- Veuillez noter ! Il n'est pas possible de créer des produits gratuits, chacun d'entre eux doit avoir un prix ajouté.

- 4. Pour associer le produit à un ou plusieurs services particuliers, veuillez utiliser l'onglet "Services connectés" et cocher les cases avec les services/classes souhaités.

- 5. Vous pouvez également faire en sorte que le produit soit sélectionné par défaut sur la page de réservation et définir le montant par défaut qui sera affiché aux clients.
- Attention ! Les clients pourront ajuster le montant à leurs besoins sur le site de réservation ou décocher ce produit.
Ici, vous pouvez voir à quoi peuvent ressembler les produits sur la page de réservation :

Corrélation avec d'autres fonctionnalités personnalisées :
1- Réservations de groupe. Le nombre d'éléments est multiplié par le nombre de participants sélectionnés.
2- Réservations multiples. Les produits sont sélectionnés séparément pour chaque réservation.
Puis-je ajouter les éléments que les clients ont sélectionnés aux modèles de notification ?
Bien sûr, ajoutez simplement la variable [produits] à tous les modèles nécessaires dans Paramètres//Paramètres e-mail et SMS et la liste des produits sera incluse dans les notifications correspondantes

Code couleur du fournisseur
Certains utilisateurs aiment simplifier la vue du tableau de bord en ayant des fournisseurs avec certaines couleurs. Avec cette fonctionnalité personnalisée, vous pouvez donner à chacun de vos fournisseurs sa propre couleur afin que, lorsque vous jetez un coup d'œil rapide sur le tableau de bord, vous puissiez facilement voir quelles réservations appartiennent à chaque fournisseur.
- Comment utiliser
- 1. Activez cette option sur votre page Fonctionnalités personnalisées.

- 2. Dans Gérer//Fournisseurs//Plus d'options//attribuez une couleur à chaque fournisseur pour les distinguer facilement dans le calendrier.

- 3. En conséquence, vous verrez les réservations dans les couleurs correspondantes sur votre page Calendrier.

- Si vous utilisez également la fonction personnalisée Status qui influence également la couleur des rendez-vous sur la page du calendrier,
- les couleurs des prestataires seront représentées par des cercles colorés dans le coin supérieur droit du bloc de réservation.

Ressources connexes
![]()
Connectez des équipements, des salles ou tout autre élément limité en quantité à un service. Différentes ressources peuvent être connectées au même service en cas de besoin.
- Comment utiliser
- 1. Activer Ressources connexes fonctionnalité sur votre fonctionnalités personnalisées page.

- 2. Sélectionnez Gérer option ou accédez à Manage -> Ressources associées en utilisant le menu de gauche

- 3. Créez des groupes de ressources en fonction de vos besoins en utilisant + icône ici.
- Vous pouvez choisir entre :
- Même numéro que les clients type - avec ce groupe, toutes les ressources que vous attachez à un service seront nécessaires pour chaque réservation. Si le nombre de ressources n'est pas suffisant pour un certain créneau horaire, celui-ci ne sera pas affiché sur le site de réservation. Ce type peut être utile lorsqu'un équipement limité est requis pour effectuer le service.
- Un seul type - avec ce groupe, il est possible d'accepter plusieurs réservations par plage horaire (cela dépendra du nombre de clients défini par fournisseur et/ou limiter les réservations paramètres de la fonctionnalité). Il peut être utilisé pour une réservation de salle pour des cours comme si, par exemple, vous aviez une chambre mais deux cours de sorte qu'un cours devienne indisponible si un autre obtient une réservation. Dans ce cas, les clients continueront à faire des réservations pour cette autre classe en fonction du nombre de places que vous avez indiqué pour celle-ci.
- Veuillez noter ! Il est recommandé d'utiliser Rendez-vous à heure fixe fonctionnalité avec ce type de ressource afin que le créneau horaire corresponde toujours à la salle/ressource réservée, etc.
- Même numéro que les clients type - avec ce groupe, toutes les ressources que vous attachez à un service seront nécessaires pour chaque réservation. Si le nombre de ressources n'est pas suffisant pour un certain créneau horaire, celui-ci ne sera pas affiché sur le site de réservation. Ce type peut être utile lorsqu'un équipement limité est requis pour effectuer le service.

- 4. Il est important de attacher des ressources aux services/classes afin qu'ils influencent le processus de réservation. Sinon, les ressources n'ajouteront aucune restriction et ne seront pas utilisées.
- 5. Si vous avez plus de ressources d'un certain type, vous pouvez ajouter des éléments au groupe de ressources particulier.

- 6. Si vous avez moins d'articles dans votre inventaire qu'il n'a été créé initialement, vous pouvez supprimer ceux qui ne sont pas nécessaires du groupe en utilisant des actions de masse.
- Si un certain service était connecté à une ressource qui a été supprimée, ce service peut devenir indisponible sur le site de réservation.</ span>
- Dans ce cas, vous devez mettre à jour ses relations avec les autres ressources présentes dans le système.
- sept. Les clients ne sélectionnent pas la ressource lors du processus de réservation, elle est attribuée automatiquement par le système en fonction du service et de la sélection du fournisseur.
- Vous pouvez afficher la ressource utilisée pour le rendez-vous du côté administrateur dans chaque réservation ou dans un fichier .xls exporté depuis Reports -> Détails de la réservation.

Services complémentaires
gauche
Vous pouvez créer des modules complémentaires pour les services sélectionnés. Ces modules complémentaires peuvent être configurés pour influencer ou non la durée du service, mais le service devient de toute façon plus coûteux.
Un exemple peut être un massage, alors que le client pourrait choisir d'ajouter l'huile de luxe qui coûte plus cher pendant le massage.
Utilisez-le à votre avantage pour vendre plus !
- Veuillez noter ! Cette fonctionnalité personnalisée ne peut pas être utilisée sans Accepter les paiements fonctionnalité personnalisée, c'est pourquoi cette option sera automatiquement activée dès que vous activerez les "Service Add-ons".
- Tutoriel vidéo disponible
Comment utiliser:
- 1. Pour activer cette option, rendez-vous sur votre page Fonctionnalités personnalisées et cliquez sur « Activer » près de l'option « Modules complémentaires de service ».

- 2. Cliquez sur le bouton "Gérer" qui y apparaîtra ou allez dans Gérer -> section Service Add-ons et vous arriverez sur une page où vous pourrez créer tous les éléments nécessaires.

- 3. Cliquez sur l'icône "+" pour créer un nouveau module complémentaire, définissez son nom et son prix.
- Veuillez noter ! Il n'est pas possible de créer des add-ons gratuits, chacun d'entre eux doit avoir un prix ajouté.
- Ajoutez la durée souhaitée si vous en avez besoin pour influencer l'heure globale du rendez-vous.
- Télécharger l'image et définir la description est nécessaire.

- 4. Pour associer le module complémentaire à un ou plusieurs services particuliers, veuillez utiliser l'onglet "Services connectés" et cocher les cases avec les services/classes souhaités.

- 5. Vous pouvez également faire en sorte que le module complémentaire soit sélectionné par défaut sur la page de réservation
- Attention ! Les clients pourront décocher cet élément s'ils le souhaitent sur la page de réservation.
- Ici, vous pouvez voir à quoi peuvent ressembler les modules complémentaires sur la page de réservation :
- Veuillez noter ! Nous vous recommandons d'utiliser les délais suivants si vous définissez des modules complémentaires de service avec une durée : moderne, créneaux hebdomadaires, flexible, hebdomadaire flexible ou fournisseur flexible.
- Dans ce cas, l'étape des modules complémentaires sera affichée avant l'étape de temps et les plages horaires affichées doivent correspondre aux éléments sélectionnés dans la plupart des cas.

- Avec d'autres calendriers tels que : cours quotidiens, cours hebdomadaires и fournisseur moderne, cette étape sera affichée après l'étape de sélection de l'heure et
- si toutes les sélections ne correspondent pas aux choix, les clients recevront une erreur indiquant que le service ne peut pas être réservé.
Corrélation avec d'autres fonctionnalités personnalisées :
1- Réservations de groupe. Le nombre d'éléments est multiplié par le nombre de participants sélectionnés.
2- Réservations multiples. Les suppléments sont sélectionnés séparément pour chaque réservation.
Puis-je ajouter les éléments que les clients ont sélectionnés aux modèles de notification ?
Bien sûr, ajoutez simplement la variable [attributs] à tous les modèles nécessaires dans Paramètres//Paramètres e-mail et SMS et la liste des produits sera incluse dans les notifications correspondantes
Catégories de services
la gauche
Avec l'aide de cette fonctionnalité personnalisée, vous pouvez créer des catégories et regrouper vos services pour permettre à vos clients de trouver plus facilement et plus rapidement le service nécessaire.
- Comment utiliser
- 1. Activez la fonctionnalité personnalisée des catégories de service dans la section Fonctionnalité personnalisée//Ajouter plus à la page de réservation.

- 2. Dans Gérer//Services, cliquez sur "+" et choisissez "Ajouter une catégorie" pour créer toutes les catégories nécessaires. Insérez le titre, l'image, la description et attribuez les services à la catégorie.
- 3. Cliquez sur l'onglet "Détails de la catégorie" de la catégorie pour modifier toute information. Pour connecter des services, veuillez choisir l'onglet "Services de catégorie" et cocher les cases correspondantes.
- 4. Ici, vous pouvez voir à quoi peuvent ressembler les catégories sur la page de réservation en utilisant l'un des thèmes disponibles.

Passerelle SMS
Utilisez la fonction personnalisée SMS Gateway pour utiliser votre propre passerelle SMS (Twilio, Vonage (Nexmo), BulkSMS, HISMS, Websms, Infobip disponible uniquement) et utilisez votre propre numéro de téléphone comme numéro d'expéditeur. Si vous utilisez cette fonctionnalité, vous payez directement la passerelle et économisez environ 20 % à 30 % par rapport à l'achat de crédits SimplyBook.me.
IMPORTANT !"
Comment utiliser
- 1. Activez la fonctionnalité personnalisée de la passerelle SMS dans la section Fonctionnalités personnalisées//Autre moyennant des frais d'activation uniques.

- 2. Créez un compte avec l'une des passerelles SMS disponibles : [2], Twilio, .bulksms.com/register/ BulkSMS, HISMS, Websms ou / Infobip si vous n'en avez pas encore.
- 3. Accédez aux paramètres sur le côté droit de la page Fonctionnalités personnalisées de SimplyBook.me pour la fonctionnalité personnalisée « Passerelle SMS ».
- 4. Choisissez le fournisseur de SMS dans le menu déroulant "SMS Gateway" et ajoutez les informations d'identification correspondantes pour la passerelle sélectionnée ci-dessous.

- 5. Enregistrez les paramètres et le tour est joué !
- Veuillez noter ! Si cette fonctionnalité personnalisée est activée et configurée correctement, vous n'avez pas besoin d'acheter des crédits SMS de notre part.
- Vous pourrez voir les SMS envoyés depuis le système dans Rapports // Rapport SMS avec 0 comme montant de crédits dans ce cas.
- Dépannage:
- Les crédits SMS sont prélevés sur mon compte :
La fonctionnalité personnalisée de la passerelle SMS n'est pas activée
Les paramètres du processeur SMS Gateway ne sont pas ajoutés.
- Les SMS ne sont pas envoyés depuis le système
Les paramètres de la passerelle SMS ne sont pas ajoutés correctement.
Il n'y a pas de crédits SMS sur votre solde.
SMTP
Il vous permet d'utiliser votre propre serveur SMTP afin que tous les e-mails envoyés depuis le système SimplyBook.me en votre nom proviennent de votre propre adresse e-mail.
- Comment utiliser.
- 1. Vous pouvez activer cette fonction personnalisée dans votre section Fonctionnalité personnalisée

- 2. Accédez à ses paramètres sur la droite.

- 3. Et ajoutez-y les détails de votre serveur SMTP. Enregistrez les paramètres.
- Remarquez que si vous avez une adresse gmail ou un e-mail g-suite, vous pouvez envoyer jusqu'à 1 000 e-mails par jour via cette adresse.
- Si vous envoyez plus de 1 000 notifications/promotions par jour, vous pouvez consulter d'autres services smtp comme sendinblue.com, sendgrid.com, mailjet.com ou authsmtp.com.
- Veuillez consulter le didacticiel vidéo ici.
- Pour plus de sécurité, vous pouvez configurer une double authentification pour l'e-mail que vous prévoyez d'utiliser.
- ici vous pouvez consulter les instructions d'utilisation du mot de passe d'application pour l'authentification en deux étapes.
Comment stocker une copie des e-mails sortants dans votre compte Gmail :
- 1. Vous devez vous connecter à vos paramètres de messagerie Gmail ou Google Apps et cliquer sur l'onglet Transfert/IMAP et faire défiler jusqu'à la section Accès IMAP.
- 2. Veuillez activer IMAP pour que les e-mails soient correctement copiés dans votre dossier d'envoi.
SOAP avec cryptage

Vous avez besoin que les informations sur les patients soient stockées de manière plus sécurisée ? SOAP (subjectif, objectif, évaluation et plan) avec fonction de cryptage des données permet d'insérer un enregistrement horodaté avec 4 champs de texte cryptés qui restent avec les données du client. Les données médicales sensibles de vos clients seront sécurisées avec RSA 4096.
Comment utiliser
- 1. Assurez-vous que vous disposez de simples Fonctionnalité SOAP personnalisée désactivée (car ils ne sont pas compatibles)
- 2. Ensuite, accédez à la page des fonctionnalités personnalisées à l'aide du menu de gauche de votre interface d'administration, utilisez le champ de recherche en haut ou choisissez la catégorie "Autre".
- Et cliquez sur "Activer" près de l'option "SOAP avec cryptage des données".
- 3. Veuillez choisir "Paramètres" à côté pour générer les clés et configurer le cryptage.

SSL
Établissez toutes les connexions du client avec le serveur via une couche sécurisée.
Il est important de l'activer pour certains processeurs de paiement et widgets.
Fonctionnalité personnalisée gratuite !
- Comment utiliser
- Activez-le simplement sur votre page de fonctionnalités personnalisées et vous avez terminé !

SSO : SAML
gauche
Cette fonctionnalité personnalisée permet de configurer le processus d'authentification unique pour vous en tant qu'administrateur système et les utilisateurs de votre compte, permettant ainsi la connexion au système SimplyBook.me à partir du panneau d'applications MS Azure. Vous pouvez créer des utilisateurs dans MS Azure dans les groupes de niveau d'accès souhaités et les types d'utilisateurs correspondants seront ajoutés dans votre système SimplyBook.me lors de la première connexion.
- Comment utiliser
- 1. Créez un compte sur Microsoft Azure si vous n'en avez pas encore.
- 2. Activer SSO : SAML Fonction personnalisée sur votre Fonctionnalités personnalisées .

- 3. Accédez à Gérer pour modifier les paramètres de connexion.

- 4. Cliquez sur Configuration Microsoft Azure sur la gauche et connectez-vous à votre compte MS Azure là pour commencer la configuration de la connexion.
- Veuillez noter ! Vous devez également disposer d'un accès administrateur dans MS Azure pour pouvoir pour connecter des applications.

- 5. Après une connexion réussie, vous verrez le premier bloc avec les options de base du côté de SimplyBook.me.

- 6. Dans MS Azure, accédez à Active Directory.

- sept. Sélectionnez Applications d'entreprise dans le menu de gauche et ajouter une nouvelle application.
- (vous aurez peut-être besoin d'un abonnement d'essai MS Azure ou Premium payant pour ajouter des applications)


- 8. Choisissez non-gallery taper. Ajoutez son nom et enregistrez.
- 9. Sur la page suivante, cliquez sur Configurer l'authentification unique sur et sélectionnez SAML.


- dix. Utilisez Stylo icône dans Configuration SAML de base bloc à modifier.

- 11. Copiez les URL depuis SimplyBook.me SSO : fonctionnalité SAML aux cases correspondantes sur côté MS Azure. Sauvegarder.

- 12. Sur côté MS Azure faites défiler jusqu'à Certificat de signature SAML partie et téléchargez Certificate(Base64). Ouvrez-le avec le bloc-notes ou un éditeur de texte similaire, copiez le code du certificat et collez-le dans la zone correspondante dans SSO : SAML Fonction personnalisée.


- 13. Faites défiler côté MS Azure page vers Configurer pour le didacticiel bloquer et trouver URL de connexion, Azure AD Identifier et URL de déconnexion options, copiez chacune d'entre elles et collez-les dans les cases correspondantes du côté de SimplyBook.me.

- 14. Accédez à Attributs et revendications de l'utilisateur bloc côté MS Azure et cliquez sur Stylo icône pour le modifier.

- 15. Pour Unique User Identifier(cliquez dessus pour le modifier), veuillez définir user.mail variable comme Source Attribute. C'est le paramètre qui nous permettra de différencier les différents logins des utilisateurs.
- 16. Pour des revendications supplémentaires, veuillez ajouter Groupes option utilisant Ajouter une revendication de groupe et Email et Name avec Ajouter une nouvelle revendication boutons en conséquence.
- Vous pouvez également ajouter un téléphone et un nom de famille si vous en avez besoin. Voir l'exemple de configuration des revendications ci-dessous.

- 17. Copiez les titres des revendications dans les cases correspondantes sur SimplyBook.me côté.
- 18. Accédez à Page d'accueil Azure Active Directory et accédez à la section Utilisateurs, créez tous les utilisateurs que vous souhaitez accéder au système s'ils ne sont pas encore créés.

- 19. Dans Groupes créer des groupes qui correspondront aux types d'utilisateurs de SimplyBook.me. Par exemple, Administrateurs pour les utilisateurs de niveau administrateur, Employés seniors pour l'accès des employés seniors, etc.
- Vous ne pouvez créer qu'un seul groupe si tous vos utilisateurs ont un accès administrateur, par exemple.

- 20. Ajoutez des utilisateurs aux groupes correspondants.

- 21. Assurez-vous que chaque groupe contient les appartenances.

- 22. Copiez chaque groupe Object ID à la case correspondante dans Correspondance de groupe d'utilisateurs paramètres du côté de SimplyBook.me.
- (Si vous n'avez qu'un seul groupe pour les administrateurs, insérez le même ID d'objet partout dans ce bloc). Enregistrer les paramètres.

- 23. Une fois que les utilisateurs ont accès à applications Tableau de bord des applications ils peuvent se connecter à SimplyBook.me avec leur niveau d'accès en cliquant sur l'icône de l'application SimplyBook.me.< ;/span>

- Les types d'utilisateurs correspondants seront automatiquement ajoutés à votre compte SimplyBook.me avec les données transmises en fonction de vos paramètres.
- Veuillez noter !
- Il n'est pas possible de connecter des utilisateurs secondaires SimplyBook.me existants à des utilisateurs MS Azure.
- Pour ces utilisateurs, il n'est pas possible de réinitialiser les mots de passe SimplyBook.me, de modifier le niveau d'accès, le nom d'utilisateur, d'accéder aux données personnelles rapport.
- Ils doivent contacter l'administrateur MS Azure s'ils perdent l'accès à la page des applications ou contacter l'administrateur par défaut de SimplyBook.me pour demander rapport de données personnelles.
- Si vous devez restreindre l'accès à ces utilisateurs, vous pouvez les supprimer ou les bloquer côté MS Azure.</ span>
- Si vous modifiez le groupe auquel l'utilisateur est inclus du côté MS Azure ou supprimez l'utilisateur, le niveau d'accès sera être mis à jour du côté de SimplyBook.me en quelques minutes ou l'utilisateur sera déconnecté.
Statut
Si vous avez une entreprise avec de nombreux fournisseurs et un centre de services acceptant des clients, vous pouvez ajouter une possibilité de statut aux événements pour voir le statut. Ceci est par exemple utilisé pour marquer un rendez-vous avec un statut comme "le client est arrivé", puis un autre comme "le client est parti et a payé" selon vos besoins.
- Comment utiliser
- 1. Activez cette fonctionnalité personnalisée dans la section Fonctionnalités personnalisées//Liées à la réservation.

- 2. Accédez aux paramètres de cette fonctionnalité personnalisée en cliquant sur "Gérer".

- 3. Appuyez sur "+" pour ajouter un nouveau statut.
- Insérez "Nom", "Description" et attribuez la couleur à cet état. Si vous laissez le sélecteur "Statut par défaut" activé, ce statut s'appliquera automatiquement à toutes les nouvelles réservations.

Ramenez-moi à la maison
La fonction personnalisée Take Me Back Home vous permet de ramener les clients à votre page d'accueil ou à l'URL sélectionnée après qu'une réservation a été effectuée sur la page de réservation. Les clients peuvent appuyer sur un lien ou ils seront ramenés à votre page d'accueil après 10 secondes par un script de redirection.
Veuillez noter ! Cette fonctionnalité n'est pas compatible avec Kiosk fonction personnalisée.
- Comment utiliser
- 1. Activez Ramenez-moi à la maison dans la section Fonctionnalités personnalisées//Apparence et convivialité.
- 2. Accédez à ses paramètres sur la droite.
- 3. Insérez le lien où vous souhaitez que vos clients soient redirigés, rédigez un texte pour ce lien.
- Ajoutez également le lien vers lequel vous souhaitez que vos clients soient redirigés vers la version mobile et ajoutez son texte.
- 4. Activez ou laissez désactivé "Activer la redirection automatique vers votre site". S'il est activé, il redirigera automatiquement vos clients vers la page que vous avez indiquée dans le "lien vers votre site Web" déposé en 10 secondes.
- 5. Écrivez le texte de redirection automatique qui sera affiché si l'option "Activer la redirection automatique vers votre site" est activée (veuillez noter ! ne modifiez pas la partie "%s" pour un travail correct de la minuterie).
Notifications par télégramme
Cette fonctionnalité personnalisée vous permet de créer votre propre bot de notifications en quelques étapes simples. En conséquence, chaque client aura la possibilité de s'abonner aux notifications de votre bot et de recevoir des messages sur les rendez-vous, les détails de la facture, les tickets et bien plus encore.
Tutoriel vidéo disponible ![]()
Veuillez noter !
- Cette fonctionnalité ne prend en charge que les notifications liées à la réservation.
- Cette fonctionnalité personnalisée n'est pas compatible avec Kiosk
- Comment utiliser
Activer Notifications par télégramme sur votre Fonctionnalités personnalisées -> Autre section.
Accédez au robot d'assistance BotFather en utilisant le lien dans les instructions sur le côté droit de la page SimplyBook.me.

Démarrez le processus de configuration dans le bot BotFather et sélectionnez /newbot option, suivez les conseils qui s'y trouvent : ajoutez le nom et le nom d'utilisateur souhaités.
Copiez le jeton du message de résultat.

Collez le jeton dans le champ correspondant de votre compte SimplyBook.me -> Fonctionnalités personnalisées -> Notifications par télégramme. Enregistrer les paramètres.
La page indiquera que le bot est connecté à votre compte.
1200px|centre

Pour activer les notifications pour vous en tant qu'utilisateur, veuillez utiliser barre de notifications en haut à gauche, cliquez sur l'icône Télégramme et suivez les étapes à partir de la fenêtre contextuelle :
vous devrez naviguer vers le bot, choisir l'option "S'abonner" dans le menu et insérer le code de sécurité.
Les clients verront l'invitation à s'abonner aux notifications sur la page de confirmation de réservation ou de paiement et pourront suivre les étapes similaires.
Avec l'aide de ce bot de notification, il est également possible de voir les informations sur l'entreprise et la liste des réservations à venir (leur nombre est limité à 21).

Les textes des notifications de réservation dépendent des modèles que vous avez définis pour les notifications par SMS, soit dans Settings -> Paramètres e-mail et SMS ou dans les paramètres de fonctionnalités personnalisées spécifiques (c'est-à-dire Multiple Bookings, < ;span style="background-color:#cdeffc; padding:5px; border-radius:5px;">Réservations de groupe, Flexible Notifications).
Vous pouvez y sélectionner les variables à utiliser et ajuster la formulation si nécessaire.
center
Si vous utilisez Accepter les paiements, Tickets et/ou Réunions vidéo en ligne il sera également possible d'obtenir les liens vers les pièces jointes correspondantes par rendez-vous respectif.
Voici l'exemple de la façon dont les détails du rendez-vous peuvent ressembler en fonction d'autres fonctionnalités utilisées dans le système

Conditions générales
Si vous voulez que votre entreprise soit à l'épreuve des balles, cette fonctionnalité personnalisée est un MUST. Utilisez-le pour créer et gérer des termes & conditions pour votre entreprise vis-à-vis de vos clients.
Le texte inséré dans la fonctionnalité personnalisée sera affiché sur la page "Détails" au-dessus du bouton "Réserver maintenant" ou lors de l'étape d'inscription si vous utilisez Fonction de connexion client sous la forme d'une case à cocher avec le texte "J'accepte les termes et conditions de -votre entreprise-" et les clients devront l'accepter pour pouvoir réserver vos services
Fonctionnalité personnalisée gratuite !
- Comment utiliser
- 1. Activez cette fonctionnalité sur votre page Fonctionnalités personnalisées.

- 2. Accédez à ses paramètres sur la droite pour gérer vos termes et conditions.
- 3. Ajoutez le texte. Vous pouvez y utiliser le formatage HTML pour ajuster l'apparence.

- 4. (facultatif) Rendre obligatoire l'acceptation de vos conditions à chaque réservation si vous avez besoin d'un consentement même si le même client réserve les services de temps à autre.
Code QR du billet

Créez des QR codes personnalisés pour vos tickets constitués d'un ou plusieurs champs supplémentaires variables, avec ou sans délimiteur. Ce code QR peut être ajouté à vos tickets pour faciliter la lecture d'informations supplémentaires dans des systèmes externes après validation du ticket.
Veuillez noter ! :
- Lorsque vous activez cette fonctionnalité personnalisée Tickets sera également activé.
- Avec cette fonctionnalité, vous devrez modifier le modèle de ticket personnalisé avec est disponible uniquement avec les abonnements premium.</ durée>
- Comment utiliser
- 1. Activer Code QR du ticket sur votre Fonctionnalités personnalisées -> Autre section.

- 2. Sélectionnez Capacité de correction de code QR si nécessaire.
- 3. Accédez à Modifier le modèle page.

- 4. Ajustez le modèle à vos besoins à l'aide de l'Editor et les variables disponibles variables sur la droite.

- 5. Ajoutez URL du modèle QR variable au modèle de ticket dans Fonctionnalités personnalisées -> Billets -> Billet personnalisé.
- (veuillez également vous assurer que vous avez un ticket personnalisé attaché aux services nécessaires dans Manage -> Services -> sélectionnez le service nécessaire -> Tickets)

Billets
Émettez des billets pour les services, les cours et les événements. Les billets peuvent être imprimés ou affichés depuis l'écran mobile par les clients, puis scannés à l'aide de l'application d'administration SimplyBook.me, ou insérés manuellement dans la section Valider les billets de SimplyBook.me. Si vous avez des connaissances HTML/CSS et un forfait Premium, vous pouvez personnaliser l'apparence de vos billets.
Tutoriel vidéo ![]()
Veuillez noter :
- cette fonctionnalité n'est pas compatible avec Accepter les dépôts ;
- les tickets sont joints au format PDF à l'e-mail de confirmation du client ;
- si Payer plus tard est activé dans Accepter les paiements fonctionnalité, le client la sélectionne lors de la réservation,
- les tickets seront envoyés dans le modèle d'e-mail séparé une fois que l'administrateur aura accepté le paiement dans Transactions de paiement rapport.
- Il peut être modifié dans Fonctionnalités personnalisées -> Billets.

- les tickets sont limités : chaque abonnement comprend un nombre défini de tickets par mois (140 en période d'essai). Pour vérifier le nombre de billets que vous avez, rendez-vous sur Plans&Prix -> Abonnements et faites défiler vers le bas de la page. Pour acheter plus de billets, veuillez accéder à Plans&Prix -> Éléments supplémentaires.

- Comment utiliser
- 1. Activez cette fonctionnalité sur votre Fonctionnalités personnalisées page.

- 2. Accédez à Gérer en utilisant le lien près de la fonctionnalité activée ou accédez à Manage -> Services section.

- 3. Sélectionnez le service pour lequel vous souhaitez vendre les billets en un clic et accédez à Tickets languette.
- 4. Activer émission des billets et connectez le modèle en cliquant dessus. Enregistrer les paramètres.
- (Il existe un modèle par défaut, mais avec le plan Premium, vous pouvez créer le vôtre).
- 5. Lorsque l'heure de l'événement arrive et que vous devez valider les billets, veuillez vous rendre sur Fonctionnalités personnalisées -> Billets -> Valider le ticket.
(ou accédez-y depuis la page Calendrier)

- 6. Recherchez le billet par son numéro unique (peut être utilisé sur ordinateur et mobile) ou scannez le code QR (ouvrez cette page à partir d'un appareil mobile).
- Vérifiez les informations de réservation si nécessaire et cliquez sur Valider le ticket

- sept. Si vous avez l'application d'administration SimplyBook.me, vous pouvez facilement numériser et enregistrer des billets depuis Dashboard.</ durée>

- 8. Les codes des billets peuvent être trouvés dans les réservations associées sur Calendrier ou dans Détails de la réservation rapport.
- Vous pouvez également imprimer des billets à partir de là.
- 9. (facultatif) Si vous disposez d'un forfait Premium et que vous connaissez HTML/CSS ou que quelqu'un peut vous aider, vous pouvez créer un modèle de ticket personnalisé dans Fonctionnalités personnalisées -> Billets -> Billet personnalisé.

- dix. Du côté client, ils peuvent obtenir des billets sur la page de confirmation de rendez-vous/paiement lorsque le processus de réservation est terminé.
- Ou ils peuvent accéder à Mes réservations et utilisez le bouton correspondant pour télécharger le billet PDF et l'imprimer.
Rapport de vaccination
La fonction personnalisée de vaccination donne un aperçu rapide des créneaux réservés et disponibles dans votre système, permettant ainsi de voir la charge généralement par jour/semaine/mois ou une plage de dates (jusqu'à 90 jours ) ainsi que par certains fournisseurs ou services. Vous pouvez facilement voir les surchargés et les plus libres pour les gérer en conséquence. Une autre option qui vous aide à planifier avec succès le processus de vaccination est l'onglet "Deuxième rendez-vous" : il indique si un certain patient a déjà pris rendez-vous pour une deuxième dose de vaccin ainsi que ses coordonnées, la date et l'heure des rendez-vous vous permettant pour contacter rapidement ceux qui ont encore besoin d'un autre organisme de prise de rendez-vous. Les deux onglets de rapport offrent un excellent moyen de gérer et d'organiser les ressources temporelles et les équipes de vaccination de la manière la plus efficace pour faire vacciner autant de personnes que possible.
- Comment utiliser
- 1. Activez l'élément correspondant sur votre Fonctionnalités personnalisées page.

- 2. Sélectionnez le critère de regroupement des rendez-vous. Par défaut, ils seront regroupés par client record(id), mais vous pouvez également choisir de regrouper par email ou numéro de téléphone. Et, bien sûr, vous pouvez modifier ces préférences à tout moment.
- (facultatif) Si vous utilisez Intake form et/ou Champs client fonctionnalités, vous pouvez choisir de regrouper les réservations en fonction de la réponse à l'un de ces champs.
- 3. Après avoir accédé à Slots rapport, vous pouvez voir le total des créneaux actuellement libres et réservés ainsi que le pourcentage d'occupation du temps par fournisseur ou service.
- Veuillez utiliser les sélecteurs pour afficher les données par jour/semaine/mois ou une plage de dates.
- Veuillez noter :
La période maximale pouvant être sélectionnée pour la plage de dates est de 90 jours. Si vous choisissez la plus grande période, elle sera automatiquement corrigée automatiquement.
En vue journalière, le nombre de créneaux par fournisseur est basé sur votre paramètre de délai (c'est-à-dire si le délai est de 5 minutes et le temps l'horaire d'ouverture est de 9 h 00 à 10 h 00, vous verrez alors 12 plages horaires par fournisseur s'il sert un client à la fois),
- alors que par service, cela dépend de la durée du service sélectionné (c'est-à-dire si la durée du service est de 30 minutes et l'heure d'ouverture dans le calendrier est de 9h00 à 10h00, vous verrez 2 créneaux).
- Le nombre d'emplacements affichés est généralement influencé par
le nombre de fournisseurs ajoutés dans le système ;
leurs horaires;
nombre de clients qu'ils peuvent servir à la fois.
- Les caractéristiques suivantes n'influencent pas les statistiques
- Limiter les réservations;
- Ressources associées ;
- Synchronisation du calendrier;
- Classes ne sont pas affichés dans le rapport

- 4. Lorsque vous accédez à Deuxième rendez-vous vous pouvez voir les clients qui ont déjà réservé au moins un rendez-vous non annulé dans le système.
- Les lignes seront regroupées selon les paramètres de #2.
: Dans le cas où le client spécifique a plus d'un rendez-vous, ces enregistrements seront marqués comme ayant un deuxième rendez-vous en place et la deuxième colonne contiendra la date de sa dernière réservation.
- En utilisant View vous permet d'accéder aux coordonnées de chaque client ainsi qu'à la liste de ses rendez-vous.
- Tutoriel vidéo sur la création d'un compte pour la vaccination
Compteur de visiteurs
Use Visitor Counter Custom Feature to get up-to-date information about visits to your booking website or to the page with your booking widget. This Custom Feature will help you to evaluate the visits and bookings and can help you to decide if you should do promotions to get more visitors and potential clients. You will see all this information in the main Dashboard of the SImplyBook.me system. Shows data for the previous calendar week.
- How to use
- 1. Enable this option on your custom Features page.

- 2. Check the chart on Dashboard page for updates.

Waiting List
- Video tutorial available
Please note!
- Only the following calendar layout types are supported: modern, slots weekly, flexible weekly, flexible, flexible provider and daily classes.
- If you have a non-supported one set it will be automatically changed when this custom feature is enabled.
- The waiting list booking does not have time attached and is related to date.
- When some timeslot becomes available all the client who have applied for this date waiting list receive the email notification and the one who is the first will be able to occupy the spot.
- Client can have only one active waiting list booking for the specific service and provider for the specific date.
- During the process of the applying to the waiting list the clients fill in only the basic information or register/log in. All the rest(payments, products purchase, etc. will be provided when the usual booking will be made)
- This feature cannot be enabled together with Multiple bookings
- Waiting List feature does not work for recurring services and/or classes booking.
- How to set
- 1. Enable "Waiting list" custom feature on your "Custom features" page, "Functional" section.
- 2. In its settings on the right side of the page, "Main configuration" block, please select the number of email notification attempts about the free time slot appearance.
- Choose the desired time interval between these attempts in "Notifications interval".
- Set the time period when the waiting list bookings should be automatically cancelled in case the free spaces do not appear using "Waiting list slot auto cancellation" setting.
- 3. Adjust the email templates for the free slot notification and no free slots email to your needs. Use the variables if needed.
- Save settings.
- 4. You will be able to see all the waiting list applications in the corresponding report.
- You can use the link near this custom feature to access it or navigate to Reports // Waiting list report using the left-side menu.
- It is possible to filter the booking and manually cancel if necessary.
- 5. The clients can see own waiting list appointments in the specific tab on the booking website and can also cancel them there if they wish to.
Zapier Connector
Connect SimplyBook.me with hundreds of other solutions using this feature. It contains a variety of triggers that can be used to send information to other solutions by simply using one of the available zaps or by creating a new zap. Zapier allows to integrate 2 or more web-applications via their APIs through “triggers” and “actions”. SimplyBook.me is available in Zapier as Trigger app, it means only information from SimplyBook.me is sent to Zapier (1-way integration) and via Zapier to any app that has actions.
Please note!
- Available data depends on custom features enabled;
- It doesn't work if 2-step authentication is enabled (HIPAA or Google Authenticator);
- New client trigger doesn't work with Import clients feature, but works correctly if 1 client is added manually in admin interface;
- Information about membership/promotion/package/product used is not included as it relates to invoice and not to booking;
- Comment change doesn't launch any trigger;
- To be able to use Booking change/Booking cancellation triggers in order to change existing records in Action app you need to use paid Zapier account(please check current pricing with them and if it includes multi-step zaps), as Search step is needed to find the record in action app;
- If more items are added to admin interface after ZAP was created, you need to press "Get more samples" button at "Trigger step" -> "Test this step" in Zapier to fetch new available fields and data (zap template should be changed);
- Invoice data can be sent with New Invoice trigger;
- SOAP data is not sent;
- Tax information is not sent, service price is shown without taxes added;
- It doesn't work if both Accept payments and Approve bookings are enabled, and batch bookings are partially approved.
6 triggers are now available:
• New booking - launches when new booking is created in SimplyBook.me account;
• Booking change - launches when booking is changed (change of date/time/service/provider/status/intake forms answers);
• Booking cancellation - launches upon booking cancellation;
• New client - launches when new client is added, either upon a new booking, or when admin manually adds client in SimplyBook.me admin interface.
• New Offer - launches when any new offer is created on SimplyBook.me side (can be used when Accept payments custom feature is enabled).
• New Invoice - launches when new invoice is created and paid on SimplyBook.me side (can be used when Accept payments custom feature is enabled).
- Available data:
For booking-related triggers(New booking, Booking change, Booking cancellation):
Basic functionality (no custom features enabled):
- Company (login, name, email, phone),
- Service (name, description, duration, buffer time),
- Provider (name, description, email, phone),
- Client information (name, email, phone, address, timezone),
- Booking code (if booking is confirmed, start/end date/time).
Custom features related data:
- Accept payments (service price, currency);
- Status (name, description, color);
- Approve bookings (approval status: approved, canceled);
- Multiple Locations (location name, location address (with coordinates), location phone, location description);
- Service Categories (category name, category description);
- Service Add-ons (add-on name, add-on price);
- Intake Forms (answers).
For New client trigger:
- Client ID;
- Client name;
- Client email;
- Client phone;
- Client address;
- If client is blocked to login (if Client login custom feature is enabled);
- Client registration date.
For New Offer/Invoice triggers:
- Order ID;
- Client name / email / phone;
- Offer/Invoice description (list of items ordered, information about discount: gift card/coupon/package used);
- Order amount and currency;
- Discount amount;
- Order date and time;
- Offer/Invoice number in SimplyBook.me system (O-XXXXXX or I-XXXXXX);
- Payment processor (delay, cash, credit card, wire transfer);
- Payment status (paid, pending) and if payment is received.
- How to use
- 1. Enable Zapier connector custom feature on your Custom features page on SimplyBook.me side.

- 2. Create new Zap by clicking on Make a Zap button in Zapier interface.
- 3. Look for Simplybook in Trigger step.
- 4. Select the desirable trigger.
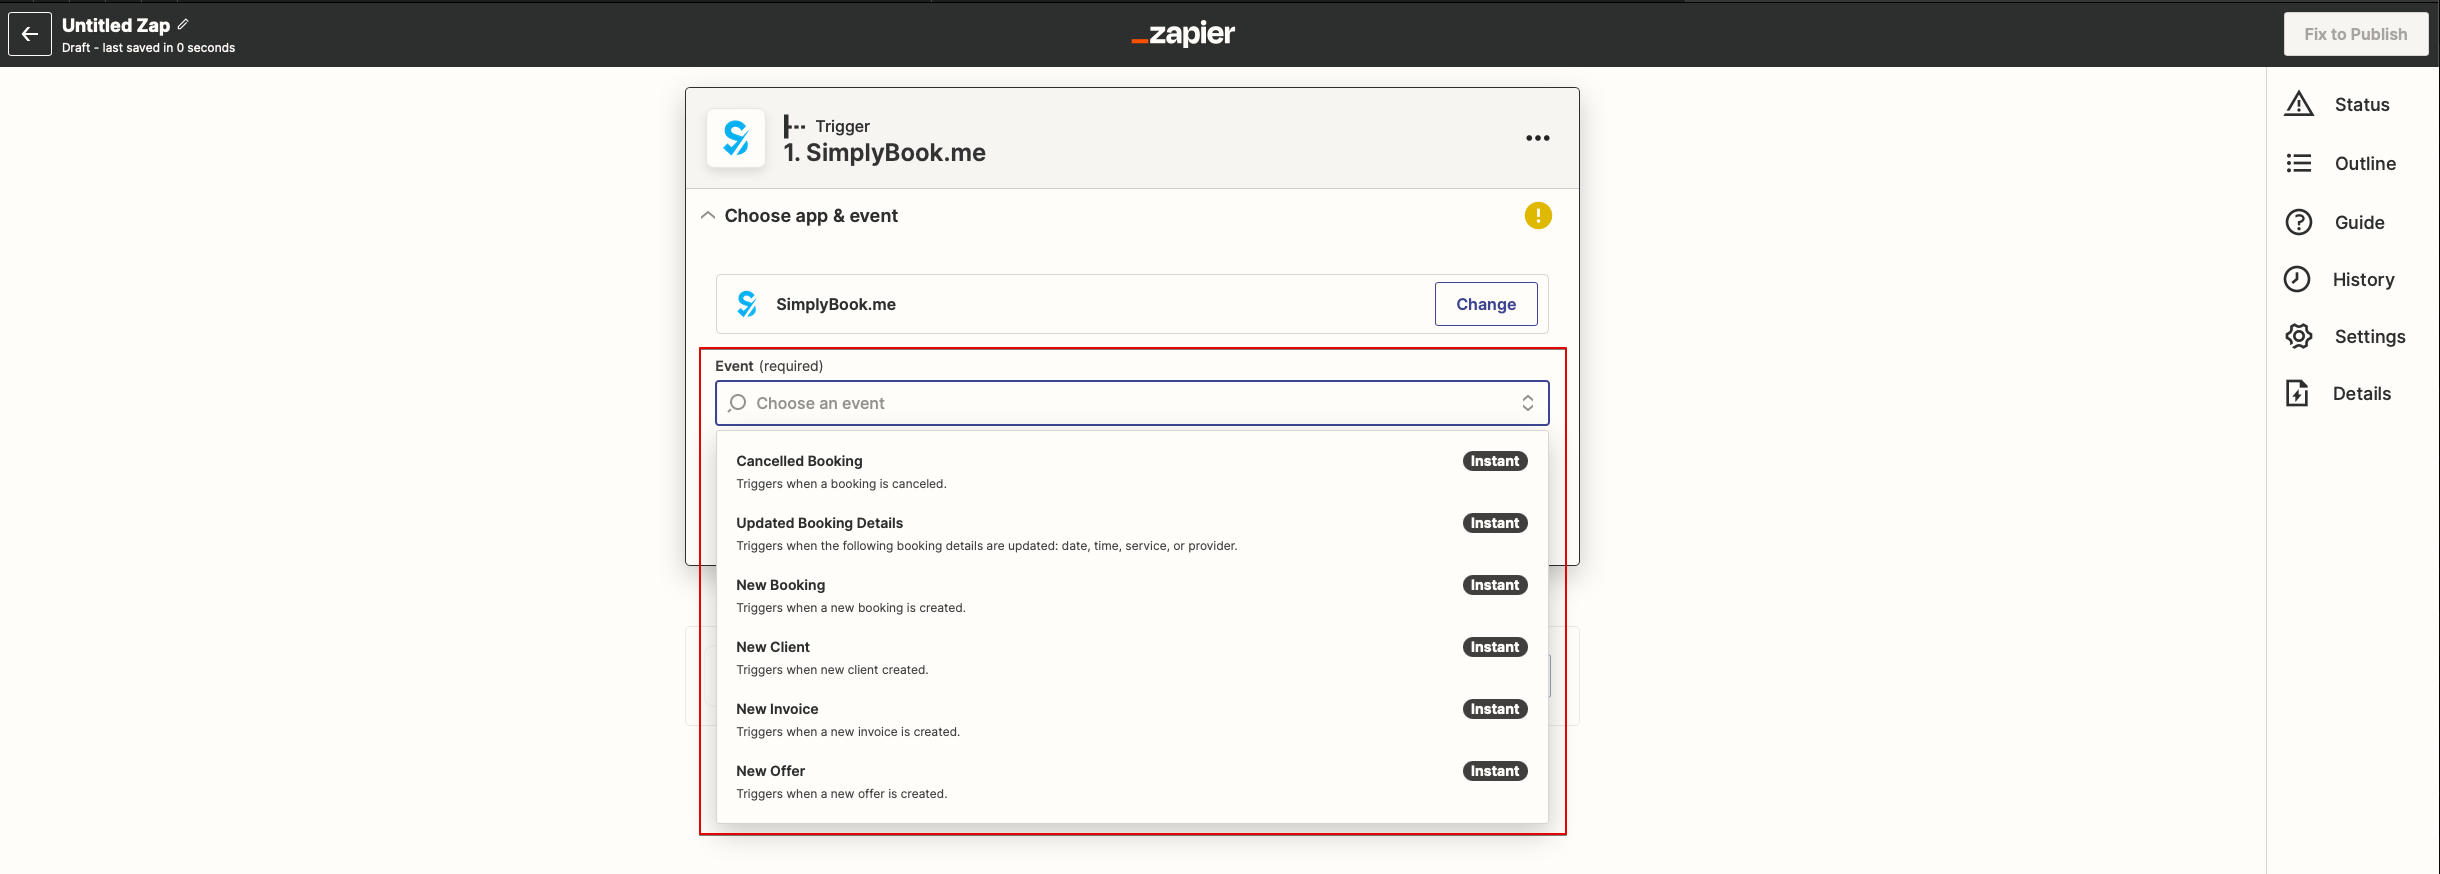
- 5. Connect SimplyBook.me account.
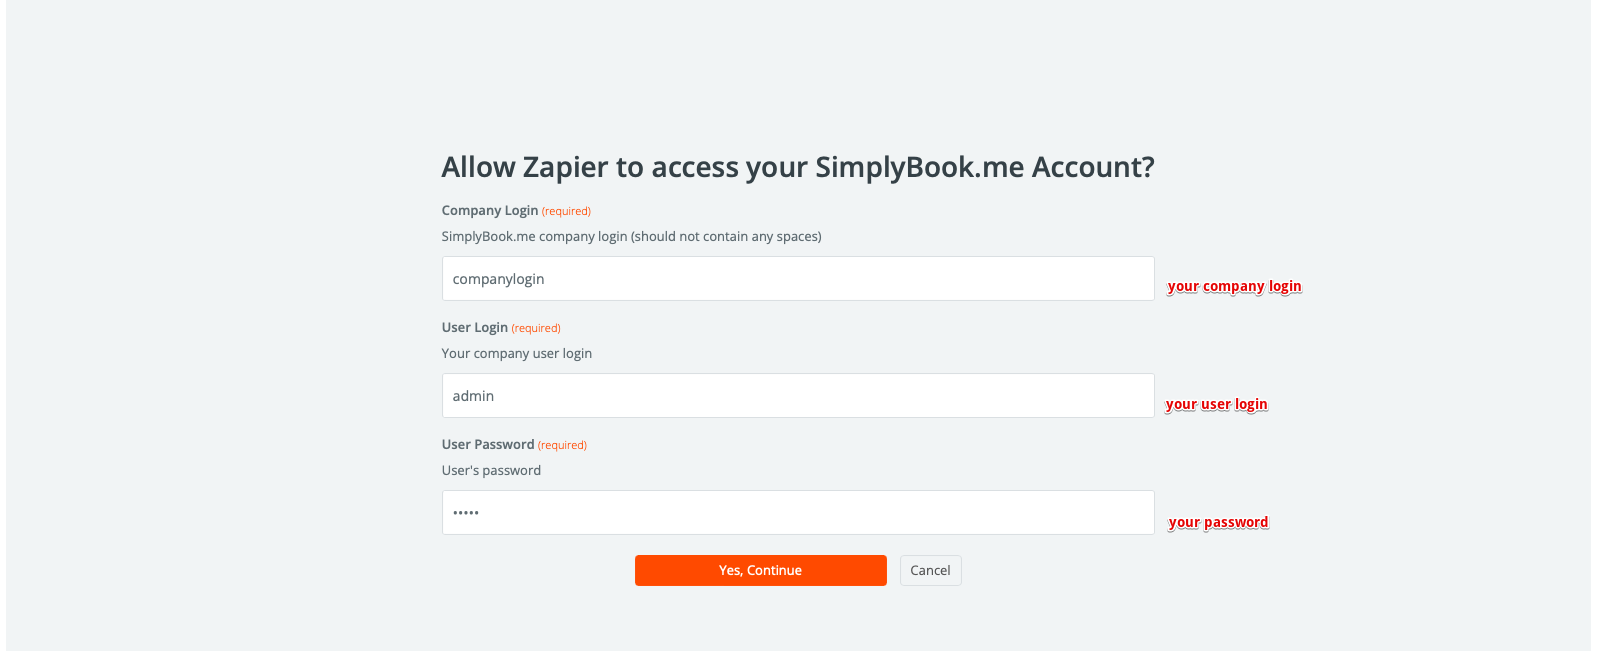
- 6. Click Continue to test this step.

- 7. Proceed to adding the Action step and search for the app you wish to connect SimplyBook.me to.
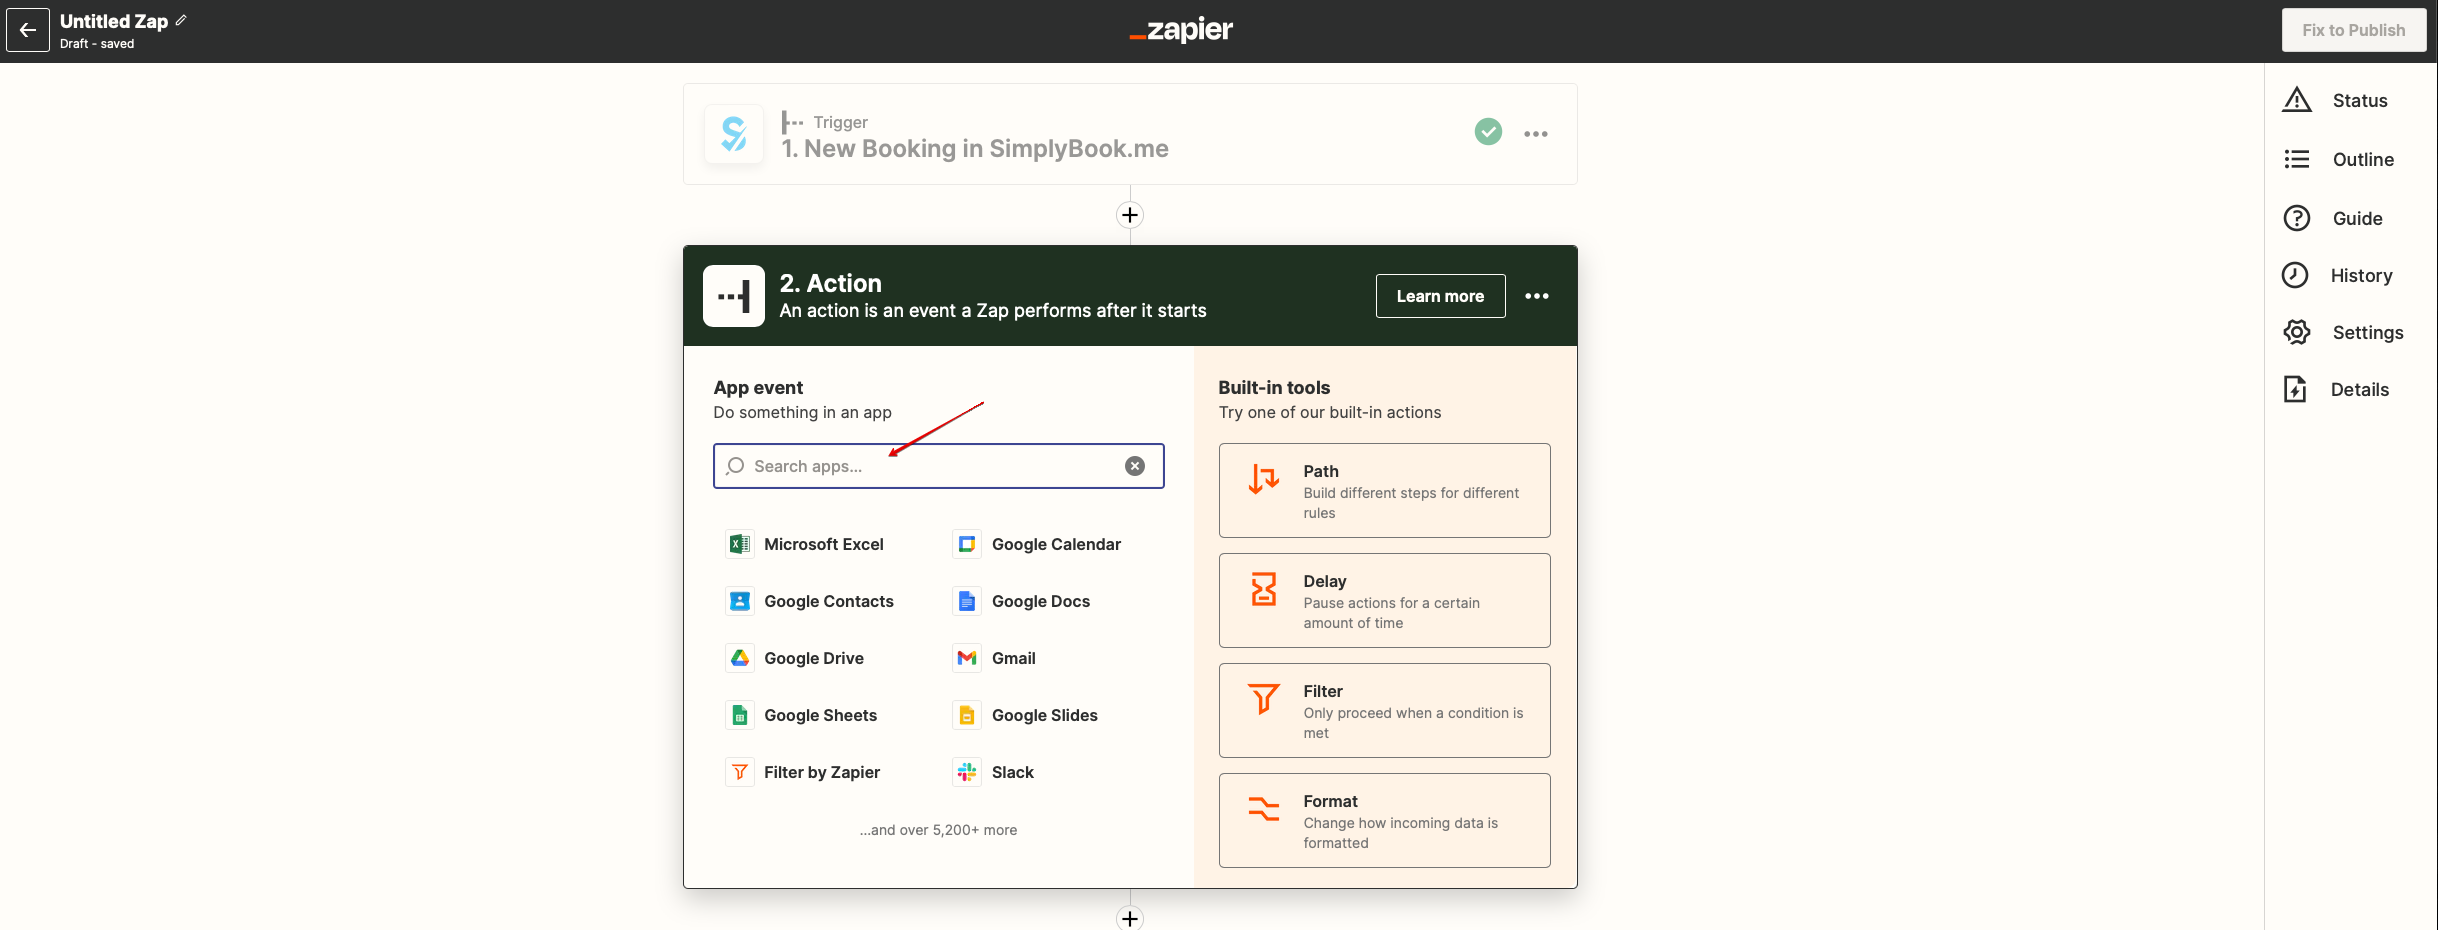
- 8. Connect this application account and setup the template using the available data mentioned above.
- 9. You can test this step operation as well if necessary or skip it.
- 10. Finish the setup, add Zap name and turn it on.