Created page with " '''Tutoriel vidéo disponible''' link=https://www.youtube.com/watch?v=3GZJzUrm0cs <br><br> <br><br> <span style="background-color:#ffe9e9; padding:5..." |
Created page with "Utilisez cette fonction personnalisée pour nettoyer toutes les anciennes réservations du système. Vous pouvez définir le moment où les réservations doivent être supprim..." |
||
| Line 985: | Line 985: | ||
[[File:Daily report new icon.png ‎|left]] | [[File:Daily report new icon.png ‎|left]] | ||
=Rapport quotidien= | |||
<br> | |||
[[File:Daily report new icon.png ‎|left]] | |||
Chaque jour, cette fonctionnalité personnalisée vous enverra un statut mis à jour de toutes les réservations de la journée. Vous recevrez également une liste avec vos réservations actives pour la semaine à venir. | |||
Dans les paramètres de cette fonction personnalisée, vous pouvez décider si vous souhaitez inclure les nouvelles réservations d'aujourd'hui, les réservations annulées d'aujourd'hui, décider de la période pour les réservations à venir comme 1 jour, 3, 7, 14, 21, 30 jours et définir l'heure de notification. | |||
<br><br> | <br><br> | ||
te fonctionnalité sur votre page Fonctionnalités personnalisées. | |||
[[File:Daily report enable path new cf.png | centre]] | |||
[[File:Daily report enable path new cf.png | | |||
<br><br> | <br><br> | ||
:2. | :2. Accédez aux paramètres à droite pour gérer les options disponibles. | ||
[[File:Daily report settings path new cf.png | | [[File:Daily report settings path new cf.png | centre]] | ||
<br><br> | <br><br> | ||
:3. | :3. Ajustez les préférences et enregistrez. | ||
<br><br> | <br><br> | ||
: | :Le système enverra le rapport correspondant à l'adresse e-mail de votre entreprise que vous avez indiquée dans Paramètres//Informations sur l'entreprise//Informations de base. | ||
[[ | [[Fichier :Rapport quotidien.png | frontière| centre]] | ||
<br><br> | <br><br> | ||
------- | ------- | ||
= | =Afficher les espaces restants= | ||
[[File:Seats left icon.png|left]]<br><br> | [[File:Seats left icon.png|left]]<br><br>Affichez le nombre de places restantes lorsque vous acceptez plusieurs clients par créneau, comme pour les cours et les événements. Vous pouvez également choisir d'afficher le nombre total de places ainsi que le nombre de places restantes. | ||
<br><br> | <br><br> | ||
<br><br> | <br><br> | ||
''' | '''Veuillez noter!''' | ||
• Cette fonctionnalité n'est pas compatible avec [[Limit_Bookings_custom_feature|Limiter les réservations]] ; | |||
• Fonctionne pour les [[How_to_change_the_way_time_slots_are_shown#Calendar_Layouts|calendar layouts]] suivants uniquement : créneaux hebdomadaires, cours modernes, hebdomadaires et quotidiens, fournisseur moderne. | |||
• Le temps bloqué par [[Calendar_Sync_custom_feature|Calendar sync]] n'influence pas le nombre de plages horaires. | |||
<br><br> | <br><br> | ||
: | :Tutoriel vidéo disponible [[File:Youtube-Logo.png|link=https://www.youtube.com/watch?v=Dn0tNJhOToE]] | ||
<br><br> | <br><br> | ||
; | ;Comment utiliser | ||
:1. | :1. Activez Afficher les espaces restants dans votre section Fonctionnalités personnalisées. | ||
[[File:Remaining spaces enable path.png|border|center]] | [[File:Remaining spaces enable path.png|border|center]] | ||
<br><br> | <br><br> | ||
:2. ( | :2. (facultatif) Activez l'option correspondante pour afficher le nombre total d'espaces avec ceux restants. | ||
[[File:Remaining spaces setting.png|border|center]] | [[File:Remaining spaces setting.png|border|center]] | ||
<br><br> | <br><br> | ||
:3. | :3. En conséquence, les clients pourront voir le nombre d'espaces restants pour chaque créneau horaire (et le total si "Afficher le nombre total d'espaces par créneau" est activé). | ||
[[File:Display slots left client side.png|1200px|border|center]] | [[File:Display slots left client side.png|1200px|border|center]] | ||
<br><br> | <br><br> | ||
<br><br> | <br><br> | ||
------- | ------- | ||
= | =Validateur de réservation externe= | ||
[[File:External booking validator icon.png|left]]<br><br> | [[File:External booking validator icon.png|left]]<br><br>Vous pouvez valider les réservations à l'aide d'un script externe. Le script peut vérifier les variables de la réservation, et seulement si les conditions sont remplies, la réservation est traitée. De plus, le script de validation peut ramener des informations qui peuvent être injectées dans les variables du formulaire d'admission.<br><br> | ||
<span style="background-color:#ffe9e9; padding:5px; border-radius:5px;">'''Veuillez noter !'''</span><br> | |||
*<span style="background-color:#ffe9e9; padding:5px; border-radius:5px;">Des compétences en développement sont nécessaires pour utiliser cette fonctionnalité.</span><br> | |||
*<span style="background-color:#ffe9e9; padding:5px; border-radius:5px;"><span style="background-color:#cdeffc; padding:5px; border-radius:5px; ">[[Intake_Forms_custom_feature|Formulaires d'admission]]</span> la fonctionnalité personnalisée sera activée avec celle-ci.</span> | |||
;Comment utiliser | |||
:1. Activer <span style="background-color:#d4f8e5; padding:5px; border-radius:5px;">External Booking Validator</span> fonction personnalisée sur votre <span style="background-color:#d4f8e5; padding:5px; border-radius:5px;">Fonctionnalités personnalisées</span> page, <span style="background-color:#d4f8e5; padding:5px; border-radius:5px;">Autre</span> section. | |||
:1. | |||
[[File:External booking validator enable path.png|border|center]] | [[File:External booking validator enable path.png|border|center]] | ||
<br><br> | <br><br> | ||
:2. | :2. Créez votre propre script de validation avec vos propres conditions souhaitées.<br> | ||
: | :Par exemple, vous pouvez exiger certaines réponses des clients à un ou plusieurs <span style="background-color:#cdeffc; padding:5px; border-radius:5px;">[[Intake_Forms_custom_feature|intake forms]]< /span> pour que la réservation soit soumise à votre système. | ||
<br><br> | <br><br> | ||
:3. | :3. Insérez votre script dans cette fonctionnalité <span style="background-color:#d4f8e5; padding:5px; border-radius:5px;">settings</span> sur la <span style="background-color:#d4f8e5; padding:5px; border-radius:5px;">Fonctionnalités personnalisées</span> page et enregistrez. | ||
[[File:External booking validator settings path.png|border|center]] | [[File:External booking validator settings path.png|border|center]] | ||
<br><br> | <br><br> | ||
: | : Un exemple de script est disponible <span style="background-color:#cdeffc; padding:5px; border-radius:5px;">[https://github.com/vetalsimplybook/simplybook-external-validator ici]. </span> | ||
<br><br><br><br> | <br><br><br><br> | ||
------- | ------- | ||
=Facebook | =Réservations Facebook et Instagram= | ||
[[File:Facebook business icon.png| | [[File:Facebook business icon.png|gauche]] | ||
<br><br> | <br><br> | ||
Connectez votre système de réservation SimplyBook.me à votre page Facebook Business et à votre profil Instagram. De cette façon, vous pouvez réserver encore plus de clients en ayant un bouton "Réserver" à la fois sur votre page Facebook Business et votre profil Instagram - le tout parfaitement intégré à votre SimplyBook système de réservation. | |||
<br><br> | <br><br> | ||
<br><br> | <br><br> | ||
<span style="background-color:#ffe9e9; padding:5px; border-radius:5px; font-weight: bold;"> | <span style="background-color:#ffe9e9; padding:5px; border-radius:5px; font-weight: bold;">Veuillez noter !</span><br> | ||
*<span style="background-color:#ffe9e9; padding:5px; border-radius:5px;"> | *<span style="background-color:#ffe9e9; padding:5px; border-radius:5px;">Il est possible de connecter l'option de réservation aux pages Facebook Business et Instagram Business. Cette fonctionnalité ne peut pas être ajoutée à une page personnelle.</span><br> | ||
*<span style="background-color:#ffe9e9; padding:5px; border-radius:5px;"> | *<span style="background-color:#ffe9e9; padding:5px; border-radius:5px;">L'option de réservation n'est pas affichée sur la version Instagram de bureau et ne peut être utilisée que via des applications mobiles.</span> ;<br> | ||
*<span style="background-color:#ffe9e9; padding:5px; border-radius:5px;">Bookingtroll | *<span style="background-color:#ffe9e9; padding:5px; border-radius:5px;">Le thème Bookingtroll est utilisé par défaut pour le widget de réservation. Si vous souhaitez modifier le style, veuillez passer à Premium pour sélectionner le thème souhaité et pouvoir utiliser <span style="background-color:#cdeffc; padding:5px; border-radius:5px;">[[Custom_Features #Custom_CSS|CSS personnalisé]]</span> ajustements.</span><br> | ||
*<span style="background-color:#ffe9e9; padding:5px; border-radius:5px;"> | *<span style="background-color:#ffe9e9; padding:5px; border-radius:5px;">L'apparence du widget peut varier en fonction des préférences Facebook pour différents appareils et applications</span><br> | ||
*<span style="background-color:#ffe9e9; padding:5px; border-radius:5px;"> | *<span style="background-color:#ffe9e9; padding:5px; border-radius:5px;">Cette fonctionnalité n'est pas compatible avec <span style="background-color:#cdeffc; padding:5px; border-radius:5px;">[[Facebook_Pixel_Custom_Feature|Facebook Pixel]]</span> fonction personnalisée.</span><br> | ||
<br><br> | <br><br> | ||
:''' | :'''Tutoriel vidéo disponible '''[[File:Youtube-Logo.png|link=https://www.youtube.com/watch?v=9o5fJkZD384&feature=youtu.be]] | ||
<br><br> | <br><br> | ||
''' | '''Comment ajouter et utiliser l'option de réservation sur la page d'entreprise Facebook/Instagram''' | ||
<br><br> | <br><br> | ||
:1. | :1. Activer <span style="background-color:#d4f8e5; padding:5px; border-radius:5px;">Facebook & Réservations Instagram</span> fonction personnalisée sur votre <span style="background-color:#d4f8e5; padding:5px; border-radius:5px;">Fonctionnalités personnalisées</span> page. | ||
[[File:Facebook and insta bookings enable path.png | | [[File:Facebook and insta bookings enable path.png | frontière| centre]] | ||
<br><br> | <br><br> | ||
:2. | :2. Connectez-vous à votre ou vos comptes professionnels Facebook/Instagram dans un autre onglet du navigateur. | ||
<br><br> | <br><br> | ||
:3. | :3. Revenez à l'interface de SimplyBook.me et cliquez sur <span style="background-color:#d4f8e5; padding:5px; border-radius:5px;">Settings</span> près de <span style="background-color:#d4f8e5; padding:5px; border-radius:5px;">Facebook & Réservations Instagram.</span> | ||
[[File:Facebook and insta | [[File:Facebook and insta booking settings path.png|border|center]] | ||
<br><br> | <br><br> | ||
:4. | :4. Cliquez sur <span style="background-color:#d4f8e5; padding:5px; border-radius:5px;">Connectez-vous avec Facebook</span> bouton sur la page que vous voyez. | ||
[[File:Facebook and insta | [[File:Facebook and insta booking settings overview.png |border|center]] | ||
<br><br> | <br><br> | ||
:5. | :5. Vous serez redirigé vers <span style="background-color:#d4f8e5; padding:5px; border-radius:5px;">Facebook</span> interface pour gérer les autorisations et la connexion à SimplyBook.me.<br> | ||
: | :Veuillez suivre les étapes 1 à 5 affichées ci-dessous.<br> | ||
:( | :(Si vous avez un profil d'entreprise Instagram connecté à votre page d'entreprise Facebook, vous pourrez également le connecter à cet endroit <br> | ||
: | :et <span style="background-color:#d4f8e5; padding:5px; border-radius:5px;">Livre</span> apparaîtra automatiquement ici) | ||
[[File:Facebook and insta new steps.png|border|center]] | [[File:Facebook and insta new steps.png|border|center]] | ||
<br><br> | <br><br> | ||
:6. | :6. Vos services seront désormais affichés sur votre page Facebook avec <span style="background-color:#d4f8e5; padding:5px; border-radius:5px;">Livre</span> à côté d'eux ou <span style="background-color:#d4f8e5; padding:5px; border-radius:5px;">Réserver maintenant</span> sous la bannière de la page qui redirigera vos clients vers votre site de réservation.<br> | ||
:( | :(les options de représentation dépendent de votre page Facebook professionnelle) | ||
[[File:Facebook and insta new result.png|border|center]] | [[File:Facebook and insta new result.png|border|center]] | ||
<br><br> | <br><br> | ||
: | :sept. Vous pouvez également ajouter une option de réservation aux publications de votre page Facebook afin que les clients puissent réserver rapidement vos services. | ||
[[File:Facebook and insta new add booking to post.png|border|center]] | [[File:Facebook and insta new add booking to post.png|border|center]] | ||
<br><br> | <br><br> | ||
| Line 1,104: | Line 1,099: | ||
<br><br> | <br><br> | ||
<br><br> | <br><br> | ||
''' | '''Comment supprimer le bouton Livre des pages Facebook/Instagram''' | ||
<br><br> | <br><br> | ||
:1. | :1. Accédez à <span style="background-color:#d4f8e5; padding:5px; border-radius:5px;">Fonctionnalités personnalisées</span> -> <span style="background-color:#d4f8e5; padding:5px; border-radius:5px;">Facebook & Réservations Instagram</span> -> <span style="background-color:#d4f8e5; padding:5px; border-radius:5px;">Paramètres</span> du côté de SimplyBook.me. | ||
[[File:Facebook and insta | [[File:Facebook and insta booking settings path.png|boredr|center]] | ||
<br><br> | <br><br> | ||
:2. | :2. Cliquez sur <span style="background-color:#d4f8e5; padding:5px; border-radius:5px;">Déconnexion</span> en haut de la page. | ||
[[File:Facebook and insta new logout.png|border|center]] | [[File:Facebook and insta new logout.png|border|center]] | ||
<br><br> | <br><br> | ||
''' | '''Comment ajouter et utiliser l'option de réservation sur Instagram uniquement''' | ||
<br><br> | <br><br> | ||
:1. | :1. Ouvrez votre <span style="background-color:#d4f8e5; padding:5px; border-radius:5px;">Instagram</span> application mobile et connectez-vous à votre page d'entreprise. | ||
<br><br> | <br><br> | ||
:2. | :2. Accédez à votre <span style="background-color:#d4f8e5; padding:5px; border-radius:5px;">profil</span> et sélectionnez pour le modifier. | ||
<br><br> | <br><br> | ||
:3. | :3. Suivez les étapes 1 à 10 ci-dessous pour ajouter <span style="background-color:#d4f8e5; padding:5px; border-radius:5px;">Book</span> bouton qui conduira les clients vers votre site de réservation : | ||
[[File:Edit profile path to add.png|border|center]] | [[File:Edit profile path to add.png|border|center]] | ||
<br><br> | <br><br> | ||
<br><br> | <br><br> | ||
''' | '''Comment supprimer l'option Réserver de la page professionnelle d'Instagram''' | ||
<br><br> | <br><br> | ||
:1. | :1. Ouvrez votre <span style="background-color:#d4f8e5; padding:5px; border-radius:5px;">Instagram</span> mobile et accédez à la modification de votre <span style="background-color:#d4f8e5; padding:5px; border-radius:5px;">profile.</span><br> | ||
: | :Suivez les étapes 1 à 4 ci-dessous pour supprimer <span style="background-color:#d4f8e5; padding:5px; border-radius:5px;">Book</span> bouton: | ||
[[File:Edit profile path to remove upd.png|border|center]] | [[File:Edit profile path to remove upd.png|border|center]] | ||
<br><br> | <br><br> | ||
<br><br> | <br><br> | ||
------- | ------- | ||
=Facebook | =Informations client Facebook= | ||
<br> | <br> | ||
[[File:Facebook client info new icon.png | [[File:Facebook client info new icon.png ‎|left]] | ||
< | :1. Activer <span style="background-color:#d4f8e5; padding:5px; border-radius:5px;">External Booking Validator</span> fonction personnalisée sur votre <span style="background-color:#d4f8e5; padding:5px; border-radius:5px;">Fonctionnalités personnalisées</span> page, <span style="background-color:#d4f8e5; padding:5px; border-radius:5px;">Autre</span> section. | ||
[[File:External booking validator enable path.png|border|center]] | |||
<br><br> | |||
:2. Créez votre propre script de validation avec vos propres conditions souhaitées.<br> | |||
:Par exemple, vous pouvez exiger certaines réponses des clients à un ou plusieurs <span style="background-color:#cdeffc; padding:5px; border-radius:5px;">[[Intake_Forms_custom_feature|intake forms]]< /span> pour que la réservation soit soumise à votre système. | |||
<br><br> | |||
:3. Insérez votre script dans cette fonctionnalité <span style="background-color:#d4f8e5; padding:5px; border-radius:5px;">settings</span> sur la <span style="background-color:#d4f8e5; padding:5px; border-radius:5px;">Fonctionnalités personnalisées</span> page et enregistrez. | |||
[[File:External booking validator settings path.png|border|center]] | |||
<br><br> | |||
: Un exemple de script est disponible <span style="background-color:#cdeffc; padding:5px; border-radius:5px;">[https://github.com/vetalsimplybook/simplybook-external-validator ici]. </span> | |||
<br><br><br><br> | |||
------- | |||
=Réservations Facebook et Instagram= | |||
[[File:Facebook business icon.png|gauche]] | |||
<br><br> | <br><br> | ||
Connectez votre système de réservation SimplyBook.me à votre page Facebook Business et à votre profil Instagram. De cette façon, vous pouvez réserver encore plus de clients en ayant un bouton "Réserver" à la fois sur votre page Facebook Business et votre profil Instagram - le tout parfaitement intégré à votre SimplyBook système de réservation. | |||
<br><br> | <br><br> | ||
<br><br> | <br><br> | ||
</ | <span style="background-color:#ffe9e9; padding:5px; border-radius:5px; font-weight: bold;">Veuillez noter !</span><br> | ||
*<span style="background-color:#ffe9e9; padding:5px; border-radius:5px;">Il est possible de connecter l'option de réservation aux pages Facebook Business et Instagram Business. Cette fonctionnalité ne peut pas être ajoutée à une page personnelle.</span><br> | |||
*<span style="background-color:#ffe9e9; padding:5px; border-radius:5px;">L'option de réservation n'est pas affichée sur la version Instagram de bureau et ne peut être utilisée que via des applications mobiles.</span> ;<br> | |||
*<span style="background-color:#ffe9e9; padding:5px; border-radius:5px;">Le thème Bookingtroll est utilisé par défaut pour le widget de réservation. Si vous souhaitez modifier le style, veuillez passer à Premium pour sélectionner le thème souhaité et pouvoir utiliser <span style="background-color:#cdeffc; padding:5px; border-radius:5px;">[[Custom_Features #Custom_CSS|CSS personnalisé]]</span> ajustements.</span><br> | |||
*<span style="background-color:#ffe9e9; padding:5px; border-radius:5px;">L'apparence du widget peut varier en fonction des préférences Facebook pour différents appareils et applications</span><br> | |||
*<span style="background-color:#ffe9e9; padding:5px; border-radius:5px;">Cette fonctionnalité n'est pas compatible avec <span style="background-color:#cdeffc; padding:5px; border-radius:5px;">[[Facebook_Pixel_Custom_Feature|Facebook Pixel]]</span> fonction personnalisée.</span><br> | |||
<br><br> | |||
:'''Tutoriel vidéo disponible '''[[File:Youtube-Logo.png|link=https://www.youtube.com/watch?v=9o5fJkZD384&feature=youtu.be]] | |||
<br><br> | |||
'''Comment ajouter et utiliser l'option de réservation sur la page d'entreprise Facebook/Instagram''' | |||
<br><br> | |||
:1. Activer <span style="background-color:#d4f8e5; padding:5px; border-radius:5px;">Facebook & Réservations Instagram</span> fonction personnalisée sur votre <span style="background-color:#d4f8e5; padding:5px; border-radius:5px;">Fonctionnalités personnalisées</span> page. | |||
[[File:Facebook and insta bookings enable path.png | frontière| centre]] | |||
<br><br> | |||
:2. Connectez-vous à votre ou vos comptes professionnels Facebook/Instagram dans un autre onglet du navigateur. | |||
<br><br> | |||
:3. Revenez à l'interface de SimplyBook.me et cliquez sur <span style="background-color:#d4f8e5; padding:5px; border-radius:5px;">Settings</span> près de <span style="background-color:#d4f8e5; padding:5px; border-radius:5px;">Facebook & Réservations Instagram.</span> | |||
[[File:Facebook and insta booking settings path.png|border|center]] | |||
<br><br> | |||
:4. Cliquez sur <span style="background-color:#d4f8e5; padding:5px; border-radius:5px;">Connectez-vous avec Facebook</span> bouton sur la page que vous voyez. | |||
[[File:Facebook and insta booking settings overview.png |border|center]] | |||
<br><br> | |||
:5. Vous serez redirigé vers <span style="background-color:#d4f8e5; padding:5px; border-radius:5px;">Facebook</span> interface pour gérer les autorisations et la connexion à SimplyBook.me.<br> | |||
:Veuillez suivre les étapes 1 à 5 affichées ci-dessous.<br> | |||
:(Si vous avez un profil d'entreprise Instagram connecté à votre page d'entreprise Facebook, vous pourrez également le connecter à cet endroit <br> | |||
:et <span style="background-color:#d4f8e5; padding:5px; border-radius:5px;">Livre</span> apparaîtra automatiquement ici) | |||
[[File:Facebook and insta new steps.png|border|center]] | |||
<br><br> | |||
:6. Vos services seront désormais affichés sur votre page Facebook avec <span style="background-color:#d4f8e5; padding:5px; border-radius:5px;">Livre</span> à côté d'eux ou <span style="background-color:#d4f8e5; padding:5px; border-radius:5px;">Réserver maintenant</span> sous la bannière de la page qui redirigera vos clients vers votre site de réservation.<br> | |||
:(les options de représentation dépendent de votre page Facebook professionnelle) | |||
[[File:Facebook and insta new result.png|border|center]] | |||
<br><br> | |||
:sept. Vous pouvez également ajouter une option de réservation aux publications de votre page Facebook afin que les clients puissent réserver rapidement vos services. | |||
[[File:Facebook and insta new add booking to post.png|border|center]] | |||
<br><br> | |||
<br><br> | |||
<br><br> | |||
<br><br> | |||
'''Comment supprimer le bouton Livre des pages Facebook/Instagram''' | |||
<br><br> | |||
:1. Accédez à <span style="background-color:#d4f8e5; padding:5px; border-radius:5px;">Fonctionnalités personnalisées</span> -> <span style="background-color:#d4f8e5; padding:5px; border-radius:5px;">Facebook & Réservations Instagram</span> -> <span style="background-color:#d4f8e5; padding:5px; border-radius:5px;">Paramètres</span> du côté de SimplyBook.me. | |||
[[File:Facebook and insta booking settings path.png|boredr|center]] | |||
<br><br> | |||
:2. Cliquez sur <span style="background-color:#d4f8e5; padding:5px; border-radius:5px;">Déconnexion</span> en haut de la page. | |||
[[File:Facebook and insta new logout.png|border|center]] | |||
<br><br> | |||
'''Comment ajouter et utiliser l'option de réservation sur Instagram uniquement''' | |||
<br><br> | |||
:1. Ouvrez votre <span style="background-color:#d4f8e5; padding:5px; border-radius:5px;">Instagram</span> application mobile et connectez-vous à votre page d'entreprise. | |||
<br><br> | |||
:2. Accédez à votre <span style="background-color:#d4f8e5; padding:5px; border-radius:5px;">profil</span> et sélectionnez pour le modifier. | |||
<br><br> | |||
:3. Suivez les étapes 1 à 10 ci-dessous pour ajouter <span style="background-color:#d4f8e5; padding:5px; border-radius:5px;">Book</span> bouton qui conduira les clients vers votre site de réservation : | |||
[[File:Edit profile path to add.png|border|center]] | |||
<br><br> | |||
<br><br> | |||
'''Comment supprimer l'option Réserver de la page professionnelle d'Instagram''' | |||
<br><br> | |||
:1. Ouvrez votre <span style="background-color:#d4f8e5; padding:5px; border-radius:5px;">Instagram</span> mobile et accédez à la modification de votre <span style="background-color:#d4f8e5; padding:5px; border-radius:5px;">profile.</span><br> | |||
:Suivez les étapes 1 à 4 ci-dessous pour supprimer <span style="background-color:#d4f8e5; padding:5px; border-radius:5px;">Book</span> bouton: | |||
[[File:Edit profile path to remove upd.png|border|center]] | |||
<br><br> | |||
<br><br> | |||
------- | |||
=Informations client Facebook= | |||
<br> | |||
[[File:Facebook client info new icon.png |left]] | |||
;Comment utiliser | |||
; | :1. Activez cette option sur votre page de fonctionnalités personnalisées. | ||
:1. | [[File:Facebook client info enable path new cf.png| centre]] | ||
[[File:Facebook client info enable path new cf.png| | |||
<br><br> | <br><br> | ||
:2. | :2. Et les clients pourront se connecter avec leurs profils Facebook sur le site de réservation. | ||
[[File:Facebook client info client view.png | | [[File:Facebook client info client view.png | centre]] | ||
[[File:Facebook client info client view | [[File:Facebook client info client view connected.png | centre]] | ||
<br><br> | <br><br> | ||
------- | ------- | ||
=[[Facebook_Pixel_Custom_Feature|Facebook Pixel]]= | =[[Facebook_Pixel_Custom_Feature|Facebook Pixel]]= | ||
[[File:Tracking icon.png|left]] <br> | [[File:Tracking icon.png|left]] <br>Gérez les analyses de votre site de réservation avec Facebook Pixel | ||
<br><br><br><br> | <br><br><br><br> | ||
<span style="background-color:#ffe9e9; padding:5px; border-radius:5px;">'''Veuillez noter !''' Cette fonctionnalité personnalisée n'est pas compatible avec <span style="background- color:#cdeffc; padding:5px; border-radius:5px;">[[Facebook_and_Instagram_Bookings |Facebook and Instagram Bookings]]</span></span> | |||
<span style="background-color:#ffe9e9; padding:5px; border-radius:5px;">''' | |||
<br><br><br><br> | <br><br><br><br> | ||
; | ;Comment utiliser | ||
:1. | :1. Activer <span style="background-color:#d4f8e5; padding:5px; border-radius:5px;">Facebook Pixel</span> sur votre <span style="background-color:#d4f8e5; padding:5px; border-radius:5px;">Fonctionnalités personnalisées</span> page, <span style="background-color:#d4f8e5; padding:5px; border-radius:5px;">Statistiques et analyses</span> section. | ||
[[File:Tracking enable path.png|1200px|border|center]] | [[File:Tracking enable path.png|1200px|border|center]] | ||
<br><br> | <br><br> | ||
:2. | :2. Accédez à <span style="background-color:#cdeffc; padding:5px; border-radius:5px;">[https://www.facebook.com/events_manager2/list/pixel/ Sources de données sur votre Facebook page entreprise]</span> et sélectionnez le pixel précédemment sélectionné ou <span style="background-color:#cdeffc; padding:5px; border-radius:5px;">[[Additional_tips#Create_Facebook_pixel|créez-en un nouveau]]</span> ; en cliquant sur <span style="background-color:#d4f8e5; padding:5px; border-radius:5px;">Connecter les sources de données</span> bouton. | ||
<br><br> | <br><br> | ||
:3. | :3. Copiez le <span style="background-color:#d4f8e5; padding:5px; border-radius:5px;">code de pixel à 16 chiffres.</span> | ||
[[File:Facebook copy pixel code.png|1200px| | [[File:Facebook copy pixel code.png|1200px|bordure|centre]] | ||
<br><br> | <br><br> | ||
:4. | :4. Collez-le dans le champ <span style="background-color:#d4f8e5; padding:5px; border-radius:5px;">Pixel ID</span> champ sur <span style="background-color:#d4f8e5; padding:5px; border-radius:5px;">SimplyBook.me</span> côté. Enregistrer les paramètres. | ||
[[File:Tracking settings path.png|1200px|border|center]] | [[File:Tracking settings path.png|1200px|border|center]] | ||
<br><br> | <br><br> | ||
:5. ( | :5. (facultatif) Vous pouvez <span style="background-color:#d4f8e5; padding:5px; border-radius:5px;">tester les événements</span> en utilisant l'onglet correspondant sur votre page professionnelle Facebook.<br> | ||
: | : Collez simplement l'URL de votre site Web de réservation, accédez-y et parcourez les pages pour créer l'activité. | ||
: | : Visualisez les urls, les événements et leurs paramètres. Il est possible de voir des pages vues simples, de programmer et d'acheter des événements. | ||
[[File:Facebook test events.png|1200px|border|center]]<br><br> | [[File:Facebook test events.png|1200px|border|center]]<br><br> | ||
[[File:Facebook event example.png|1200px|border|center]]<br><br> | [[File:Facebook event example.png|1200px|border|center]]<br><br> | ||
:6. | :6. Dans la section <span style="background-color:#d4f8e5; padding:5px; border-radius:5px;">Overview</span> L'onglet Facebook vous permettra de voir les événements réels avec les détails dans les paramètres. | ||
[[File:Facebook events parameters.png|1200px|border|center]]<br><br><br><br> | [[File:Facebook events parameters.png|1200px|border|center]]<br><br><br><br> | ||
------- | ------- | ||
= | =Téléchargeur de fichiers - Google Drive= | ||
[[File:Cloud storage icon.png|left]] <br><br> | [[File:Cloud storage icon.png|left]] <br><br>Activez cette fonctionnalité personnalisée pour permettre à vos clients de télécharger des documents signés ou d'autres informations directement sur votre compte Google Drive. | ||
<br><br> | <br><br> | ||
<span style="background-color:#ffe9e9; padding:5px; border-radius:5px;">''' | <span style="background-color:#ffe9e9; padding:5px; border-radius:5px;">'''Veuillez noter !'''</span> | ||
*<span style="background-color:#ffe9e9; padding:5px; border-radius:5px;"> | *<span style="background-color:#ffe9e9; padding:5px; border-radius:5px;">Cette fonctionnalité n'est pas entièrement prise en charge dans l'application d'administration. Si vous l'utilisez et avez besoin de créer des réservations à partir de là, veuillez rendre les champs de fichier facultatifs car il n'est actuellement pas possible de télécharger des fichiers dans l'application. Cependant, vous pourrez voir les noms de fichiers dans les rendez-vous déjà pris.</span> | ||
*<span style="background-color:#ffe9e9; padding:5px; border-radius:5px;"> | *<span style="background-color:#ffe9e9; padding:5px; border-radius:5px;">La taille du fichier téléchargé doit être inférieure à 5 Mo et ne peut pas être une archive ou un fichier exécutable.</span> | ||
<br><br> | <br><br> | ||
; | ;Comment utiliser | ||
1. | 1. Activez cette option sur votre <span style="background-color:#d4f8e5; padding:5px; border-radius:5px;">Fonctionnalités personnalisées</span> -> <span style="background-color:#d4f8e5; padding:5px; border-radius:5px;">Ajout d'éléments supplémentaires au site Web de réservation</span> Catégorie. | ||
[[File:Google drive enable path.png|1200px|center]] | [[File:Google drive enable path.png|1200px|center]] | ||
<br><br> | <br><br> | ||
2. | 2. Sur le côté droit de la page, vous verrez ses paramètres. Cliquez sur <span style="background-color:#d4f8e5; padding:5px; border-radius:5px;">Autoriser</span> pour vous connecter à votre Google Drive et donner les autorisations demandées. | ||
[[File:Google drive auth path.png|1200px|center]] | [[File:Google drive auth path.png|1200px|center]] | ||
<br><br> | <br><br> | ||
3. | 3. Une fois la connexion établie, vous pourrez voir son état et utiliser le lien vers le dossier des fichiers sur votre Google Drive à partir de la même page Fonctionnalités personnalisées. | ||
[[ | [[Fichier : Google drive authentication.png|1200px|center]] | ||
<br><br> | <br><br> | ||
4. | 4. Accédez à <span style="background-color:#d4f8e5; padding:5px; border-radius:5px;">Gérer</span> -> <span style="background-color:#cdeffc; padding:5px; border-radius:5px;">[[Intake_Forms_custom_feature|Formulaires d'admission]]</span> ou <span style="background-color:#d4f8e5; padding:5px; border-radius:5px;">Gérer</span> -> <span style="background-color:#cdeffc; padding:5px; border-radius:5px;">[[Client_Fields_Custom_Feature|Champs client]]</span> (ou activez une ou les deux fonctionnalités si nécessaire) et créez <span style="background-color:#d4f8e5; padding:5px; border-radius:5px;">File Uploader - Google Drive</span> formulaire. | ||
Rendez-le obligatoire ou non selon vos besoins. | |||
[[ | [[Fichier :Type de champ Google Drive.png|1200px|center]] | ||
<br><br> | <br><br> | ||
5. | 5. Après avoir créé les formulaires souhaités, les clients pourront télécharger leurs fichiers pendant le processus de réservation <span style="background-color:#cdeffc; padding:5px; border-radius:5px;">([[Intake_Forms_custom_feature |Formulaires d'admission]])</span> | ||
[[File:Cloud storage client | [[File:Cloud storage côté client booking form.png|1200px|center]] | ||
<br><br> | <br><br> | ||
ou inscrivez-vous <span style="background-color:#cdeffc; padding:5px; border-radius:5px;">([[Client_Fields_Custom_Feature|Champs client]])</span> | |||
[[File:Cloud storage client | [[File:Cloud storage côté client sign up.png|1200px|center]] | ||
<br><br> | <br><br> | ||
6. | 6. Du côté administrateur, vous pourrez voir et télécharger les fichiers soit <span style="background-color:#d4f8e5; padding:5px; border-radius:5px;">dans la fenêtre contextuelle de réservation</span> sur la page Calendrier s'il s'agit d'un <span style="background-color:#cdeffc; padding:5px; border-radius:5px;">[[Intake_Forms_custom_feature|intake form]]</span> | ||
[[File:Cloud storage booking management.png|1200px|center]] | [[File:Cloud storage booking management.png|1200px|center]] | ||
<br><br> | <br><br> | ||
ou depuis <span style="background-color:#d4f8e5; padding:5px; border-radius:5px;">Gérer</span> -> <span style="background-color:#d4f8e5; padding:5px; border-radius:5px;">Clients</span> -> <span style="background-color:#d4f8e5; padding:5px; border-radius:5px;">modifiez l'enregistrement du client</span> si vous l'avez en tant que <span style="background-color:#cdeffc; padding:5px; border-radius:5px;">[[Client_Fields_Custom_Feature|champ client]].</span> | |||
[[File:Cloud storage client management.png|1200px|center]] | [[File:Cloud storage client management.png|1200px|center]] | ||
<br><br> | <br><br> | ||
Et, bien sûr, vous pourrez télécharger manuellement les fichiers lors de la nouvelle réservation ou de la création/modification du dossier client du côté administrateur si nécessaire. | |||
<br><br><br><br> | <br><br><br><br> | ||
------- | ------- | ||
= | =Notifications flexibles= | ||
<br> | <br> | ||
[[File:Flexible notifications new icon.png| | [[File:Flexible notifications new icon.png| la gauche]] | ||
La fonction personnalisée de notifications flexibles vous permet de personnaliser les messages par service, par fournisseur ou en utilisant une combinaison de services et de fournisseurs. Cela signifie que certains services peuvent avoir un message différent du message général de rappel sortant pour d'autres services. Un certain fournisseur peut également souhaiter inclure des instructions différentes pour les clients qui réservent un certain service. La fonction personnalisée de notifications flexibles vous offre toute la flexibilité dont vous pourriez avoir besoin dans de tels cas ! | |||
<br><br> | <br><br> | ||
<span style="background-color:#ffe9e9; padding:5px; border-radius:5px;">'''Veuillez noter !''' Cette fonctionnalité personnalisée est disponible uniquement avec les abonnements payants.</span> | |||
<span style="background-color:#ffe9e9; padding:5px; border-radius:5px;">''' | |||
;Comment utiliser | |||
; | :1. Accédez à la section Fonctionnalités personnalisées//Réservation, recherchez la fonctionnalité personnalisée de notifications flexibles et appuyez sur "Activer". | ||
:1. | [[File:Flexible notifications enable path new cf.png | centre]] | ||
[[File:Flexible notifications enable path new cf.png | | |||
<br><br> | <br><br> | ||
:2. | :2. Cliquez sur "Gérer" à côté de cette fonctionnalité. | ||
[[File:Flexible notifications manage path new cf.png | | [[File:Flexible notifications manage path new cf.png | centre]] | ||
<br><br> | <br><br> | ||
:3. | :3. Sur la page que vous voyez, appuyez sur "Nouveaux paramètres de modèle flexible". | ||
[[File: | [[File:Les notifications flexibles créent un nouveau modèle.png| centre]] | ||
<br><br> | <br><br> | ||
:4. | :4. Dans le nouveau modèle, sélectionnez les services et/ou sélectionnez les fournisseurs auxquels les modèles personnalisés seront appliqués. Sélectionnez ensuite le type de notification pour ajouter/modifier le modèle et modifiez le texte. Veuillez utiliser des variables à droite pour les inclure dans vos modèles si nécessaire. | ||
[[ | [[Fichier :Création d'un modèle flexible.png | centre]] | ||
<br><br> | <br><br> | ||
------- | ------- | ||
=Google Adwords et Analytics= | |||
=Google Adwords | |||
<br> | <br> | ||
[[File:Google analytics new icon. | [[File:Google analytics new icon.png|left]] | ||
Utilisez la fonctionnalité personnalisée de Google Analytics pour voir combien de clients visitent votre site quotidiennement et pendant les campagnes de promotion. Utilisez les analyses d'adwords pour compter combien de personnes réservent réellement après avoir cliqué sur une publicité adwords. | |||
<br><br><br> | <br><br><br> | ||
;Comment utiliser | |||
; | :1. Activez la fonctionnalité "Google Adwords et Analytics" sur votre page de fonctionnalités personnalisées. | ||
:1. | [[File:Google Analytics enable path new cf.png | centre]] | ||
[[File:Google | |||
<br><br> | <br><br> | ||
:2. | :2. Accédez aux paramètres sur la droite. | ||
[[File:Google | [[File:Google Analytics settings path new cf.png | centre]] | ||
<br><br> | <br><br> | ||
:3. | :3. Remplissez les cases avec les informations correspondantes. | ||
<br><br> | <br><br> | ||
Revision as of 09:58, 24 September 2022
Les fonctionnalités personnalisées sont des fonctionnalités supplémentaires du système qui vous aideront à améliorer votre entreprise. Veuillez consulter la liste des fonctionnalités personnalisées ci-dessous ainsi que leurs descriptions et instructions d'utilisation.
Présentation vidéo ![]()
Vous pouvez également avoir besoin de :
- TOP 10 des fonctionnalités personnalisées par catégorie d'activité
- Les fonctionnalités personnalisées dépendent d'autres fonctionnalités personnalisées
- Quelles fonctionnalités personnalisées ne fonctionnent pas ensemble
- Fonctionnalités personnalisées par catégorie de fonctionnalité
Contenu
Accepter les dépôts
left
Utilisez les dépôts pour augmenter la probabilité que les clients viennent pour le service et assurez-vous qu'au cas où ils ne se présenteraient pas, vous pouvez conserver le dépôt. Notez que certains clients peuvent contacter directement leur banque pour obtenir le remboursement des dépôts, auquel cas il n'y a pas grand-chose à faire, mais de tels cas devraient être rares.
Veuillez noter :
- Lorsque vous activez la fonction Accepter les dépôts Accepter les paiements sera également activé.
- Les montants des dépôts ne peuvent être définis que par service et/ou classes.
- Cette fonctionnalité n'est pas compatible avec Tickets et Code QR du ticket.< ;/span>
- Si le client souhaite appliquer un code promotionnel ou un package lors de l'achat, il doit payer le prix total uniquement car ces articles ne peuvent pas être appliqués avec des dépôts.
- Comment utiliser
- 1. Pour activer cette fonctionnalité, accédez à Fonctionnalités personnalisées page, Améliorations commerciales section, cliquez sur Accepter les dépôts et déplacez le sélecteur vers On position ou appuyez sur Activer bouton sur le côté droit de la page.
- 2. Vous pouvez configurer le système pour permettre aux clients de payer des acomptes uniquement via le site de réservation en désactivant Autoriser les clients à payer le plein tarif< ;/span> sur le côté droit de la page.
- Dans ce cas, si le montant du dépôt est indiqué par service/class le client paiera ce montant pour confirmer sa réservation.
- Si seul le montant total est défini par service/classe, les clients paieront le prix total.
- Dans le cas où Autoriser les clients à payer le plein tarif est activé (état par défaut) et que le montant de l'acompte est indiqué par service/classe, les clients auront le choix de payer soit le prix total, soit l'acompte à la caisse.
- 3. Pour définir les montants des dépôts en fonction de vos services, veuillez accéder à Manage -> Services(Classes) ou utilisez Manage près de ce titre de fonctionnalité personnalisée.
- 4. Cliquez sur le nom du service/de la classe de l'élément souhaité pour ouvrir Détails du service/de la classe tabulation et déplacement Activer le dépôt commutateur en position active.
- 5. Indiquez le montant que vous souhaitez recevoir en acompte pour cet article dans la case correspondante (il doit être inférieur au prix réel, mais supérieur à 0) et enregistrez les paramètres.
- 6. Après avoir enregistré tous les paramètres, les services auront deux prix affichés sur le site de réservation : le montant total et l'acompte.

- sept. Lorsque les clients paient le montant de l'acompte en ligne pour confirmer leur réservation, deux commandes/factures seront créées dans le système : une pour l'acompte et la seconde pour le montant restant
- (il sera affiché comme en attente jusqu'à ce que le client paie sur le lieu de rendez-vous et que vous l'approuviez manuellement).
- Vous pouvez les gérer dans Rapports -> Transactions de paiement.
- Ou via Point de vente interface:
Accepter les paiements
La fonction personnalisée Accepter les paiements vous permet d'accepter les paiements de vos clients en ligne. Vous pouvez fixer le prix de votre service et lorsque vos clients effectueront une réservation, ils seront redirigés vers la page de paiement.
Vous pouvez accepter des paiements via une variété de processeurs de paiement. Tous les paiements en ligne sont traités par la passerelle de paiement de votre choix et s'il est nécessaire d'émettre un remboursement à un client, cela ne peut être fait qu'à partir du compte administrateur de votre processeur de paiement manuellement car Simplybook ne traite aucun paiement au premier place.
Pour vérifier les passerelles disponibles par pays, veuillez suivre /paiements ce lien.
Tutoriel vidéo ![]()
SBPay.me PRO tutoriel vidéo d'intégration ![]()
Comment utiliser
- 1. Activer Accepter les paiements fonction personnalisée dans Fonctionnalités personnalisées section.
- 2. Pour ajouter les détails de votre processeur de paiement, accédez à Paramètres pour cette fonctionnalité.
- 3. Sur le côté droit, vous verrez la liste des processeurs disponibles. Veuillez trouver celui que vous souhaitez et ajouter vos informations d'identification.

- 3.1 (Facultatif) Définissez votre Délai d'expiration du paiement dans la section gauche de cette fonction, nous recommandons pas moins de 20 à 30 minutes.
- 4. Dans Gérer -> Services -> (sélectionnez le service à modifier) -> Détails du service -> Prix fixer le prix de votre service.
- 5. Ajoutez les informations de facturation au bloc correspondant et vos clients recevront des factures pour tout achat effectué dans votre système. Vous pouvez également désactiver l'envoi de factures à vos clients si nécessaire.
frontière| centre
Comment fonctionne la fonctionnalité personnalisée Accepter les paiements
- 1. Un client suit le processus de réservation et appuie sur Réserver à la fin.
- 2. Il est dirigé vers le système de paiement et une réservation non confirmée apparaît dans le calendrier administratif marqué en rouge comme non payé pour réserver cette fois afin qu'aucune autre personne ne puisse accidentellement réserver le même créneau et qu'il n'y ait pas de double réservation.
- 3. Après cela, le client a 2 options :
- 3.1. payez et le processeur de paiement nous enverra la confirmation que le client a payé et nous l'approuverons automatiquement de notre côté (la réservation sera marquée de couleur verte).
- 3.1. payez et le processeur de paiement nous enverra la confirmation que le client a payé et nous l'approuverons automatiquement de notre côté (la réservation sera marquée de couleur verte).
- 3.2. ne finissez pas de payer : le client est dirigé vers le système de paiement, mais il ferme ensuite la page, ferme le navigateur ou le laisse simplement ouvert sans aucune action pendant une longue période. Dans ce cas, le système attendra le délai d'expiration que vous avez défini dans les paramètres de Accepter les paiements la fonctionnalité personnalisée prendra fin et annulera la réservation non payée car elle n'a jamais été terminée. Vous pouvez définir les e-mails à envoyer au client et/ou vous avertir des réservations expirées.
- La même chose se produit si le client a payé, mais a payé plus tard que le délai d'attente. Dans ce cas, si vous recevez une notification de PayPal/Stripe/etc. ce client a payé la réservation, mais comme il était trop tard, vous pouvez accéder à Reports -> Transactions de paiement et approuver cette réservation manuellement.
- 3.2. ne finissez pas de payer : le client est dirigé vers le système de paiement, mais il ferme ensuite la page, ferme le navigateur ou le laisse simplement ouvert sans aucune action pendant une longue période. Dans ce cas, le système attendra le délai d'expiration que vous avez défini dans les paramètres de Accepter les paiements la fonctionnalité personnalisée prendra fin et annulera la réservation non payée car elle n'a jamais été terminée. Vous pouvez définir les e-mails à envoyer au client et/ou vous avertir des réservations expirées.
Qu'est-ce que l'option "Autoriser le paiement différé"
Lorsque vos clients sont transférés vers la page de paiement après Details , ils ont généralement plusieurs options : votre processeur de paiement (un ou plusieurs) et Payer plus tard. Payer plus tard signifie que le client paiera directement sur place lorsqu'il arrivera au rendez-vous. Dans votre Dashboard, lorsque vous cliquez sur le rendez-vous, cette réservation dans le champ prix du service aura une note "Pay Later". Si vous souhaitez désactiver Payer plus tard , réglez le sélecteur sur Off position pour Autoriser le paiement différé dans les paramètres de Accepter les paiements fonctionnalité personnalisée.
Comment changer la devise des paiements
Vous pouvez modifier la devise dans les paramètres de Accepter les paiements fonction personnalisée.
Veuillez noter ! Certains processeurs de paiement ne prennent pas en charge toutes les devises. Avant de définir la devise, vérifiez si le processeur de paiement sélectionné la prend en charge.

Comment ajouter une taxe aux services
- 1. Ajoutez les options de taxes nécessaires dans Manage -> Taxes -> +
- Choisissez celui par défaut si nécessaire - il sera automatiquement défini pour chaque nouvel article de vente que vous créerez dans le système.

- 2. Accédez à Gérer -> Services et sélectionnez l'option de taxe pour chaque service.
- Si vous avez d'autres éléments comme Classes, Packages, Appartenances, Produits en vente, Service add-ons, Cartes cadeaux et avez besoin que des taxes y soient également appliquées, veuillez vous rendre sur la page de gestion correspondante et sélectionner parmi les taxes pré-créées pour chaque article.

- 3. Dans Fonctionnalités personnalisées -> Accepter les paiements -> Paramètres choisissez si le montant de la taxe doit être ajouté au prix que vous avez défini par service (ou autre article) ou s'il est déjà inclus en utilisant le sélecteur Les prix incluent les taxes.
- Si vous activez le sélecteur, cela signifie que le montant que vous avez défini par service est déjà avec les taxes.
- Si vous désactivez le sélecteur, le système ajoutera automatiquement le pourcentage de taxe sélectionné aux prix des articles
Puis-je utiliser un autre processeur de paiement qui n'est pas répertorié dans la fonction personnalisée Accepter les paiements
Dans ce cas, veuillez contacter le support et nous nous ferons un plaisir de vérifier les possibilités de l'ajouter à notre système. Le support peut vous demander de fournir une documentation technique relative à ce processeur de paiement pour vérifier s'il existe une possibilité d'une telle intégration.
Comment personnaliser les factures clients
Il peut être nécessaire d'afficher ou de masquer certaines données ou de modifier l'apparence des factures que le système envoie aux clients après avoir effectué un achat sur votre site de réservation.
Vous pouvez régler les éléments suivants :
1. Adresse de la société.
S'il est ajouté dans Settings -> Informations sur la société et configuré pour être affiché sur le site de réservation, il apparaîtra également sur les factures.
Si vous avez besoin de le masquer, cochez simplement Ne pas afficher l'e-mail sur le site de réservation là, enregistrez les paramètres et il n'apparaîtra ni sur le site ni sur les factures.
2. Numéro de TVA de l'entreprise.
S'il est ajouté dans Settings -> Informations sur la société il sera également présent sur les factures.
3. Adresse du client.
Pour que l'adresse client soit affichée, veuillez activer la fonction personnalisée Client Login, activez à la fois Afficher l'adresse sur la page de réservation et Rendre le champ d'enregistrement obligatoire de l'adresse dans Accessibilité section. Enregistrer les paramètres.

4. Formulaires d'admission et Champs client
Vous pouvez ajouter certains formulaires à afficher dans le bloc d'informations client.
S'il s'agit d'un formulaire d'admission, veuillez accéder à Manage -> Formulaires d'admission -> cliquez sur le formulaire nécessaire pour sélectionner -> activer Ajouter un champ à la facture, enregistrer les paramètres.
Ou si vous souhaitez ajouter un formulaire client, accédez à Manage -> Champs client -> cliquez sur le champ souhaité pour le modifier -> activer Ajouter un champ à la facture, enregistrer.
En conséquence, le titre du formulaire et la réponse du client seront reflétés dans la facture.
1200px|border|center
5. Conception de facture.
Vous pouvez sélectionner l'un des trois modèles de facture disponibles.
Veuillez choisir le modèle par défaut, blanc ou foncé dans Fonctionnalités personnalisées -> Accepter les paiements -> Paramètres -> Sélectionnez le modèle de facture -> choisissez l'apparence souhaitée et enregistrez les paramètres.
1200px|border|center
Tout sélecteur d'employés
Vous pouvez utiliser cette fonction personnalisée pour ajouter un fournisseur de services appelé "Tout fournisseur" à la page de réservation, et si le client choisit ce fournisseur, tous les horaires des fournisseurs disponibles s'afficheront.
Vous pouvez également utiliser cette fonctionnalité personnalisée pour :
   • Masquez l'étape de l'employé sur la page de réservation.
   • Allouer automatiquement tout fournisseur disponible pour le service sélectionné de manière aléatoire.
De cette façon, le client choisit uniquement le service et l'heure, ce qui simplifie le processus de réservation.
- Comment utiliser
- 1. Activez la fonctionnalité personnalisée "Tout sélecteur d'employé" dans la section Fonctionnalités personnalisées.

- 2. Accédez aux paramètres sur la droite pour ajuster le titre et la description de l'option "Tout employé" à vos besoins.

- 3. Si vous avez besoin de masquer des prestataires du site de réservation et/ou de les attribuer au hasard, veuillez cocher les cases correspondantes.
API
gauche
Avec l'aide de cette fonctionnalité personnalisée, vous pouvez concevoir vos propres solutions allant de simples widgets à des applications multifonctionnelles.
Utilisez-le pour autoriser l'API Simplybook avec la clé API.
- Comment utiliser
- 1. Accédez à Fonctionnalités personnalisées section à l'aide du menu de gauche de votre interface d'administration,
- recherchez la fonctionnalité correspondante et activez-la.

- 2. Accédez à Paramètres à droite pour accéder aux clés API.

- 3. (facultatif) Utilisez URL de rappel et d'autres options disponibles pour votre propre développement.
Rendez-vous à Heure Fixe
Cette fonction personnalisée permet une flexibilité avancée pour vos heures de début de rendez-vous pour tous les services à la fois ou pour chaque service. La fonction personnalisée peut être utilisée pour définir l'heure et/ou les minutes exactes dans une heure où vos services sont disponibles (par exemple 10h00, 14h30, 16h25). Il peut être utilisé pour définir l'heure de début, puis choisir un intervalle fixe ou multiple en minutes lorsque vos services sont disponibles (par exemple multiple de 15 min 10h00, 10h15, 10h30, 10h45).
- Veuillez noter ! Cette fonctionnalité fonctionne avec les "créneaux" timelines : créneaux hebdomadaires ou modernes ; et ne fonctionne avec aucun type timeline flexible.
- Comment utiliser
- 1. Ouvrez la page des fonctionnalités personnalisées dans votre compte et cliquez sur "Activer" près de l'option Rendez-vous à heure fixe.
- 2. Pour régler les heures, allez dans "Paramètres" à côté.
- 3. Sur la page que vous voyez, veuillez sélectionner le service dont vous souhaitez modifier les heures de début ou sélectionnez "Tous les services" si toutes les heures sont les mêmes.
- Et choisissez les horaires souhaités à l'aide des cases correspondantes.
Approuver les réservations
La fonction personnalisée Approuver les réservations est essentielle si vous devez consulter les détails des clients avant de pouvoir approuver leur réservation. Il vous permet de vérifier les informations fournies par les clients avant d'accepter leurs réservations. Lorsque vos clients réservent un rendez-vous, à la fin, ils verront un avis indiquant que l'e-mail de confirmation sera envoyé lorsque leur réservation sera approuvée.
Veuillez noter !
- Si vous avez Fonction personnalisée Accepter les paiements activée, les réservations payées seront approuvées automatiquement, seuls les services gratuits et les réservations avec l'option "Payer plus tard" peuvent être approuvées/rejetées.
- Si le client a réservé en utilisant Fonction personnalisée de réservations multiples (ou d'autres réservations par lots), tous les rendez-vous du pack de réservations multiples sont approuvés si une session est approuvée. La solution consiste à modifier les réservations que vous souhaitez reprogrammer et à annuler les réservations que vous souhaitez d'abord refuser, puis à approuver le pack.
- Comment utiliser
- 1. Activez la fonction personnalisée Approuver les réservations dans votre section Fonctions personnalisées.

- 2. Accédez à Calendrier//Réservations en attente pour vérifier les réservations en attente d'approbation et les accepter ou les refuser.
- Le client ne recevra l'e-mail de confirmation qu'après votre approbation.
- Si vous refusez la réservation, il n'y aura aucune notification au client.

Système de notification de réservation prochaine
Assurez-vous que vos clients reviennent ! Cette fonctionnalité personnalisée rappellera à vos clients de revenir car vous pouvez leur envoyer un message x-nombre de jours après leur rendez-vous. Par exemple, vous pouvez composer votre propre message et envoyer un rappel toujours 30 jours après un rendez-vous.
Veuillez noter !
- Cette fonctionnalité personnalisée est disponible uniquement avec les abonnements payants.
- Les clients doivent être abonnés à vos supports marketing pour pouvoir recevoir ces notifications.
- Comment utiliser
- 1. Activez cette fonctionnalité personnalisée sur votre page de fonctionnalités personnalisées.
- 2. Allez dans "Paramètres" près de cette option.

- 3. Dans les paramètres, appuyez sur "Ajouter nouveau".
- 4. Configurez les notifications par e-mail et/ou SMS en écrivant l'objet et le texte.
- Vous pouvez utiliser les variables suivantes dans votre message : [client_name], [client_phone], [client_email], [event](pour le nom du service), [unit](pour le nom du fournisseur), [code], [date_start] , [heure_début].
- 5. Dans le champ "Notifications de réservation prochainement", nommez cette notification pour la distinguer des autres notifications que vous voudrez peut-être créer à l'avenir.
- 6. Définir les jours de délai de notification (nombre de jours après le rendez-vous où la notification doit être envoyée)
- sept. Sélectionnez le service et le fournisseur pour lesquels la notification sera appliquée (facultatif).
Synchronisation du calendrier
gauche
La fonction personnalisée de synchronisation du calendrier est utilisée pour la synchronisation bidirectionnelle avec les calendriers Google et Outlook. Vous pouvez exporter les réservations de SimplyBook vers les calendriers Google ou Outlook et également bloquer les heures occupées par l'événement Google/Outlook Calendar dans votre tableau de bord SimplyBook.
Veuillez noter que cette fonctionnalité ne fonctionne qu'avec les calendriers Web - elle peut ne pas fonctionner avec les calendriers Microsoft Exchange.
- Tutoriel vidéo disponible

Comment utiliser
- 1. Activez la fonction de synchronisation du calendrier dans la section Fonction personnalisée.

- 2. Allez dans "Paramètres" près de cette option.

- 3. Cliquez sur "Connecter un nouveau calendrier" et connectez un compte Google ou Outlook.

- 4. Sélectionnez le calendrier souhaité et connectez-y les fournisseurs nécessaires.
- 5. Appuyez sur "exporter" pour exporter vos anciennes réservations vers le calendrier Google ou Outlook pour que le processus de synchronisation démarre.
- 6. Cochez la case "synchroniser les heures d'occupation" si vous souhaitez bloquer les heures dans le tableau de bord [1] occupées par les événements Google/Outlook Calendar.
- (Google calendrier uniquement) Activez "Créer un lien Google Meet" si vous souhaitez que le système génère des conférences Google Meet pour les rendez-vous et envoie des invitations à vos clients.
1200px|border| centre
Veuillez noter que si "synchroniser le temps occupé" est coché et que vous avez configuré votre fournisseur pour accepter plus d'un client à la fois, il ne sera pas possible d'effectuer plus d'une réservation comme réservation sera exporté vers Google/Oultook en tant que "temps occupé" et bloquera ce temps de la réservation.
Si vous devez accepter plus d'une réservation à la fois pour votre fournisseur, veuillez décocher la case "synchroniser les heures d'occupation".
- sept. Vous pourrez voir les événements du calendrier Google/Outlook qui bloquent l'heure dans SimplyBook uniquement dans la Vue du fournisseur de services dans le calendrier (parce que vous connectez le calendrier au fournisseur). Rien ne sera visible dans la vue Jour et Semaine car ces vues sont pour tous les fournisseurs (si vous avez plusieurs fournisseurs, il serait impossible d'afficher tous les événements Google/Outlook dans 1 calendrier).

Veuillez noter Pendant le processus de synchronisation, aucun détail d'événement n'est importé de votre calendrier externe. Les événements sont représentés par des blocs bleus sur la page Calendrier uniquement.
Simplybook ne se synchronise pas avec le calendrier Google/Outlook
Raisons possibles:
- 1. veuillez noter que la synchronisation peut prendre jusqu'à 10 minutes ;
- 2. si Google/Outlook met à jour l'application de calendrier, appuyez à nouveau sur le bouton "Exporter" pour synchroniser ;
- 3. le mauvais calendrier a été choisi (dans Fonctionnalités personnalisées//Synchronisation du calendrier//Paramètres//Veuillez sélectionner le calendrier) ou vous utilisez le calendrier du serveur Microsoft Exchange ;
- 4. les fuseaux horaires de votre calendrier Google/Outlook et de votre compte SimplyBook.me ne coïncident pas.
- 5. Les événements du calendrier Google doivent être marqués comme "occupés" pour une synchronisation bidirectionnelle, les événements du calendrier Outlook ne doivent pas être marqués comme "libres" pour bloquer les horaires sur la page de réservation.
Exemple tiré de l'agenda Google :
Exemple de calendrier Outlook :
centre
L'événement SimplyBook.me est répertorié deux fois dans l'agenda Google
Cela peut être dû au paramètre de calendrier Google pour ajouter automatiquement des événements à partir de vos e-mails. Par conséquent, si vous recevez des e-mails de confirmation avec les détails de la réservation, Google les ajoute automatiquement à votre calendrier. Pour désactiver cette option : cliquez sur l'icône Paramètres dans le coin supérieur droit de l'agenda Google // Paramètres et décochez la case à côté de l'option "Ajouter automatiquement des événements de Gmail à mon agenda".
Politique d'annulation
Vous pouvez limiter le temps pendant lequel les clients peuvent annuler des rendez-vous à l'aide de la fonction personnalisée de politique d'annulation. Définissez simplement le nombre d'heures avant le rendez-vous lorsque l'annulation est possible ou interdisez les annulations du tout. Si le client essaie d'annuler un rendez-vous au-delà de la limite, il verra un avertissement indiquant que la réservation ne peut pas être annulée.
Fonctionnalité personnalisée gratuite !
- Comment utiliser
- 1. Activez la politique d'annulation sur votre page Fonctionnalités personnalisées.

- 2. Accédez à ses paramètres sur la droite.

- 3. Ajoutez votre texte dans le champ correspondant et sélectionnez la période pendant laquelle les réservations peuvent être annulées
- (vous pouvez y utiliser des balises HTML pour formater le texte selon vos besoins).
- 4. Vous pouvez également demander à vos clients le motif d'annulation et rendre cette option obligatoire ou non.
Cours
gauche Maintenant, SimplyBook.me permet une nouvelle option pour la planification des cours et des événements, quel que soit le type d'entreprise que vous avez. Une toute nouvelle fonctionnalité vous permet d'avoir tous vos cours/événements dans une section séparée afin que vous ne les mélangez jamais avec des services simples. Ou vous pouvez utiliser uniquement l'interface classes/événements. De plus, cette fonctionnalité personnalisée permet d'avoir presque tous les paramètres nécessaires à la planification des cours/événements sur une seule page, ce qui rend le processus de configuration simple et rapide.
Tutoriel vidéo disponible ![]()
Pour activer cette option, rendez-vous sur la page Fonctionnalités personnalisées, sélectionnez la section « Connexe à la réservation » et cliquez sur « Activer » près de la fonction « Cours ».

Veuillez consulter des instructions plus détaillées sur la création de classes ici.
Et un tutoriel vidéo sur la façon de vendre des cours liés à l'adhésion ici
Nettoyer l'historique
Utilisez cette fonction personnalisée pour nettoyer toutes les anciennes réservations du système. Vous pouvez définir le moment où les réservations doivent être supprimées, puis la fonctionnalité personnalisée veillera à ne jamais enregistrer de réservations plus anciennes que celles définies par votre définition. Veuillez l'utiliser avec précaution car nous ne pouvons pas récupérer les réservations supprimées pour vous ! Cela fonctionne et supprime les réservations sélectionnées jusqu'à ce que vous désactiviez cette fonctionnalité.
Fonctionnalité personnalisée gratuite !
Veuillez noter ! :
- Cette fonctionnalité personnalisée n'est pas compatible avec : Coupons & Cartes-cadeaux, Packages et Adhésion
- Il commence à fonctionner le lendemain après son activation et supprime les réservations une fois par jour tous les jours jusqu'à ce que vous désactivez-le.
- Si vous avez des clients sans réservation à l'avenir, leurs enregistrements seront également supprimés avec leur dernière réservation.
- Comment utiliser
- 1. Activez cette fonctionnalité dans votre section Fonctionnalités personnalisées.

- 2. Accédez aux paramètres sur la droite pour définir vos préférences et sélectionnez l'heure à laquelle les réservations doivent être supprimées.

Champs client
Obtenez des informations des clients lors de l'inscription qui se rapportent au client. Un exemple de telles informations pourrait être « Nom du conjoint » ou « Date de naissance », car il s'agit d'informations fixes qui ne changent généralement pas entre les réservations.
Veuillez noter ! Lorsque vous activez la fonctionnalité personnalisée Champs client Client Login sera également activé.
- Comment utiliser
- 1. Activer Champs client Fonction personnalisée sur la Fonctionnalités personnalisées page.

- 2. Accédez à ses paramètres en cliquant sur Manage lien.
- 3. Ici, vous verrez les champs d'enregistrement de connexion client par défaut. Vous pouvez cliquer sur l'un d'eux pour le renommer si nécessaire.
- Appuyez sur + bouton pour créer un nouveau formulaire.

- 4. Dans le champ Titre de la question écrivez la question à laquelle vous voulez que vos clients répondent.
- 5. Choisissez le type de champ :
- chiffres uniquement - permet de saisir uniquement des chiffres. Utile lorsque vous avez besoin de connaître l'âge, la taille ou toute autre information qui ne nécessitera que des chiffres.
- une seule ligne - généralement utilisé pour les réponses courtes
- plusieurs lignes - utilisez ce type de fichier si vous attendez de longues explications de vos clients
- case à cocher - crée une case à cocher que les clients doivent cocher ou laisser décochée.
- sélection déroulante - crée une liste déroulante avec la possibilité de choisir une seule option. Afin de créer ce champ, vous devrez créer une liste de valeurs dans la section "Options déroulantes et option par défaut". Vous pouvez également sélectionner la valeur par défaut qui sera attribuée si rien n'est choisi dans la liste.
- date - crée une option de sélection de date avec le calendrier.
- HTML personnalisé - permet d'ajouter des séparateurs visuels ou du texte supplémentaire près du champ client. Ne peut pas être utilisé pour l'entrée client.
- 6. Faites-le plutôt obligatoire ou non à l'aide de Ce champ doit-il être facultatif commutateur.
- Ajouter aux factures si vous souhaitez que son titre et la réponse du client y soient reflétés.
- Enregistrez le formulaire lorsque vous avez terminé.
- sept. Vous pouvez également réorganiser tous les formulaires à votre goût en utilisant les flèches sur le bloc de gauche ou en définissant la position dans le mode d'édition de formulaire sur le côté droit.

- 8. Si vous souhaitez inclure des informations de formulaire client dans les modèles d'e-mail, recherchez les formulaires client variables et ajoutez-les aux modèles dans Settings -> Paramètres e-mail et SMS.
- (Ou utilisez Flexible Notifications fonctionnalité pour les modèles personnalisés par service et /ou fournisseur)

- 9. Les clients pourront alors remplir leurs réponses lors de sign up sur le site de réservation et modifier leurs données dans les profils clients.


- 10. Depuis votre page d'administration, vous pourrez afficher et modifier les réponses des clients dans Manage -> Clients -> Modifier pour le client correspondant.

- et exporter les réponses vers un fichier Excel au format Reports -> Clients -> Exporter vers Excel.

- Ou dans Gérer -> Clients -> Exporter vers Excel.
- Ou avec les informations de réservation dans Reports -> Détails de la réservation -> Exporter vers Excel.
Connexion client
Utilisez cette fonctionnalité personnalisée pour permettre aux clients de s'inscrire en ligne, d'effectuer rapidement des réservations et de consulter leur historique de réservation. Vous pouvez empêcher et débloquer les clients d'effectuer des réservations sur votre page de réservation et également désactiver ou activer la possibilité pour les clients de créer un compte. Si vous fermez pour les inscriptions de clients, seuls les clients que vous avez enregistrés et auxquels vous avez accordé l'accès peuvent effectuer des réservations.
- Comment utiliser
- 1. Activez cette option sur votre page Fonctionnalités personnalisées.

- 2. Accédez aux paramètres à droite pour :
- activer/désactiver l'inscription sur la page de réservation,
- demandez à vos clients leur adresse sur la page de réservation,
- rendre le champ téléphonique obligatoire ou non,
- masquer le "rapport de données personnelles" du profil du client
- définir des modèles de notification sur la création d'un nouvel utilisateur, la réinitialisation et la modification du mot de passe.

Pour avoir réservations uniquement de clients qui existent déjà dans le système veuillez décocher la case "Autoriser les clients à s'inscrire sur place".
Si elle est cochée, n'importe qui pourra s'inscrire et faire une réservation.

Pour bloquer/débloquer certains clients de la réservation, veuillez vous rendre dans Gérer//Clients et cliquer sur les boutons "Bloquer" ou "Débloquer".

Veuillez noter ! Si vous bloquez le client, il ne recevra pas d'informations sur vos promotions également.
Si vous avez plusieurs profils pour un même client et que vous avez besoin de fusionner des clients veuillez suivre ces instructions :
- 1) Allez dans Gérer//Clients, et cliquez sur "Fusionner les clients" en haut.

- 2) Cochez ensuite les cases avec les clients nécessaires et cliquez sur "Fusionner"

Veuillez noter ! Si vous avez des clients non fusionnés, ils ne pourront pas se connecter/s'inscrire sur votre site de réservation pour effectuer et voir des réservations.
Application mobile client
Permettez à vos clients de télécharger votre propre application client personnalisée. Avec l'application sur leur mobile, ils peuvent facilement réserver, reschedule, achetez packages, memberships et cartes cadeaux ainsi qu'accéder à votre entreprise directement à partir de leurs téléphones.
L'application Client est disponible pour tous les utilisateurs payants de SimplyBook.me qui utilisent Client Login,< ;/span> et si vous avez un abonnement premium, vous pouvez le personnaliser avec votre propre logo et la couleur de votre marque. Demandez à vos clients d'accéder à votre site de réservation sur un appareil mobile, et à partir de là, ils seront invités à télécharger l'application sur leur mobile.
C'est aussi simple que ça!
- Veuillez noter !
- Il s'agit de la version bêta ;
- Lorsque vous activez cette fonctionnalité Connexion client la fonctionnalité personnalisée sera également activée ;
- Il fonctionne actuellement avec des cours hebdomadaires, modernes et flexibles calendar layouts uniquement ;
- La fonctionnalité suivante n'est actuellement pas présente dans l'application client : Actualités, Galerie de photos,, Avis, Page personnalisée, Google translate, changement de mode de la page principale, affichage de l'heure de fin, masquage des images lors des étapes de réservation, orientation RTL, Contact widget, ajustements de couleur des emplacements occupés et disponibles.</span> ;
- Tutoriels vidéo disponibles
- Comment configurer l'application mobile Client
- Comment utiliser l'application mobile Client
- Comment configurer l'application mobile Client
- Comment utiliser
- 1. Activer Application mobile client sur votre Fonctionnalités personnalisées page dans Améliorations commerciales section.

- 2. Et il est prêt à l'emploi. Certaines options de rapport deviennent disponibles.

- 3.(disponible uniquement pour les abonnements Premium) Ajoutez votre propre nom d'application, définissez la couleur de la marque, sélectionnez le calendar layout, téléchargez le logo et les images de la bannière.
- Il est important d'utiliser une image carrée pour le logo, les différentes dimensions ne seront pas enregistrées.
- Nous vous recommandons également d'utiliser des couleurs plus claires et/ou plus sombres pour l'arrière-plan pour une meilleure expérience client.

- 4. Envoyez l'URL de votre site de réservation (la bannière n'apparaît pas sur les widgets) à vos clients afin qu'ils puissent installer l'application sur leur téléphone en cliquant sur le bannière.
- (La bannière d'installation d'invitation peut ne pas s'afficher dans les navigateurs mobiles intégrés, il est recommandé d'utiliser Chrome à la place)
- Veuillez noter ! Les utilisateurs d'appareils iOS devront ouvrir votre site de réservation dans la version complète de Safari pour avoir la bannière d'invitation à l'installation, puis utilisez simplement Ajouter à l'écran d'accueil option.

- 5. En conséquence, ils pourront réserver en ligne, voir leurs rendez-vous (cette option est disponible même en mode hors ligne), <span style="background-color:#cdeffc; padding:5px; border-radius:5px;"> ;reschedule ou les annuler, achetez gift cards, memberships et packages, afficher invoices et mettre à jour ses propres informations si nécessaire.

- Notifications push
- Les utilisateurs de téléphones Android peuvent également recevoir des notifications push sur les nouvelles réservations ou les annulations sur leurs appareils.
- Pour cela, il ne sera nécessaire d'activer les notifications dans l'application qu'après l'inscription/la connexion et dans une boîte de dialogue système standard.

- Si les notifications sont activées, mais que les messages push ne viennent pas, il est nécessaire de vérifier si Système Chrome notifications sont activés dans les paramètres de l'appareil.

- Les appareils iOS n'autorisent pas actuellement les notifications push dans les navigateurs et c'est pourquoi il ne sera malheureusement pas possible de les obtenir sur ces téléphones.
• Du côté administrateur, il est possible de voir toutes les notifications push envoyées aux clients dans Reports</ durée> -> Application client -> Notifications ainsi que s'ils ont été reçus et cliqués par le client.

Reprogrammation client
La fonction personnalisée de replanification du client vous permet d'inclure des liens de replanification dans les messages de notification à vos clients et le bouton de replanification sur le site de réservation. Les clients peuvent utiliser ces options pour trouver une nouvelle heure pour leur réservation si dans la période de report autorisée.
- Veuillez noter ! :
- Les clients peuvent uniquement modifier la date et/ou l'heure du rendez-vous ;
- Si vous avez activé Tout employé fonction personnalisée et qu'elle a été utilisée lors du processus de réservation, le fournisseur ne sera pas modifié lors de la reprogrammation du côté client. Si le changement de fournisseur (ou la sélection aléatoire) est nécessaire, veuillez demander aux clients d'annuler et de réserver à nouveau.
- Cette fonctionnalité n'est pas compatible avec Approuver les réservations fonction personnalisée ;
- Il n'est pas possible de reprogrammer des rendez-vous récurrents et de groupe ;
- Si carte-cadeau, coupon ou membership ont été appliqués lors du processus de réservation initial, il n'est pas possible de reprogrammer par le client ;
- Certains calendrier layouts changement sur la page de reprogrammation (prestataire flexible devient flexible ; prestataire moderne devient moderne ; cours hebdomadaires devient créneaux hebdomadaires ; cours quotidiens ' est remplacé par moderne).
- Comment utiliser
- 1. Activer Replanification client sur votre Fonctionnalités personnalisées page.

- 2. Sélectionnez la replanification de la période de restriction dans ses paramètres.

- 3. (facultatif) Ajoutez [reschedule_link] variable aux notifications client dans Settings -> Paramètres e-mail et SMS(ou Flexible Notifications paramètres si vous avez des modèles personnalisés par service/fournisseur).

- 4. En conséquence, les clients pourront utiliser Reschedule sur le site de réservation Mes réservations page ou en utilisant le lien des notifications par e-mail.

Widget de contact
Activez cette fonction personnalisée si vous devez ajouter un widget Réserver et contacter à votre propre site Web ou simplement ajouter un formulaire de contact au site Web de réservation. Grâce à cette fonctionnalité personnalisée, vos clients pourront réserver directement depuis votre site Web et également vous envoyer un contact avec des informations détaillées.
- Comment utiliser
- 1. Pour activer cette option, veuillez cliquer sur "Activer" près de l'option correspondante sur votre page de fonctionnalités personnalisées.

- 2. Veuillez choisir "Paramètres" pour configurer l'apparence du widget et générer le code nécessaire.

- Voir les instructions comment ajouter un widget de réservation à votre site Web
- 3. Pour vérifier les messages reçus de vos clients, accédez à Rapports -> SMS (messages texte) -> ; Contacter wodget

Coupons & Cartes-cadeaux
![]()
Créez et vendez des cartes-cadeaux, et envoyez des coupons à vos clients avec Coupons & Fonctionnalité personnalisée des cartes-cadeaux ! Vous pouvez faire des réductions en % et en montant fixe et vendre des chèques-cadeaux. Utilisez cette fonctionnalité étonnante pour promouvoir votre entreprise. Personnalisez vos promotions avec des dates, des messages et des codes définis.
- Veuillez consulter notre tutoriel vidéo sur l'utilisation de cette fonctionnalité ici.
Veuillez noter!
   • Cette fonctionnalité personnalisée ne peut pas être utilisée avec  Nettoyer l'historique.
   • Lorsque vous activez cette fonctionnalité  Accepter les paiements sera également activé.
   • Les remises à montant fixe peuvent être utilisées pour plusieurs achats jusqu'à ce que le montant total de la remise soit utilisé.
   • Les clients doivent être abonnés à vos supports marketing pour pouvoir recevoir ces notifications.
   • Si vous utilisez cette fonctionnalité avec  Réservations multiples,  Réservations de groupe ou services récurrents la réduction sera appliquée à l'ensemble de l'achat (toutes les sessions sélectionnées).
- Comment utiliser
- 1. Activez cette fonctionnalité personnalisée dans la section Améliorations professionnelles de votre page Fonctionnalités personnalisées.
- 2. Accédez à "Gérer" sur la droite ou allez à Gérer//Coupons et cartes-cadeaux.
- 3. Cliquez sur l'icône "+" pour créer une promotion ou une carte cadeau.

- 4. Remplissez les détails principaux dans le menu qui apparaît sur le côté droit.
- 5. Ajoutez des détails que vos clients verront.

- 6. Définissez la période de validité de la promotion ou de la carte-cadeau.

- sept. De plus, vous pouvez associer votre promotion/carte-cadeau à des services, des abonnements, des produits à vendre et/ou des services complémentaires spécifiques.
- 8. Enregistrez vos paramètres. Si nécessaire, vous pouvez maintenant émettre les cartes-cadeaux et/ou envoyer des messages de promotion à vos clients existants en cliquant sur le bouton "Émettre une carte-cadeau"/"Envoyer un message de coupon" à côté de l'article souhaité.
- Ou créez-y un lot de cartes-cadeaux non personnalisées.
- 9. Vous pouvez également définir des modèles pour que les clients reçoivent des notifications par e-mail et/ou SMS lorsqu'ils achètent eux-mêmes une carte-cadeau sur le site de réservation.
:Pour ce faire, veuillez accéder aux fonctionnalités personnalisées//Coupons et cartes-cadeaux, à droite de la page.
CSS personnalisé
Créez votre propre interface de réservation avec cette fonctionnalité CSS personnalisée. Il permet de changer les styles des différents éléments, de les masquer, de changer les polices, les couleurs, les tailles de police, etc. Si vous connaissez le codage CSS, veuillez utiliser les outils du navigateur pour trouver les identifiants des éléments et écrire des règles dans les paramètres de la fonction personnalisée, Si vous n'avez pas de connaissances approfondies en CSS, veuillez contacter le support et ils essaieront de trouver la meilleure solution pour vous.
Fonctionnalité personnalisée gratuite !
- Comment utiliser
- 1. Activez cette option sur votre page Fonctionnalités personnalisées.

- 2. Cliquez sur "Paramètres" pour cette fonctionnalité.
- 3. Ajoutez le(s) code(s) pour ajuster les styles à l'onglet "Pages de réservation CSS" si vous souhaitez modifier la page de réservation
- ou "Widget CSS" si vous modifiez un widget sur votre site Web.
centre
Voir les demandes les plus courantes sur la suppression d'éléments avec CSS ici (téléphone, champs de messagerie, onglets sociaux, notre temps, etc.)
Domaine personnalisé
Cette option permet de définir votre propre lien de site (URL) pour votre page de réservation avec une connexion effectuée via une couche sécurisée. Si vous possédez votre propre nom de domaine, vous pouvez maintenant simplement utiliser le site de réservation avec ce nom ou un sous-domaine de ce nom (/v2/ une partie de l'URL du site de réservation ne peut pas être modifiée).
Veuillez noter ! Cette fonctionnalité n'est pas compatible avec la Facebook Client Info custom feature.
- Comment utiliser
- 1. Activez cette fonctionnalité par paiement unique (vous verrez le prix exact dans votre compte) sur votre page de fonctionnalités personnalisées.

- 2. Accédez à ses "Paramètres" en sélectionnant l'option correspondante sur le côté droit de la page.

- 3. Ensuite, dans votre contrôleur de domaine, vous devez trouver où vous définissez les enregistrements DNS et définissez l'enregistrement A sur IP mentionné dans les paramètres de cette fonctionnalité.
- Veuillez noter ! L'enregistrement AAAA (IPv6) ne doit pas être défini, sinon le certificat SSL ne peut pas être émis.
centre
:Une fois les enregistrements A définis, entrez le nom de domaine que vous souhaitez utiliser dans ses paramètres et enregistrez-le.
- Ensuite, nous recevrons automatiquement la demande et appliquerons les paramètres de notre côté (cela peut prendre un certain temps - généralement entre 24 et 48h). Dès qu'ils sont appliqués, votre nom de domaine commence à fonctionner pour le site de réservation.
- Si vous souhaitez changer le nom de domaine personnalisé en un nom différent de celui défini avant de pouvoir le faire pour un prix supplémentaire, car de nouveaux certificats SSL doivent être créés. Pour plus d'informations, veuillez contacter l'assistance.
Courriel personnalisé
Souhaitez-vous envoyer à vos clients et à votre personnel des notifications par e-mail attrayantes avec votre propre marque personnalisable, des liens, des boutons et de nombreuses autres options ? L'activation de cette fonctionnalité personnalisée vous donne accès à l'éditeur HTML où vous pouvez facilement faire glisser et déposer divers blocs de contenu, ajouter des images, du texte, des coordonnées, etc. N'oubliez pas que le contenu lié à la réservation ou à l'achat, ainsi que l'ajout du correspondant les variables doivent être éditées soit dans Paramètres -> Paramètres d'e-mail et de SMS si vous utilisez des modèles de notification de rendez-vous courants, ou dans les paramètres de fonctionnalités personnalisées spécifiques si vous avez des notifications personnalisées.
Veuillez noter ! Cette fonctionnalité personnalisée est disponible uniquement avec les abonnements payants.
Tutoriel vidéo disponible ![]()
Veuillez noter !
La personnalisation actuellement disponible est présente pour les modèles d'e-mail suivants :
   • Principales notifications liées aux réservations depuis Paramètres -> Paramètres e-mail et SMS ;
   • Facture les e-mails de la fonctionnalité personnalisée Accepter les paiements ;
   • Réservations de groupe notifications de fonctionnalités personnalisées ;
   • Réservations multiples notifications de fonctionnalités personnalisées ;
   • Connexion client notifications de fonctionnalités personnalisées ;
   • Adhésion notifications de fonctionnalités personnalisées ;
   • Packages notifications de fonctionnalités personnalisées ;
   • Tickets notifications de fonctionnalités personnalisées ;
   • Coupons & Cartes-cadeaux notifications de fonctionnalités personnalisées (à la fois : achat côté client sur la page des fonctionnalités personnalisées et émission manuelle côté administrateur dans la gestion des coupons et des cartes-cadeaux) ;
   • Test médical notifications de fonctionnalités personnalisées ;
   • Fonction personnalisée Réserver bientôt notifications.
- Comment utiliser
- 1. Activer E-mail personnalisé sur votre Fonctionnalités personnalisées page, Apparence section.

- 2. Cliquez sur Créer un modèle lien pour accéder à l'éditeur et pouvoir configurer votre premier modèle.

- 3. Veuillez sélectionner Créer à partir de modèles si vous souhaitez sélectionner l'une de nos belles options prédéfinies ou Créer un nouveau vide pour commencer à ajouter tous les éléments à partir de zéro.
: Ajoutez un nom de modèle pour le type de modèle vide (les modèles prédéfinis peuvent être renommés lors de l'édition) et appuyez sur Create< /span> bouton pour accéder au mode d'édition.


- 4. Ajoutez/modifiez des blocs de texte, ajoutez des images, des liens, des menus, des colonnes, téléchargez le logo de votre entreprise, utilisez les couleurs de la marque et bien plus encore avec l'éditeur intégré.
- Veuillez utiliser les outils sur le côté droit de la page et la visualisation au centre, faites glisser et déposez, ajustez les éléments souhaités pour obtenir le look nécessaire.
- 5. Vous pouvez également passer à Mobile mode pour ajuster l'apparence des e-mails pour les téléphones mobiles.

- 6. Il est important d'ajouter {{content}} balise à l'endroit souhaité dans le modèle, comme dans les vrais e-mails, il sera remplacé par les informations relatives à la réservation/achat.
- Sans cette balise, la personnalisation ne sera pas appliquée à la notification et elle sera envoyée en texte brut.
- Veuillez noter ! Toutes les variables liées aux rendez-vous ou aux achats ne doivent être utilisées que soit dans Settings -> Paramètres e-mail et SMS ou dans la fonction personnalisée options.

- (facultatif) Vous pouvez également utiliser {{name}}< /span> et {{email}} balises ici au cas où vous auriez besoin de refléter le nom et/ou l'adresse e-mail du destinataire séparément du contenu principal de la notification.
- Veuillez noter ! Les modèles sont régulièrement enregistrés automatiquement, vous n'avez donc pas besoin d'enregistrer manuellement eux.

- sept. Utilisez le Aperçu option en bas pour vérifier le look.

- 8. (facultatif) Si vous avez besoin de conceptions similaires avec quelques modifications mineures uniquement ou avec un contenu différent, veuillez utiliser Clone</span> ; option pour faire une copie du modèle précédemment enregistré.

- 9. Une fois que tous les modèles nécessaires sont prêts, veuillez revenir à Fonctionnalités personnalisées -> Apparence -> E-mail personnalisé.

- dix. Dans le tout premier bloc, vous verrez votre entreprise adresse e-mail par défaut. Vous pouvez le laisser tel quel ou en définir un autre pour le test.

- 11. Dans le(s) bloc(s) suivant(s), veuillez sélectionnez le modèle pour chaque type de notification.
- 12. Envoyez des testez les e-mails pour vérifier l'apparence avec un exemple de contenu.

- 13. Si vous souhaitez définir le même modèle pour tous les types de notifications dans un bloc, veuillez utiliser le de droite options de menu.

- 14. Si vous avez diverses fonctionnalités personnalisées avec vos propres types de notification activés, vous pourrez voir le blocks</span> ; dans E-mail personnalisé paramètres.
- Veuillez ouvrir chaque bloc et définissez les modèles pour les notifications que vous souhaitez personnaliser.
- Enregistrer les paramètres une fois terminé.

- 15. Il est également possible d'utiliser des e-mails personnalisés lorsque vous devez envoyer manuellement des e-mails depuis Reports -> Détails des réservations ou Rapports -> Clients.
- Cochez simplement les cases souhaitées, cliquez sur Envoyer un e-mail et choisissez le modèle à appliquer dans la première liste déroulante de la fenêtre contextuelle. Ajoutez un sujet et du contenu. Envoyez le message.

Page personnalisée
la gauche
Cette fonctionnalité personnalisée vous permet d'ajouter vos propres pages statiques personnalisées à votre site Web de réservation, de réorganiser toutes les pages du site de réservation dans le menu principal, de masquer les éléments de menu et d'ajouter des liens personnalisés au menu principal.
Comment utiliser l'option de création de page
- 1. Activez la fonctionnalité "Page personnalisée" sur votre Page de fonctionnalités personnalisées -> Ajout de plus à la section "Site de réservation".

- 2. Allez dans "Gérer" pour configurer les pages souhaitées.

- 3. Sur la page suivante, vous pourrez voir les onglets de la page de réservation du système.
- (Ceux qui sont actuellement désactivés sont grisés.)
- Les pages système ne peuvent pas être modifiées dans cette interface. Vous devrez naviguer vers la section correspondante en utilisant les liens fournis.
- 4. Vous pouvez utiliser les flèches pour réorganiser les onglets et les icônes "Œil" pour masquer et afficher les pages.
- Veuillez noter que si vous masquez la page, il sera toujours possible d'y accéder en utilisant le lien direct.

- 5. Si vous souhaitez ajouter une nouvelle page personnalisée, veuillez cliquer sur l'icône "+" en haut et choisissez l'option "Ajouter une page personnalisée".

- 6. Sur le côté droit, le menu de création de page apparaîtra. Veuillez ajouter le titre et le contenu de la page souhaitée.
- Vous pouvez utiliser l'éditeur HTML intégré pour ajouter des éléments ou si vous avez des connaissances en codage HTML, vous pouvez passer en mode code en utilisant l'icône "</>".
- Attention, il est nécessaire de désactiver le mode de codage avant d'enregistrer la page pour que le code soit enregistré correctement.

Comment utiliser l'ajout de liens
Il peut arriver que vous deviez rediriger vos clients vers une autre page (ex. votre site web, etc.).
Dans ce cas, "Ajouter un lien à la barre de menu" vous aidera.
- 1. Cliquez sur l'icône "+" en haut et choisissez l'option "Ajouter un lien à la barre de menus".
- 2. Ajoutez le titre que vous souhaitez afficher dans l'en-tête de la page de réservation dans le champ "Texte du lien personnalisé à afficher" et indiquez le lien lui-même dans le champ correspondant.
- 3. Vous pouvez également choisir si le lien doit être ouvert dans le nouvel onglet du navigateur ou dans le même.
- Pour cela veuillez choisir "self" si vous souhaitez que la page soit ouverte dans le même onglet ou "vide" si vous souhaitez qu'elle soit ouverte dans l'onglet séparé du Paramètre "Choisissez comment le lien sera ouvert".
Rapport quotidien
Rapport quotidien
Chaque jour, cette fonctionnalité personnalisée vous enverra un statut mis à jour de toutes les réservations de la journée. Vous recevrez également une liste avec vos réservations actives pour la semaine à venir.
Dans les paramètres de cette fonction personnalisée, vous pouvez décider si vous souhaitez inclure les nouvelles réservations d'aujourd'hui, les réservations annulées d'aujourd'hui, décider de la période pour les réservations à venir comme 1 jour, 3, 7, 14, 21, 30 jours et définir l'heure de notification.
te fonctionnalité sur votre page Fonctionnalités personnalisées.

- 2. Accédez aux paramètres à droite pour gérer les options disponibles.

- 3. Ajustez les préférences et enregistrez.
- Le système enverra le rapport correspondant à l'adresse e-mail de votre entreprise que vous avez indiquée dans Paramètres//Informations sur l'entreprise//Informations de base.
Afficher les espaces restants
Affichez le nombre de places restantes lorsque vous acceptez plusieurs clients par créneau, comme pour les cours et les événements. Vous pouvez également choisir d'afficher le nombre total de places ainsi que le nombre de places restantes.
Veuillez noter!
   • Cette fonctionnalité n'est pas compatible avec Limiter les réservations ;
   • Fonctionne pour les calendar layouts suivants uniquement : créneaux hebdomadaires, cours modernes, hebdomadaires et quotidiens, fournisseur moderne.
   • Le temps bloqué par Calendar sync n'influence pas le nombre de plages horaires.
- Tutoriel vidéo disponible
- Comment utiliser
- 1. Activez Afficher les espaces restants dans votre section Fonctionnalités personnalisées.

- 2. (facultatif) Activez l'option correspondante pour afficher le nombre total d'espaces avec ceux restants.

- 3. En conséquence, les clients pourront voir le nombre d'espaces restants pour chaque créneau horaire (et le total si "Afficher le nombre total d'espaces par créneau" est activé).

Validateur de réservation externe
Vous pouvez valider les réservations à l'aide d'un script externe. Le script peut vérifier les variables de la réservation, et seulement si les conditions sont remplies, la réservation est traitée. De plus, le script de validation peut ramener des informations qui peuvent être injectées dans les variables du formulaire d'admission.
Veuillez noter !
- Des compétences en développement sont nécessaires pour utiliser cette fonctionnalité.
- Formulaires d'admission la fonctionnalité personnalisée sera activée avec celle-ci.
- Comment utiliser
- 1. Activer External Booking Validator fonction personnalisée sur votre Fonctionnalités personnalisées page, Autre section.

- 2. Créez votre propre script de validation avec vos propres conditions souhaitées.
:Par exemple, vous pouvez exiger certaines réponses des clients à un ou plusieurs intake forms< /span> pour que la réservation soit soumise à votre système.
- 3. Insérez votre script dans cette fonctionnalité settings sur la Fonctionnalités personnalisées page et enregistrez.

- Un exemple de script est disponible ici.
Réservations Facebook et Instagram
![]()
Connectez votre système de réservation SimplyBook.me à votre page Facebook Business et à votre profil Instagram. De cette façon, vous pouvez réserver encore plus de clients en ayant un bouton "Réserver" à la fois sur votre page Facebook Business et votre profil Instagram - le tout parfaitement intégré à votre SimplyBook système de réservation.
Veuillez noter !
- Il est possible de connecter l'option de réservation aux pages Facebook Business et Instagram Business. Cette fonctionnalité ne peut pas être ajoutée à une page personnelle.
- L'option de réservation n'est pas affichée sur la version Instagram de bureau et ne peut être utilisée que via des applications mobiles.</span> ;
- Le thème Bookingtroll est utilisé par défaut pour le widget de réservation. Si vous souhaitez modifier le style, veuillez passer à Premium pour sélectionner le thème souhaité et pouvoir utiliser CSS personnalisé ajustements.
- L'apparence du widget peut varier en fonction des préférences Facebook pour différents appareils et applications
- Cette fonctionnalité n'est pas compatible avec Facebook Pixel fonction personnalisée.
- Tutoriel vidéo disponible
Comment ajouter et utiliser l'option de réservation sur la page d'entreprise Facebook/Instagram
- 1. Activer Facebook & Réservations Instagram fonction personnalisée sur votre Fonctionnalités personnalisées page.

- 2. Connectez-vous à votre ou vos comptes professionnels Facebook/Instagram dans un autre onglet du navigateur.
- 3. Revenez à l'interface de SimplyBook.me et cliquez sur Settings près de Facebook & Réservations Instagram.
- 4. Cliquez sur Connectez-vous avec Facebook bouton sur la page que vous voyez.
- 5. Vous serez redirigé vers Facebook interface pour gérer les autorisations et la connexion à SimplyBook.me.
- Veuillez suivre les étapes 1 à 5 affichées ci-dessous.
- (Si vous avez un profil d'entreprise Instagram connecté à votre page d'entreprise Facebook, vous pourrez également le connecter à cet endroit
- et Livre apparaîtra automatiquement ici)

- 6. Vos services seront désormais affichés sur votre page Facebook avec Livre à côté d'eux ou Réserver maintenant sous la bannière de la page qui redirigera vos clients vers votre site de réservation.
- (les options de représentation dépendent de votre page Facebook professionnelle)

- sept. Vous pouvez également ajouter une option de réservation aux publications de votre page Facebook afin que les clients puissent réserver rapidement vos services.

Comment supprimer le bouton Livre des pages Facebook/Instagram
- 1. Accédez à Fonctionnalités personnalisées -> Facebook & Réservations Instagram -> Paramètres du côté de SimplyBook.me.
- 2. Cliquez sur Déconnexion en haut de la page.

Comment ajouter et utiliser l'option de réservation sur Instagram uniquement
- 1. Ouvrez votre Instagram application mobile et connectez-vous à votre page d'entreprise.
- 2. Accédez à votre profil et sélectionnez pour le modifier.
- 3. Suivez les étapes 1 à 10 ci-dessous pour ajouter Book bouton qui conduira les clients vers votre site de réservation :

Comment supprimer l'option Réserver de la page professionnelle d'Instagram
- 1. Ouvrez votre Instagram mobile et accédez à la modification de votre profile.
- Suivez les étapes 1 à 4 ci-dessous pour supprimer Book bouton:

Informations client Facebook
- 1. Activer External Booking Validator fonction personnalisée sur votre Fonctionnalités personnalisées page, Autre section.
- 2. Créez votre propre script de validation avec vos propres conditions souhaitées.
:Par exemple, vous pouvez exiger certaines réponses des clients à un ou plusieurs intake forms< /span> pour que la réservation soit soumise à votre système.
- 3. Insérez votre script dans cette fonctionnalité settings sur la Fonctionnalités personnalisées page et enregistrez.
- Un exemple de script est disponible ici.
Réservations Facebook et Instagram
![]()
Connectez votre système de réservation SimplyBook.me à votre page Facebook Business et à votre profil Instagram. De cette façon, vous pouvez réserver encore plus de clients en ayant un bouton "Réserver" à la fois sur votre page Facebook Business et votre profil Instagram - le tout parfaitement intégré à votre SimplyBook système de réservation.
Veuillez noter !
- Il est possible de connecter l'option de réservation aux pages Facebook Business et Instagram Business. Cette fonctionnalité ne peut pas être ajoutée à une page personnelle.
- L'option de réservation n'est pas affichée sur la version Instagram de bureau et ne peut être utilisée que via des applications mobiles.</span> ;
- Le thème Bookingtroll est utilisé par défaut pour le widget de réservation. Si vous souhaitez modifier le style, veuillez passer à Premium pour sélectionner le thème souhaité et pouvoir utiliser CSS personnalisé ajustements.
- L'apparence du widget peut varier en fonction des préférences Facebook pour différents appareils et applications
- Cette fonctionnalité n'est pas compatible avec Facebook Pixel fonction personnalisée.
- Tutoriel vidéo disponible
Comment ajouter et utiliser l'option de réservation sur la page d'entreprise Facebook/Instagram
- 1. Activer Facebook & Réservations Instagram fonction personnalisée sur votre Fonctionnalités personnalisées page.
- 2. Connectez-vous à votre ou vos comptes professionnels Facebook/Instagram dans un autre onglet du navigateur.
- 3. Revenez à l'interface de SimplyBook.me et cliquez sur Settings près de Facebook & Réservations Instagram.
- 4. Cliquez sur Connectez-vous avec Facebook bouton sur la page que vous voyez.
- 5. Vous serez redirigé vers Facebook interface pour gérer les autorisations et la connexion à SimplyBook.me.
- Veuillez suivre les étapes 1 à 5 affichées ci-dessous.
- (Si vous avez un profil d'entreprise Instagram connecté à votre page d'entreprise Facebook, vous pourrez également le connecter à cet endroit
- et Livre apparaîtra automatiquement ici)
- 6. Vos services seront désormais affichés sur votre page Facebook avec Livre à côté d'eux ou Réserver maintenant sous la bannière de la page qui redirigera vos clients vers votre site de réservation.
- (les options de représentation dépendent de votre page Facebook professionnelle)
- sept. Vous pouvez également ajouter une option de réservation aux publications de votre page Facebook afin que les clients puissent réserver rapidement vos services.
Comment supprimer le bouton Livre des pages Facebook/Instagram
- 1. Accédez à Fonctionnalités personnalisées -> Facebook & Réservations Instagram -> Paramètres du côté de SimplyBook.me.
- 2. Cliquez sur Déconnexion en haut de la page.
Comment ajouter et utiliser l'option de réservation sur Instagram uniquement
- 1. Ouvrez votre Instagram application mobile et connectez-vous à votre page d'entreprise.
- 2. Accédez à votre profil et sélectionnez pour le modifier.
- 3. Suivez les étapes 1 à 10 ci-dessous pour ajouter Book bouton qui conduira les clients vers votre site de réservation :
Comment supprimer l'option Réserver de la page professionnelle d'Instagram
- 1. Ouvrez votre Instagram mobile et accédez à la modification de votre profile.
- Suivez les étapes 1 à 4 ci-dessous pour supprimer Book bouton:
Informations client Facebook
- Comment utiliser
- 1. Activez cette option sur votre page de fonctionnalités personnalisées.

- 2. Et les clients pourront se connecter avec leurs profils Facebook sur le site de réservation.

Facebook Pixel
Gérez les analyses de votre site de réservation avec Facebook Pixel
Veuillez noter ! Cette fonctionnalité personnalisée n'est pas compatible avec Facebook and Instagram Bookings
- Comment utiliser
- 1. Activer Facebook Pixel sur votre Fonctionnalités personnalisées page, Statistiques et analyses section.

- 2. Accédez à Sources de données sur votre Facebook page entreprise et sélectionnez le pixel précédemment sélectionné ou créez-en un nouveau</span> ; en cliquant sur Connecter les sources de données bouton.
- 3. Copiez le code de pixel à 16 chiffres.

- 4. Collez-le dans le champ Pixel ID champ sur SimplyBook.me côté. Enregistrer les paramètres.

- 5. (facultatif) Vous pouvez tester les événements en utilisant l'onglet correspondant sur votre page professionnelle Facebook.
: Collez simplement l'URL de votre site Web de réservation, accédez-y et parcourez les pages pour créer l'activité.
- Visualisez les urls, les événements et leurs paramètres. Il est possible de voir des pages vues simples, de programmer et d'acheter des événements.


- 6. Dans la section Overview L'onglet Facebook vous permettra de voir les événements réels avec les détails dans les paramètres.

Téléchargeur de fichiers - Google Drive
Activez cette fonctionnalité personnalisée pour permettre à vos clients de télécharger des documents signés ou d'autres informations directement sur votre compte Google Drive.
Veuillez noter !
- Cette fonctionnalité n'est pas entièrement prise en charge dans l'application d'administration. Si vous l'utilisez et avez besoin de créer des réservations à partir de là, veuillez rendre les champs de fichier facultatifs car il n'est actuellement pas possible de télécharger des fichiers dans l'application. Cependant, vous pourrez voir les noms de fichiers dans les rendez-vous déjà pris.
- La taille du fichier téléchargé doit être inférieure à 5 Mo et ne peut pas être une archive ou un fichier exécutable.
- Comment utiliser
1. Activez cette option sur votre Fonctionnalités personnalisées -> Ajout d'éléments supplémentaires au site Web de réservation Catégorie.

2. Sur le côté droit de la page, vous verrez ses paramètres. Cliquez sur Autoriser pour vous connecter à votre Google Drive et donner les autorisations demandées.

3. Une fois la connexion établie, vous pourrez voir son état et utiliser le lien vers le dossier des fichiers sur votre Google Drive à partir de la même page Fonctionnalités personnalisées.
4. Accédez à Gérer -> Formulaires d'admission ou Gérer -> Champs client (ou activez une ou les deux fonctionnalités si nécessaire) et créez File Uploader - Google Drive formulaire.
Rendez-le obligatoire ou non selon vos besoins.
1200px|center
5. Après avoir créé les formulaires souhaités, les clients pourront télécharger leurs fichiers pendant le processus de réservation (Formulaires d'admission)
ou inscrivez-vous (Champs client)
6. Du côté administrateur, vous pourrez voir et télécharger les fichiers soit dans la fenêtre contextuelle de réservation sur la page Calendrier s'il s'agit d'un intake form

ou depuis Gérer -> Clients -> modifiez l'enregistrement du client si vous l'avez en tant que champ client.

Et, bien sûr, vous pourrez télécharger manuellement les fichiers lors de la nouvelle réservation ou de la création/modification du dossier client du côté administrateur si nécessaire.
Notifications flexibles
![]()
La fonction personnalisée de notifications flexibles vous permet de personnaliser les messages par service, par fournisseur ou en utilisant une combinaison de services et de fournisseurs. Cela signifie que certains services peuvent avoir un message différent du message général de rappel sortant pour d'autres services. Un certain fournisseur peut également souhaiter inclure des instructions différentes pour les clients qui réservent un certain service. La fonction personnalisée de notifications flexibles vous offre toute la flexibilité dont vous pourriez avoir besoin dans de tels cas !
Veuillez noter ! Cette fonctionnalité personnalisée est disponible uniquement avec les abonnements payants.
- Comment utiliser
- 1. Accédez à la section Fonctionnalités personnalisées//Réservation, recherchez la fonctionnalité personnalisée de notifications flexibles et appuyez sur "Activer".

- 2. Cliquez sur "Gérer" à côté de cette fonctionnalité.

- 3. Sur la page que vous voyez, appuyez sur "Nouveaux paramètres de modèle flexible".
- 4. Dans le nouveau modèle, sélectionnez les services et/ou sélectionnez les fournisseurs auxquels les modèles personnalisés seront appliqués. Sélectionnez ensuite le type de notification pour ajouter/modifier le modèle et modifiez le texte. Veuillez utiliser des variables à droite pour les inclure dans vos modèles si nécessaire.
Google Adwords et Analytics
Utilisez la fonctionnalité personnalisée de Google Analytics pour voir combien de clients visitent votre site quotidiennement et pendant les campagnes de promotion. Utilisez les analyses d'adwords pour compter combien de personnes réservent réellement après avoir cliqué sur une publicité adwords.
- Comment utiliser
- 1. Activez la fonctionnalité "Google Adwords et Analytics" sur votre page de fonctionnalités personnalisées.
- 2. Accédez aux paramètres sur la droite.
- 3. Remplissez les cases avec les informations correspondantes.
- Where to find the details
- 1. The Google analytics id can be found in your Google analytics accounts.
- Go to Analytics home, and click on "All Web Site data" in the top left corner.

- 2. In the pop-up you will see your Analytics ID

- It should be in the format: UA-XXXXXXXX-X Where XXXXXXX-X is some number.
- An example of this id would be: UA-70295750-1
- To start tracking visitors, you only need to set your analytics account id.
However to track results of an adwords campaign you need to set up an adwords campaign conversion id and insert this id into the SimplyBook.me Custom Feature.
- 1. Sign in to your Ads account at https://ads.google.com
- 2. Click Tools and select Conversions

- 3. Click + to create conversions and select Website conversions.

- 4. Set up the options.

Google conversion value is the conversion value that you give to a client that hits your target. It can, for example, be set as 20 for $20 per conversion if the average price of your service is $20. We set it default to 1, which could mean $1 value per conversion but you should change this to the right value for you.
- 5. Select to insert the Tag yourself.

- 6. Then you will see a code like this:

<!- Event snippet for Testing conversion page ->

<script>

gtag('event', 'conversion', {'send_to': 'AW-XXXXXXXXX/YYYYYYYY-YYYYYYYYYYY'});

</script>
where XXXXXXXXX is your conversion id(google_conversion_id value) and
YYYYYYYY-YYYYYYYYYYY is conversion label(google_conversion_label value)
- 7. Use these details to add to the corresponding fields of this custom feature settings.

Google Authenticator

Add security to your account. You can use a 2-step authentication when logging into your account preventing unauthorized access. Upon entering password, you'll be asked to insert 6-digit login code from your Google authenticator or a 3rd party app.
You can use this custom feature with or without HIPAA feature depending on your needs and business requirements.
- Please note! In case you have this feature enabled our support agents will not be able to access your account settings.
- As well it will not be possible to connect the account to Zapier.
How to use it as admin user
- 1. Open “Custom features” page using left-side menu of your admin interface and find “Security & Data Protection” section. Just click on “Enable” near “Google authenticator”

- 2. To set 2-step authentication please go to Manage//Users using left-side menu or click on ”Set up 2-step authentication” near this custom feature.

- 3. On Manage//Users page click on “+” and create all desired system users to be able to connect each to 2-step authentication.

- 4. Download “Google Authenticator” application from Google Play or App Store. You can just scan QR-code in Manage//Users//select the user//Google Authenticator and immediately get to application page.

- 5. In the same section scan QR-code with Google Authenticator application on your smartphone, enter the code you see in the app and click on "Connect" button.

- 6. All done! This user can now log in in more secure way!
- Login process will look like as follows:
- - open Simplybook.me site or direct link as companyname.simplybook.me
- - fill in all necessary details and password
- - enter 6-digits code from Google Authenticator feature

If you plan to allow your employees to be able to connect themselves please create them as users beforehand and allow them to login without 2-step authentication in Custom features//Google authenticator//Settings//Settings.

How to connect Google Authenticator if you are a user
- 1. Google Authenticator custom feature should be previously enabled by admin as described above.
- 2. Open “Welcome” page using left-side menu and scan the code to download the application if you have not done this before.

- 3. Click on “Connect/Change” link, scan the code, enter the code you get and save settings.

- 4. From now you will login in more secure way!
- Login process will look like as follows:
- - open Simplybook.me site or direct link as https://companyname.simplybook.me
- - fill in all necessary details and password
- - enter 6-digits code from Google Authenticator feature
Google Business
Easily increase your business visibility on the Internet via the Google My Business feature. It does not cost anything but increases visibility in search as well as makes your business visible on Google maps.
Free custom feature!
Video tutorial ![]()
Google Business
- How to use
- 1. Enable this custom feature on your Custom Features page.

- 2. Navigate to Settings to create Google Business account if you do not have one yet, or connect already existing Google Business account.


- 3. Give the necessary permissions so that it will be possible to see and edit your location(s) in SimplyBook.me.
- 4. If you already have some locations in Google Business you will be able to see them on the left side of the page.

- 5. Just click on one of them if you need to make some edits and enable the option Update address in the profile, make the necessary changes and re-save the location for the information to be updated on Google side

- or choose + option to add a new business address.

- 6. After you have added the address, click on Save and Close and you will have the possibility to proceed to the business location verification on Google side(it may take some time).
- You can also close the pop-up and get back to the verification step later(there will be Verify now button for each saved and synced business location).
- As soon as your location is verified by Google(you will see the verification process steps while following Google instuctions) your business will appear in search and on Google Maps.

- 7. When you save the location the following information is passed to Google about your company:
- business location title;
- company working hours;
- company phone number;
- booking site link;
- business category(as Google categories differ the best matching one will be found).

- Please note, if you have changed some of these details in your SimplyBook.me account you will need to re-save the business location in Google Business feature settings for the details to be updated on Google side.
- 8. You can also edit your business location details on Google side if necessary. Simply click on Edit on GMB button at the top(appears for saved and synced locations).

- 9. If some location(s) become not relevant for your business anymore you can easily delete them in this feature settings. Just click on Delete on GMB option.

Reserve with Google
Add a Book online button to your Google Business listing. Allow your clients to find you easily on Google and book your services right there via Google Search, Google Maps or Google Assistant, powered by the SimplyBook.me booking system.
- Please note!:
- Reserve with Google is currently available only for supported countries listed here;
- Currently it is not possible to use this option for the following business categories: medical center, educational institution, government office, engineer, medical clinic, dentist, medical office, education center, event management company, city administration, embassy, general practice attorney, child care agency, university, college, school, library, financial institution.
- It is required to have Accept Payments custom feature enabled (Pay later (Allow delay payment) option should always be On) and prices should be added for all the services/classes you wish to be displayed and bookable through Google Maps;
- All the services/classes should have descriptions to be displayed on the Google side;
- If you are using Intake forms feature there should be no mandatory forms added to the services you wish to be available for booking;
- If a service is recurring or connected to Membership it will not be displayed in Reserve with Google;
- If you are using outdated Google Calendar Sync custom feature it will not be possible to use Reserve with Google.
- How to use
- 1. Add and verify your Google Business location(s) either via SimplyBook.me platform(previous part of this tutorial) or using your Google Business interface and re-save it(them) in Google Business custom feature settings.

- 2. Navigate to Reserve on google maps tab and move the switcher Synchronization with Reserve with Google to an active position.

- 2. (optional) If you use Multiple Locations custom feature, connect your Google Businesses to desired SimplyBook.me locations.
- Please note! It is possible to connect one SimplyBook.me location to one Google Business.
- If you do not use Multiple Locations your main company location can be connected to one Google Business.

- 3. Save settings. Now the sync takes place and after you reload the page it will be possible to see the list of services that will be passed to Reserve with Google for booking.
- By default we gather all the information and pass the update to Google once a day, but you can use Update info button to prepare the information for transfer manually if any settings changes in your account(for example, if you have created new service) were made.

Google Tag Manager
This feature allows to manage tracking and marketing optimization JavaScript tags on your site. You can add and update AdWords, Google Analytics, Floodlight, and non-Google tags.
- How to use
- 1. Enable Google Tag Manager custom feature in your Custom features section.

- 2. Sign up for a Google tag manager site
- 3. Create a new container and set it up.
- 4. Insert the container ID on the SimplyBook.me admin page -> Custom features -> Google Tag Manager -> on the right side.

Google Translate

Need to show your booking website in several languages for your clients' convenience? Now we have Google Translate custom feature that makes is possible. It allows you to add Google Translate’s automatic translation to your booking website and each client will be able to choose the language convenient for them.
- How to use
- 1. To enable this option navigate to Custom Features//Adding more to the Booking Website.

- 2. To access available options for this functionality click on "Settings" button.

- 3. Check the boxes with languages you wish your clients to be able to choose on the booking website.

- 4. Select the view mode to your taste.

- 5. Save settings. Everything is ready to use! Here is how it can look like on your booking page using one of the themes.

One more translation possibility using third-party service here
Group Bookings
Group bookings is useful when you need your customers to be able to book appointment or reservation for many individuals at the same time. This Custom Feature creates a selection menu with the number of participants in the group. With this Custom Feature you can also use payment custom feature at the same time so that the total payment for all participants will be paid in one payment at time of check-out even though only the group leader/organizer is registered. If you are using Products for Sale or Service Add-Ons features, number of items will also be multiplied to the number of participants selected.
- How to use
- 1. Make sure that the Service provider is set able to accept X many clients at same time(or more depending on your needs). For this go Manage//Service Providers//select necessary provider//Service provider details//How many clients can this provider serve at same time? and set the X number of clients.

- 2. Activate Group Bookings custom feature on your Custom features page

- 3. Go to its settings on the right.

- 4. Here you can specify how many people can be booked in same booking, by same client and edit notification templates related to this feature.

- (optional) You can additionally indicate minimum number of allowed group bookings if it is required for your services and as the result the clients will not be able to select the lower number of sessions on the service step of the booking process.<br<
- It is possible to set this minimum number for all the services you have. Then please do that in Custom features -> Group bookings -> right side of the page -> Min allowed bookings at a time

- Or you can define some number per service/class in Manage -> Services/Classes -> select the service/class -> More options -> Min allowed bookings at a time

How will it look like on the booking page:
- The clients will be able to use the arrows to choose the number of participants(the look may differ depending on the theme you have).

HIPAA
Available with Standard and Premium(former Gold and Platinum) subscriptions.
The personal information custom feature is designed to help SimplyBook.me users to protect their client's and patient's data. It does not replace user's own security procedures but enhances SimplyBook.me data security by using double authentication during login process for all users who access the system (users need to register their mobile phone number to receive authentication code SMS(you need SMS credits for this) or connect Google Authenticator using corresponding custom feature). This custom feature includes a “Timeout” setting which automatically logs user out to reduce the risk of unauthorized users accessing the system.
The system blocks all access for SimplyBook support personnel further reducing access by unrelated people to the system. It is possible to further reduce exposure of personal information to unauthorized people by using the Clean History custom feature. This way old data gets deleted and is therefore not accessible.
Please note!
- This custom feature does NOT replace the SimplyBook.me user's own security controls which also need to be in place for client and patient data protection. Please refer to relevant documentation in your country and get assistance from qualified advisors in the field of client/patient data protection.
- [service] and [client] variables in notification templates do not work when this Custom Feature is enabled due to security reasons.
- It is not possible to connect the account to Zapier if you are using HIPAA feature.
- This custom feature cannot be enabled without Google Authenticator custom feature.
- How to use
- 1. Enable HIPAA features on your Custom Features page.
- When you enable this feature SSL custom feature and Google Authenticator will be enabled as well to add security to client side.

- 2. Go to its settings on the right to set timeout period and email address to be notified about new log ins.

- 3. Add phone numbers for your users in Manage//Users//select the user//User details.

- 4. Set up and validate main admin Google Authenticator in Manage//Users//select the user//Google Authenticator.
- (download the app to your phone from Google Play or App Store if you do not have it yet,
- scan QR-code with Google Authenticator application on your smartphone, enter the code you see in the app and click on "Connect" button.)
- 5. Validate main admin phone number to have a backup tw-step authentication method.
- How to validate phone number
- 1. Please navigate to Manage//Users//main admin user//User details.
- Click on "Generate a check-code to validate phone" button under the phone number field.

- 2. You will receive sms with the code, enter the code into the "Validation code" field and press "Confirm the check-code".

- 3. Get a success message that the code is confirmed.

- As a one more backup method you can download the file with one-time codes for two-step authentication in "Google Authenticator" tab on Manage//Users page.

HTML Description Field for Events
Allows inserting HTML formatting (background and font color, bold, italic, underline, alignment and other HTML elements) for Service, Service Providers, Locations and Categories description fields.
Free custom feature!
- How to use
- 1. Enable this functionalitty on your Custom Features page.

- 2. Go to Manage section using left-side menu and select Services/Providers/Classes/Memberships/Products for sale depending on which item do you wish to add/edit description to.
- Select the item and the first tab with name and details.
- Edit the description and save settings

Import Clients
Use this feature if you need to add the list of clients to your system with just several clicks. Simply upload a CSV file containing your clients data, then select headers for corresponding columns, and you will have an updated list of clients in your client register.
Free custom feature!
- Attention! It is forbidden to import a client list with emails and client information where the clients have not specifically granted you the right to do so.
- Please note that this feature is available with Standard and Premium subscriptions only(former Advanced, Gold and Platinum).
- It is only possible to import 500 clients by default. If you need to import more please contact support for details.
How to use this option:
- 1. Enable "Import Clients" custom feature on your Custom features page:

- 2. Prepare your Excel file.
- - No text above the list of clients should be written
- - Make sure all cells are correctly displayed
- - Save file in .csv format with comma separation.
- 3. Go to Manage//Clients//Import from CSV or simply click on "Settings" near this custom feature.

- 4. Press "Choose file" and select the prepared file.

- 5. Assign values to the columns from drop-down lists in the upper bar (above each column, marked with black arrows). Assign "name", "email" and "phone".

- 6. Press "Confirm clients import".
- Please note that only 10 clients will be shown in preview, but after you import, all clients will be shown.
- If you can't import clients, please check the possible reasons
- 1. Format of .csv file is incorrect. It should be saved in .csv with comma or tab separation.
- 2. There is some text above the data or unnecessary columns that prevent successful import. Please delete the text.
- 3. Values are not assigned. Use drop-down menus above the columns to assign values "name", "email", "phone", etc.
Insights
This Custom Feature creates a variety of charts with key performance indicators in your new financial dashboard.
Providers availability, total bookings, payment per provider etc
- How to use
- 1. Enable Insights on your Custom features page.

- 2. Navigate to Dashboard to check the graphs and charts.

Instagram Photo Sharing

Enable the Instagram photo sharing feature and show automatically your photos on the booking site to make it more a live and fun for your visitors. Take photos with your Instagram app and show the results on your booking page.
How to use:
- 1. To enable this custom feature please go to Custom features page and click on “Enable” near “Instagram photo sharing” option.

- 2. Then please choose “Settings” near this custom feature

- 3. You will get to the page where you will be able to connect your Instagram account.
- Just click on “Authorization”, fill in your Instagram username and password.


- 4. If you have many posts within your Instagram account you can set how many images to display per page.

You have it set now and your Instagram images will be displayed on separate tab on the booking site.

Please note!
- When you add images to your Instagram they will be updated on the booking page within an hour.
If you wish it to happen sooner please click on “Refresh now” on this custom feature “Settings” page.

- If Instagram post consists of several images/photos only first one will be displayed on the booking site.
Intake Forms
Intake Forms Custom Feature allows you to request more information from your clients during the booking process. You can ask several questions and they can be answered in many types of fields, such as text lines, drop-downs, text boxes etc.
- How to use
- 1. Enable Intake Forms Custom Feature in the Custom Feature//Adding more to the booking page.

- 2. Go to its management or to Manage//Intake forms page.

- 3. Press "+" button in the settings of Custom Feature to create a new form.

- 4. In the field "Question title" write the question you want your clients to answer. For example: Age, preferences, Do you have any health problems?, etc.
- 5. Choose the field type:
- digits only - allows entering only numbers. Useful when you need to know the age, height or any other information that will require only digits.
- single line - usually used for short answers
- multiple lines - use this type of filed if you expect lengthy explanations from your clients
- checkbox - creates a checkbox that clients should either check or leave unchecked. Useful for questions that require binary answer, for example "I will need additional services".
- dropdown selection - creates a drop-down list with the ability to choose only 1 option. In order to create this field, you will need to create a list of values in the section "Dropdown options and default option". Also you can select the Default value that will be assigned if nothing is chosen from the list.
- date - creates date selection option with calendar.
- barcode - allows to scan barcodes via admin mobile application and get the values from scanning. Also allows simple text input like in single line intake forms.
- custom HTML - allows to add visual dividers or additional text near the intake form. Cannot be used for client input.

- 6. Make it rather obligatory or not with the help of "optional" switcher.
- Include the field (both title and response will be included) to client invoices if you need and if you use Accept payments custom feature.
- 7. If you wish to relate form with certain services, choose "Services, attached to this field" tab and check the boxes near corresponding services.

- 8. If you want to include intake form information to email templates, find the intake forms variables and add them to templates in Settings//Email and SMS settings.

Kiosk

The Kiosk Custom Feature allows you to accept bookings on your client booking site so in between bookings, data gets cleared. This makes privacy issues less of a concern.
You can set the time when the customer will be redirected to home page of the booking site or to the beginning of the services booking steps in case you use widget after he/she completes the booking or if the page is left inactive.
Please note! This feature is not compatible with Take me Back Home, Telegram Notifications and Online Video Meetings custom features.
- How to use
- 1. Enable this feature on your Custom features page, Other section.

- 2. Select if you wish to clear client data with each new booking, set redirect time for after booking completion and in case of inactivity on the booking site on the settings side of the page.

Save your preferences and you are done!
Limit Bookings
This Custom Feature allows you to restrict booking quantity which can be booked at the same time. This Custom Feature is useful when your services require additional things like dental chair or room in the studio etc. (Another way to restrict the number of bookings due to the limted resources is to use Related Resources feature instead). When the booking limit is reached the corresponding time interval will looks like breaktime at the booking page (and in the admin interface if you haven't set to skip this restrictions for admin). It is possible to limit booking number at the same time generally, and also you can set certain limit for each service separately.
For example, you have 2 providers and 1 room and both of your providers are available at 10.00.
Each of providers is set up to serve 1 person at a time and totally, 2 people can book service at 10.00.
But you need to limit that number to 1 person, because only 1 room is available.
You need to enable Limit Bookings Custom Feature and set it to 1.
In such way, when someone books 10.00, this time will be closed for another provider.
Please note! This feature is not compatible with Display Remaining Spaces
- How to use
- 1. Enable this custom feature on your Custom Features page.

- 2. Go to its settings on the right if you need to limit number of bookings at a time for the whole system.

- 3. Indicate the necessary amount in the corresponding box.
- 4. If you need to set the limit for certain service please navigate to Manage//Services(Classes) page, choose More options tab and set the desired number per service/class.

Line Bot

The Line Bot custom feature allows your clients to book your services via Line messenger and it also works in Line mobile app. The booking bot connects with your schedule at SimplyBook.me and guides your client throughout the booking process.
Supports service categories, multiple locations, intake forms, online payments(but taxes are not calculated), client login(but without client address).
Please note:
- In service/provider/category/location descriptions limited number of symbols can be displayed.
- In intake forms drop-down options no more than 20 symbols can be displayed.
- It is not possible to hide images on the booking steps.
- How to use
- 1. Go to SimplyBook.me admin side, custom features page and enable Line bot custom feature.

- 2. Navigate to its settings on the right.

- 3. Log in to LINE Developers page and create Provider following the instructions listed there.

- 4. Then create new channel, adding the necessary details, confirming them and agreeing to LINE Terms of Service and other required options.


- 5. An application will be created, please click on it to get to the channel credentials.
- 6. Switch to SimplyBook.me admin side tab with Line Bot feature settings and copy Callback URL from there.

- 7. Add this url to the Webhook URL box in Messaging settings section of LINE Developers channel page.

- 8. Enable Use webhooks.

- 9. Issue Channel access token (long-lived) and insert it to Simplybook.me feature settings to Access token box.

- 10. Proceed to Using LINE@ features section and disable auto-replies according to the following example.


- 11. Copy Channel ID and Channel secret and insert them to the corresponding settings boxes on SimplyBook.me side. Save settings.


- 12. After bot is approved from the LINE side your clients will be able to book using it. In the meanwhile you can add testers or try your bot using LINE mobile app.
Loyalty System
Let clients earn points for services/classes booking and allow them to redeem for gift cards. You can set different amount of points per each service/class and 3-4 hours after the meeting takes place the bonuses will be automatically added to the client's balance. As soon as the client gathers the necessary amount of points he/she will be able to exchange them for a gift card, which can be later used for another purchases on your booking website or as a present to someone.
Video tutorial ![]()
Please note!
- When you enable Loyalty System the following custom features will be enabled as well: Accept Payments, Client Login, Coupons & Gift Cards.
- The clients should be subscribed to your marketing materials to be able to receive such notifications.
- How to use
1. To enable Loyalty System please navigate to your Custom Features page, select Business enhancements section and click on Enable or use the switcher near the respective feature.

2. After it is enabled you can edit the related notifications templates right away, on the right side of the page. Please use the suggested variables if needed.
Two notifications types are available: for automated points addition and manual client balance update.

3. To set the points amounts please go to Manage -> Services (or use Services link near the custom feature) or Manage -> Classes (if you are using them and wish to be a part of the loyalty program).
4. Create new service/class if necessary or click on the existing one to edit, select Loyalty System tab.

5. Enable the switcher to connect the service/class to the loyalty system and indicate the amount of points the client will earn per this service/class booking in the box that appears. Save settings.

6. Then please go to Manage -> Coupons & Gift Cards page using the left-side menu, create a new gift card or click on the existing one to edit and choose Loyalty System tab.

7. Enable the switcher to allow the clients to buy this gift card for bonuses. Set the necessary amount to be earned in the box that appears. Save settings.

8. From the client side they can see the amount of the points earned as well as the bonuses usage history inside the client profile or go to the specific tab of the booking website.


9. As soon as the client has enough points the button Select by points becomes active on the Gift cards page on the booking website and such gift card can be purchased in exchange of these points.
As the result the client will get the gift card to his/her email or can copy its code in Gift cards tab -> Your gift cards and use as usual gift card for another purchases or make someone a present.

10. From the admin side you can also view all the points earning and spending in Reports -> Loyalty points report. Please use the filter if necessary to see some selected results, export the data to Excel or .csv.


11. With the help of this report you can also manually manage the points amounts per client.
Please click on the Add points button at the top, use the search box in the popup that appears to find the desired client, indicate the amountto be added or deducted in the Reward points amount box (to deduct please simply add "-" before the amount), add some description (it will also be reflected on the client side) and hit Add. The client will receive the notification about the balance update.

As well you can use the option Add more bonus to client in Actions per the specific report line for faster balance update as the client will be already preselected in this case,

12. In case you need to view the point history per the particular client please use Reports -> Clients and click on the highlighted bonuses amount in the table to get to the bonuses history popup.

Make me Look Busy
This feature will make slots look occupied when clients visit your site while still making availabilites so they will be able to find something to book. You can decide how many slots should be available every day.
Please note!
- This feature is not compatible with the following calendar layout types: flexible, flexible weekly and flexible provider.
- If you have enabled to show the booking website in client timezone and it is different from company timezone, it could cause more slots displayed per day than set in this custom feature settings.
- How to use
- 1. Enable this feature on your Custom Features page -> Booking Related section.
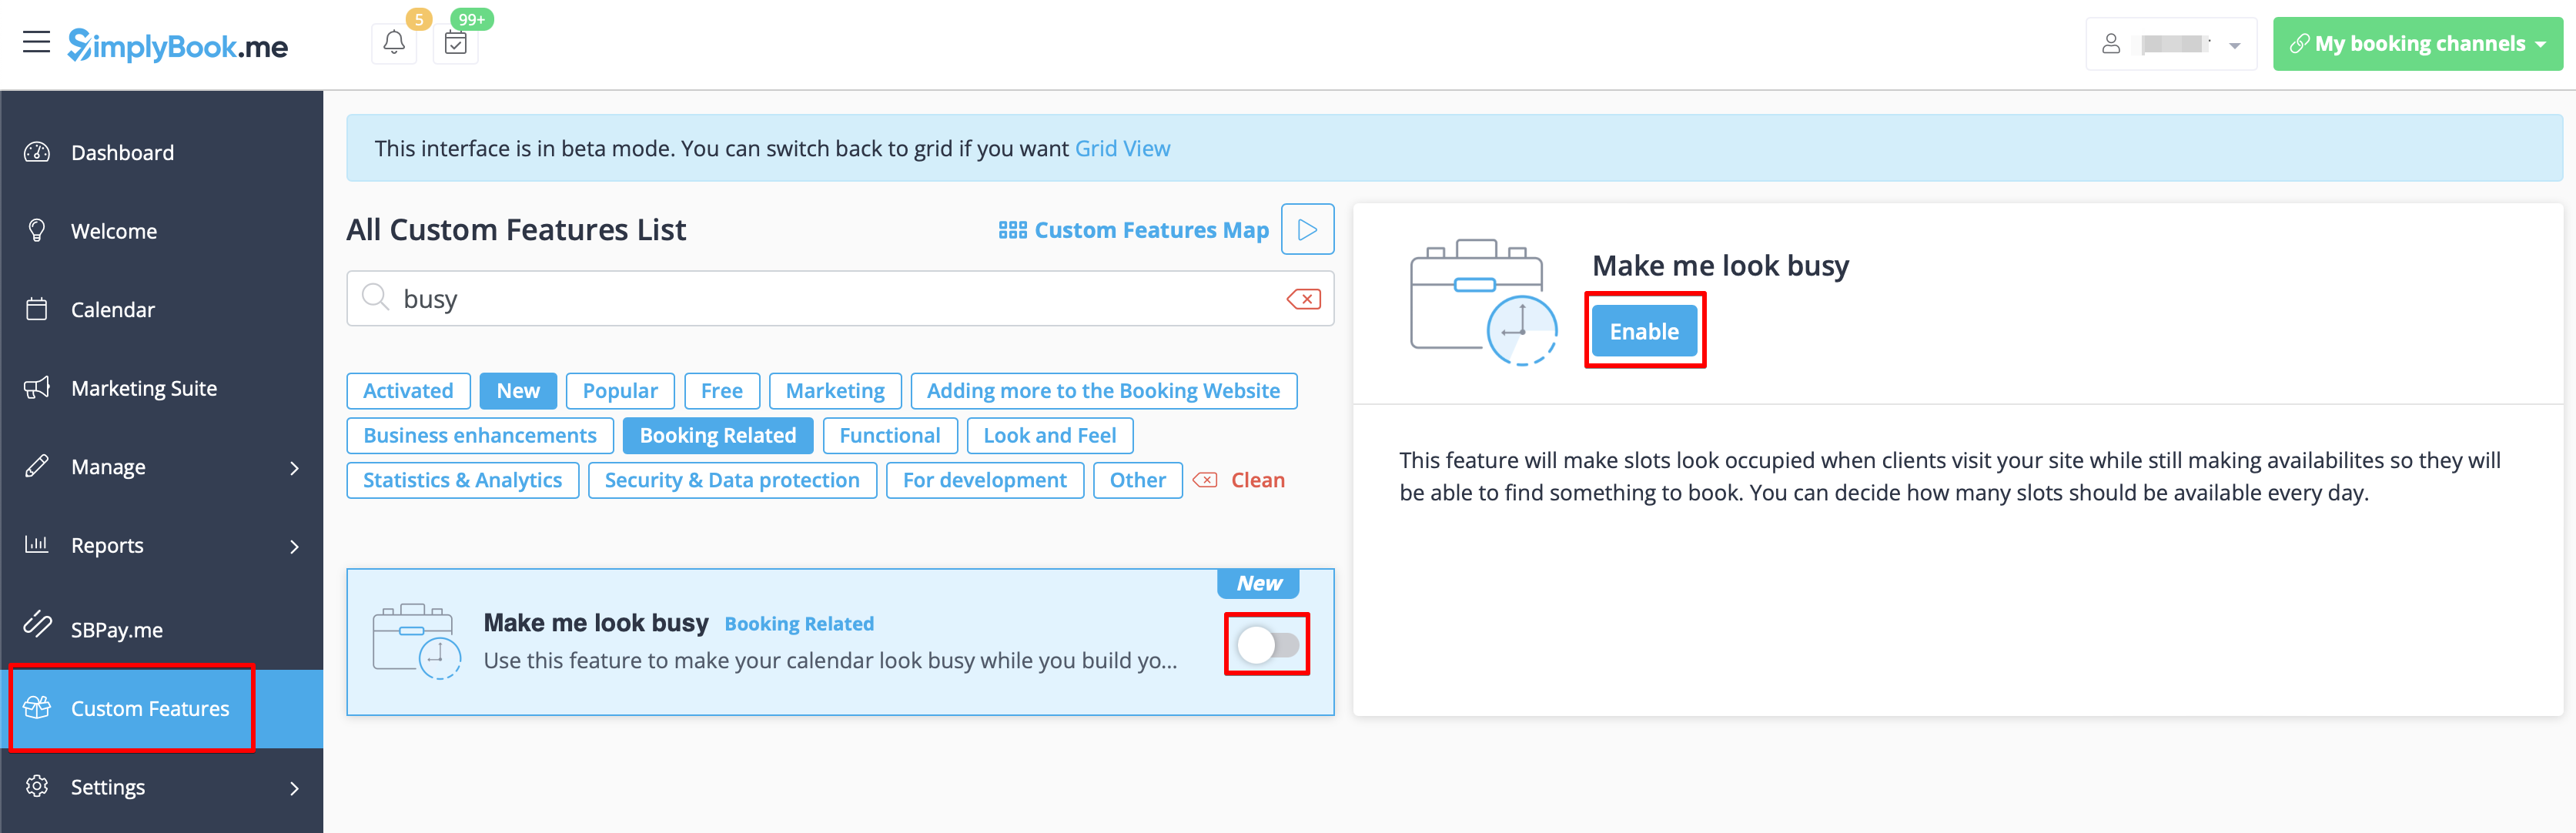
- 2. Indicate the number of timeslots you would like to show as available on your booking website per day.
- It is the number of timeslots to be shown per date per each service + provider pair.
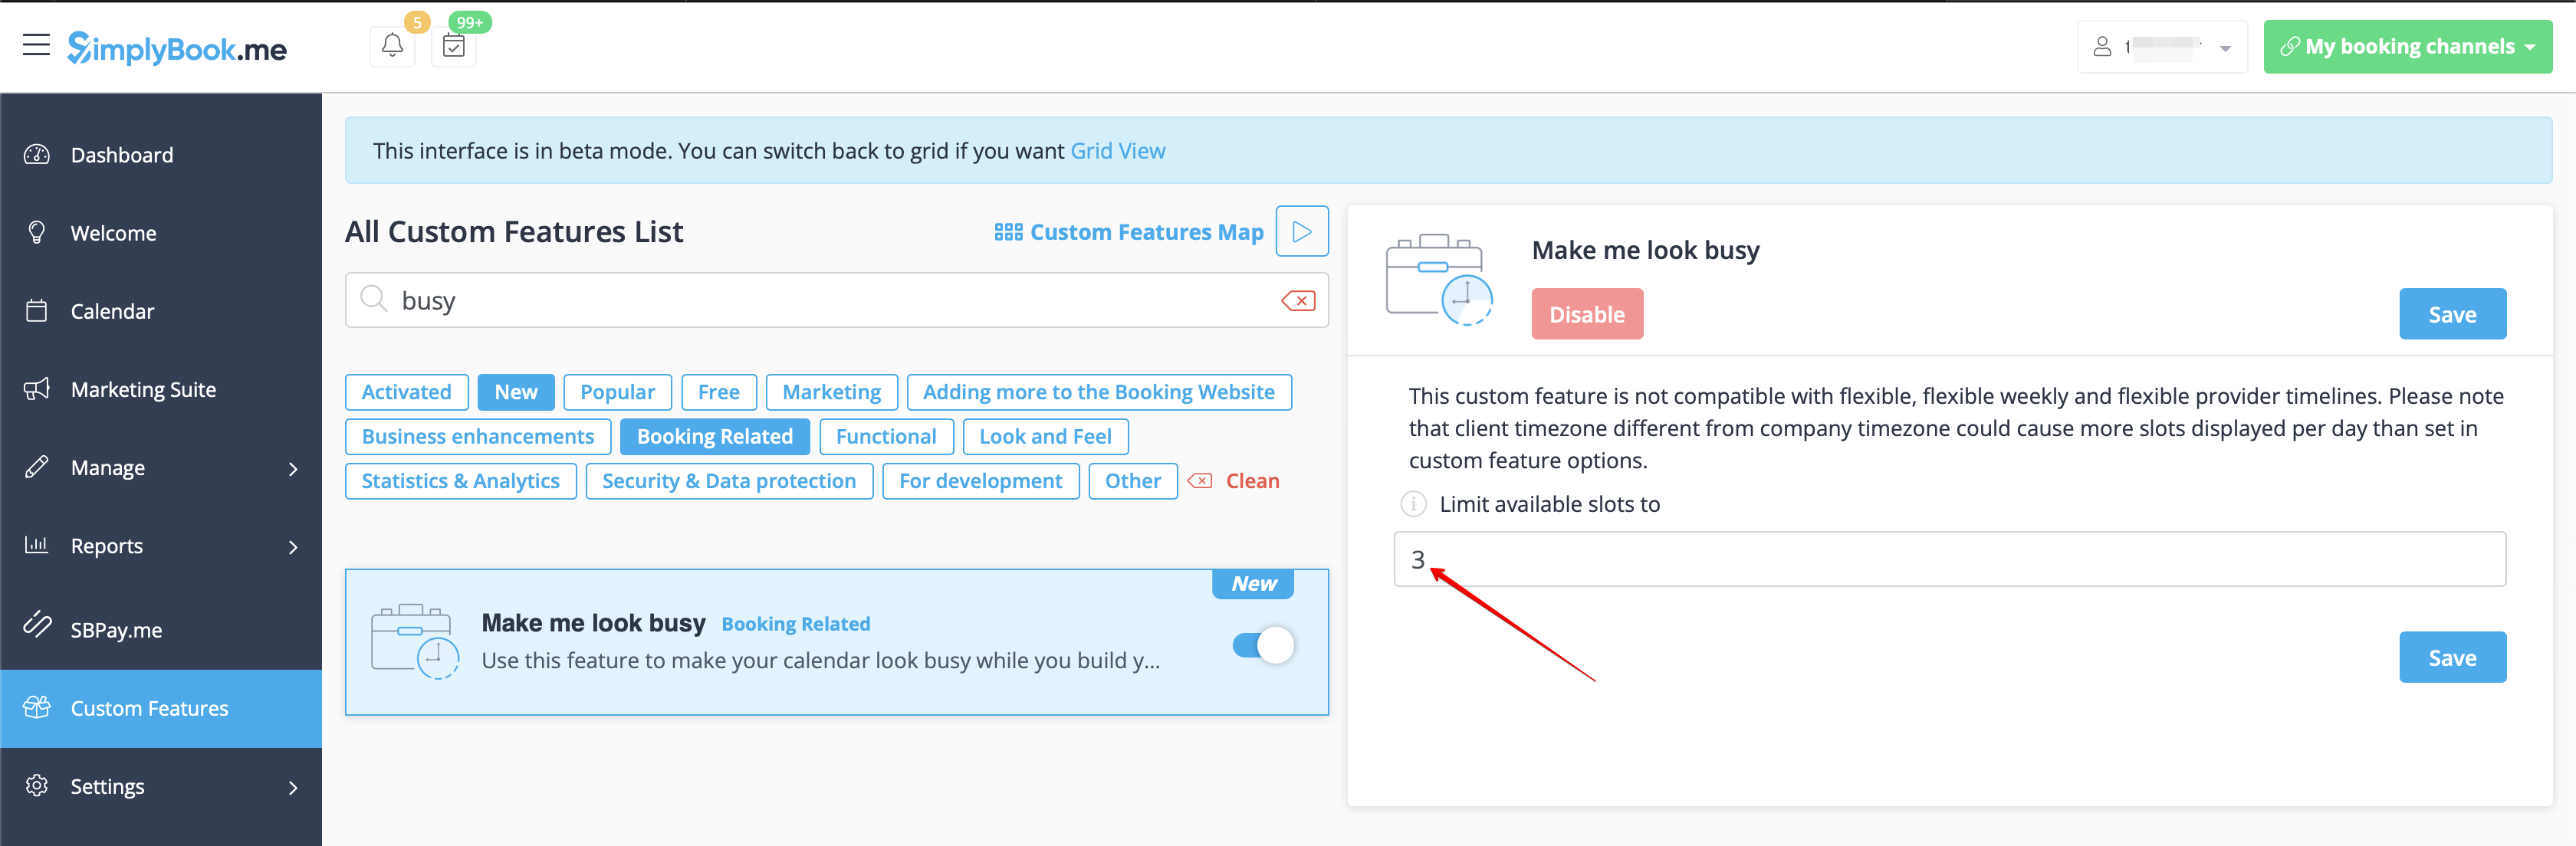
- 3. Here are some examples of how it may look on the client side.
- When some timeslot is booked the system will automatically open the next one depending on the scheduled that you have set in your account.
- modern calendar layout:
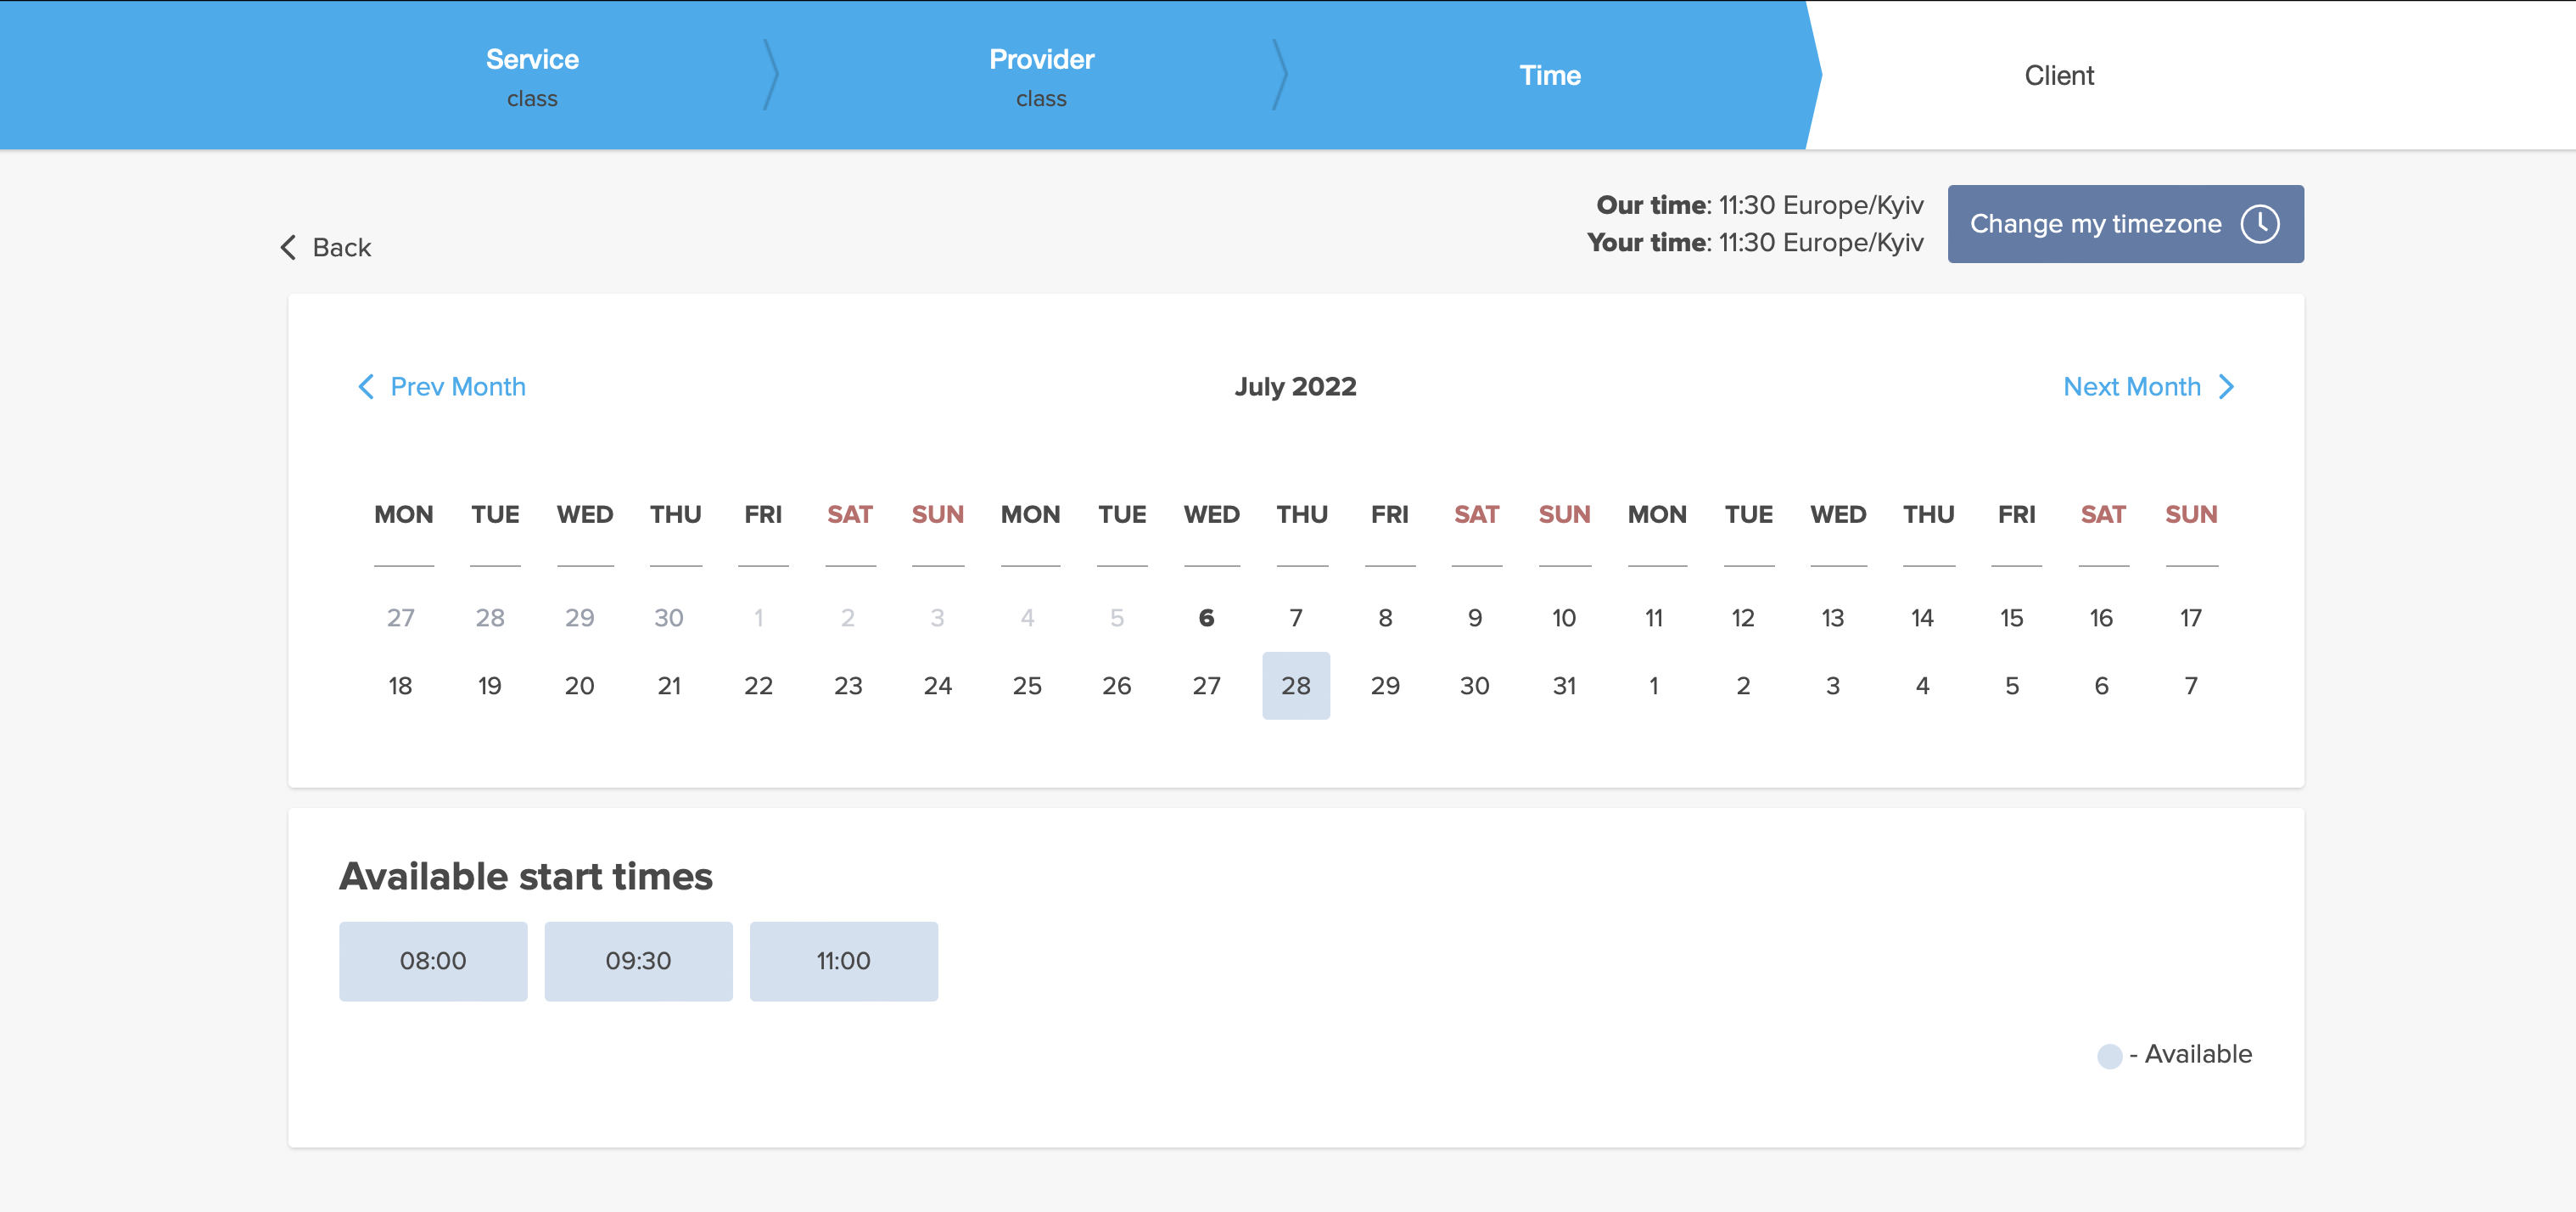
- slots weekly calendar layout:
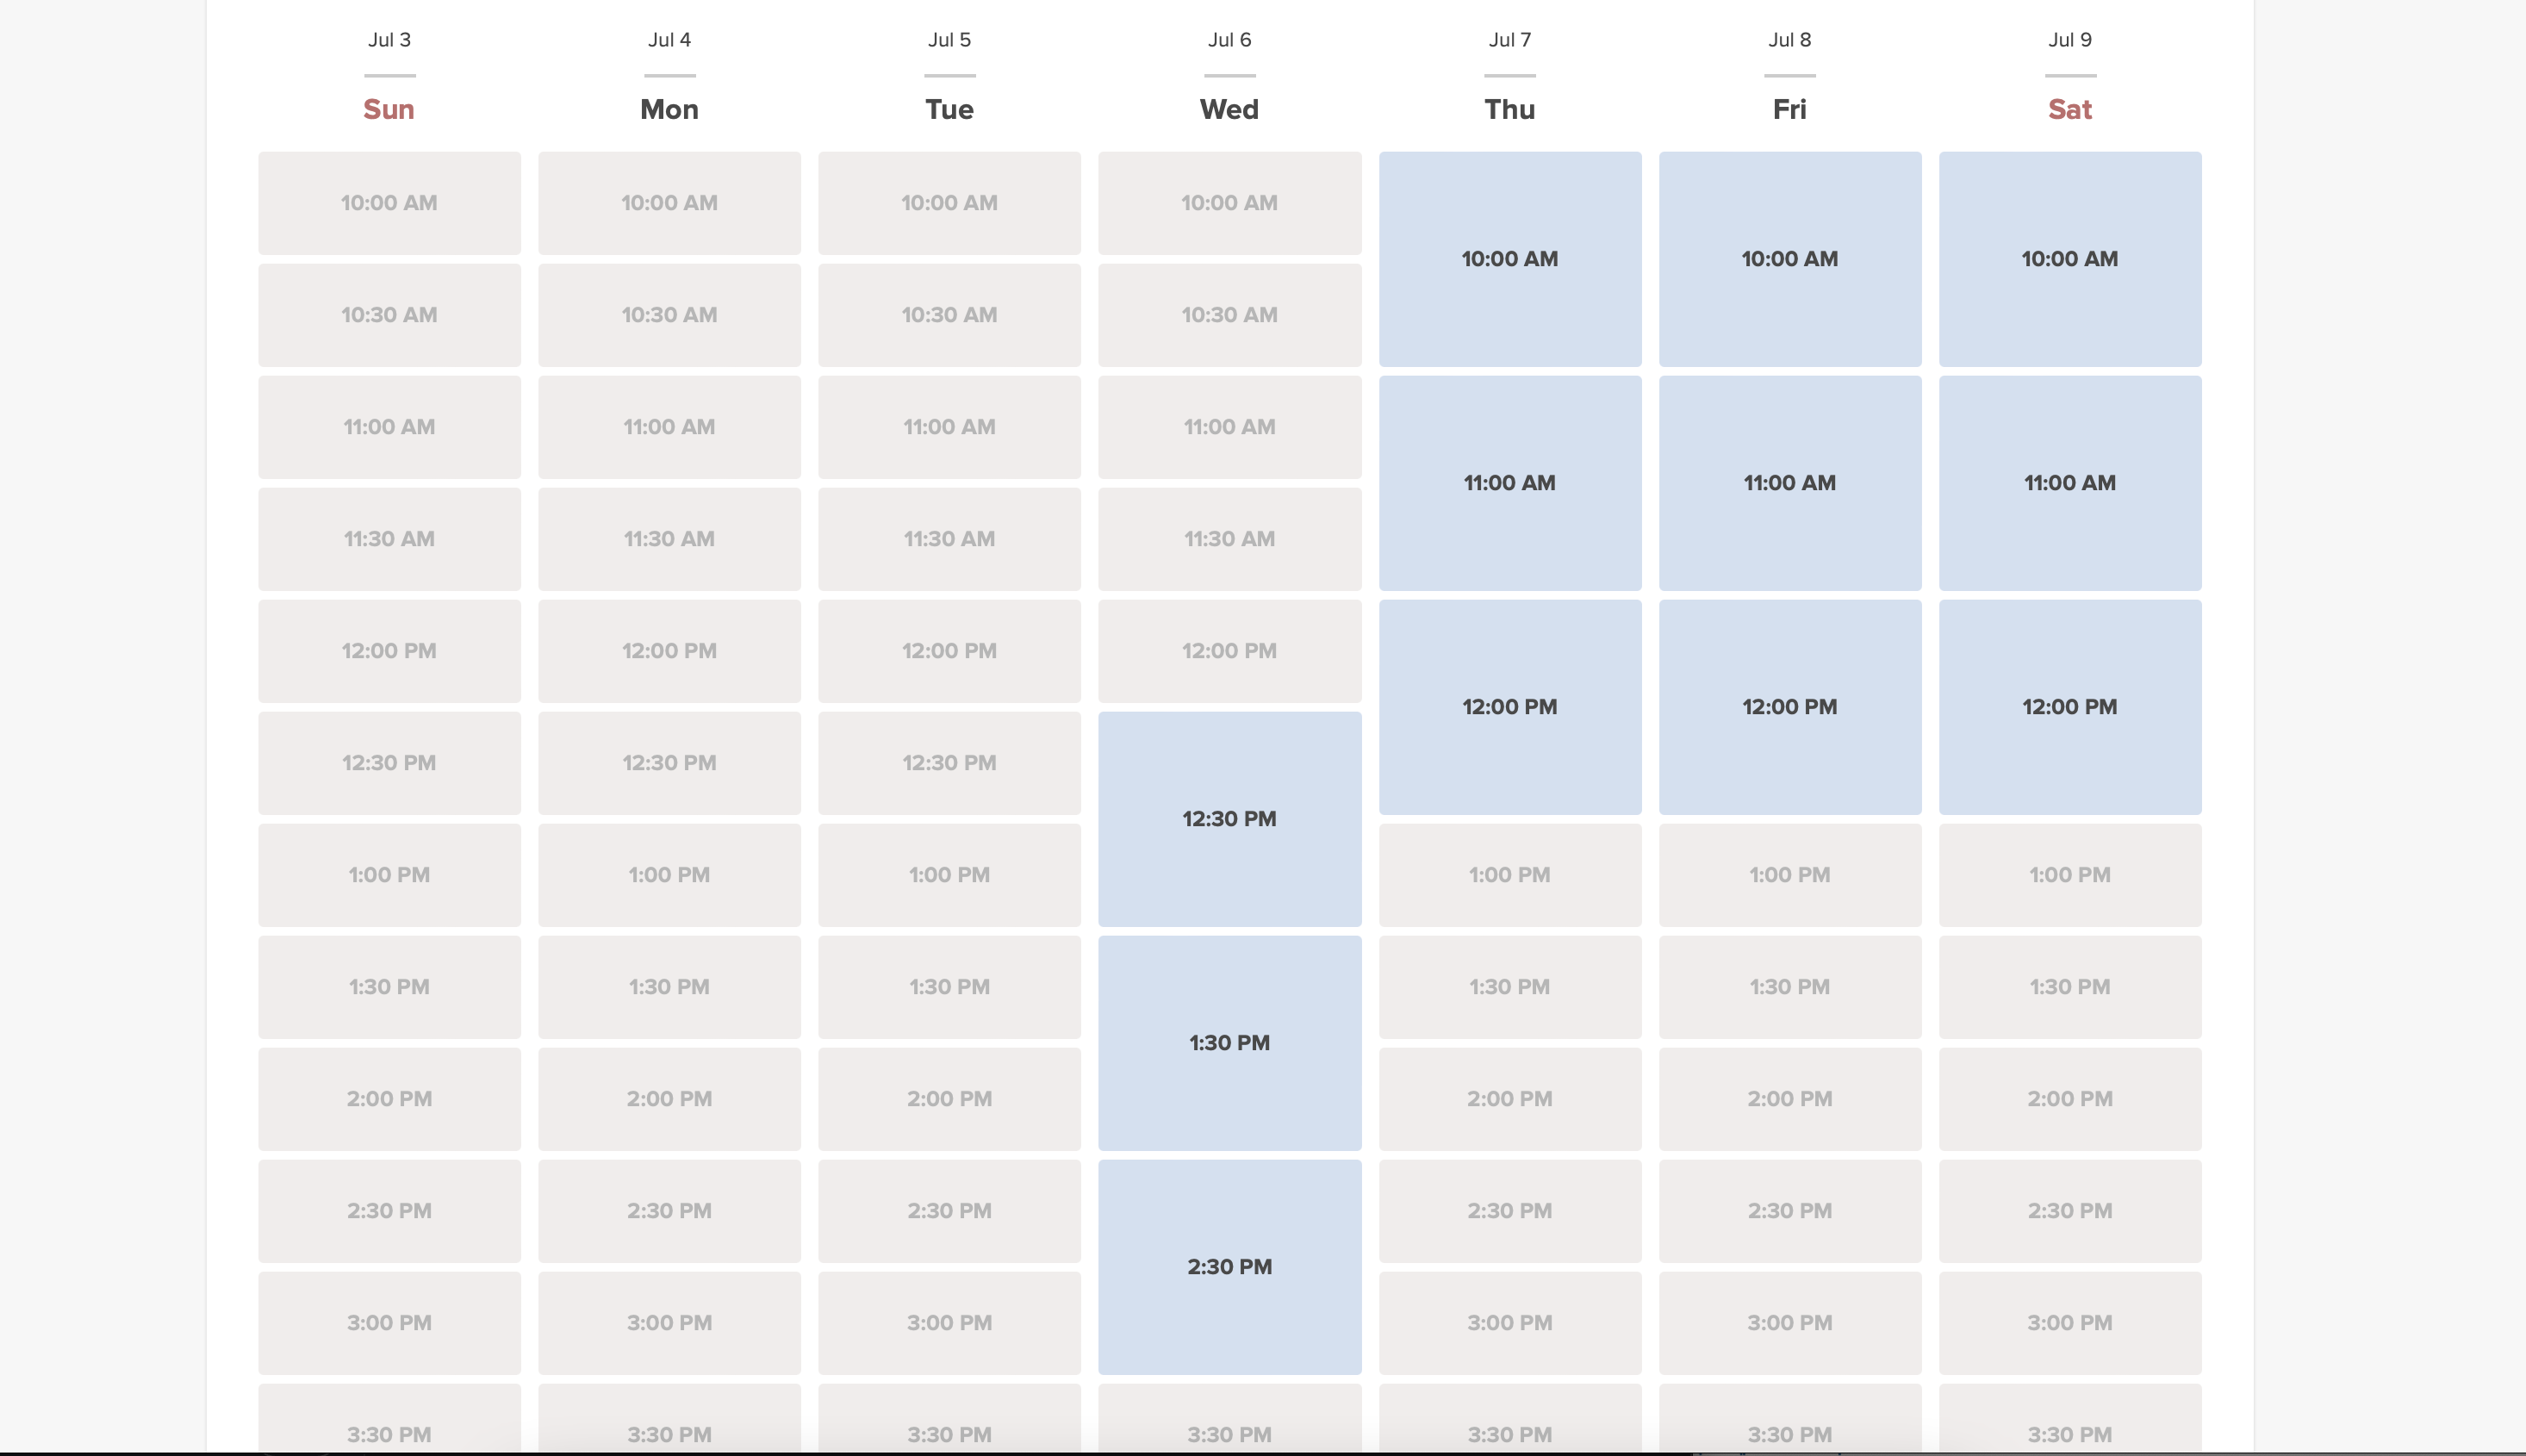
Medical Test
The medical test feature allows you to easily check in persons for testing, and send them access to results after their test results are ready. On arrival, their ticket is scanned and they get an arrived status. This ticket can be printed and put on the persons test tube. When the results are ready, the ticket can be scanned for quick processing of results that will be sent to a person via email and/or SMS. The results can be added in a message, or person can be asked to log in to their account on booking website to get the results and a downloadable PDF form with company branding.
Please note!
- When you enable Medical Test custom feature Tickets feature will be enabled as well;
- This custom feature is available with certain subscriptions only. Please check your plan details in your account Plans&Prices -> Subscriptions or contact support to check if it is included.
- How to use
- 1. Enable Medical test custom feature on your Custom features page, Other section(or use search there).

- 2. On the right side of the page select your preferences for results display.
- It is mandatory to either enable Client Login custom feature or Attach results as PDF to email option. Otherwise the feature will not work.

- 3. Select whether you would like your clients to be informed about certain test result and adjust the templates below.

- 4. Navigate to Results form to start working with the testing process by clicking on Validate ticket button on the Calendar page or by selecting Results form near this feature in the Custom features interface.

- 5. On this page you will see the ticket search form. Please use ticket or booking code to find the necessary appointment details.
- If you are using mobile browser and have allowed camera access you can also scan the client's ticket QR code.
- If you have admin mobile application please use QR scanning function there.

- 6. After the client has come for the test, you have scanned his ticket, please validate it to check in and the next possibilities to appear.

- 7. As soon as the test materials are taken from the client please press on Print label, print it(special printers are recommended) and stick to the test tube.
- The appointment will get "Work in progress - results not ready" status.

Test tube label example:

- 8. When you receive the results, open this interface again, scan the QR from the test tube label to find the appointment.

- 9. Select one of the three result options.
- As the result, the appointment status will be updated according to your selection.
- At this point the client will get the notification that the results are ready if you have it enabled in #3.

You can also print the test results if necessary.

- 10. All the tickets with the medical test result statuses are available for viewing and export in Reports -> Tickets report.

Membership
This Custom feature allows you to have services that only members can book provided they have an active paid membership. This can be applied to a selection or all services, only classes or similar.
Here you can check more cases when Membership can be useful.
Check video ![]() tutorial how to set it up.
tutorial how to set it up.
Demo page with Membership-related classes is available here.
Please note!
- This feature is not compatible with Clean History.
- Client login and Accept payments custom features will be automatically enabled as well.
- How to use
- 1. To enable this feature please go to Custom Features section using left-side menu of your admin interface, find Membership and click on Enable button or use the switcher.

- 2. Navigate to Manage -> Memberships or use Manage button on Custom features page near this feature to add new Membership to your system.
- Click on + on the page you see.
- Add membership title, set description, upload an image, select the desired duration and decide on the sessions limit included.
- If necessary define the fixed date when the membership should start, otherwise it either will begin at the day the client makes the purchase(default) or it will also be possible to select the start date from the client side.
- Restrict how many future bookings can the client make within the membership to reduce the risk that same client books all the slots if you wish.
- Set the membership price if needed.
- If you would like to allow the membership to repeat please enable Is recurring option there and set the recurring price (it can be the same or different from the first price).
- If necessary define the fixed date when the membership should start, otherwise it either will begin at the day the client makes the purchase(default) or it will also be possible to select the start date from the client side.
- Please note! Automatic membership renewal can work from client side via Stripe(previous integration) and Adyen payment processors only.

- 3. Don't forget to attach the membership to services/classes to restrict booking to the members only.

- 4. For sure, you will need to notify your clients about the membership purchase or send the information related to its renewal.
- To adjust your templates please navigate to Custom features -> Membership -> click on its name on the left to open right-side options and see the list of available notifications:

- You can use the variables to automatically add the corresponding information to each email/SMS notification.

- 5. (optional) You may need to issue membership to some clients from admin side if they have already paid or you have given them some free period.
- You can do that from the same Manage -> Memberships page by clicking on Issue membership button either near the membership name or in the top right corner of membership editing window.

- 6. (optional) There are several issuing options to choose from:
- - you can set membership start date(current date is set by default);
- - you can generate an invoice if you need it for accounting purposes;
- - you can issue membership without an invoice;
- - if you select issuing with the invoice and the membership is recurring it is possible to set manual or automatic recurring mode and set the number of times to repeat for the automatic one,
- so that the new invoice will be generated each time the membership is prolonged if auto-prolonging is enabled.
- Otherwise, an offer will be created in Reports//Payment transactions and the membership will be prolonged when you approve it or you can prolong it manually in Reports//Payment transactions//Recurring profiles.;
- Please note! There will be no charges made by us in relation to your clients' accounts, this option only prolongs the clients' memberships for the new periods.
- If you need to charge your clients please do it on your payment processor side.
- - as well you can choose several clients at once to issue the membership to.

- 7. When the memberships are purchased or issued there are several places to check the information related:
- - Reports -> Membership payments - contains the information of each membership period present in the system(each recurring period will be displayed as a separate row).
- You can cancel the specific client's membership here if necessary.

- - Reports -> Payment transactions -> Invoices - contains all the invoices present in the system, memberships included.
- Please note! If you delete the invoice related to some membership purchase the corresponding membership will be canceled.
- - Reports -> Payment transactions -> Recurring profiles - shows all membership recurring profiles created either by clients or from admin side.
- It allows to cancel recurring profiles(both made by clients and admin) or prolong the recurring memberships issued from admin side only.
- Please note! If one and the same client already has the recurring profile for some membership it is not possible to create new recurring profile for the same membership for this client.
- You can either cancel current recurring profile and create a new one or issue another membership to this client.


- 8. From the client side the clients will see memberships tab on the booking site
- with the list of all options you have set as available and the services related will have clickable "Subscription required" labels
- that lead to the corresponding membership purchase.

- 9. (optional) As well you can add custom membership widget to your website if necessary following these instructions.
Multiple Bookings
Allows clients to book more than one service before they check-out and pay for all booking with one payment. This Custom Feature adds "Add another service" button to the "Details" step on the booking page. This functionality allows clients to book several services/classes on different time or day of the week.
- Please note!
- "Add another service" button will not be shown if several participants are selected with group booking or if the service is recurring.
- This feature cannot be enabled together with Waiting List
- How to use
- 1. Enable Multiple bookings custom feature on your custom features page.

- 2. You can edit notification templates related on the right side of the page.

- 3. Here is how it will look like on the client side in one of the themes.

Multiple Locations
Allows creating multiple service locations and relating them with different service providers (staff members). Locations will be shown as the first step on the booking site.
How to use
1. Enable Multiple Locations custom feature in Custom Feature section//Adding more to booking website.

2. Add locations either in the settings of the Custom Feature or in Manage//Service Providers//Add location.

3. Click on "Location providers" tab for corresponding location and check necessary boxes to connect service providers with location.

4. (Optional) In Settings // General settings // Email and SMS settings insert the following variables into your email templates:

- [location] - value of field "Location name"
- [location_address] - value of field "Location address"
- [location_phone] - value of field "Location phone"
How to set schedule for location
You can set individual schedule for the provider and then relate provider to the location. Thus working hours of the provider related to location will automatically apply to location.
- 1. To set individual schedule for provider go to Settings//Service providers//Working hours, or to Manage//Service Providers//Service providers schedule and you can set opening hours, break times, and special days for this specific employees. Just take care that opening hours of employees must be within opening hours of company.
- 2. To relate provider and location go to Manage//Service Providers//Service provider's locations and check the boxes with location(s) provider should be related to.
'How can I relate service to location
Locations can be related only to service providers, thus if you need to relate service to the particular location, you need initially to relate this service to the service provider:
- 1. In Manage//Service Providers//Services, attached to this service provider check the boxes with services related to this provider.
- 2. In Manage//Service Providers//Service provider's locations and check the boxes with location(s) provider should be related to.
The example of client view

News
Give your website a fresh life by managing news on your main page in our booking system.
You can publish news or blog on your booking website to keep your customers up to date with what’s happening in the business.
- How to use
- 1. Enable this custom feature on your Custom Features page, Adding more to the Booking Website section.

- 2. Click on "Manage" near this option.

- 3. Create the posts on the page you see by clicking on "+" button.

Online Video Meetings
Use this feature to easily create meeting links for your clients and meet them online using video or phone
We also recommend enabling Client Login feature for the smooth client experience in joining the meetings as there may be errors if they try to join within a separate browser session.
Please note! This feature is not compatible with Kiosk custom feature.
Video tutorial available ![]()
How to set
- 1. Enable Online meetings custom feature in your SimplyBook.me account.

- 2. Login to Microsoft Azure portal and your Microsoft Teams account with the user that is a member of your organization in MS Azure.
- (Or create the accounts there)
- Please note! It is not possible to connect personal/private Microsoft Teams account to the system, it should be related to an organization via Microsoft Azure.
- 3. Add Microsoft Teams in MS Azure -> Azure Active Directory -> Enterprise applications.

- And add your user(or the desired one that you need to connect to SimplyBook.me) in Enterprise applications -> Microsoft Teams -> Users and Groups on MS Azure side.

- 4. On SimplyBook.me side please click on Meeting services block and choose Authorization near Microsoft Teams”.
- Connect your Microsoft account.

- 5. For the services/classes you wish to conduct online meetings switch the option Enable as online meeting service/class on in Manage -> Services -> click on service name -> More options
(in Manage -> Classes -> click on class name -> More options if you are using Classes feature)


- 6. When the clients book such a service/class there will be online meeting link on My bookings page for the associated booking. When the appointment time comes the clients will be able to follow it to access the meeting.
- For admin side it will be possible to follow the link from booking info popup form in Calendar or in Reports -> Booking details.


- 7. (optonal) You can add online meetings link to provider and client notification templates so that both sides receive them with the booking details.
To do that please navigate to Settings -> Email and sms settings (or Custom features -> Flexible notifications -> Manage if you have customized notifications per service and/or provider).

Additional steps for case when you need to allow your Providers to have own MS Teams account connection
- 8. By default your MS Teams account that you have connected in Step#6 will be used to generate meetings links and conduct meetings, but if you have several employees in your company, they are added to SimplyBook.me side as providers and users and you wish them to use own MS Teams accounts for their online services/classes please make sure that you have them added as users in MS Azure with access to this application as well as members on MS Teams side.
- (you can add users in MS Azure interface with internal domain or invite using existing email addresses)
- 9. Then they need to log in to SimplyBook.me system under their credentials and connect their accounts in Manage -> Online video meetings.

- 10. Once they have connected own accounts you will be able to see this information in Custom features -> Online meetings -> Meeting providers&Meeting services.
- Please note! It is only possible to manually start a meetings for the users that have admin, senior employee or junior employee(connected to specific provider) rights.

How the meeting process works
- 1. After everything is set up and the client books the online meetings related service/class both the client and the provider (or company, depending on your settings) will get the links to the meeting.
- Either from email notifications if you have added the corresponding variables to the templates.

- Or the provider can get to the meeting page right from the booking on Calendar while the client from "My bookings" tab of the booking site.


- 2. By default the meeting starts automatically for the both sides when the booked time comes.

- 3. As well the provider can manually start the meeting if necessary using the corresponding button.

- 4. After this the redirect to Microsoft Teams sofware takes place and all the participants can join.
- (It is not mandatory for the customers to have MS Teams account. To join they will only need to fill in their name after opening the meeting url in their browser)

Packages
With the Packages custom feature you can create a package of multiple services, or, if you also sell additional items, combine services with products, add-ons, and classes. Clients can buy packages on your booking page or with Simplybook.me’s POS feature. Each package can be defined with some general items limit and any number of services and products, and you can set the validity to any period available. Once clients have purchased a package, they can book a service at any time paying with their package credits. They can always check how many occurrences are left within each package.
- Please note:
- as soon as you turn this custom feature on, Client login and Accept Payments features will be enabled as well.
- if the appointment that was purchased with the package credits is then cancelled the credits are not returned to the client's balance.
Video tutorial available ![]()
How to use
- 1. To switch this custom feature on, please navigate to your Custom Features page, go to “Booking related” section and click on “Enable”

- 2. Then choose “Manage” option either near the custom feature or navigate to Packages in Manage section of the left-side menu.

- 3. Just click on “+” button to create a new package. The form will appear on the right side of the page.


- 4. Insert package name, add a description (you can even use HTML formatting for a better look) and image.
- At this point you can also set the package price: you can specify the defined pack cost (if you want to make a discount, for example) or
- skip price box to later calculate the total amount of all the elements included into the package.
- Please note, it is not possible to create a package without a price.


- 5. Define the validity period of the package,
- enable and set the general limit for the included items(optional, will be applied to services, add-ons and products connected to the package)
- and set the number of sets available for sale (unlimited by default).


- 6. Proceed to adding services, products and add-ons to the package
- (you still need to set them in addition to the general limit if you use it to include the desired items into the pack, otherwise it will not be possible to use the package during the service/class booking process).
- You will see three corresponding sections below.


- 7. Please select “Services” section, check the boxes with the necessary items and set the quantity that will be available for booking within the package.


- 8. If you are using Products for sale and/or Service Add-ons features simply select the corresponding tabs and add elements the same way.


- 9. After you have added all the options and if you have not set a package price yet, get back to the “Details” tab and use “Calculate price” button to make the system automatically sum up all the elements prices for you.


- 10. Now you can click on “Save and issue package” to issue it to certain customers or simply save everything and allow your clients to buy this package on your booking site.

- If you assign a package from admin side or the client buys a package on the booking site he/she will receive package activation notification
- The invoice will be sent only in the case of the purchase and payment made from the client side.
- 11. Go to Reports//Issued packages to check packages order history, customer data, as well as the number of remaining items.
- Use filters for more extensive analysis.
- Here you can also cancel the package for the specific client if needed.


The use of Packages within the POS feature
- 1. Make sure you have enabled POS custom feature.

- 2. Go to POS interface, click on “New sale” button.


- 3. Select the client on the right side of the page to make the "Package" button active.


- 4. Pick the item and define the start date. End date will be automatically set based on the package duration after you save the selection.


- Please note, if the package is hidden from the booking page it will be still available within POS interface as it is part of admin side visible to POS user.
- 5. Proceed to checkout after you have added all the necessary services/products/add-ons/memberships/gift cards to the cart.


- 6. You may have a client who has already purchased a package before and wants to use it.
- You will be able to see if there is an applicable package after the necessary services are already added to cart.
- Then you will be able to click on “Use packages” button so that the items selected will be fully or partially paid with this set during the checkout.

Booking site operation
- 1. The clients will be able to navigate to the “Packages” tab on your booking site.
- Please note, the client must be logged in to see his/her purchases.


- 2. They will find a suitable set, choose a start date and buy the package.


- (if they select “pay later” option during checkout you will need to approve their purchase from admin side first. Then they will be able to book/buy the items included)
- 3. When the client has already the purchased package and books the separate services/products/add-ons, he/she will be able to cover those items with his packages’ credits (if included in packages) or pay for them in a regular way.


Password Security Settings
The Password security settings Custom Feature allows to define password requirements for system users and clients. This can further harden the system for possible intrusion. Just in few steps you can make your system more secure!
Free custom feature!
- How to use
- 1. Enable Password Security Settings option on your Custom Features page.

- 2. Go to its settings on the right side of the page.

- 3. Now you can set requirements for password for your system users in the left-side block.

- 4. (is skipped if you are already using Client Login Custom Feature) If you wish your clients to be able to log in securely please enable Client Login option there.

- 5. Set up password requirements for your clients in the right-side block and save settings.

Photo Gallery
With Photo Gallery custom feature you can upload the photos of your services to attract more clients. Simply browse photos and they will appear on your booking page.
- How to use
- 1. Enable Photo gallery option on your Custom Features page.

- 2. Click on "Settings" near it.

- 3. Upload the images on the page you see, add descriptions if necessary and they will appear in the separate tab on the booking site.

Point of Sale
Point of Sale Custom Feature allows system users to create and track sales of bookings, and to sell memberships, products and gift certificates to existing or new clients. You can check client's history of purchases, approve pending transactions and print invoices. All in the neat mobile friendly interface!
Please note! Accept Payments Custom Feature will be enabled as well when you switch PoS feature on.
Why you should use The Point Of Sale System ![]()
Video tutorial ![]()
- How to use
- 1. Enable Point of Sale Custom Feature on your Custom Features page, “Other” section.

- 2. Click on “Go to POS” near this feature or in top right corner of your admin interface under "My booking channels".

- 3. You will see sale start page. (If you need to return here at some point please use “Home” icon in the top left corner.)

- 4. By default guest client is selected, but you can select a client from already existing ones in your system.

- 5. Or add new client directly from POS interface.

- 6. Select “New Sale” option to sell service/membership/package/product/add-on.


- 7. If you have selected service option new booking will be created. Please choose which service/class, provider, date and time do you wish to book. Add product(s), add-on(s) if necessary and click on “Save”.

- 8. On the next step you can add more options to the cart(left side of the page) or confirm all the selections by clicking on the “Checkout button”(right side of the page).

- 9. Select payment method to confirm the order.

- 10. If you have chosen “Credit card/Wire transfer/Cash” the order will be automatically confirmed meaning that you have received the money using the options mentioned.
- If you have selected “Pay later” the order will be displayed as “pending”. You will be able to click on “Checkout” once more and select another payment method to confirm the sale.


- 11. You can go to “Home” page and use filters to see today/upcoming/expired/non-booking/pending/paid, etc. orders. It is possible to click on the order to see the details/print the invoice.

Products for Sale

When your clients are booking the services they will be offered to add relevant products to their purchase. Someone buying a haircut could for example be offered to buy hair gel at the same time.
Use this to your advantage to sell more!
- Please note! This custom feature cannot be used without Accept Payments custom feature, that is why this option will be automatically enabled as soon as you switch on "Products for sale".
How to use:
- 1. To enable this option please go to your Custom Features page and click on “Enable” near “Products for sale” option.

- 2. Click on “Manage” button that will appear there or select "Manage// Products for sale" section and you will get to a page where you will be able to create all necessary products.

- 3. Click on “+” icon to create new product, set its name, image, description if necessary and price.
- Please note! It is not possible to create free products, each of them needs to have some price added.

- 4. To relate the product with particular service(s) please use “Connected services” tab and check the boxes with desired services/classes.

- 5. You can also make product to be selected by default on the booking page and set default amount that will be displayed to clients.
- Please note! The clients will be able to adjust amount to their needs on the booking site or uncheck this product.

Here you can see how the products can look like on the booking page:

Correlation with other custom features:
1- Group Bookings. Number of items is multiplied to number of participants selected.
2- Multiple bookings. Products are selected separately for each booking.
Can I add the items that clients has selected to notification templates?
Sure, just add [products] variable to all necessary templates in Settings//Email and SMS settings and the list of products will be included to corresponding notifications

Provider's Color Coding
Some users like to simplify the dashboard view by having providers with certain colors. With this Custom Feature, you can give each of your providers their own color so when you quickly glance over the dashboard, it can be easily seen what bookings belong to each provider.
- How to use
- 1. Enable this option on your Custom Features page.

- 2. In Manage//Providers//More options//assign color to each provider to make them easily distinguished in the calendar.

- 3. As the result you will see bookings in corresponding colors on your Calendar page.

- If you are also using Status custom feature that also influences appointments color on the calendar page,
- the providers' colors will be represented by colored circles in the top right corner of the booking block.

Related Resources
Connect equipment, rooms or anything else that is limited in quantity to a service. Different resources can be connected to the same service when needed.
- How to use
- 1. Enable Related Resources feature on your custom features page.

- 2. Select Manage option or navigate to Manage -> Related resources using left-side menu

- 3. Create resources group(s) depending on your needs using + icon there.
- You can select between:
- Same number as clients type - with this group all the resources you attach to a service will be required for each booking. If the number of resources is not enough for a certain timeslot, it will not be displayed on the booking site. This type may be useful when some limited equipment is required to perform the service.
- Only one type - with this group it is possible to accept multiple bookings per timeslot(it will depend on the number of clients set per provider and/or limit bookings feature settings). It can be used for a room reservation for classes as if, for example, you have one room but two classes so that one class should become unavailable if another one gets a booking. In this case, the clients will continue making bookings for this another class according to the number of spaces you have indicated for it.
- Please note! It is recommended to use Appointmet at fixed time feature with this resource type so that the timeslot will always correspond to the reserved room/resource, etc.
- Same number as clients type - with this group all the resources you attach to a service will be required for each booking. If the number of resources is not enough for a certain timeslot, it will not be displayed on the booking site. This type may be useful when some limited equipment is required to perform the service.

- 4. It is important to attach resources to services/classes so that they will influence the booking process. Otherwise, the resources will not add any restrictions and will not be used.

- 5. If you got more resources of a certain type you can add items to the particular resource group.

- 6. In case you have less items in your inventory than it was created initially you can remove unnecessary ones from the group using mass actions.
- If certain service was connected to resource that was deleted such service may become unavailable on the booking site.
- In this case you need to update its relations towards other resources present in the system.

- 7. The clients do not select the resource during the booking process, it is allocated by the system automatically depending on the service and provider selection.
- You can view the resource used for the appointment from the admin side in each booking or in exported .xls file from Reports -> Booking details.

Service Add-ons

You can create add-ons for selected services. These add-ons can be set to influence service duration or not, but the service anyway becomes more expensive.
An example may be a massage, whereas the client could choose to add the luxury oil that costs more during massage.
Use this to your advantage to sell more!
- Please note! This custom feature cannot be used without Accept Payments custom feature, that is why this option will be automatically enabled as soon as you enable "Service Add-ons".
- Video tutorial available
How to use:
- 1. To enable this option please go to your Custom Features page and click on “Enable” near “Service Add-ons” option.

- 2. Click on “Manage” button that will appear there or go to Manage -> Service Add-ons section and you will get to a page where you will be able to create all necessary items.

- 3. Click on “+” icon to create new add-on, set its name and price.
- Please note! It is not possible to create free add-ons, each of them needs to have price added.
- Add the desired duration if you need it to influence the overall appointment time.
- Upload the image and set description is necessary.

- 4. To relate the add-on with particular service(s) please use “Connected services” tab and check the boxes with desired services/classes.

- 5. You can also make add-on to be selected by default on the booking page
- Please note! The clients will be able to to uncheck this item if they wish to on the booking page.

- Here you can see how the add-ons can look like on the booking page:
- Please note! We recommend using the following timelines in case you set service add-ons with duration: modern, slots weekly, flexible, flexible weekly or flexible provider.
- In this case add-ons step will be shown before time step and the timeslots displayed should suit the items selected in most cases.

- With other timelines such as: daily classes, weekly classes и modern provider this step will be shown after time selection step and
- if all the selections do not fit the choices the clients will get an error that the service cannot be booked.

Correlation with other custom features:
1- Group Bookings. Number of items is multiplied to number of participants selected.
2- Multiple bookings. Add-ons are selected separately for each booking.
Can I add the items that clients has selected to notification templates?
Sure, just add [attributes] variable to all necessary templates in Settings//Email and SMS settings and the list of products will be included to corresponding notifications

Service Categories
With the help of this Custom Feature you can create categories and group your services to make it easier and faster for your clients to find the necessary service.
- How to use
- 1. Enable Service Categories custom feature in the Custom Feature section//Adding more to booking page.

- 2. In Manage//Services click on "+" and choose "Add category" to create all necessary categories. Insert title, picture, description and assign services to category.

- 3. Click on "Category details" tab of the category to edit any information. To connect services please choose "Category services" tab and check corresponding boxes.

- 4. Here you can see how categories can look like on the booking page using one of the themes avilable.

SMS Gateway

Use the SMS Gateway custom feature to use your own SMS gateway (Twilio, Vonage(Nexmo), BulkSMS, HISMS, Websms, Infobip available only) and use your own phone number as sender number. If you use this feature, you pay the gateway directly saving around 20% to 30% compared to when you buy SimplyBook.me credits.
IMPORTANT! Setting this up requires some technical knowledge and the SimplyBook.me team can not help with account creation at the SMS gateway providers.
How to use
- 1. Enable Sms Gateway Custom feature in Custom features//Other section at one-time activation fee.

- 2. Create an account with one of available sms gateways: Vonage(Nexmo), Twilio, BulkSMS, HISMS, Websms or Infobip if you do not have one yet.
- 3. Go to settings on the right side of the SimplyBook.me Custom Features page for “SMS Gateway” custom feature.
- 4. Choose the sms provider from “SMS Gateway” drop down and add corresponding credentials for the selected gateway below.

- 5. Save settings and it is all done!
- Please note! If this custom feature is enabled and set correctly you do not need to purchase sms credits from our side.
- You will be able to see sms being sent from the system in Reports//Sms report with 0 as credits amount in this case.
- Troubleshooting:
- Sms credits are charged from my account:
- SMS Gateway Custom Feature is not enabled
- SMS Gateway processor settings are not added.
- Sms are not sent from the system
- SMS Gateway settings are not added correctly.
- There is no sms credits on your balance.
SMTP
It allows you to use your own SMTP server so all emails sent from the SimplyBook.me system on your behalf, come from your own email address.
- How to use.
- 1. You can enable this Custom Feature in your Custom Feature section

- 2. Go to its settings on the right.

- 3. And add your SMTP server details there. Save settings.
- Remark that if you have a gmail address or g-suite email, you can send up to 1.000 emails per day through that address.
- If you send more than 1.000 notifications/promotions per day, you can look at other smtp services like sendinblue.com, sendgrid.com, mailjet.com, or authsmtp.com.
- Please check video tutorial here.
- For added security, you can setup double authentication for the email that you plan to use.
- Here you can check instructions how to use application password for double-step authentication.
How to store a copy of outgoing emails in your Gmail:
- 1. You need to log into your Gmail or Google Apps email Settings and Click on the Forwarding/IMAP tab and scroll down to the IMAP Access section.
- 2. Please set the IMAP as enabled in order for emails to be properly copied to your sent folder.
SOAP with Encryption

Need patient information to be more securely stored? SOAP (subjective, objective, assessment and plan) with data encryption feature allows to insert time-stamped record with 4 encrypted text fields that stay with client data. Sensitive medical data of your clients will be secured with RSA 4096.
How to use
- 1. Make sure that you have simple SOAP custom feature disabled(as they are not compatible)
- 2. Then please go to Custom features page using the left-side menu of your admin interface, use searchbox at the top or choose “Other” category.
- And click on “Enable” near “SOAP with data encryption” option.

- 3. Please choose “Settings” near it to generate the keys and setup encryption.


SSL
Make all client's connections with the server through a secure layer.
It is important to have it enabled for some payment processors and widgets.
Free custom feature!
- How to use
- Just enable it on your Custom features page and you are done!

SSO: SAML
This custom feature allows to setup Single Sign-On process for you as the system admin and your account users thus enabling login to SimplyBook.me system from MS Azure applications panel. You can create users in MS Azure within the desired access level groups and the corresponding user types will be added in your SimplyBook.me system on the first login.
- How to use
- 1. Create account at Microsoft Azure if you do not have one yet.
- 2. Enable SSO: SAML Custom feature on your Custom features page .

- 3. Navigate to Manage to edit the connection settings.

- 4. Click on Microsoft Azure Configuration on the left and log in to your MS Azure account there to start connection setup.
- Please note! You need to have administrator access in MS Azure as well to be able to connect applications.

- 5. After successful login you will see the first block with basic options on SimplyBook.me side.

- 6. In MS Azure please navigate to Active Directory.

- 7. Select Enterprise applications in the left-side menu and add new application.
- (you may need paid MS Azure or Premium trial subscription there to add applications)


- 8. Choose non-gallery type. Add its name and save.
- 9. On the next page click on Set up single sign on and select SAML.


- 10. Use Pen icon in Basic SAML Configuration block to edit.

- 11. Copy the urls from SimplyBook.me SSO: SAML feature to the corresponding boxes on MS Azure side. Save.

- 12. On MS Azure side scroll to SAML Signing Certificate part and download Certificate(Base64). Open it with notepad or similar text editor, copy the certificate code and paste it to the corresponding box into SSO: SAML Custom Feature.


- 13. Scroll MS Azure side page to Set up For tutorial block and find Login URL, Azure AD Identifier and Logout URL options, Copy each of them and paste to the corresponding boxes on SimplyBook.me side.

- 14. Go to User attributes and claims block on MS Azure side and click on Pen icon to edit it.

- 15. For Unique User Identifier(click on it to edit) please set user.mail variable as Source Attribute. It is the parameter that will allow us to differentiate between different user logins.


- 16. For additional claims please add Groups option using Add group claim and Email and Name with Add new claim buttons correspondingly.
- You can also add phone and last name if you need. See claims setup example below.

- 17. Copy the claims titles to the corresponding boxes on SimplyBook.me side.

- 18. Navigate to Azure Active Directory homepage and go to Users section, create all users that you would like to access the system if they are not created yet.

- 19. In Groups create groups that will correspond to SimplyBook.me user types. For example, Admins for admin level users, Senior Employees for Senior Employee access, etc.
- You can create only one group if all your users have admin access, for example.

- 20. Add users to the corresponding groups.

- 21. Make sure each group contains the corresponding memberships.

- 22. Copy each group Object ID to the corresponding box in User Group matching settings on SimplyBook.me side.
- (If you have only one group for admins insert same object ID everywhere in that block). Save settings.

- 23. Once the users are given the access to Applications dashboard they can log in to SimplyBook.me with their access level by a click on the SimplyBook.me application icon.

- The corresponding user types will be added automatically to your SimplyBook.me account with the data passed according to your settings.
- Please note!
- It is not possible to connect existing SimplyBook.me side users to MS Azure users.
- For such users it is not possible to reset SimplyBook.me passwords, edit access level, username, access personal data report.
- They need to contact MS Azure administrator if they loose access to applications page or contact SimplyBook.me default admin to request personal data report.
- If you need to restrict access for such users you can remove or block them on MS Azure side.
- If you change the group the user is included to on MS Azure side or remove the user there the access level will be updated on SimplyBook.me side within several minutes or the user will be logged out.
Status
If you have a company with many providers, and a service desk accepting clients you can add status possibility to events to see the status. This is for example used to mark appointment with one status as "client has arrived", and then another as "Client has left and paid" whatever suits your needs.
- How to use
- 1. Activate this custom feature in the Custom Features section//Booking related.

- 2. Go to the settings of this custom feature by click on "Manage".

- 3. Press "+" to add new status.
- Insert "Name", "Description" and assign the color to this status. If you leave the switcher "Status by default" on, such status will automatically apply to all new bookings.

Take Me Back Home
The Take Me Back Home Custom Feature, allows you to bring clients back to your home page or selected URL after a booking has been performed on the booking page. Clients can press a link or they will be brought back to your homepage after 10 seconds by a redirect script.
Please note! This feature is not compatible with Kiosk custom feature.

- How to use
- 1. Enable Take Me Back Home in the Custom Features section//Look and Feel.

- 2. Go to its settings on the right.

- 3. Insert the link where you want your clients to be redirected, write a text for this link.
- Also add the link where you want your clients to be redirected for mobile version and add its text.
- 4. Enable or leave disabled "Enable auto redirect to your site". If enabled, it will redirect your clients automatically to the page you indicated in the "link to your website" filed in 10 seconds.
- 5. Write auto redirect text that will be displayed in case the option "Enable auto redirect to your site" is enabled(please note! do not change "%s" part for correct timer work).
Telegram Notifications
This custom feature allows you to create your own notifications bot in a few simple steps. As the result each customer will have an option to subscribe to your bot notifications and get messages about the appointments, invoice details, tickets and much more.
Video tutorial available ![]()
Please note!
- This functionality supports only booking related notifications.
- This custom feature is not compatible with Kiosk
- How to use
1. Enable Telegram Notifications on your Custom features page -> Other section.

2. Navigate to helper bot BotFather using the link in the instructions on the right side of the SimplyBook.me page.

3. Start the setup process in the BotFather bot and select /newbot option, follow the hints there: add the desirable name and username.

4. Copy the token from the result message.

5. Paste the token to the corresponding field in your SimplyBook.me account -> Custom features -> Telegram notifications. Save settings.
The page will show that the bot is connected to your account.


6. To enable the notifications for you as a user please use top left notifications bar, click on the Telegram icon and follow the steps from the popup:
you will need to navigate to the bot, choose "Subscribe" option from the menu and insert the security code.

7. The clients will see the invitation to subscribe to the notifications on the booking confirmation or payment page and will be able to follow the similar steps.

With the help of this notification bot it is also possible to see the information about the company and the list of upcoming bookings(their number is limited to 21).

The booking notifications texts depend on the templates you set for SMS notifications either in Settings -> Email and SMS settings or in the specific custom feature settings (i.e. Multiple Bookings, Group Bookings, Flexible Notifications).
There you can select the desirable variables to be used and adjust the wording if necessary.

In case you are using Accept payments, Tickets and/or Online video meetings it will also be possible to get the links to the corresponding attachments per respective appointment.
Here is the example of how appointment details may look like depending on other features used in the system

Terms and Conditions
If you want your business to be bulletproof then this Custom Feature is a MUST. Use it to create and manage terms & conditions for your company towards your clients.
The text inserted in the Custom Feature will be displayed on the "Details" page above the "Book Now" button or on sign up step if you are using Client login feature as a checkbox with text "I agree with -your company name- Terms & Conditions" and the clients will need to agree to it to be able to book your services
Free custom feature!
- How to use
- 1. Enable this feature on your Custom Features page.

- 2. Go to its settings on the right to manage your Terms and Conditions.
- 3. Add the text. You can use HTML formatting there to adjust the look.

- 4. (optional) Make it required to agree to your terms with each booking if you need a consent even if the same client books the services from time to time.
Ticket's QR Code

Create customized QR codes for your tickets consisting of one or more additional fields variables, with or without a delimiter. This QR code can be added to your tickets to facilitate further information reading into external systems after ticket validation.
Please note!:
- When you enable this custom feature Tickets will be enabled as well.
- With this feature you will need to edit custom ticket template with is available with premium subscriptions only.
- How to use
- 1. Enable Ticket's QR Code feature on your Custom features page -> Other section.

- 2. Select QR code correction capability if necessary.

- 3. Navigate to Edit template page.

- 4. Adjust the template to your needs using the Editor and the available variables on the right.

- 5. Add QR template url variable to the ticket template in Custom features -> Tickets -> Custom ticket.
- (please also make sure that you have custom ticket attached to necessary services in Manage -> Services -> select the necessary service -> Tickets)

Tickets
Issue tickets for services, classes and events. The tickets can be printed or shown from mobile screen by clients and then be scanned using the SimplyBook.me admin app, or manually inserted in the Validate tickets section of SimplyBook.me. If you have HTML/CSS knowledge and Premium plan, you can customize the look of your tickets.
Video tutorial ![]()
Please note:
- this feature is not compatible with Accept Deposits;
- the tickets are attached in PDF format to client confirmation email;
- if Pay Later is enabled within Accept Payments feature, the client selects it during booking,
- the tickets will be sent within the separate email template after admin accepts the payment in Payment transactions report.
- It can be edited in Custom features -> Tickets.

- the tickets are limited: every subscription has a definite amount of tickets per month included(140 in trial period). To check the number of tickets you have please go to Plans&Prices -> Subscriptions and scroll to the bottom of the page. To buy more tickets please navigate to Plans&Prices -> Additional items.

- How to use
- 1. Enable this feature on your Custom Features page.

- 2. Navigate to Manage using the link near the enabled feature or go to Manage -> Services section.

- 3. Select the service you would like to sell the tickets for with a click and go to Tickets tab.
- 4. Enable tickets issuing and connect the template by clicking on it. Save settings.
- (There is one default template, but with Premium plan you can create your own one).

- 5. When the event time comes and you need to validate tickets please go to Custom Features -> Tickets -> Validate ticket.
(or access it from Calendar page)

- 6. Look for the ticket by its unique number(can be used on desktop and mobile) or scan the QR code(open that page from mobile device).
- Check the booking information if necessary and click on Validate ticket


- 7. If you have SimplyBook.me admin application you can easily scan and check-in tickets there from Dashboard.

- 8. Ticket codes can be found in the related bookings on Calendar page or in Booking details report.
- You can also print tickets from there.


- 9. (optional) If you have Premium plan and know HTML/CSS or have someone who can help with it you can create a custom ticket template in Custom features -> Tickets -> Custom ticket.

- 10. From the client side they can get tickets on the appointment/payment confirmation page when the booking process is completed.
- Or they can go to My bookings tab and use the corresponding button there to download ticket PDF and print.


Vaccination report
- How to use
- 1. Enable the corresponding item on your Custom Features page.

- 2. Select the criterion for grouping the appointments. By default they will be grouped by client record(id), but you can also select to group by email or phone number. And, for sure, you can change these preferences at any time.
- (optional) In case you are using Intake forms and/or Client fields features you can choose to group the bookings by the answer to one of those fields.

- 3. After you navigate to Slots report you can see total, currently free and booked slots as well as time occupation percentage per provider or service.
- Please use the switchers to view the data per day/week/month or a date range.
- Please note:
- Maximum period that can be selected for the date range is 90 days. If you choose the larger period it will be automatically autocorrected.
- In day view the number of slots per provider is based on your timeframe setting(i.e. if timeframe is 5 mins and time open in schedule is 9:00-10:00, then you will see 12 timeslots per provider if he/she serves one client at a time),
- while per service it depends on the selected service duration (i.e. if service duration is 30 mins and time open in schedule is 9:00-10:00 you will see 2 slots).
- The number of slots displayed is generally influenced by
- the amount of providers added in the system;
- their schedules;
- number of clients they can serve at a time.
- The following features do not influence the statistics
- Limit bookings;
- Related resources;
- Calendar sync;
- Classes are not displayed in the report

- 4. When you navigate to Second appointment tab you can see the clients who have already booked at least one non-cancelled appointment in the system.
- The lines will be grouped according to the settings from #2.
- In case the specific client has more than one appointment such records will be marked as having second appointment in place and the second column will contain the date of his/her last booking.
- By using View option you can access each client contact details as well as the list of his/her appointments.

- Video tutorial on setting up an account for vaccination
Visitor Counter
Use Visitor Counter Custom Feature to get up-to-date information about visits to your booking website or to the page with your booking widget. This Custom Feature will help you to evaluate the visits and bookings and can help you to decide if you should do promotions to get more visitors and potential clients. You will see all this information in the main Dashboard of the SImplyBook.me system. Shows data for the previous calendar week.
- How to use
- 1. Enable this option on your custom Features page.

- 2. Check the chart on Dashboard page for updates.

Waiting List
- Video tutorial available
Please note!
- Only the following calendar layout types are supported: modern, slots weekly, flexible weekly, flexible, flexible provider and daily classes.
- If you have a non-supported one set it will be automatically changed when this custom feature is enabled.
- The waiting list booking does not have time attached and is related to date.
- When some timeslot becomes available all the client who have applied for this date waiting list receive the email notification and the one who is the first will be able to occupy the spot.
- Client can have only one active waiting list booking for the specific service and provider for the specific date.
- During the process of the applying to the waiting list the clients fill in only the basic information or register/log in. All the rest(payments, products purchase, etc. will be provided when the usual booking will be made)
- This feature cannot be enabled together with Multiple bookings
- Waiting List feature does not work for recurring services and/or classes booking.
- How to set
- 1. Enable "Waiting list" custom feature on your "Custom features" page, "Functional" section.
- 2. In its settings on the right side of the page, "Main configuration" block, please select the number of email notification attempts about the free time slot appearance.
- Choose the desired time interval between these attempts in "Notifications interval".
- Set the time period when the waiting list bookings should be automatically cancelled in case the free spaces do not appear using "Waiting list slot auto cancellation" setting.
- 3. Adjust the email templates for the free slot notification and no free slots email to your needs. Use the variables if needed.
- Save settings.
- 4. You will be able to see all the waiting list applications in the corresponding report.
- You can use the link near this custom feature to access it or navigate to Reports // Waiting list report using the left-side menu.
- It is possible to filter the booking and manually cancel if necessary.
- 5. The clients can see own waiting list appointments in the specific tab on the booking website and can also cancel them there if they wish to.
Zapier Connector
Connect SimplyBook.me with hundreds of other solutions using this feature. It contains a variety of triggers that can be used to send information to other solutions by simply using one of the available zaps or by creating a new zap. Zapier allows to integrate 2 or more web-applications via their APIs through “triggers” and “actions”. SimplyBook.me is available in Zapier as Trigger app, it means only information from SimplyBook.me is sent to Zapier (1-way integration) and via Zapier to any app that has actions.
Please note!
- Available data depends on custom features enabled;
- It doesn't work if 2-step authentication is enabled (HIPAA or Google Authenticator);
- New client trigger doesn't work with Import clients feature, but works correctly if 1 client is added manually in admin interface;
- Information about membership/promotion/package/product used is not included as it relates to invoice and not to booking;
- Comment change doesn't launch any trigger;
- To be able to use Booking change/Booking cancellation triggers in order to change existing records in Action app you need to use paid Zapier account(please check current pricing with them and if it includes multi-step zaps), as Search step is needed to find the record in action app;
- If more items are added to admin interface after ZAP was created, you need to press "Get more samples" button at "Trigger step" -> "Test this step" in Zapier to fetch new available fields and data (zap template should be changed);
- Invoice data can be sent with New Invoice trigger;
- SOAP data is not sent;
- Tax information is not sent, service price is shown without taxes added;
- It doesn't work if both Accept payments and Approve bookings are enabled, and batch bookings are partially approved.
6 triggers are now available:
• New booking - launches when new booking is created in SimplyBook.me account;
• Booking change - launches when booking is changed (change of date/time/service/provider/status/intake forms answers);
• Booking cancellation - launches upon booking cancellation;
• New client - launches when new client is added, either upon a new booking, or when admin manually adds client in SimplyBook.me admin interface.
• New Offer - launches when any new offer is created on SimplyBook.me side (can be used when Accept payments custom feature is enabled).
• New Invoice - launches when new invoice is created and paid on SimplyBook.me side (can be used when Accept payments custom feature is enabled).
- Available data:
For booking-related triggers(New booking, Booking change, Booking cancellation):
Basic functionality (no custom features enabled):
- Company (login, name, email, phone),
- Service (name, description, duration, buffer time),
- Provider (name, description, email, phone),
- Client information (name, email, phone, address, timezone),
- Booking code (if booking is confirmed, start/end date/time).
Custom features related data:
- Accept payments (service price, currency);
- Status (name, description, color);
- Approve bookings (approval status: approved, canceled);
- Multiple Locations (location name, location address (with coordinates), location phone, location description);
- Service Categories (category name, category description);
- Service Add-ons (add-on name, add-on price);
- Intake Forms (answers).
For New client trigger:
- Client ID;
- Client name;
- Client email;
- Client phone;
- Client address;
- If client is blocked to login (if Client login custom feature is enabled);
- Client registration date.
For New Offer/Invoice triggers:
- Order ID;
- Client name / email / phone;
- Offer/Invoice description (list of items ordered, information about discount: gift card/coupon/package used);
- Order amount and currency;
- Discount amount;
- Order date and time;
- Offer/Invoice number in SimplyBook.me system (O-XXXXXX or I-XXXXXX);
- Payment processor (delay, cash, credit card, wire transfer);
- Payment status (paid, pending) and if payment is received.
- How to use
- 1. Enable Zapier connector custom feature on your Custom features page on SimplyBook.me side.

- 2. Create new Zap by clicking on Make a Zap button in Zapier interface.
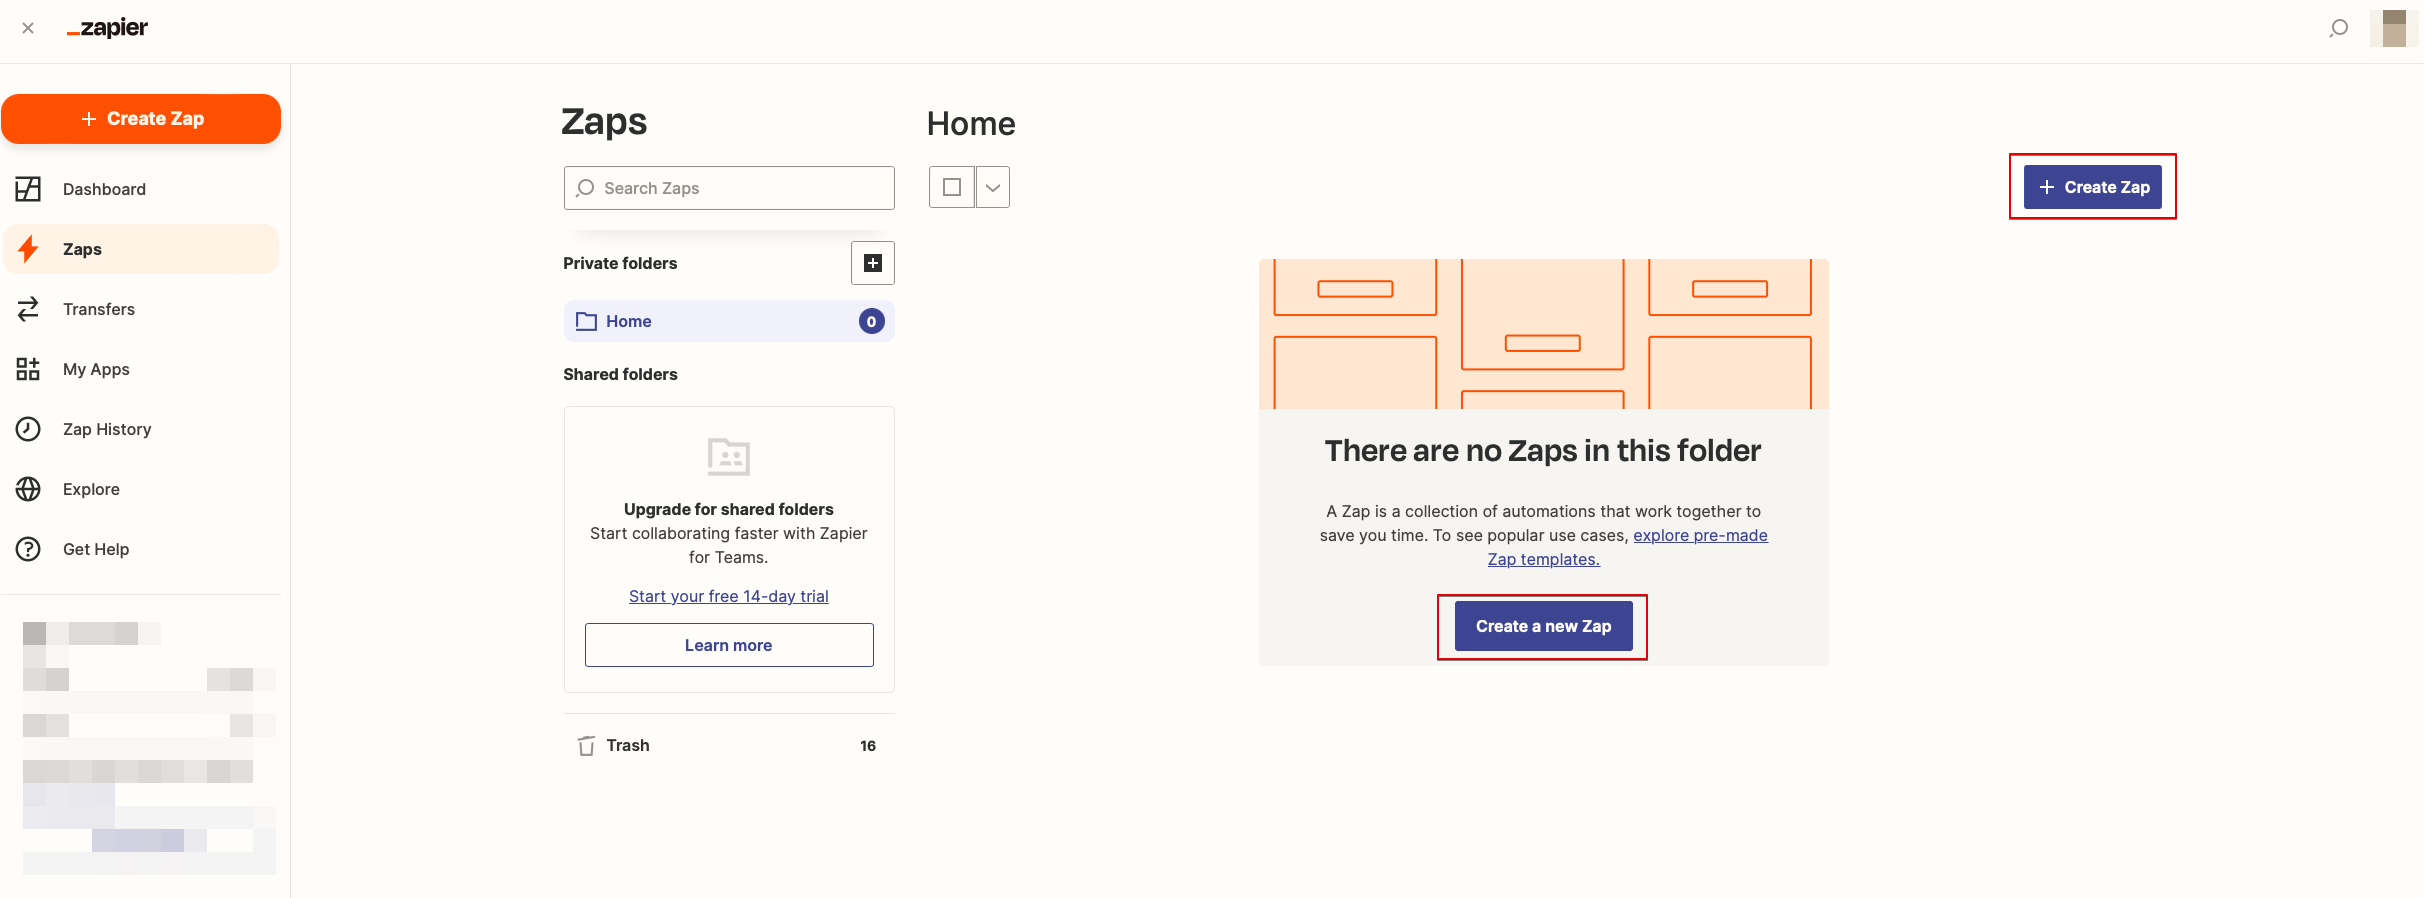
- 3. Look for Simplybook in Trigger step.
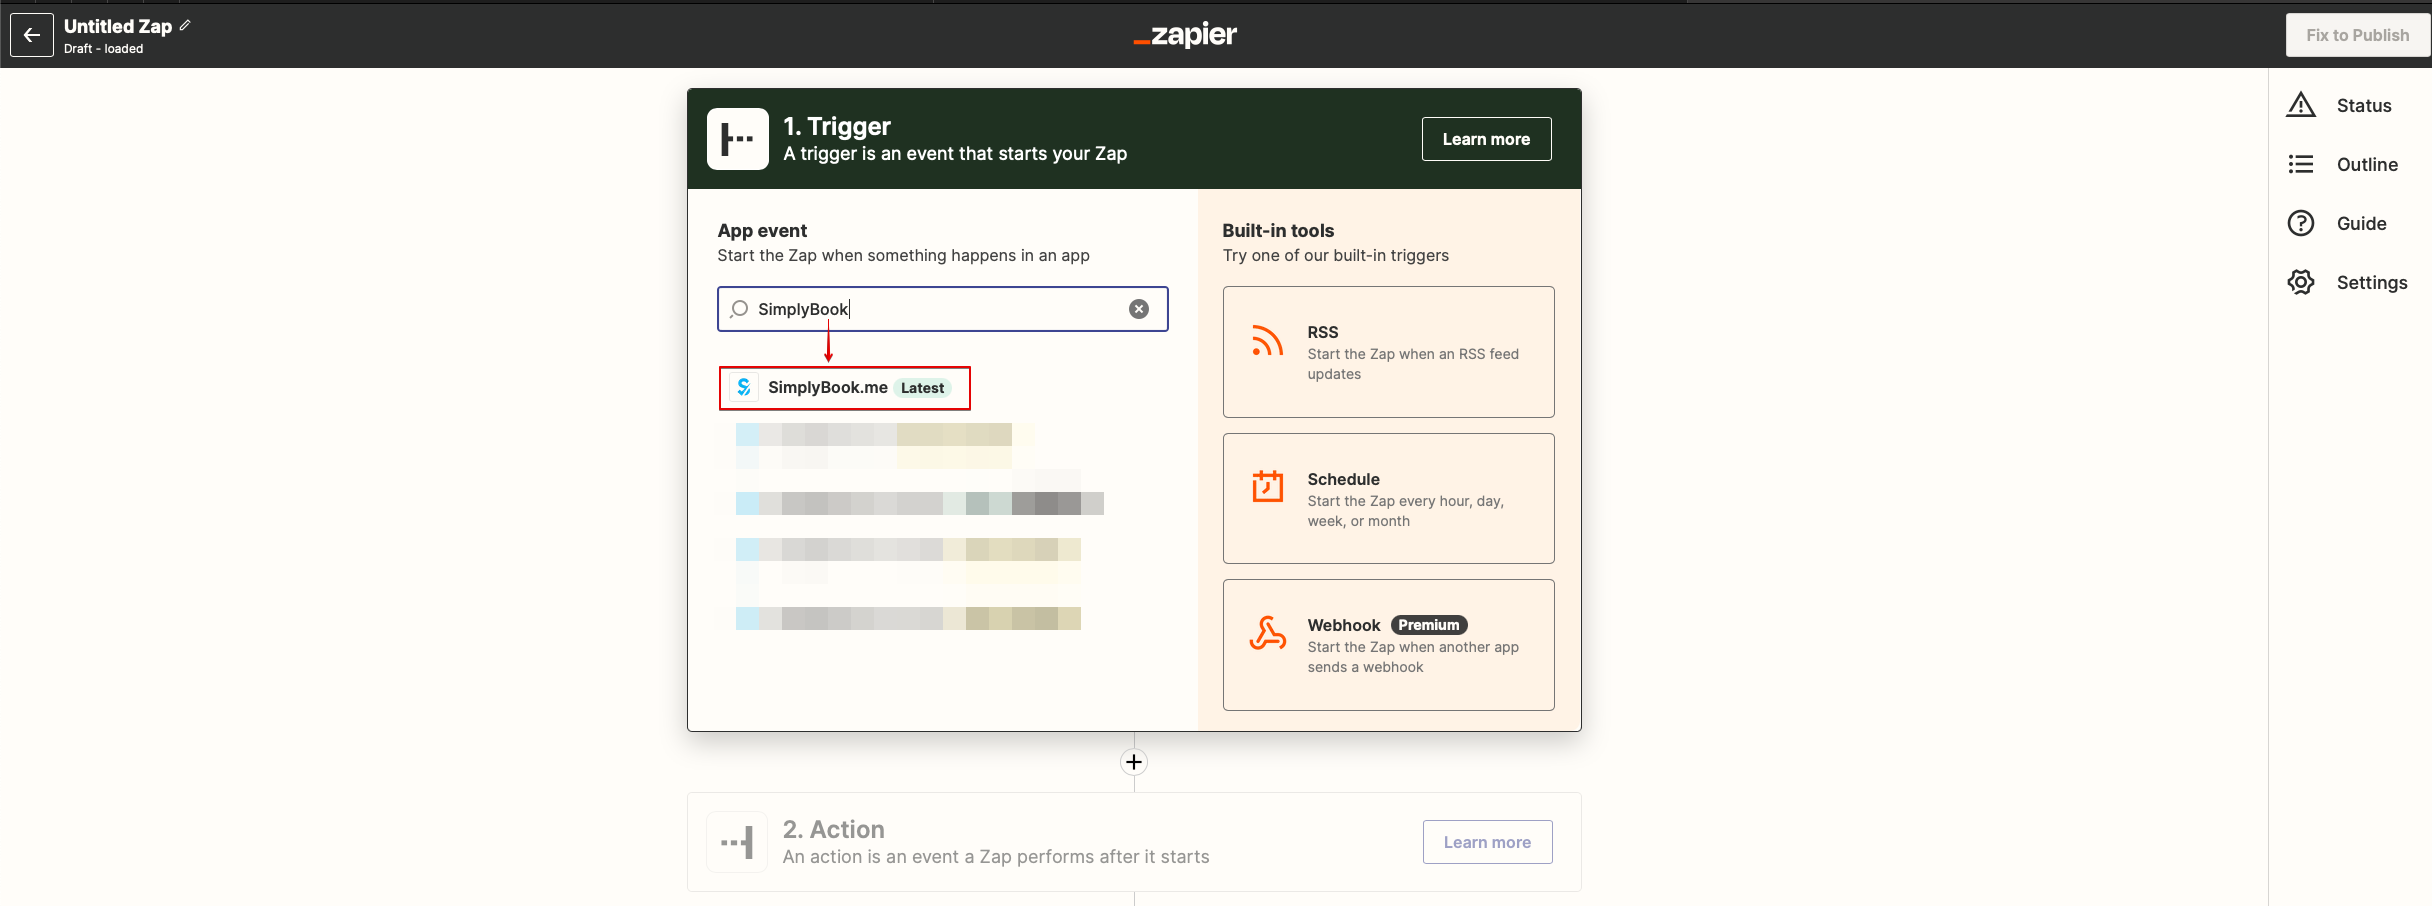
- 4. Select the desirable trigger.
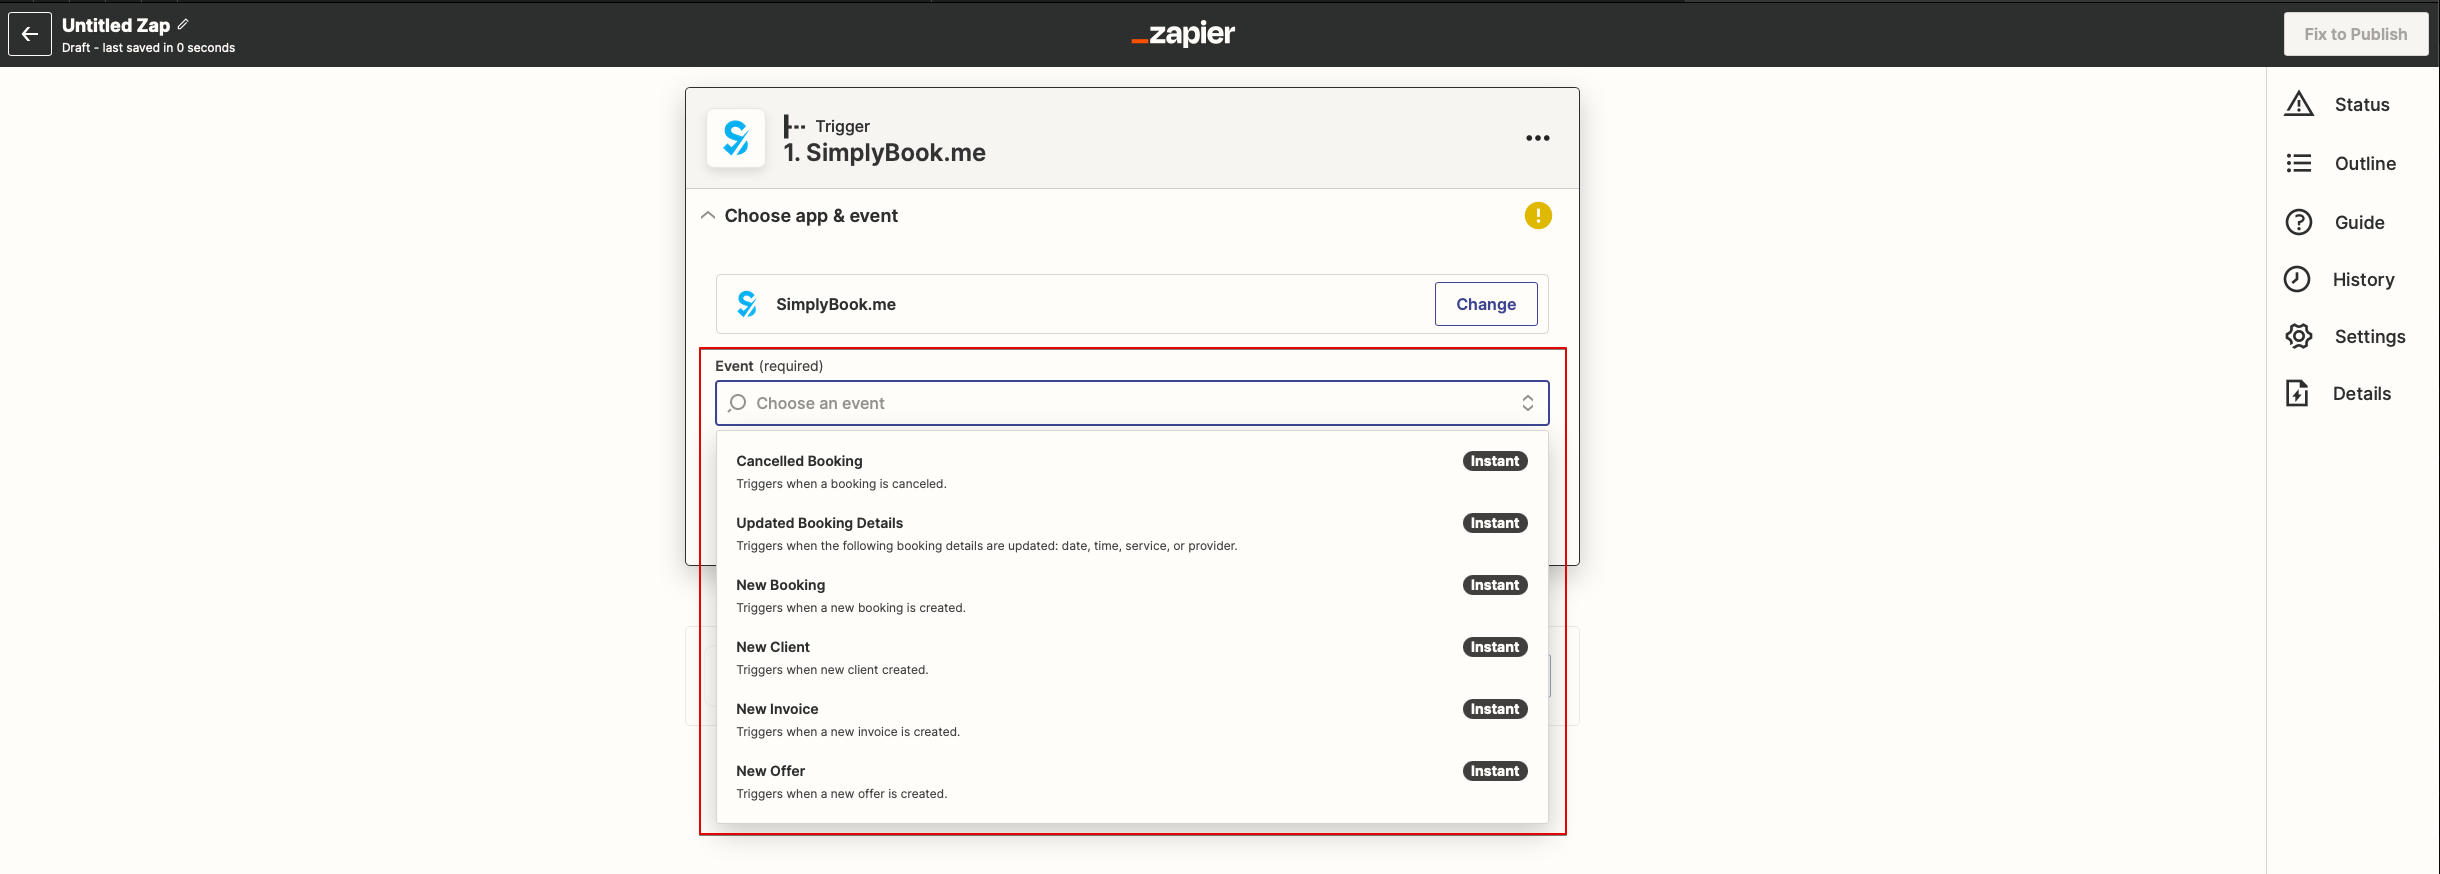
- 5. Connect SimplyBook.me account.
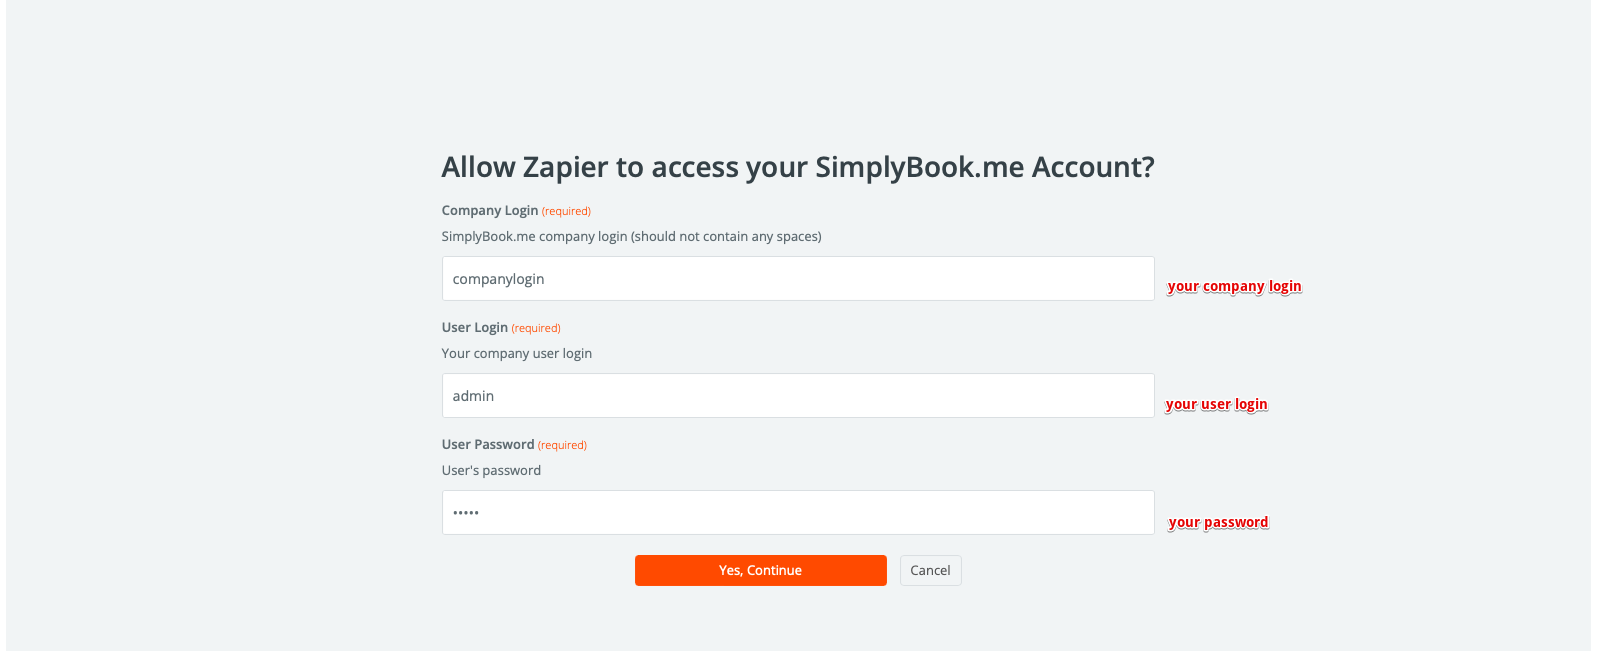
- 6. Click Continue to test this step.

- 7. Proceed to adding the Action step and search for the app you wish to connect SimplyBook.me to.
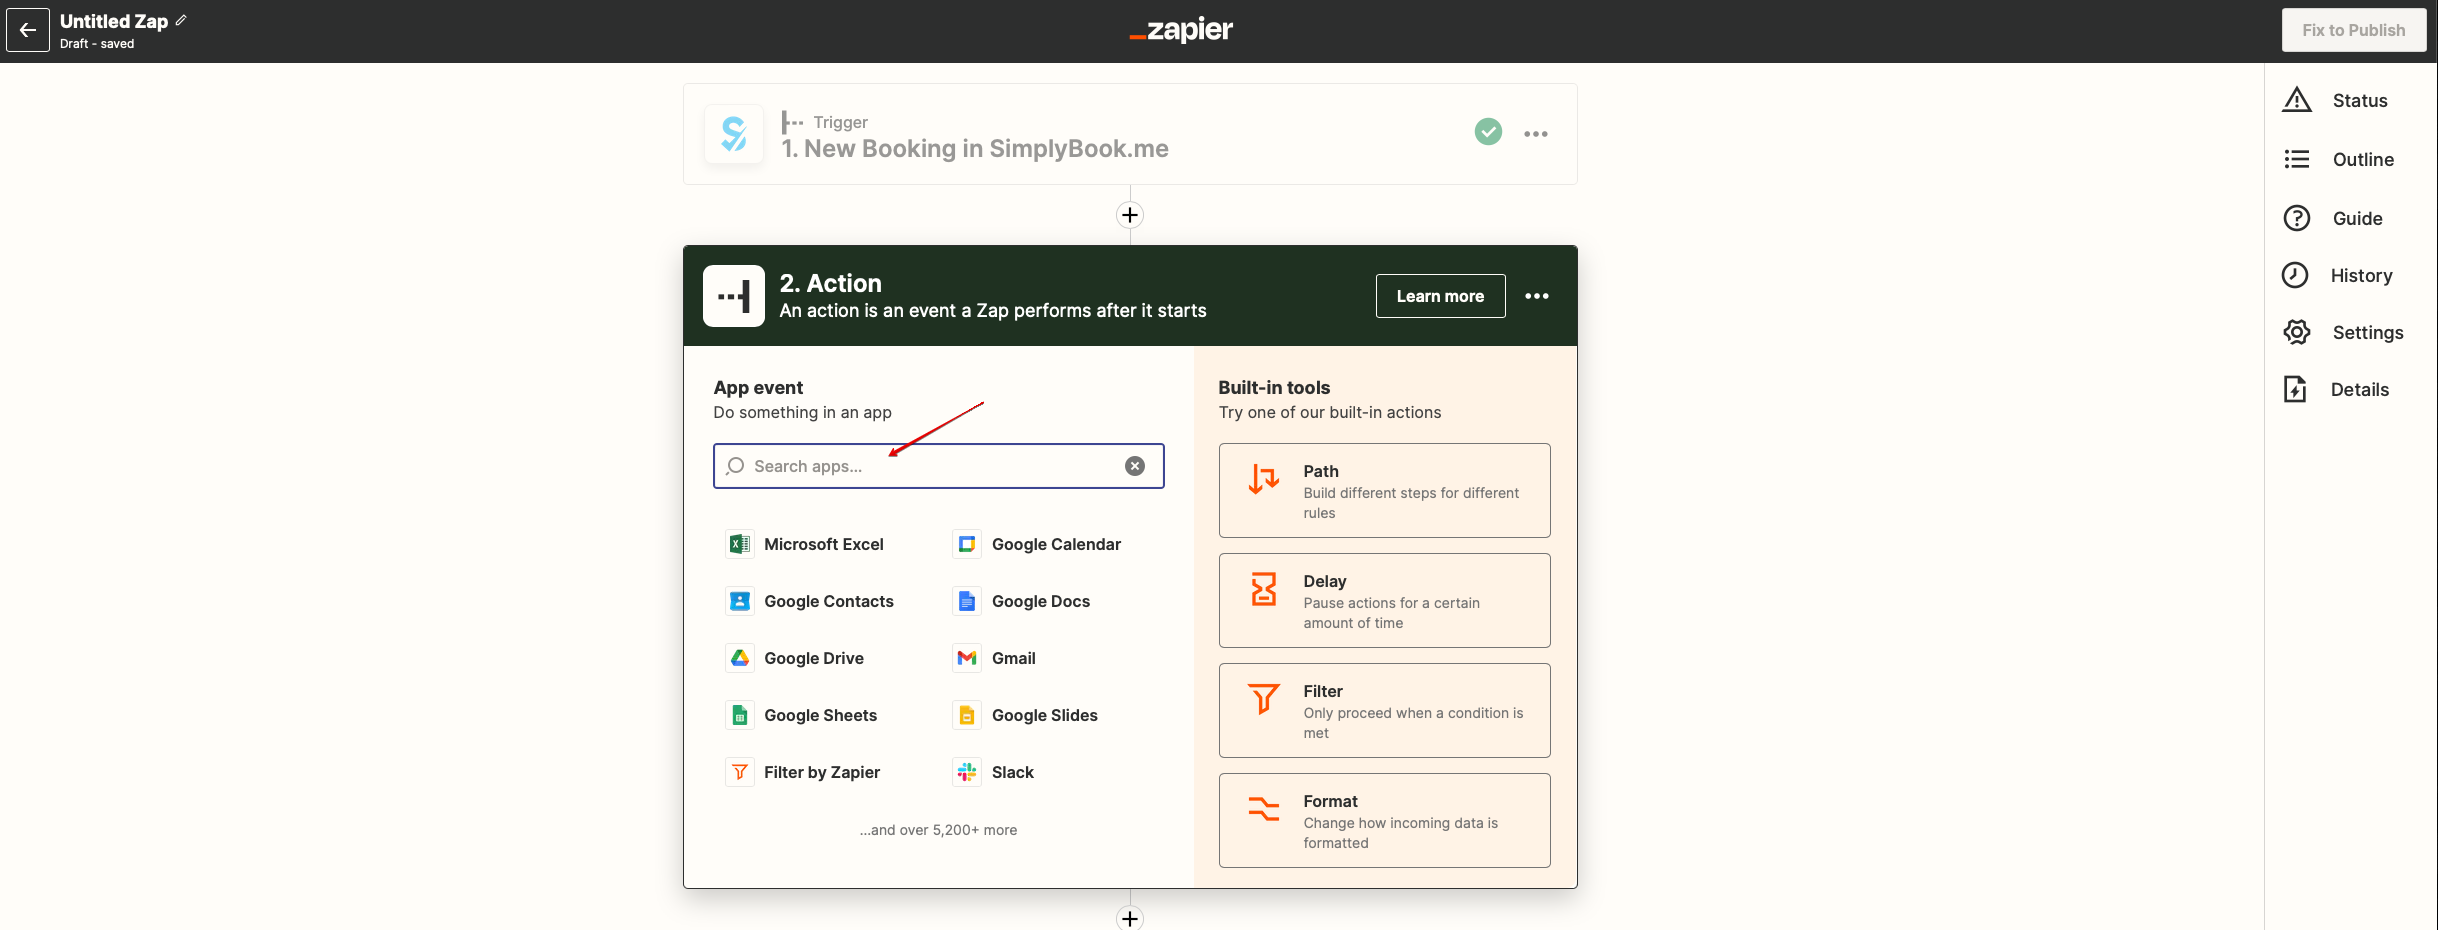
- 8. Connect this application account and setup the template using the available data mentioned above.
- 9. You can test this step operation as well if necessary or skip it.
- 10. Finish the setup, add Zap name and turn it on.