Difference between revisions of "Bookings on Facebook"
From SimplyBook.me
| (27 intermediate revisions by the same user not shown) | |||
| Line 1: | Line 1: | ||
| − | =How to add | + | <br><br> |
| − | :1. | + | __TOC__ |
| − | + | =Facebook and Instagram Bookings Custom Feature= | |
| − | [[File: | + | <span style="background-color:#ffe9e9; padding:5px; border-radius:5px; font-weight: bold;">Please note!</span><br> |
| + | *<span style="background-color:#ffe9e9; padding:5px; border-radius:5px;">It is possible to connect booking option to Facebook Business and Instagram Business pages. This functionality cannot be added to a personal page.</span><br> | ||
| + | *<span style="background-color:#ffe9e9; padding:5px; border-radius:5px;">The booking option is not shown on desktop Instagram version and can be used via mobile apps only.</span><br> | ||
| + | *<span style="background-color:#ffe9e9; padding:5px; border-radius:5px;">Bookingtroll theme is used for the booking widget by default. If you wish to change the styling please upgrade to Premium to select the desired theme and be able to use <span style="background-color:#cdeffc; padding:5px; border-radius:5px;">[[Custom_Features#Custom_CSS|Custom CSS]]</span> adjustments.</span><br> | ||
| + | *<span style="background-color:#ffe9e9; padding:5px; border-radius:5px;">The widget look may differ depending on Facebook preferences for different devices and applications</span><br> | ||
| + | <br><br> | ||
| + | :'''Video tutorial available '''[[File:Youtube-Logo.png|link=https://www.youtube.com/watch?v=9o5fJkZD384&feature=youtu.be]] | ||
| + | <br><br> | ||
| + | ==How to add and use booking option to Facebook/Instagram business page== | ||
| + | <br><br> | ||
| + | :1. Enable <span style="background-color:#d4f8e5; padding:5px; border-radius:5px;">Facebook & Instagram Bookings</span> custom feature on your <span style="background-color:#d4f8e5; padding:5px; border-radius:5px;">Custom Features</span> page. | ||
| + | [[File:Facebook and insta bookings enable path.png | border| center]] | ||
| + | <br><br> | ||
| + | :2. Login to your Facebook/Instagram business account(s) in another browser tab. | ||
| + | <br><br> | ||
| + | :3. Go back to SimplyBook.me interface and click on <span style="background-color:#d4f8e5; padding:5px; border-radius:5px;">Settings</span> near <span style="background-color:#d4f8e5; padding:5px; border-radius:5px;">Facebook & Instagram Bookings.</span> | ||
| + | [[File:Facebook and insta bookings settings path.png|border|center]] | ||
| + | <br><br> | ||
| + | :4. Click on <span style="background-color:#d4f8e5; padding:5px; border-radius:5px;">Connect with Facebook</span> button on the page you see. | ||
| + | [[File:Facebook and insta bookings settings overview.png |border|center]] | ||
| + | <br><br> | ||
| + | :5. You will be redirected to <span style="background-color:#d4f8e5; padding:5px; border-radius:5px;">Facebook</span> interface to manage the permissions and connection to SimplyBook.me.<br> | ||
| + | :Please follow the steps 1-5 displayed below.<br> | ||
| + | :(If you have Instagram business profile connected to your Facebook business page you will be able to connect it there as well <br> | ||
| + | :and <span style="background-color:#d4f8e5; padding:5px; border-radius:5px;">Book</span> button will automatically appear there) | ||
| + | [[File:Facebook and insta new steps.png|border|center]] | ||
| + | <br><br> | ||
| + | :6. Now you will have your services shown on your Facebook page with <span style="background-color:#d4f8e5; padding:5px; border-radius:5px;">Book</span> buttons next to them or <span style="background-color:#d4f8e5; padding:5px; border-radius:5px;">Book now</span> button under the page banner that will redirect your clients to your booking site.<br> | ||
| + | :(the representation options depend on your Facebook business page) | ||
| + | [[File:Facebook and insta new result.png|border|center]] | ||
| + | <br><br> | ||
| + | :7. You can also add booking option to your Facebook page posts so that the customers will be able to quickly book your services. | ||
| + | [[File:Facebook and insta new add booking to post.png|border|center]] | ||
| + | <br><br> | ||
| + | <br><br> | ||
| + | <br><br> | ||
| + | <br><br> | ||
| + | ==How to remove Book button from Facebook/Instagram pages== | ||
| + | <br><br> | ||
| + | :1. Navigate to <span style="background-color:#d4f8e5; padding:5px; border-radius:5px;">Custom Features</span> -> <span style="background-color:#d4f8e5; padding:5px; border-radius:5px;">Facebook & Instagram Bookings</span> -> <span style="background-color:#d4f8e5; padding:5px; border-radius:5px;">Settings</span> on SimplyBook.me side. | ||
| + | [[File:Facebook and insta bookings settings path.png|boredr|center]] | ||
| + | <br><br> | ||
| + | :2. Click on <span style="background-color:#d4f8e5; padding:5px; border-radius:5px;">Logout</span> at the top of the page. | ||
| + | [[File:Facebook and insta new logout.png|border|center]] | ||
| + | <br><br> | ||
| + | ==How to add and use booking option on Instagram only== | ||
| + | <br><br> | ||
| + | :1. Open your <span style="background-color:#d4f8e5; padding:5px; border-radius:5px;">Instagram</span> mobile application and login to your business page. | ||
| + | <br><br> | ||
| + | :2. Navigate to your <span style="background-color:#d4f8e5; padding:5px; border-radius:5px;">profile</span> and select to edit it. | ||
| + | <br><br> | ||
| + | :3. Follow the steps 1-8 below to add <span style="background-color:#d4f8e5; padding:5px; border-radius:5px;">Book</span> button that will lead the customers to your booking site: | ||
| + | [[File:Insta setup.png|border|center]] | ||
| + | <br><br> | ||
| + | <br><br> | ||
| + | ==How to remove Book option from Instagram business page== | ||
| + | <br><br> | ||
| + | :1. Open your <span style="background-color:#d4f8e5; padding:5px; border-radius:5px;">Instagram</span> mobile application and navigate to editing your <span style="background-color:#d4f8e5; padding:5px; border-radius:5px;">profile.</span><br> | ||
| + | :Follow the steps 1-5 below to remove <span style="background-color:#d4f8e5; padding:5px; border-radius:5px;">Book</span> button: | ||
| + | [[File:Insta button removal.png|border|center]] | ||
| + | <br><br> | ||
| + | <br><br> | ||
| + | =Call-to-action button for Facebook fan page= | ||
| + | <br><br> | ||
| + | :1. Go to your Page’s cover photo and click <span style="background-color:#d4f8e5; padding:5px; border-radius:5px;">+ Add a Button</span> | ||
| + | <br> | ||
| + | <nomobile>[[File:Fb add button.png | center]]</nomobile> | ||
| + | <mobileonly>[[File:M add booking button step 2 new.png | center]]</mobileonly> | ||
| + | <br><br> | ||
| + | :2. Choose your call-to-action, then select <span style="background-color:#d4f8e5; padding:5px; border-radius:5px;">Link to website</span> option and enter the URL for your booking site. | ||
| + | <br> | ||
| + | [[File:Fb book now option.png| border|center]] | ||
| + | <br><br> | ||
| + | :3. Click on <span style="background-color:#d4f8e5; padding:5px; border-radius:5px;">Finish</span> and you will get the button <span style="background-color:#d4f8e5; padding:5px; border-radius:5px;">Book Now</span> as a result, so that your clients will be able to click on it, go to your booking site and book your services. | ||
| + | <nomobile>[[File:Add booking button result.png | center]]</nomobile> | ||
| + | <mobileonly>[[File:M add booking button result.png | center]]</mobileonly> | ||
| + | <br><br> | ||
| + | =Facebook widget= | ||
| + | ==How to add SimplyBook.me widget to your Facebook fan page== | ||
| + | <br> | ||
| + | :1.You can add [https://simplybook.me SimplyBook.me] functionality to Facebook fan page (only to fan page, it can't be connected to your personal page) in <span style="background-color:#d4f8e5; padding:5px; border-radius:5px;">Settings</span> -> <span style="background-color:#d4f8e5; padding:5px; border-radius:5px;">Booking widgets settings</span> -> <span style="background-color:#d4f8e5; padding:5px; border-radius:5px;">Facebook widget</span> -> <span style="background-color:#d4f8e5; padding:5px; border-radius:5px;">Apply & add to facebook</span> -> choose the page to attach [https://simplybook.me Simplybook] to. | ||
| + | <br> | ||
| + | [[File:Facebook widget path new navigation.png|1200px|border | center]] | ||
| + | <br><br> | ||
:2. After you connected [https://simplybook.me SimplyBook.me] to Facebook fan page, it is listed in the left-side menu of the page under the photo of your company. | :2. After you connected [https://simplybook.me SimplyBook.me] to Facebook fan page, it is listed in the left-side menu of the page under the photo of your company. | ||
| − | + | <br> | |
[[File:Simplybook tab on facebook.png | center]] | [[File:Simplybook tab on facebook.png | center]] | ||
| + | <br><br> | ||
| + | You can press <span style="background-color:#d4f8e5; padding:5px; border-radius:5px;">Settings</span> -> <span style="background-color:#d4f8e5; padding:5px; border-radius:5px;">Templates and tabs</span> and make [https://simplybook.me SimplyBook.me] more visible for clients by dragging and dropping it higher in the list. | ||
| + | <br><br> | ||
| + | [[File:Facebook reorder.png | center]] | ||
| + | <br><br> | ||
| + | :3. You may need to change the title <span style="background-color:#cdeffc; padding:5px; border-radius:5px;">[https://simplybook.me Simplybook.me appointments]</span> to something else. For this, on your Facebook fan page go to <span style="background-color:#d4f8e5; padding:5px; border-radius:5px;">Settings</span>(upper bar) -> <span style="background-color:#d4f8e5; padding:5px; border-radius:5px;">Templates and tabs</span> -> <span style="background-color:#d4f8e5; padding:5px; border-radius:5px;">SimplyBook.me appointments</span> -> <span style="background-color:#d4f8e5; padding:5px; border-radius:5px;">Settings</span> -> <span style="background-color:#d4f8e5; padding:5px; border-radius:5px;">Edit settings</span> -> <span style="background-color:#d4f8e5; padding:5px; border-radius:5px;">Custom tab name.</span> | ||
| + | <br> | ||
| + | [[File:Facebook rename tab 2.png | center]] | ||
| + | <br><br> | ||
| + | [[File:Rename tab.png | center]] | ||
| + | <br><br> | ||
| − | + | ==How to remove Facebook widget from my Facebook page?== | |
| − | + | <br> | |
| − | + | On your Facebook fan page go to <span style="background-color:#d4f8e5; padding:5px; border-radius:5px;">Settings</span>(upper bar) -> <span style="background-color:#d4f8e5; padding:5px; border-radius:5px;">Templates and tabs</span> -> <span style="background-color:#d4f8e5; padding:5px; border-radius:5px;">SimplyBook.me appointments</span> -> <span style="background-color:#d4f8e5; padding:5px; border-radius:5px;">Settings</span> -> press <span style="background-color:#d4f8e5; padding:5px; border-radius:5px;">Off</span> near <span style="background-color:#d4f8e5; padding:5px; border-radius:5px;">[https://simplybook.me Simplybook] app</span> to remove this tab and save settings. | |
| − | + | <br><br> | |
| − | + | [[File:Remove tab Facebook.png | center]] | |
| − | + | <br><br> | |
| − | + | ==Facebook widget is not visible from mobiles== | |
| − | =How to remove Facebook widget from my Facebook page?= | + | <br> |
| − | On your Facebook fan page go to Settings (upper bar)// | ||
| − | [[File: | ||
| − | |||
| − | |||
| − | =Facebook widget is not visible from mobiles= | ||
:Unfortunately, Facebook does not show third-party apps from mobiles. Your clients need to access desktop version to book from Facebook. | :Unfortunately, Facebook does not show third-party apps from mobiles. Your clients need to access desktop version to book from Facebook. | ||
| − | + | <br> | |
| − | + | ==I cannot change the email when book from Facebook== | |
| − | =I cannot change the email when book from Facebook= | + | <br> |
:When you use Facebook widget, the [https://simplybook.me system] perceives a customer as Facebook user and uses his/her data to fill in the details. Thus, by default it uses email under which Facebook is registered. Unfortunately, it is not in our competency to change this, you can try contacting Facebook support to clarify this issue. | :When you use Facebook widget, the [https://simplybook.me system] perceives a customer as Facebook user and uses his/her data to fill in the details. Thus, by default it uses email under which Facebook is registered. Unfortunately, it is not in our competency to change this, you can try contacting Facebook support to clarify this issue. | ||
| + | <br> | ||
| + | =How to add a Facebook Messenger chat to your booking page= | ||
| + | :'''Video tutorial available '''[[File:Youtube-Logo.png|link=https://www.youtube.com/watch?v=PuFFtCOksc8]] | ||
| + | <br><br> | ||
Latest revision as of 12:07, 20 September 2021
Facebook and Instagram Bookings Custom Feature
Please note!
- It is possible to connect booking option to Facebook Business and Instagram Business pages. This functionality cannot be added to a personal page.
- The booking option is not shown on desktop Instagram version and can be used via mobile apps only.
- Bookingtroll theme is used for the booking widget by default. If you wish to change the styling please upgrade to Premium to select the desired theme and be able to use Custom CSS adjustments.
- The widget look may differ depending on Facebook preferences for different devices and applications
How to add and use booking option to Facebook/Instagram business page
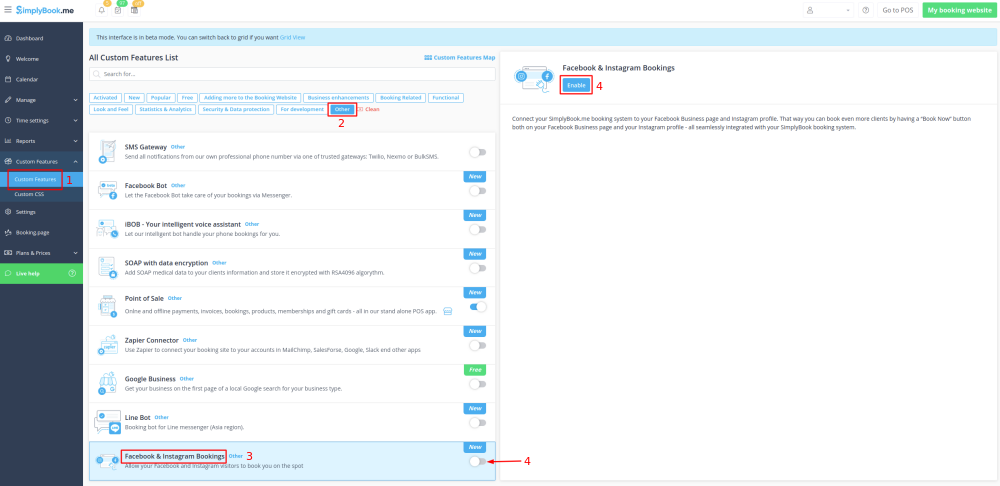
- 1. Enable Facebook & Instagram Bookings custom feature on your Custom Features page.
- 2. Login to your Facebook/Instagram business account(s) in another browser tab.
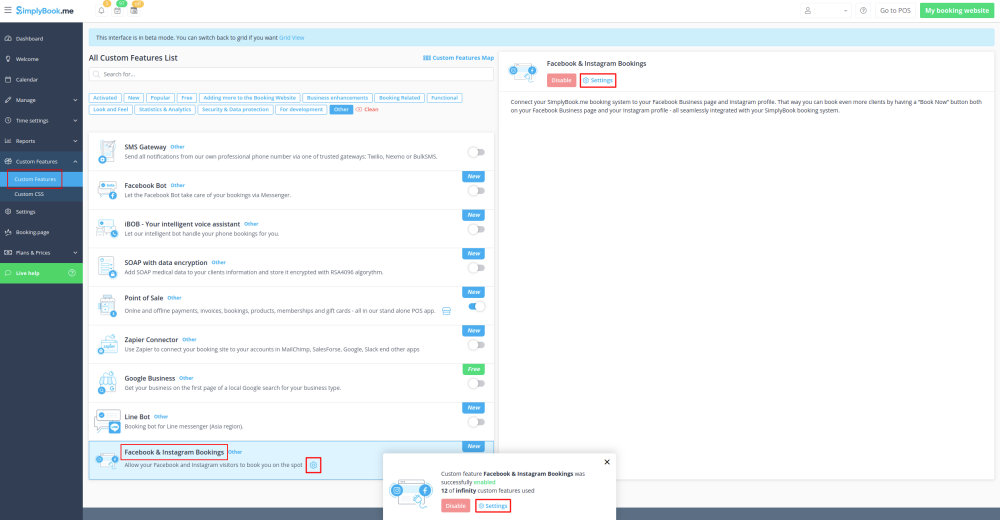
- 3. Go back to SimplyBook.me interface and click on Settings near Facebook & Instagram Bookings.
- 4. Click on Connect with Facebook button on the page you see.
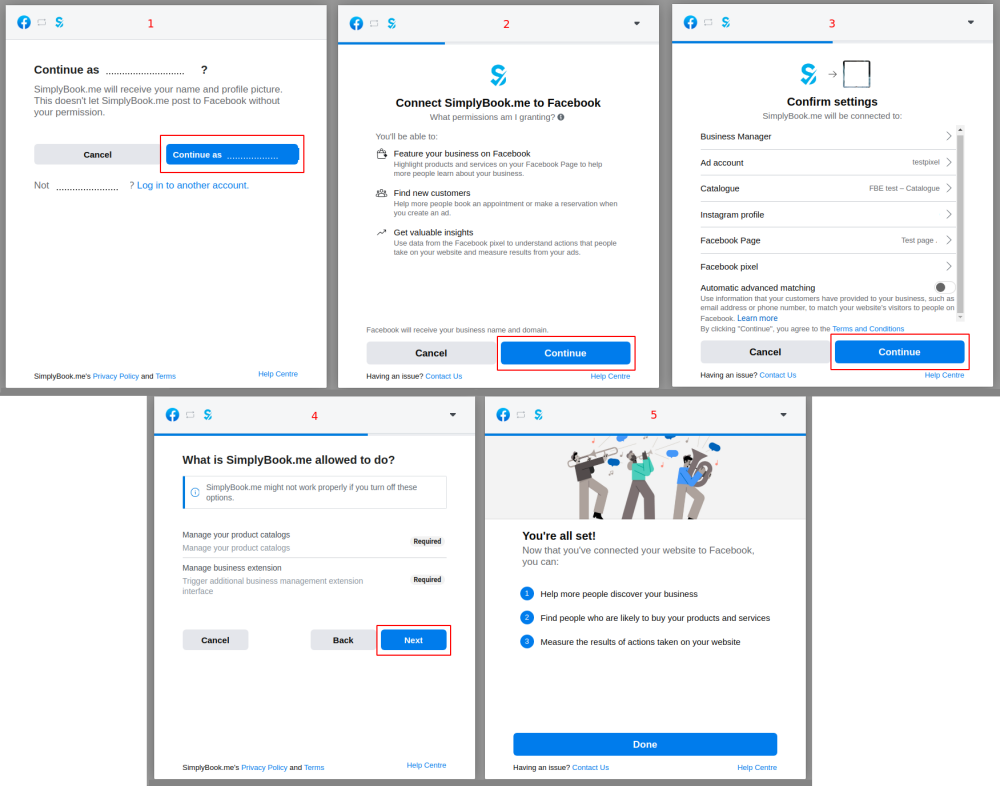
- 5. You will be redirected to Facebook interface to manage the permissions and connection to SimplyBook.me.
- Please follow the steps 1-5 displayed below.
- (If you have Instagram business profile connected to your Facebook business page you will be able to connect it there as well
- and Book button will automatically appear there)
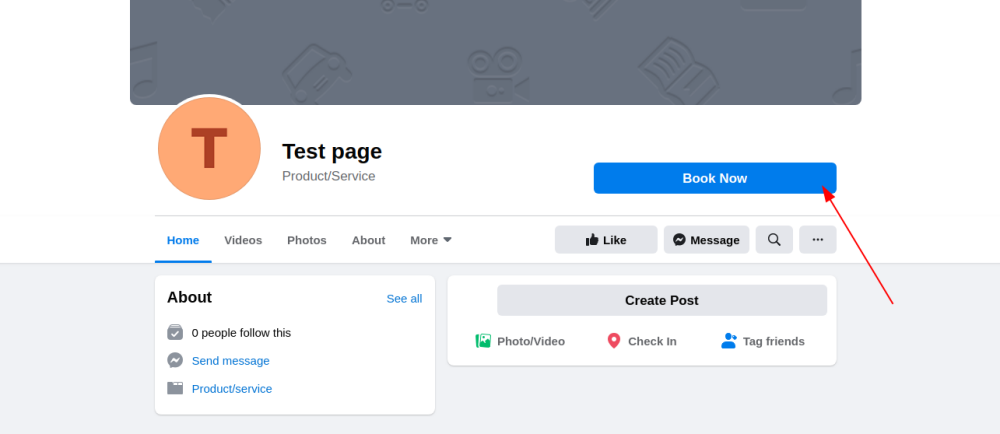
- 6. Now you will have your services shown on your Facebook page with Book buttons next to them or Book now button under the page banner that will redirect your clients to your booking site.
- (the representation options depend on your Facebook business page)
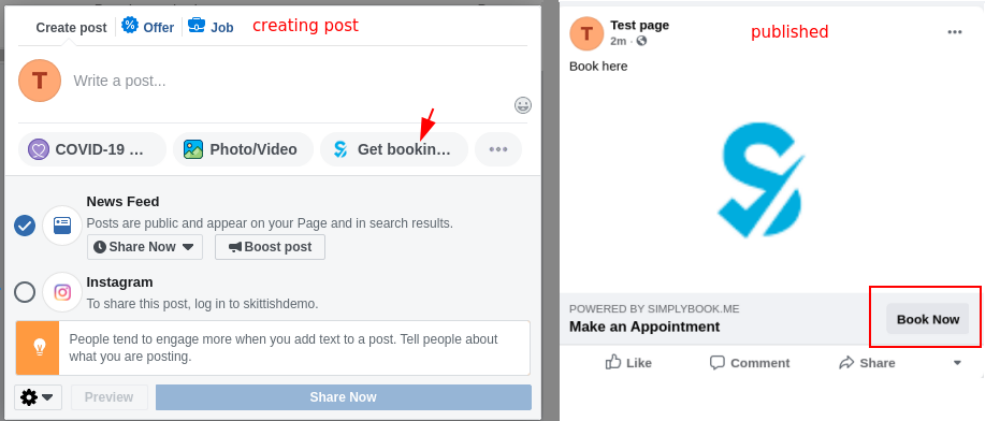
- 7. You can also add booking option to your Facebook page posts so that the customers will be able to quickly book your services.
How to remove Book button from Facebook/Instagram pages
- 1. Navigate to Custom Features -> Facebook & Instagram Bookings -> Settings on SimplyBook.me side.
- 2. Click on Logout at the top of the page.
How to add and use booking option on Instagram only
- 1. Open your Instagram mobile application and login to your business page.
- 2. Navigate to your profile and select to edit it.
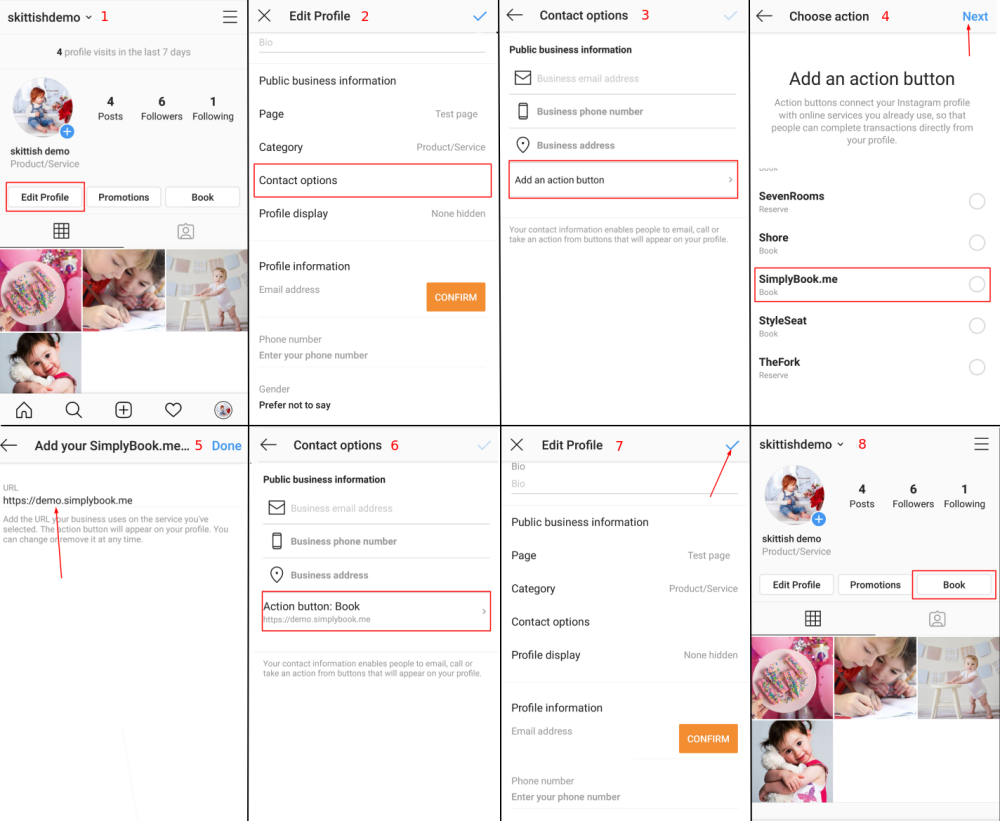
- 3. Follow the steps 1-8 below to add Book button that will lead the customers to your booking site:
How to remove Book option from Instagram business page
- 1. Open your Instagram mobile application and navigate to editing your profile.
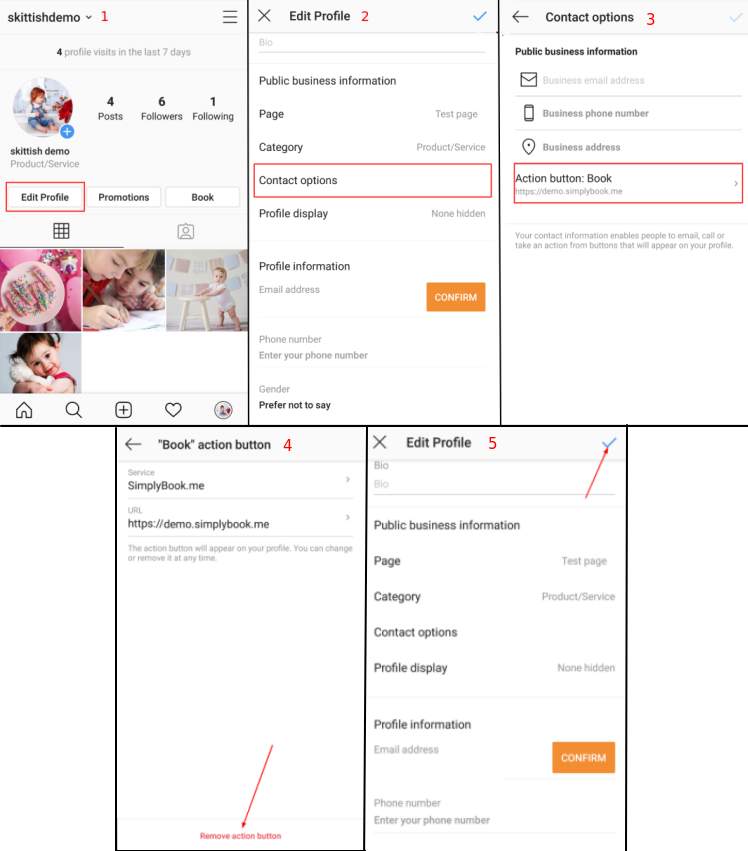
- Follow the steps 1-5 below to remove Book button:
Call-to-action button for Facebook fan page
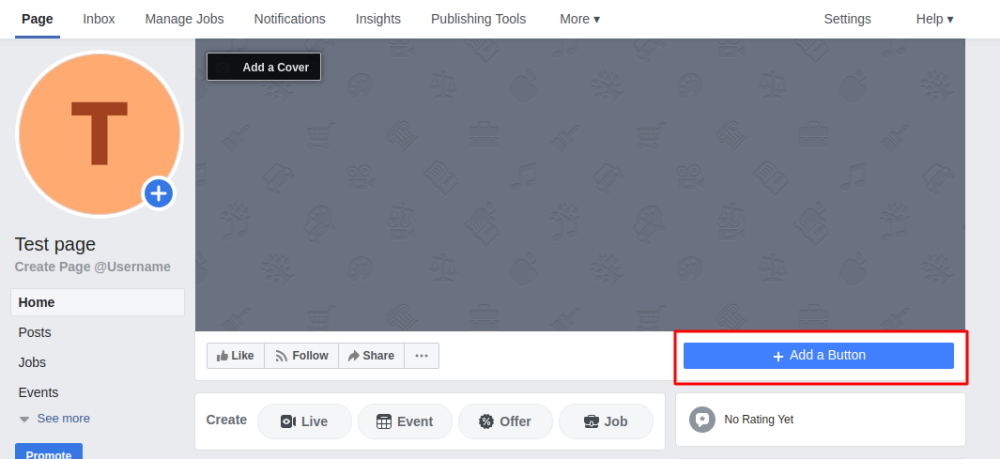
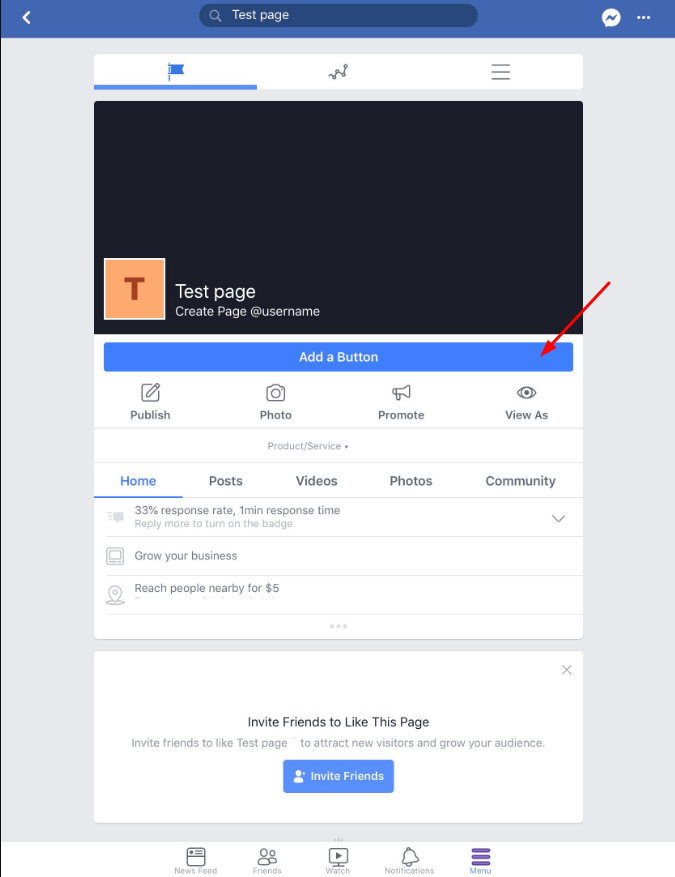
- 1. Go to your Page’s cover photo and click + Add a Button
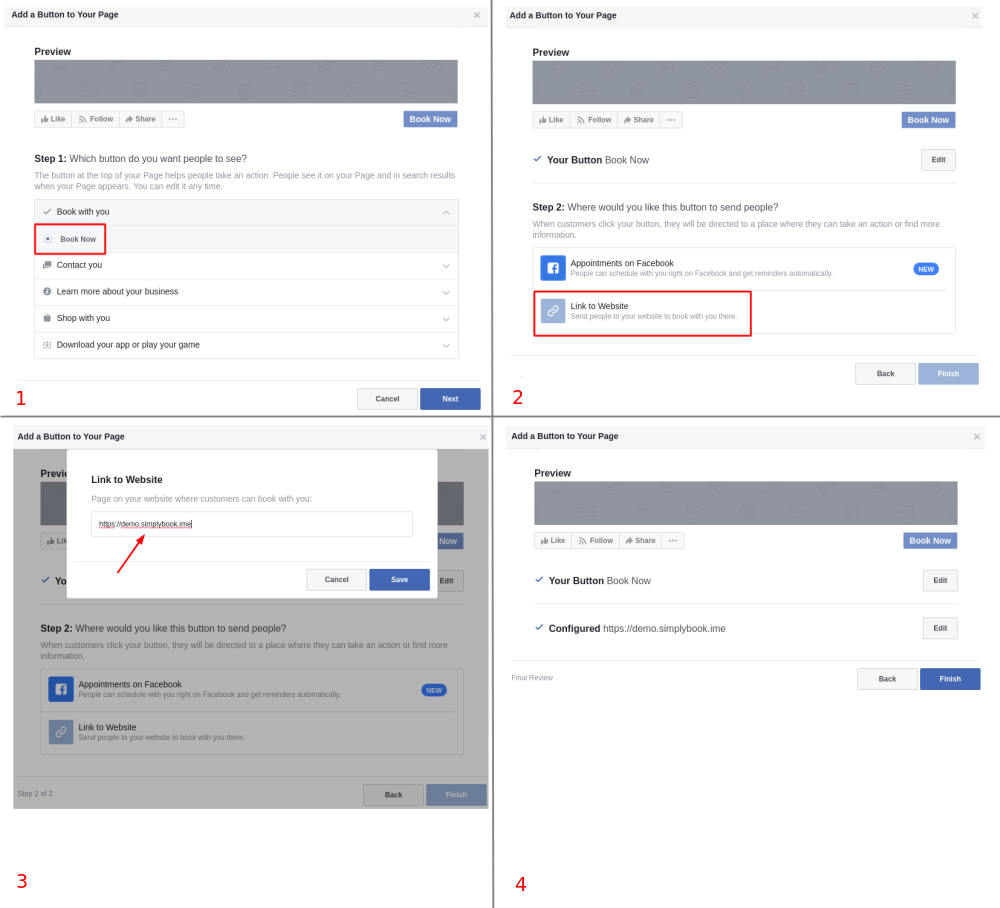
- 2. Choose your call-to-action, then select Link to website option and enter the URL for your booking site.
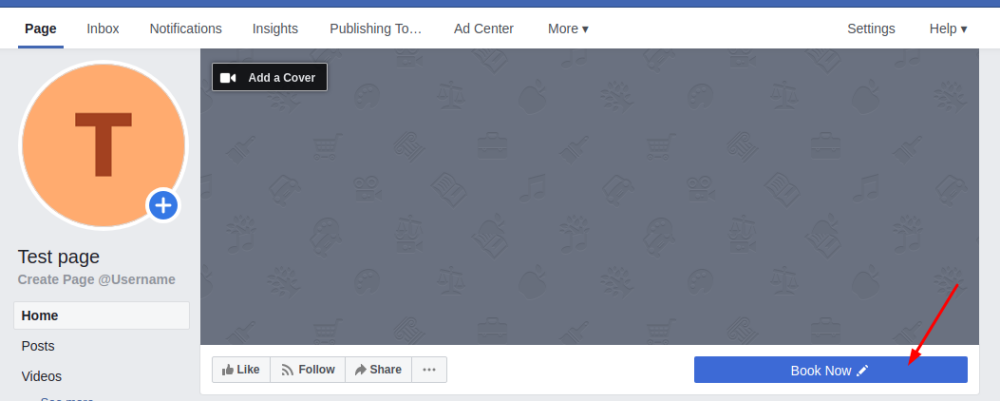
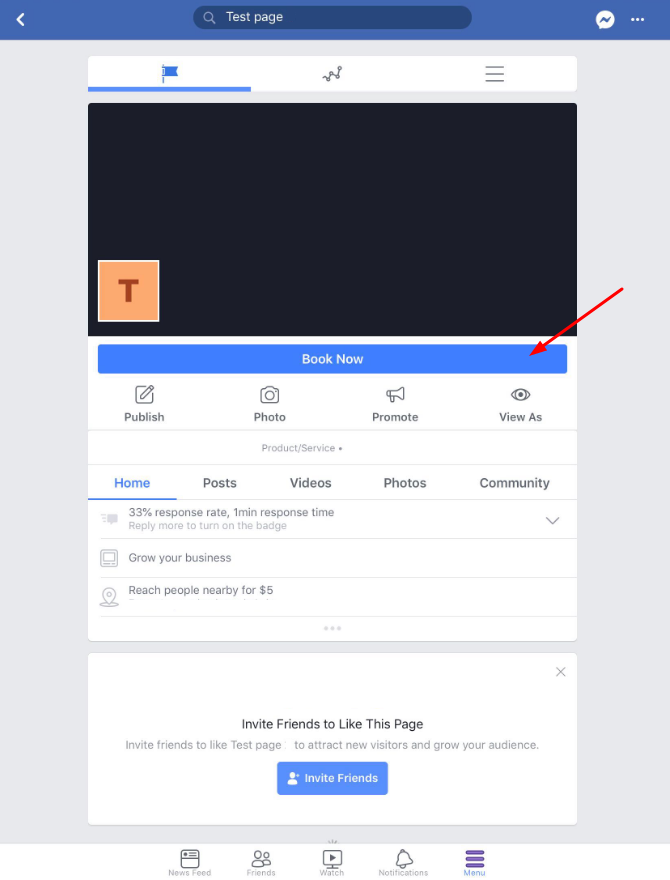
- 3. Click on Finish and you will get the button Book Now as a result, so that your clients will be able to click on it, go to your booking site and book your services.
Facebook widget
How to add SimplyBook.me widget to your Facebook fan page
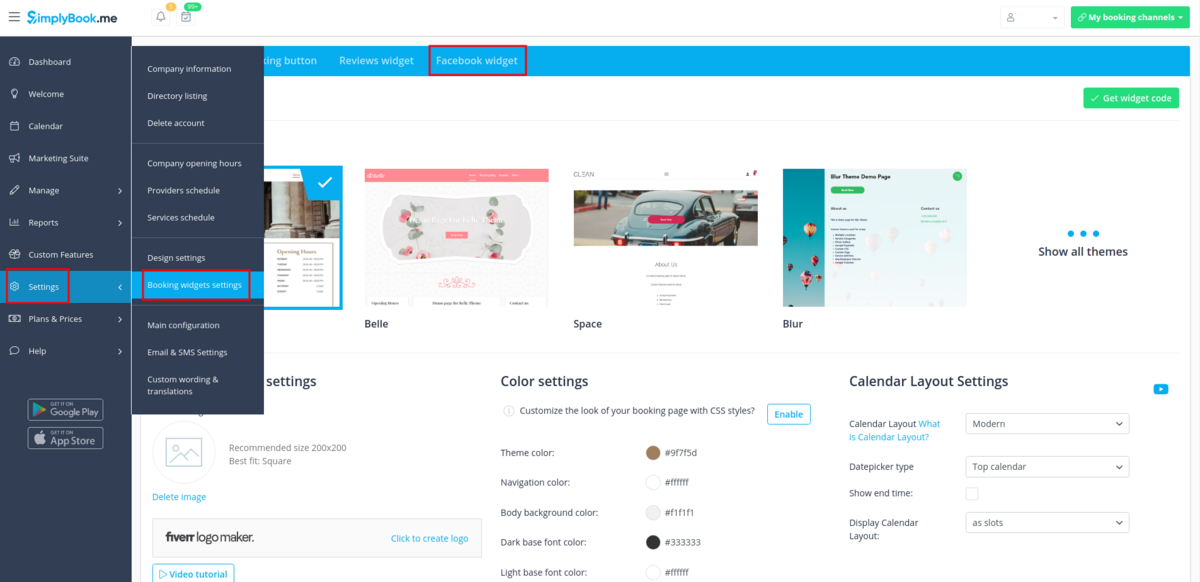
- 1.You can add SimplyBook.me functionality to Facebook fan page (only to fan page, it can't be connected to your personal page) in Settings -> Booking widgets settings -> Facebook widget -> Apply & add to facebook -> choose the page to attach Simplybook to.
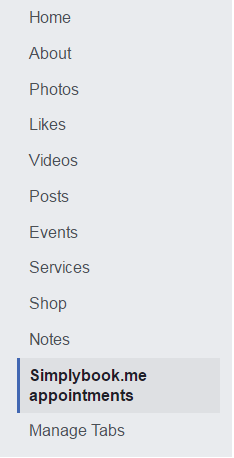
- 2. After you connected SimplyBook.me to Facebook fan page, it is listed in the left-side menu of the page under the photo of your company.
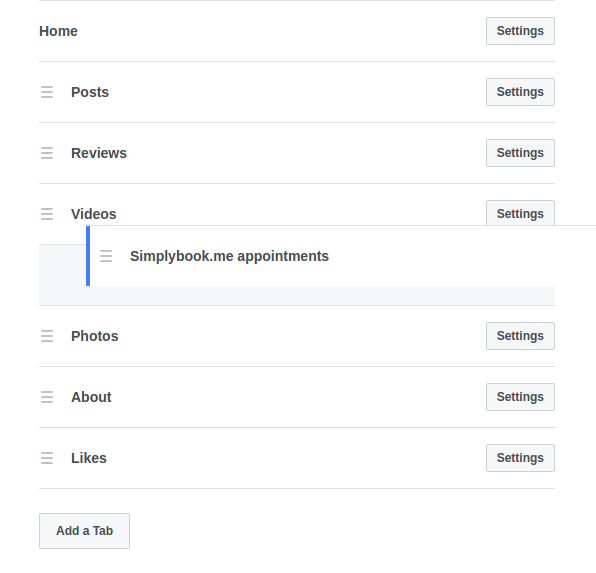
You can press Settings -> Templates and tabs and make SimplyBook.me more visible for clients by dragging and dropping it higher in the list.
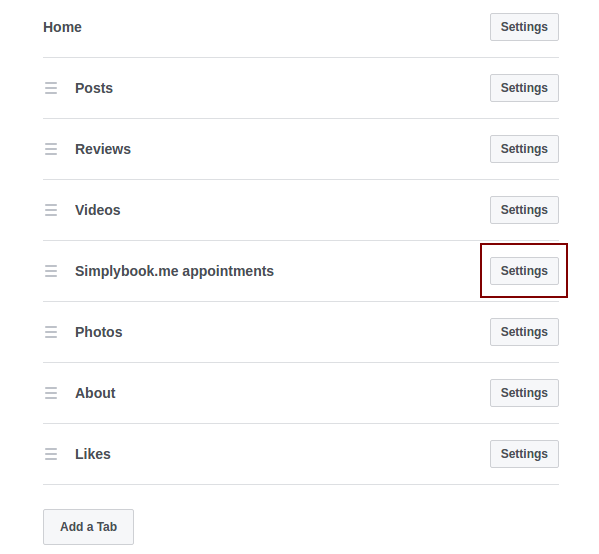
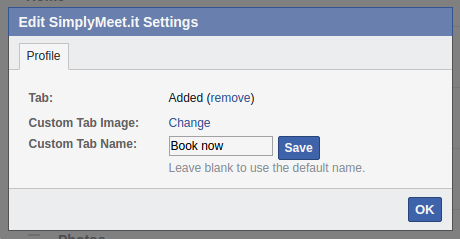
- 3. You may need to change the title Simplybook.me appointments to something else. For this, on your Facebook fan page go to Settings(upper bar) -> Templates and tabs -> SimplyBook.me appointments -> Settings -> Edit settings -> Custom tab name.
How to remove Facebook widget from my Facebook page?
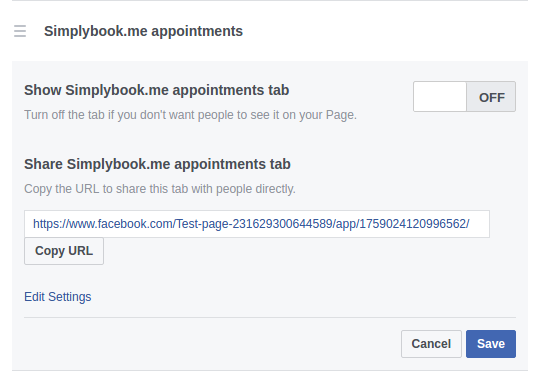
On your Facebook fan page go to Settings(upper bar) -> Templates and tabs -> SimplyBook.me appointments -> Settings -> press Off near Simplybook app to remove this tab and save settings.
Facebook widget is not visible from mobiles
- Unfortunately, Facebook does not show third-party apps from mobiles. Your clients need to access desktop version to book from Facebook.
I cannot change the email when book from Facebook
- When you use Facebook widget, the system perceives a customer as Facebook user and uses his/her data to fill in the details. Thus, by default it uses email under which Facebook is registered. Unfortunately, it is not in our competency to change this, you can try contacting Facebook support to clarify this issue.
How to add a Facebook Messenger chat to your booking page
