Difference between revisions of "File Uploader - Google Drive custom feature"
(Marked this version for translation) |
|||
| (2 intermediate revisions by the same user not shown) | |||
| Line 1: | Line 1: | ||
| + | <languages/> | ||
| + | <translate> | ||
| + | </translate> | ||
{{#seo: | {{#seo: | ||
|title=Cloud Storage custom feature - SimplyBook.me | |title=Cloud Storage custom feature - SimplyBook.me | ||
| Line 4: | Line 7: | ||
|keywords=faq, frequently asked questions, booking software, appointment system questions, appointments online, calendar software, booking system, booking calendar, scheduling software, online appointment scheduling, online scheduling, plugins, custom features, additional functionality, cloud storage, files upload, attach file, attach documents, document upload, file upload | |keywords=faq, frequently asked questions, booking software, appointment system questions, appointments online, calendar software, booking system, booking calendar, scheduling software, online appointment scheduling, online scheduling, plugins, custom features, additional functionality, cloud storage, files upload, attach file, attach documents, document upload, file upload | ||
}} | }} | ||
| + | <translate> | ||
| + | <!--T:1--> | ||
[[File:Cloud storage icon.png|left]] <br><br>Enable this custom feature to allow your clients to upload signed documents or other information directly to your Google drive account. | [[File:Cloud storage icon.png|left]] <br><br>Enable this custom feature to allow your clients to upload signed documents or other information directly to your Google drive account. | ||
<br><br> | <br><br> | ||
| Line 12: | Line 17: | ||
*<span style="background-color:#ffe9e9; padding:5px; border-radius:5px;">The uploaded file should be less than 5Mb size and cannot be archive or executable one.</span> | *<span style="background-color:#ffe9e9; padding:5px; border-radius:5px;">The uploaded file should be less than 5Mb size and cannot be archive or executable one.</span> | ||
| + | <!--T:2--> | ||
<br><br> | <br><br> | ||
;How to use | ;How to use | ||
| + | <!--T:3--> | ||
1. Enable this option on your <span style="background-color:#d4f8e5; padding:5px; border-radius:5px;">Custom features</span> page -> <span style="background-color:#d4f8e5; padding:5px; border-radius:5px;">Adding more to the Booking Website</span> category. | 1. Enable this option on your <span style="background-color:#d4f8e5; padding:5px; border-radius:5px;">Custom features</span> page -> <span style="background-color:#d4f8e5; padding:5px; border-radius:5px;">Adding more to the Booking Website</span> category. | ||
[[File:Google drive enable path.png|1200px|center]] | [[File:Google drive enable path.png|1200px|center]] | ||
| Line 24: | Line 31: | ||
[[File:Google drive authenticated.png|1200px|center]] | [[File:Google drive authenticated.png|1200px|center]] | ||
<br><br> | <br><br> | ||
| − | 4. Navigate to <span style="background-color:#d4f8e5; padding:5px; border-radius:5px;">Manage</span> -> <span style="background-color:#cdeffc; padding:5px; border-radius:5px;">[[Intake_Forms_custom_feature|Intake forms]]</span> or <span style="background-color:#d4f8e5; padding:5px; border-radius:5px;">Manage</span> -> <span style="background-color:#cdeffc; padding:5px; border-radius:5px;">[[Client_Fields_Custom_Feature|Client fields]]</span> (or enable one or both features if needed) and create <span style="background-color:#d4f8e5; padding:5px; border-radius:5px;">File Uploader - Google Drive</span> form. | + | 4. Navigate to <span style="background-color:#d4f8e5; padding:5px; border-radius:5px;">Manage</span> -> <span style="background-color:#cdeffc; padding:5px; border-radius:5px;">[[Special:MyLanguage/Intake_Forms_custom_feature|Intake forms]]</span> or <span style="background-color:#d4f8e5; padding:5px; border-radius:5px;">Manage</span> -> <span style="background-color:#cdeffc; padding:5px; border-radius:5px;">[[Special:MyLanguage/Client_Fields_Custom_Feature|Client fields]]</span> (or enable one or both features if needed) and create <span style="background-color:#d4f8e5; padding:5px; border-radius:5px;">File Uploader - Google Drive</span> form. |
Make it obligatory or not depending on your needs. | Make it obligatory or not depending on your needs. | ||
[[File:Google drive field type.png|1200px|center]] | [[File:Google drive field type.png|1200px|center]] | ||
<br><br> | <br><br> | ||
| − | 5. After you have created the desired forms the clients will be able to upload their files during the booking process <span style="background-color:#cdeffc; padding:5px; border-radius:5px;">([[Intake_Forms_custom_feature|Intake forms]])</span> | + | 5. After you have created the desired forms the clients will be able to upload their files during the booking process <span style="background-color:#cdeffc; padding:5px; border-radius:5px;">([[Special:MyLanguage/Intake_Forms_custom_feature|Intake forms]])</span> |
[[File:Cloud storage client side booking form.png|1200px|center]] | [[File:Cloud storage client side booking form.png|1200px|center]] | ||
<br><br> | <br><br> | ||
| − | or sign up <span style="background-color:#cdeffc; padding:5px; border-radius:5px;">([[Client_Fields_Custom_Feature|Client fields]])</span> | + | or sign up <span style="background-color:#cdeffc; padding:5px; border-radius:5px;">([[Special:MyLanguage/Client_Fields_Custom_Feature|Client fields]])</span> |
[[File:Cloud storage client side sign up.png|1200px|center]] | [[File:Cloud storage client side sign up.png|1200px|center]] | ||
<br><br> | <br><br> | ||
| − | 6. From admin side you will be able to see and download the files either <span style="background-color:#d4f8e5; padding:5px; border-radius:5px;">in the booking popup</span> on the Calendar page if it is an <span style="background-color:#cdeffc; padding:5px; border-radius:5px;">[[Intake_Forms_custom_feature|intake form]]</span> | + | 6. From admin side you will be able to see and download the files either <span style="background-color:#d4f8e5; padding:5px; border-radius:5px;">in the booking popup</span> on the Calendar page if it is an <span style="background-color:#cdeffc; padding:5px; border-radius:5px;">[[Special:MyLanguage/Intake_Forms_custom_feature|intake form]]</span> |
[[File:Cloud storage booking management.png|1200px|center]] | [[File:Cloud storage booking management.png|1200px|center]] | ||
<br><br> | <br><br> | ||
| − | or from <span style="background-color:#d4f8e5; padding:5px; border-radius:5px;">Manage</span> -> <span style="background-color:#d4f8e5; padding:5px; border-radius:5px;">Clients</span> -> <span style="background-color:#d4f8e5; padding:5px; border-radius:5px;">edit the client record</span> if you have it as a <span style="background-color:#cdeffc; padding:5px; border-radius:5px;">[[Client_Fields_Custom_Feature|client field]].</span> | + | or from <span style="background-color:#d4f8e5; padding:5px; border-radius:5px;">Manage</span> -> <span style="background-color:#d4f8e5; padding:5px; border-radius:5px;">Clients</span> -> <span style="background-color:#d4f8e5; padding:5px; border-radius:5px;">edit the client record</span> if you have it as a <span style="background-color:#cdeffc; padding:5px; border-radius:5px;">[[Special:MyLanguage/Client_Fields_Custom_Feature|client field]].</span> |
[[File:Cloud storage client management.png|1200px|center]] | [[File:Cloud storage client management.png|1200px|center]] | ||
<br><br> | <br><br> | ||
And, for sure, you will be able to manually upload the files during the new booking or client record creation/editing from admin side if necessary. | And, for sure, you will be able to manually upload the files during the new booking or client record creation/editing from admin side if necessary. | ||
| + | <br><br> | ||
| + | 7. If you are also using <span style="background-color:#cdeffc; padding:5px; border-radius:5px;">[[Special:MyLanguage/SOAP_with_Encryption_custom_feature| SOAP with Encryption]]</span> custom feature you can also enable attaching the file in the SOAP feature settings on your Custom Features page. | ||
| + | [[File:File upload for soap enable.png|1200px|border|center|link=https://help.simplybook.me/images/9/98/File_upload_for_soap_enable.png]] | ||
| + | <br><br> | ||
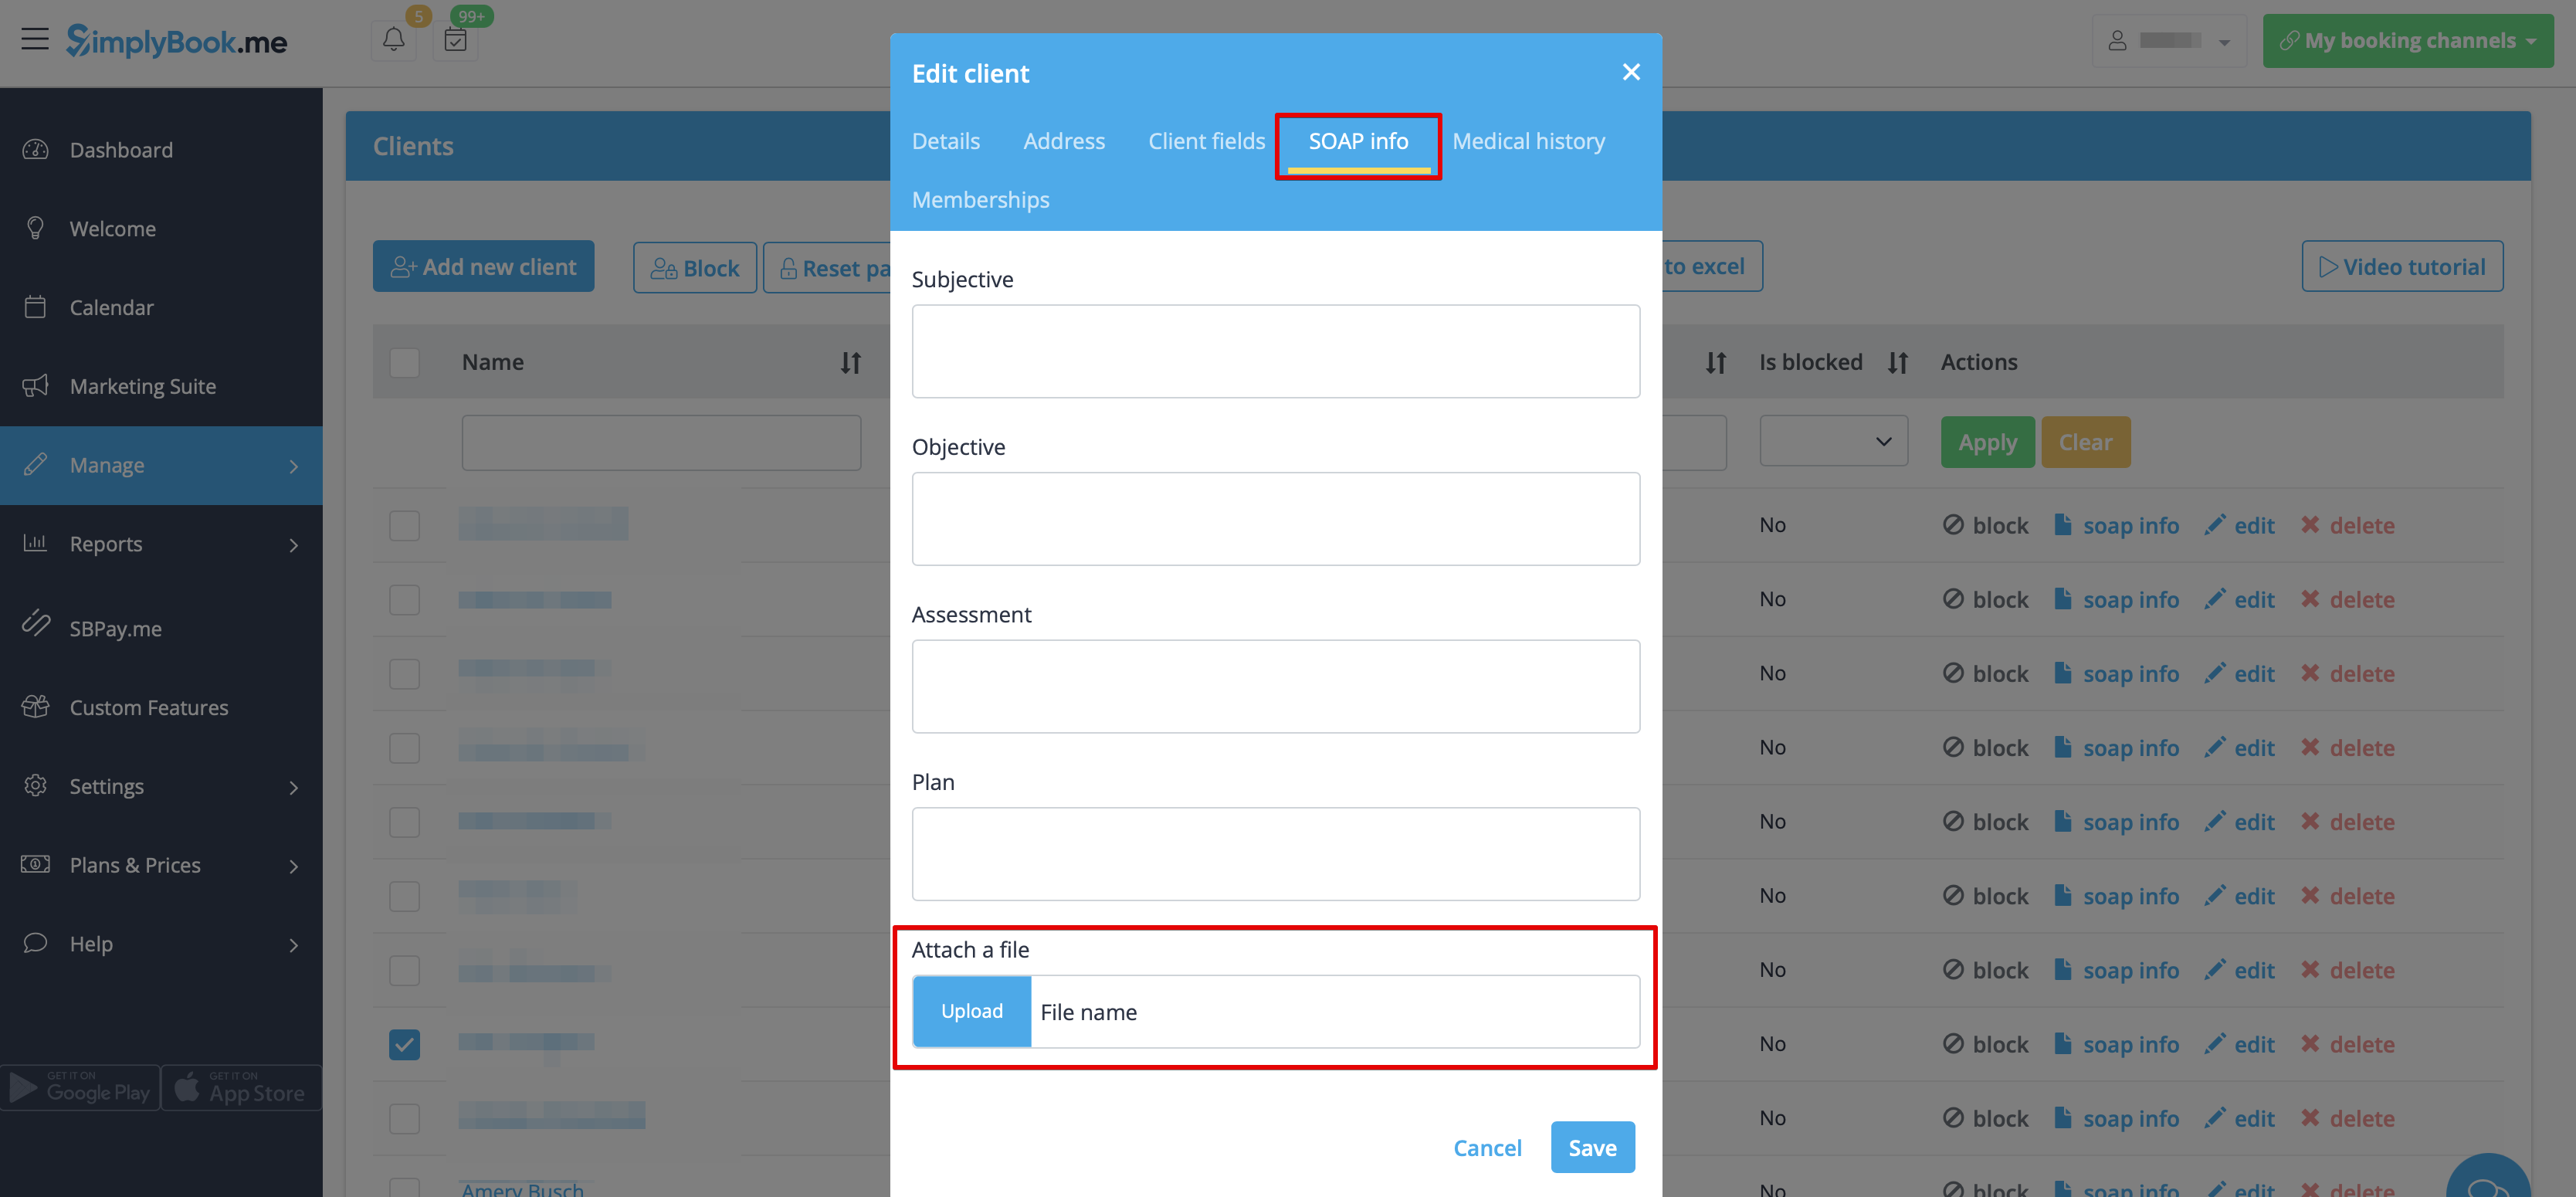
| + | As the result you will have the corresponding form in <span style="background-color:#d4f8e5; padding:5px; border-radius:5px;">Manage</span> -> <span style="background-color:#d4f8e5; padding:5px; border-radius:5px;">Clients</span> -> <span style="background-color:#d4f8e5; padding:5px; border-radius:5px;">SOAP info</span> -> <span style="background-color:#d4f8e5; padding:5px; border-radius:5px;">Attach a file.</span> | ||
| + | [[File:File upload for soap upload form.png|1200px|border|center|link=https://help.simplybook.me/images/c/cf/File_upload_for_soap_upload_form.png]] | ||
<br><br><br><br> | <br><br><br><br> | ||
| + | </translate> | ||
Latest revision as of 11:37, 18 March 2024
Enable this custom feature to allow your clients to upload signed documents or other information directly to your Google drive account.
Please note!
- This functionality is not fully supported in the admin application. If you are using it and need to create bookings from there please make file fields as optional as it is not currently possible to upload files in the application. However you will be able to see files names in already made appointments.
- The uploaded file should be less than 5Mb size and cannot be archive or executable one.
- How to use
1. Enable this option on your Custom features page -> Adding more to the Booking Website category.

2. On the right side of the page you will see it settings. Click on Authorize to connect to your Google Drive and give the requested permissions.

3. After successful connection you will be able to see its status and use the link to the files folder on your Google Drive from the same Custom Features page.

4. Navigate to Manage -> Intake forms or Manage -> Client fields (or enable one or both features if needed) and create File Uploader - Google Drive form.
Make it obligatory or not depending on your needs.

5. After you have created the desired forms the clients will be able to upload their files during the booking process (Intake forms)

or sign up (Client fields)

6. From admin side you will be able to see and download the files either in the booking popup on the Calendar page if it is an intake form

or from Manage -> Clients -> edit the client record if you have it as a client field.

And, for sure, you will be able to manually upload the files during the new booking or client record creation/editing from admin side if necessary.
7. If you are also using SOAP with Encryption custom feature you can also enable attaching the file in the SOAP feature settings on your Custom Features page.

As the result you will have the corresponding form in Manage -> Clients -> SOAP info -> Attach a file.