Difference between revisions of "Importing the list of clients"
From SimplyBook.me
| Line 1: | Line 1: | ||
====How to import clients==== | ====How to import clients==== | ||
| − | |||
| − | |||
| − | |||
<br><br> | <br><br> | ||
:'''Attention!''' It is forbidden to import a client list with emails and client information where the clients have not specifically granted you the right to do so. | :'''Attention!''' It is forbidden to import a client list with emails and client information where the clients have not specifically granted you the right to do so. | ||
| + | <br> | ||
:'''Please note''' that this feature is available with Standard and Premium subscriptions only(former Advanced, Gold and Platinum). | :'''Please note''' that this feature is available with Standard and Premium subscriptions only(former Advanced, Gold and Platinum). | ||
| + | <br><br> | ||
| + | |||
| + | :1. Enable "Import Clients" custom feature on your Custom features page: | ||
| + | [[File:Import clients enable path.png | center]] | ||
<br><br> | <br><br> | ||
:2. Prepare your Excel file. | :2. Prepare your Excel file. | ||
| Line 13: | Line 15: | ||
<br><br> | <br><br> | ||
:3. Go to Manage//Clients//Import from CSV. | :3. Go to Manage//Clients//Import from CSV. | ||
| − | [[ File:Import | + | [[ File:Import clients file upload path.png | center]] |
<br><br> | <br><br> | ||
:4. Press "Choose file" and select the prepared file. | :4. Press "Choose file" and select the prepared file. | ||
| − | [[File: | + | [[File:Import clients file upload step1.png | center]] |
<br><br> | <br><br> | ||
:5. Assign values to the columns from drop-down lists in the upper bar (above each column, marked with black arrows). Assign "name", "email" and "phone". | :5. Assign values to the columns from drop-down lists in the upper bar (above each column, marked with black arrows). Assign "name", "email" and "phone". | ||
| − | [[File:Import clients | + | [[File: Import clients assigning column headers.png | center]] |
<br><br> | <br><br> | ||
| − | :6. Press " | + | :6. Press "Confirm clients import". |
:''Please note that only 10 clients will be shown in preview, but after you import, all clients will be shown.'' | :''Please note that only 10 clients will be shown in preview, but after you import, all clients will be shown.'' | ||
<br><br> | <br><br> | ||
;If you can't import clients, please check the possible reasons: | ;If you can't import clients, please check the possible reasons: | ||
:1. Format of .csv file is incorrect. It should be saved in .csv with comma or tab separation.<br/> | :1. Format of .csv file is incorrect. It should be saved in .csv with comma or tab separation.<br/> | ||
| − | :2. There is some text above the data that | + | :2. There is some text above the data or unnecessary columns that prevent successful import. Please delete the text.<br/> |
:3. Values are not assigned. Use drop-down menus above the columns to assign values "name", "email", "phone", etc. | :3. Values are not assigned. Use drop-down menus above the columns to assign values "name", "email", "phone", etc. | ||
<br><br> | <br><br> | ||
Revision as of 15:13, 27 June 2018
How to import clients
- Attention! It is forbidden to import a client list with emails and client information where the clients have not specifically granted you the right to do so.
- Please note that this feature is available with Standard and Premium subscriptions only(former Advanced, Gold and Platinum).
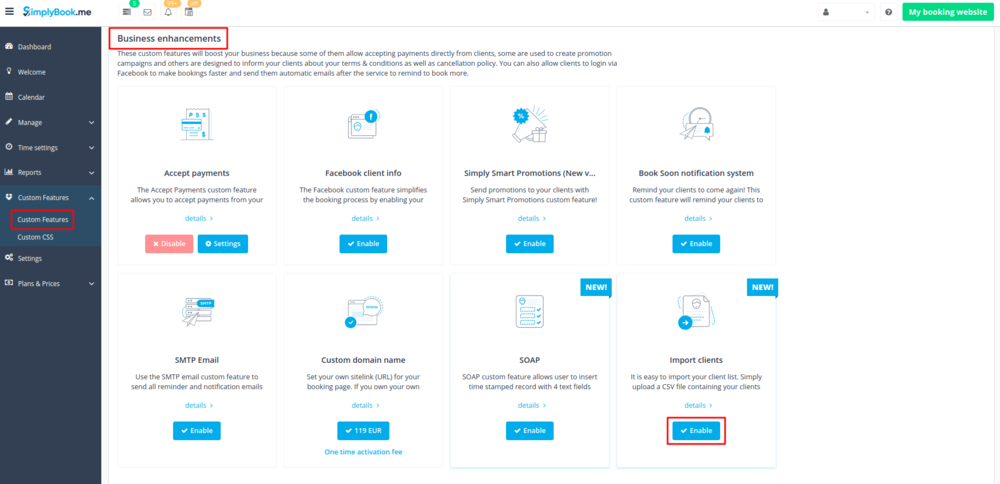
- 1. Enable "Import Clients" custom feature on your Custom features page:
- 2. Prepare your Excel file.
- - No text above the list of clients should be written
- - Make sure all cells are correctly displayed
- - Save file in .csv format with comma separation.
- 3. Go to Manage//Clients//Import from CSV.
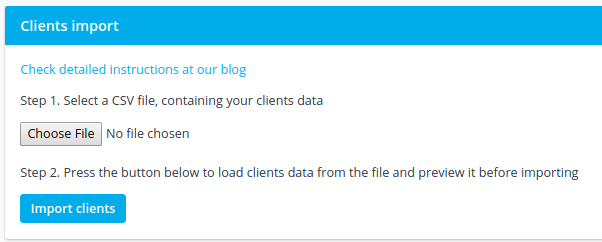
- 4. Press "Choose file" and select the prepared file.
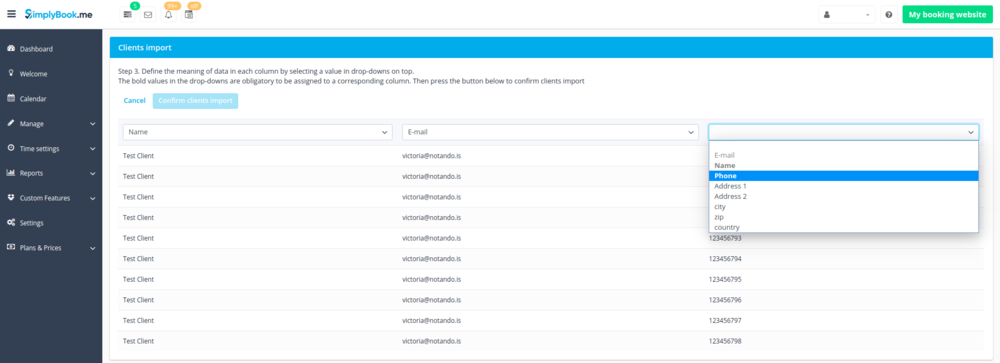
- 5. Assign values to the columns from drop-down lists in the upper bar (above each column, marked with black arrows). Assign "name", "email" and "phone".
- 6. Press "Confirm clients import".
- Please note that only 10 clients will be shown in preview, but after you import, all clients will be shown.
- If you can't import clients, please check the possible reasons
- 1. Format of .csv file is incorrect. It should be saved in .csv with comma or tab separation.
- 2. There is some text above the data or unnecessary columns that prevent successful import. Please delete the text.
- 3. Values are not assigned. Use drop-down menus above the columns to assign values "name", "email", "phone", etc.


