Difference between revisions of "Service/Provider relations"
| (10 intermediate revisions by the same user not shown) | |||
| Line 6: | Line 6: | ||
<div class="mw-collapsible mw-collapsed" data-expandtext="Show" data-collapsetext="Hide" style="width:800px;"> | <div class="mw-collapsible mw-collapsed" data-expandtext="Show" data-collapsetext="Hide" style="width:800px;"> | ||
| − | <span class="qa">[[How to create schedules for services | + | <span class="qa">[[Adding_services,_providers_and_availability(new_interface)#How_to_set_specific_schedule_for_service | How to create schedules for services]]</span> |
<div class="mw-collapsible-content"> | <div class="mw-collapsible-content"> | ||
| − | : | + | :In our system it is possible to set schedules for each service. In order to do this, follow the next steps:<br/> |
| − | :1. Go to Manage // | + | :1. Go to Manage // Services// Add service and create all necessary services.<br/> |
| − | :2. Then in Manage // | + | :2. Then in Manage // Services click on "Service schedule" tab and set schedule for each service.<br/> |
| − | [[File: | + | [[File:Edit service schedule.png | center ]]<br/> |
| − | :3. In Manage // Services // | + | :3. In Manage // Services // "Service providers" tab you can relate this service to providers by checking corresponding boxes.<br> |
| − | [[File: | + | (Read more about [[Adding_services,_providers_and_availability(new_interface)#Adding_Providers | adding providers]])<br/> |
| − | + | [[File:Attach providers to service v3.png | center]]<br/><br/> | |
</div> | </div> | ||
</div> | </div> | ||
| Line 21: | Line 21: | ||
<span class="qa">[[Events (services on particular dates)]]</span> | <span class="qa">[[Events (services on particular dates)]]</span> | ||
<div class="mw-collapsible-content"> | <div class="mw-collapsible-content"> | ||
| − | :1. | + | <br> |
| + | ==Option 1 (as Service with its own schedule)== | ||
| + | :1. In Manage//Services click on "+" icon to create new service. | ||
| + | <br> | ||
| + | [[File:Create new service.png | center ]] | ||
| + | <br> | ||
| + | :2. In Manage//Services choose "Service schedule" tab on the newly created service switch on the option "Do you want to set service on special days only?". | ||
| + | <br> | ||
| + | [[File: Special days only new.png | center]] | ||
| + | <br><br> | ||
| + | :3. Then use the calendar, click on the dates that you want to open and set the schedule for these dates by moving the sliders(bright blue zone is open time). | ||
| + | <br> | ||
| + | [[File:Special day setup.png | center]] | ||
| + | <br><br> | ||
| + | :If you need to select several dates at once please switch on "Enable group dates selection?", choose the dates to edit and click on "Setup schedule" to set the times. | ||
| + | <br> | ||
| + | [[File:Several dates at once.png |center]] | ||
| + | <br><br> | ||
| + | :4. Connect service to necessary provider in "Service providers" tab. | ||
| − | :2. | + | ==Option 2 (as Event with the help of [[Custom_Features#Classes | Classes]] custom feature)== |
| + | <br> | ||
| + | :1. Enable Classes custom feature on your Custom features page. | ||
| + | [[File:Classes enable path new cf.png | center]] | ||
| + | <br><br> | ||
| + | :2. Navigate to Manage//Classes page and create a new class. | ||
| + | [[File:Create new class v3.png | center ]] | ||
| + | <br/><br/> | ||
| + | :3. Choose "Class schedule" tab on the newly created class and switch on the option "Do you want to set service on special days only?" | ||
| + | :4. Then use the calendar, click on the dates that you want to open and set the schedule for these dates by moving the sliders(bright blue zone is open time). | ||
| + | <br><br> | ||
| − | + | ;How events(classes) work | |
| − | + | <br> | |
| − | + | The general logic of event(class) is creating Service + Provider related to it with dates selected in the settings of the event(class) as special days. When you use [[Custom_Features#Classes | Classes]] custom feature the event creates service+provider related to it with identical name. In order to preserve proper functioning of the event on the dates needed, you should not delete provider with identical name related to event (but you can easily change his/her name) and should not disconnect provider from the event. <br/> | |
| − | + | [[File:Event client side booking.png|1200px| center]] | |
| − | + | <br><br> | |
| − | |||
| − | |||
| − | |||
| − | |||
| − | |||
| − | |||
| − | The general logic of event is creating Service + Provider related to it with dates selected in the settings of event as special days | ||
| − | [[File: | ||
</div> | </div> | ||
</div> | </div> | ||
| Line 44: | Line 64: | ||
<span class="qa">[[Recurring services(packs)]]</span> | <span class="qa">[[Recurring services(packs)]]</span> | ||
<div class="mw-collapsible-content"> | <div class="mw-collapsible-content"> | ||
| + | <br><br> | ||
You can create recurring services and enable your clients to book a particular amount of sessions. | You can create recurring services and enable your clients to book a particular amount of sessions. | ||
| − | + | <br> | |
| + | <br> | ||
'''How to create recurring service:''' | '''How to create recurring service:''' | ||
| + | <br><br> | ||
| + | :1. Go to Manage // Services // "Time details" tab on the needed service. | ||
| − | + | :2. Enable "Make service recurring (pack)?" there | |
| − | + | [[File:Make service recurring v3.png | center]] | |
| − | :2. | + | <br><br> |
| − | + | :4. Choose when your service will repeat. Select "Repeat weekly (please select week days)" and day/days of the week (e.g Mondays) when your service occurs. <br> | |
| − | + | :If you need more specific intervals, you can choose "Or repeat each" and set your service to reoccur every 14 days, for example. | |
| − | [[File: | ||
| − | :4. Choose when your service will repeat. Select " | ||
:5. Choose the mode for the bookings. Available modes: | :5. Choose the mode for the bookings. Available modes: | ||
| − | ::'''Not allow''' - not allow recurring bookings if one of dates in between unavailable. | + | ::'''Not allow''' - not allow recurring bookings if one of dates in between unavailable (Using the example below, if 15th is busy, the system will not allow to book 1st and 8th, only days after busy day). |
| − | ::'''Book only on available date''' - only book on available dates and skip unavailable dates. | + | ::'''Book only on available date''' - only book on available dates and skip unavailable dates (Using the example below, if 15th is busy, the system will allow you to book 1st and 8th and 22nd (only 3 out of 4). |
| − | ::'''Add appointments''' - book on all available dates and add dates behind for unavailable in between dates. | + | ::'''Add appointments''' - book on all available dates and add dates behind for unavailable in between dates (Using the example below, if 15th is busy, the system will book 1 and 8th and 22nd + 1 day instead of busy 15th, which is August 29th). |
:6. Set the number of times your service will repeat in "Repeat count". | :6. Set the number of times your service will repeat in "Repeat count". | ||
::''Example'': If you set up Mondays and repeat count 4, when clients book this service from booking page, they will book 4 Mondays at once. | ::''Example'': If you set up Mondays and repeat count 4, when clients book this service from booking page, they will book 4 Mondays at once. | ||
| − | + | [[File:Recurring dates example.png |center]] | |
| − | '''Please note!''' | + | <br><br> |
| + | '''Please note!''' If you make the recurring service paid, the amount that you set as the service price is the total for all the sessions.<br> | ||
| + | It is currently not possible to set single session price for the recurring service packs.<br> | ||
| + | That is why if you have single service and decide to make a recurring booking for it from the admin side/[[Point_of_Sale_custom_feature|POS]] interface, its price will not be multiplied by the number of selected sessions. | ||
| + | <br><br><br><br> | ||
</div> | </div> | ||
</div> | </div> | ||
<br/> | <br/> | ||
<div class="mw-collapsible mw-collapsed" data-expandtext="Show" data-collapsetext="Hide" style="width:800px;"> | <div class="mw-collapsible mw-collapsed" data-expandtext="Show" data-collapsetext="Hide" style="width:800px;"> | ||
| − | <span class="qa">[[ | + | <span class="qa">[[Categories_and_Locations#How_to_add_Location| Working on different locations]]</span> |
<div class="mw-collapsible-content"> | <div class="mw-collapsible-content"> | ||
| − | [[ | + | [[Custom_Features#Multiple_Locations| '''Locations''']] are designed to group providers. Can be added with the help of [[Custom_Features#Multiple_Locations|Multiple Locations custom feature]]. |
;How to add: | ;How to add: | ||
| − | Enable | + | Enable "Multiple Locations" custom feature and add locations either in the settings of the feature or in Manage//Service Providers//Add location. Click on "Location providers" tab of the location and check corresponding boxes to connect providers with location. |
</div> | </div> | ||
</div> | </div> | ||
<br/> | <br/> | ||
<div class="mw-collapsible mw-collapsed" data-expandtext="Show" data-collapsetext="Hide" style="width:800px;"> | <div class="mw-collapsible mw-collapsed" data-expandtext="Show" data-collapsetext="Hide" style="width:800px;"> | ||
| − | <span class="qa">[[ | + | <span class="qa">[[Categories_and_Locations#How_to_add_Category| Having many services]]</span> |
<div class="mw-collapsible-content"> | <div class="mw-collapsible-content"> | ||
| − | [[ | + | [[Custom_Features#Service_Categories| '''Categories''']] are designed to group services. Can be added with the help of [[Custom_Features#Service_Categories| Service Categories]] custom feature. |
;How to add: | ;How to add: | ||
| − | Enable [[ | + | Enable [[Custom_Features#Service_Categories | Service Categories]] feature. In Manage//Services//Add category create all necessary categories. Click on "Category services" tab of the category and check necessary boxes to connect services with category. |
</div> | </div> | ||
</div> | </div> | ||
<br/> | <br/> | ||
<div class="mw-collapsible mw-collapsed" data-expandtext="Show" data-collapsetext="Hide" style="width:800px;"> | <div class="mw-collapsible mw-collapsed" data-expandtext="Show" data-collapsetext="Hide" style="width:800px;"> | ||
| − | <span class="qa">[[Providers do only certain services]]</span> | + | <span class="qa">[[Adding_services,_providers_and_availability(new_interface)#How_to_attach_services_to_provider | Providers do only certain services]]</span> |
<div class="mw-collapsible-content"> | <div class="mw-collapsible-content"> | ||
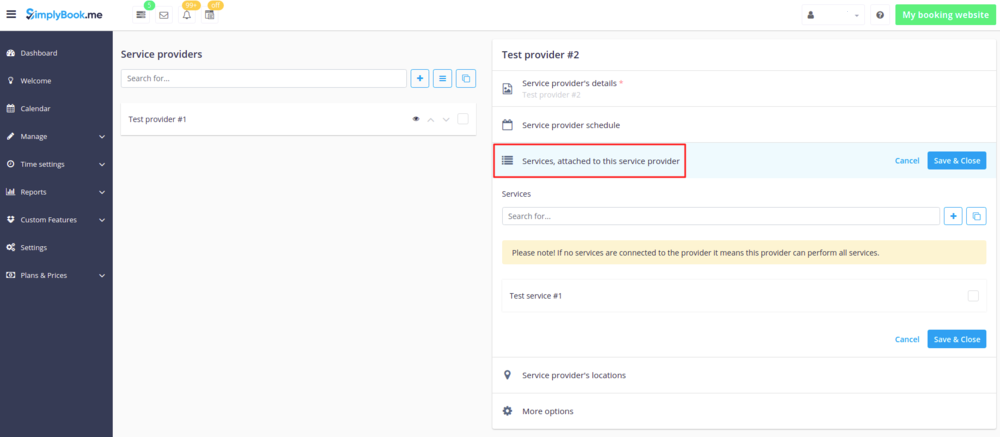
| − | In | + | In Manage// Service Providers // select the desired provider // Services, attached to this service provider check boxes with necessary services to connect them.<br/> |
| − | [[File: | + | [[File:Attach provider to services.png | center ]]<br/> |
| − | |||
| − | |||
| − | |||
| − | |||
| − | |||
</div> | </div> | ||
</div> | </div> | ||
<br/> | <br/> | ||
Latest revision as of 07:40, 4 August 2021
How to create schedules for services
- In our system it is possible to set schedules for each service. In order to do this, follow the next steps:
- 1. Go to Manage // Services// Add service and create all necessary services.
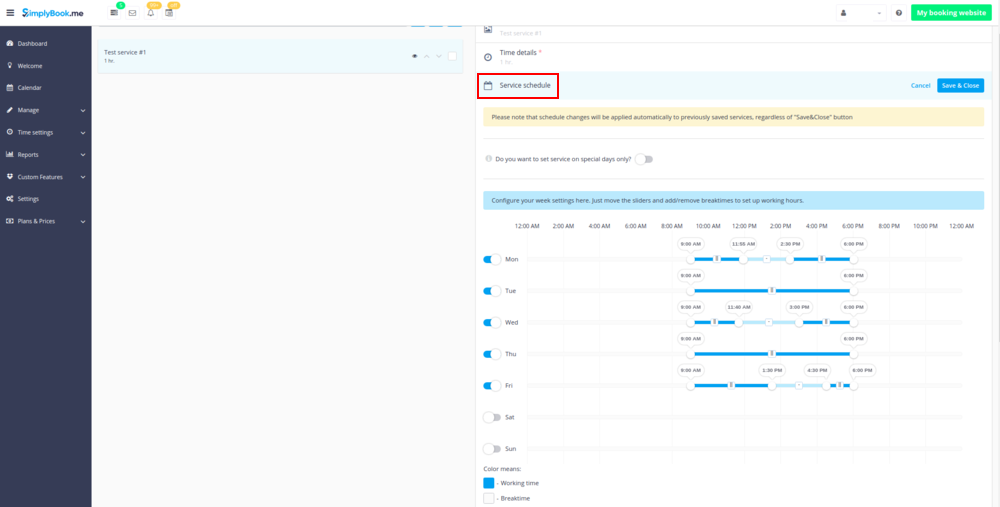
- 2. Then in Manage // Services click on "Service schedule" tab and set schedule for each service.
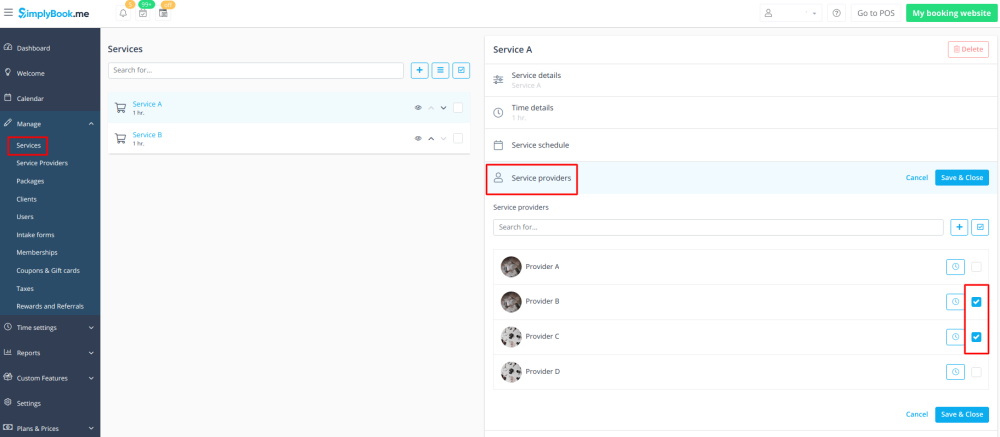
- 3. In Manage // Services // "Service providers" tab you can relate this service to providers by checking corresponding boxes.
(Read more about adding providers)
Events (services on particular dates)
Option 1 (as Service with its own schedule)
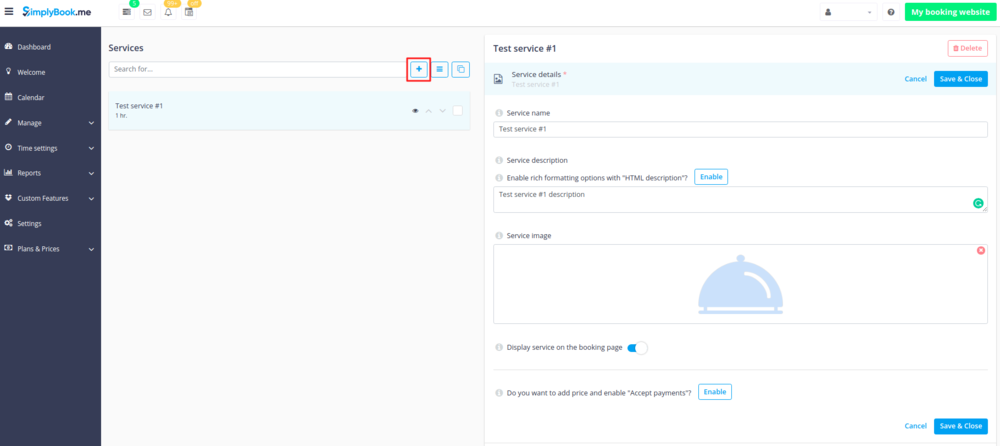
- 1. In Manage//Services click on "+" icon to create new service.
- 2. In Manage//Services choose "Service schedule" tab on the newly created service switch on the option "Do you want to set service on special days only?".
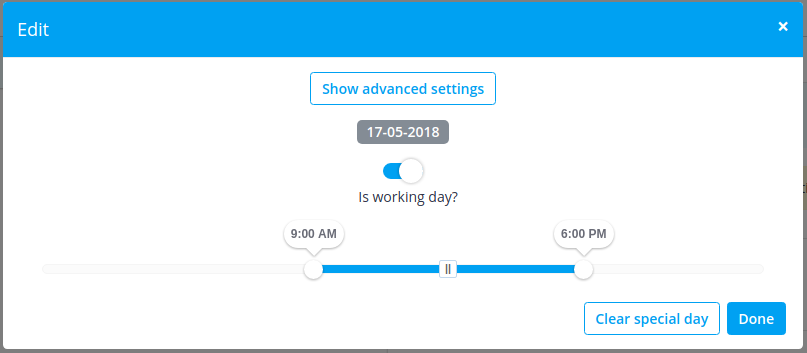
- 3. Then use the calendar, click on the dates that you want to open and set the schedule for these dates by moving the sliders(bright blue zone is open time).
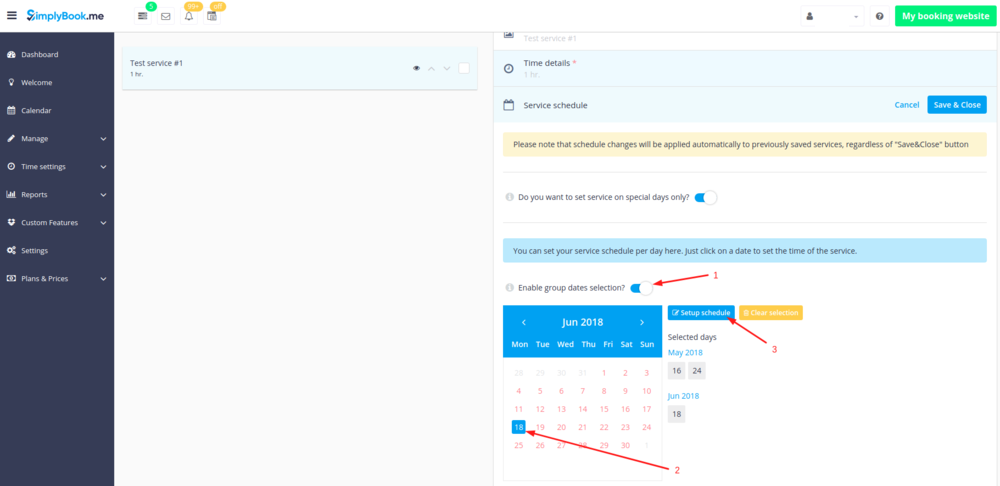
- If you need to select several dates at once please switch on "Enable group dates selection?", choose the dates to edit and click on "Setup schedule" to set the times.
- 4. Connect service to necessary provider in "Service providers" tab.
Option 2 (as Event with the help of Classes custom feature)
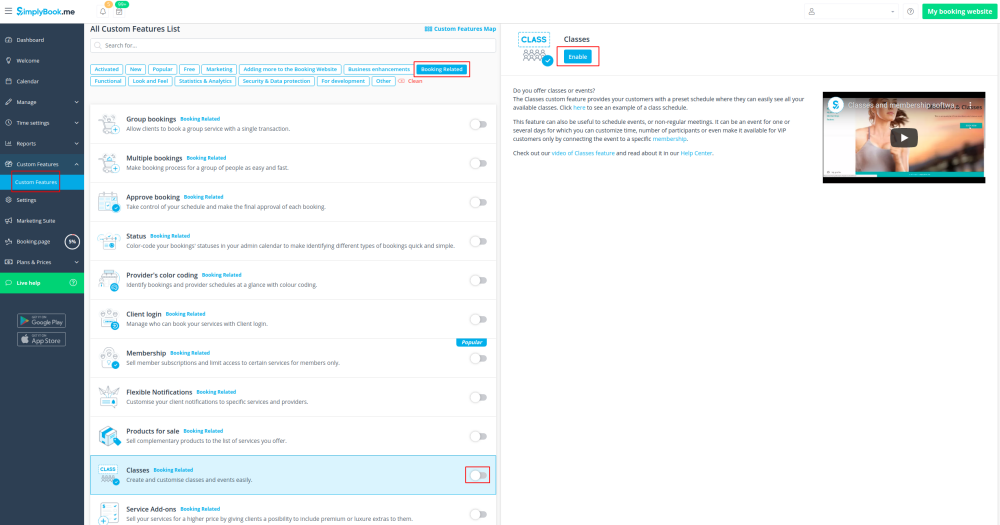
- 1. Enable Classes custom feature on your Custom features page.
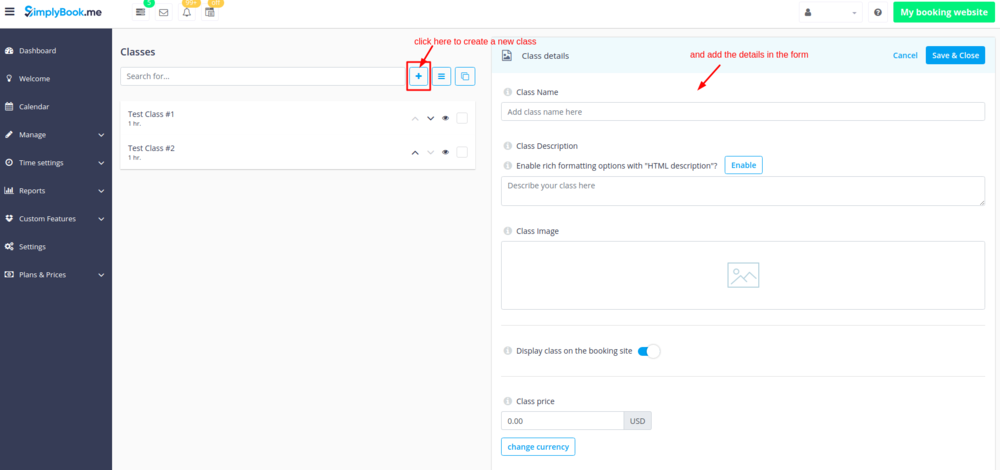
- 2. Navigate to Manage//Classes page and create a new class.
- 3. Choose "Class schedule" tab on the newly created class and switch on the option "Do you want to set service on special days only?"
- 4. Then use the calendar, click on the dates that you want to open and set the schedule for these dates by moving the sliders(bright blue zone is open time).
- How events(classes) work
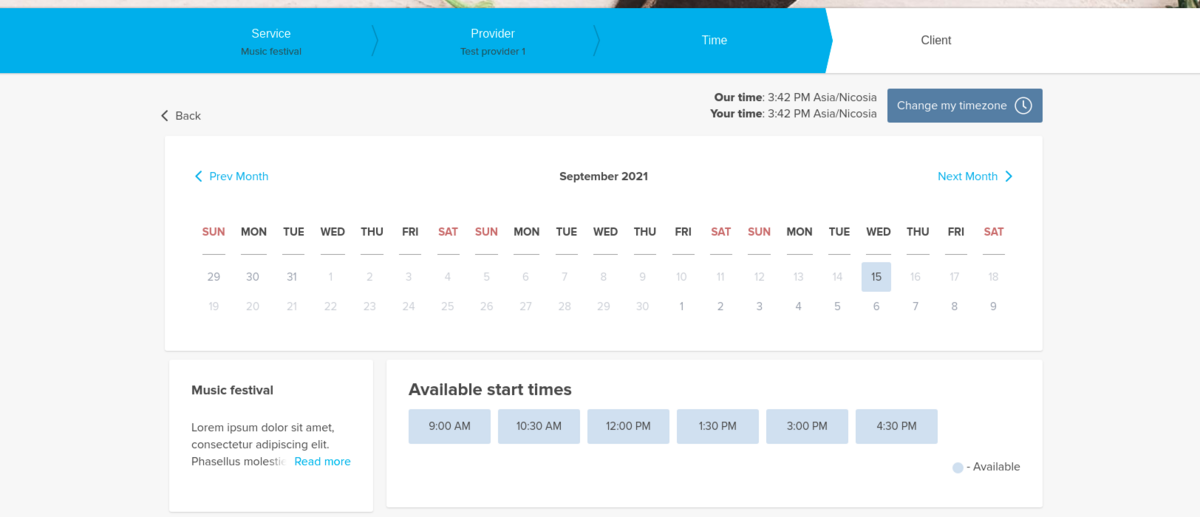
The general logic of event(class) is creating Service + Provider related to it with dates selected in the settings of the event(class) as special days. When you use Classes custom feature the event creates service+provider related to it with identical name. In order to preserve proper functioning of the event on the dates needed, you should not delete provider with identical name related to event (but you can easily change his/her name) and should not disconnect provider from the event.
You can create recurring services and enable your clients to book a particular amount of sessions.
How to create recurring service:
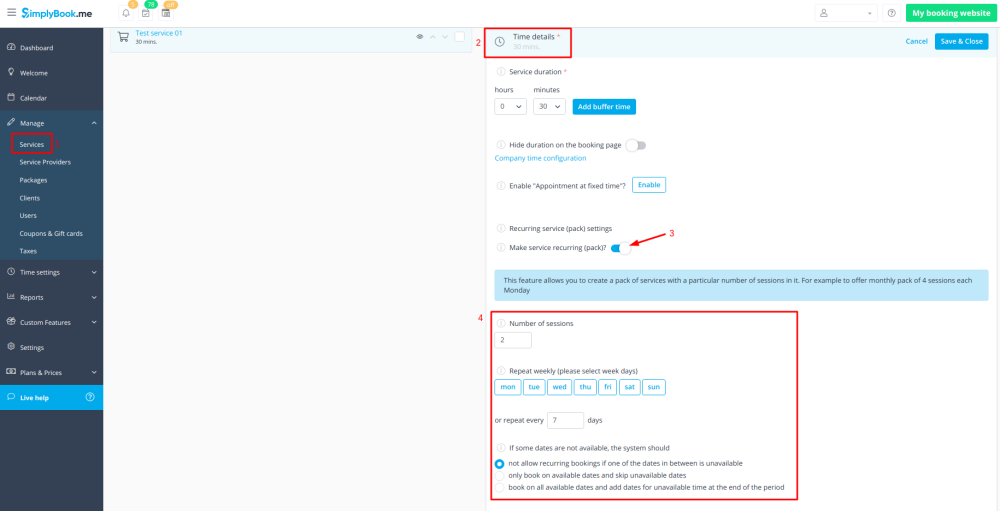
- 1. Go to Manage // Services // "Time details" tab on the needed service.
- 2. Enable "Make service recurring (pack)?" there
- 4. Choose when your service will repeat. Select "Repeat weekly (please select week days)" and day/days of the week (e.g Mondays) when your service occurs.
- If you need more specific intervals, you can choose "Or repeat each" and set your service to reoccur every 14 days, for example.
- 5. Choose the mode for the bookings. Available modes:
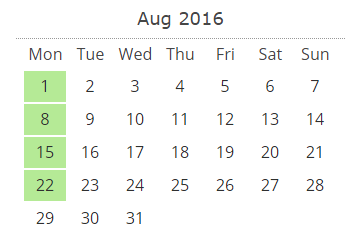
- Not allow - not allow recurring bookings if one of dates in between unavailable (Using the example below, if 15th is busy, the system will not allow to book 1st and 8th, only days after busy day).
- Book only on available date - only book on available dates and skip unavailable dates (Using the example below, if 15th is busy, the system will allow you to book 1st and 8th and 22nd (only 3 out of 4).
- Add appointments - book on all available dates and add dates behind for unavailable in between dates (Using the example below, if 15th is busy, the system will book 1 and 8th and 22nd + 1 day instead of busy 15th, which is August 29th).
- 6. Set the number of times your service will repeat in "Repeat count".
- Example: If you set up Mondays and repeat count 4, when clients book this service from booking page, they will book 4 Mondays at once.
Please note! If you make the recurring service paid, the amount that you set as the service price is the total for all the sessions.
It is currently not possible to set single session price for the recurring service packs.
That is why if you have single service and decide to make a recurring booking for it from the admin side/POS interface, its price will not be multiplied by the number of selected sessions.
Working on different locations
Locations are designed to group providers. Can be added with the help of Multiple Locations custom feature.
- How to add
Enable "Multiple Locations" custom feature and add locations either in the settings of the feature or in Manage//Service Providers//Add location. Click on "Location providers" tab of the location and check corresponding boxes to connect providers with location.
Categories are designed to group services. Can be added with the help of Service Categories custom feature.
- How to add
Enable Service Categories feature. In Manage//Services//Add category create all necessary categories. Click on "Category services" tab of the category and check necessary boxes to connect services with category.
