Difference between revisions of "Multiple Locations custom feature"
| (3 intermediate revisions by the same user not shown) | |||
| Line 1: | Line 1: | ||
| + | <languages/> | ||
| + | <translate> | ||
| + | </translate> | ||
{{#seo: | {{#seo: | ||
|title=Multiple Locations custom feature - SimplyBook.me | |title=Multiple Locations custom feature - SimplyBook.me | ||
| Line 4: | Line 7: | ||
|keywords=faq, frequently asked questions, booking software, appointment system questions, appointments online, calendar software, booking system, booking calendar, scheduling software, online appointment scheduling, online scheduling, plugins, custom features, additional functionality, locations, several locations, provider location | |keywords=faq, frequently asked questions, booking software, appointment system questions, appointments online, calendar software, booking system, booking calendar, scheduling software, online appointment scheduling, online scheduling, plugins, custom features, additional functionality, locations, several locations, provider location | ||
}} | }} | ||
| + | <translate> | ||
| + | <!--T:1--> | ||
[[File:Unit location new icon.png |left]] | [[File:Unit location new icon.png |left]] | ||
| Line 14: | Line 19: | ||
<br><br> | <br><br> | ||
__TOC__ | __TOC__ | ||
| − | =How to use= | + | =How to use= <!--T:2--> |
1. Enable Multiple Locations custom feature in Custom Feature section//Adding more to booking website. | 1. Enable Multiple Locations custom feature in Custom Feature section//Adding more to booking website. | ||
| − | [[File: | + | [[File:Multiple locations enable path redesigned.png|1200px| center|link=https://help.simplybook.me/images/0/06/Multiple_locations_enable_path_redesigned.png]] |
<br><br> | <br><br> | ||
2. Add locations either in the settings of the Custom Feature or in Manage//Service Providers//Add location. | 2. Add locations either in the settings of the Custom Feature or in Manage//Service Providers//Add location. | ||
| − | [[File:Create new location | + | [[File:Create new location form redesigned.png|1200px | center|link=https://help.simplybook.me/images/8/8b/Create_new_location_form_redesigned.png ]]<br/> |
3. Click on "Location providers" tab for corresponding location and check necessary boxes to connect service providers with location.<br/> | 3. Click on "Location providers" tab for corresponding location and check necessary boxes to connect service providers with location.<br/> | ||
| − | [[File: | + | [[File:Connect location to providers redesigned.png|1200px |center|link=https://help.simplybook.me/images/8/84/Connect_location_to_providers_redesigned.png]]<br/><br/> |
4. (Optional) In Settings // General settings // Email and SMS settings insert the following variables into your email templates:<br/> | 4. (Optional) In Settings // General settings // Email and SMS settings insert the following variables into your email templates:<br/> | ||
| − | [[File:Add location variables to | + | [[File:Add location variables to notification redesigned.png|1200px | center|link=https://help.simplybook.me/images/8/88/Add_location_variables_to_notification_redesigned.png ]] <br/><br/> |
:'''[location]''' - value of field "Location name" | :'''[location]''' - value of field "Location name" | ||
:'''[location_address]''' - value of field "Location address" | :'''[location_address]''' - value of field "Location address" | ||
:'''[location_phone]''' - value of field "Location phone" | :'''[location_phone]''' - value of field "Location phone" | ||
| + | :'''[location_description]''' - value of field "Location description" | ||
| − | =How to set schedule for location= | + | =How to set schedule for location= <!--T:3--> |
You can set individual schedule for the provider and then relate provider to the location. Thus working hours of the provider related to location will automatically apply to location. | You can set individual schedule for the provider and then relate provider to the location. Thus working hours of the provider related to location will automatically apply to location. | ||
:1. To set individual schedule for provider go to Settings//Service providers//Working hours, or to Manage//Service Providers//Service providers schedule and you can set opening hours, break times, and special days for this specific employees. Just take care that opening hours of employees must be within opening hours of company. | :1. To set individual schedule for provider go to Settings//Service providers//Working hours, or to Manage//Service Providers//Service providers schedule and you can set opening hours, break times, and special days for this specific employees. Just take care that opening hours of employees must be within opening hours of company. | ||
| Line 40: | Line 46: | ||
<br><br> | <br><br> | ||
| − | =The example of client view= | + | =The example of client view= <!--T:4--> |
| − | [[File:Locations | + | [[File:Locations client side.png|1200px|border| center]] |
| + | </translate> | ||
Revision as of 11:02, 17 September 2024
Allows creating multiple service locations and relating them with different service providers (staff members). Locations will be shown as the first step on the booking site.
How to use
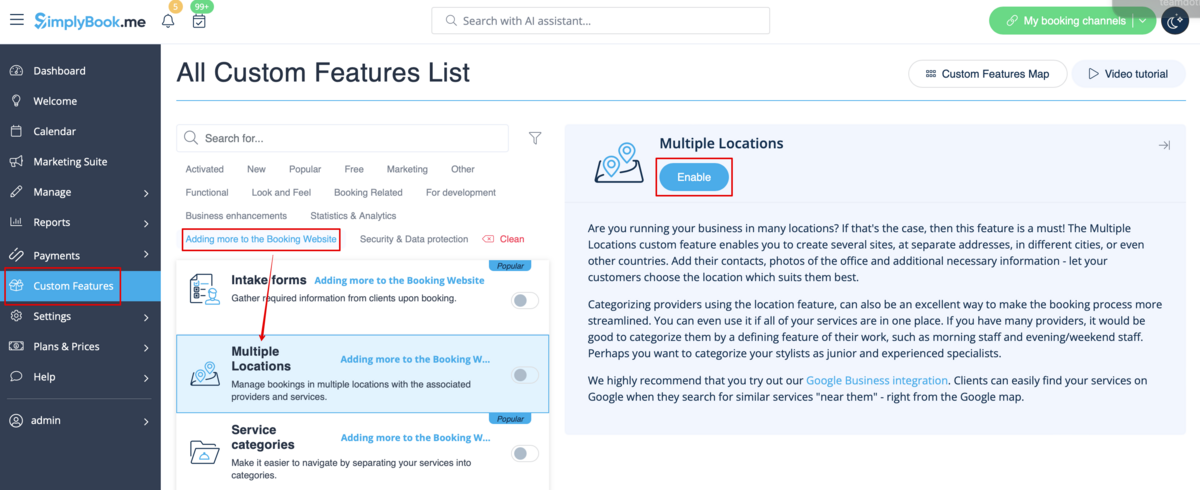
1. Enable Multiple Locations custom feature in Custom Feature section//Adding more to booking website.
2. Add locations either in the settings of the Custom Feature or in Manage//Service Providers//Add location.
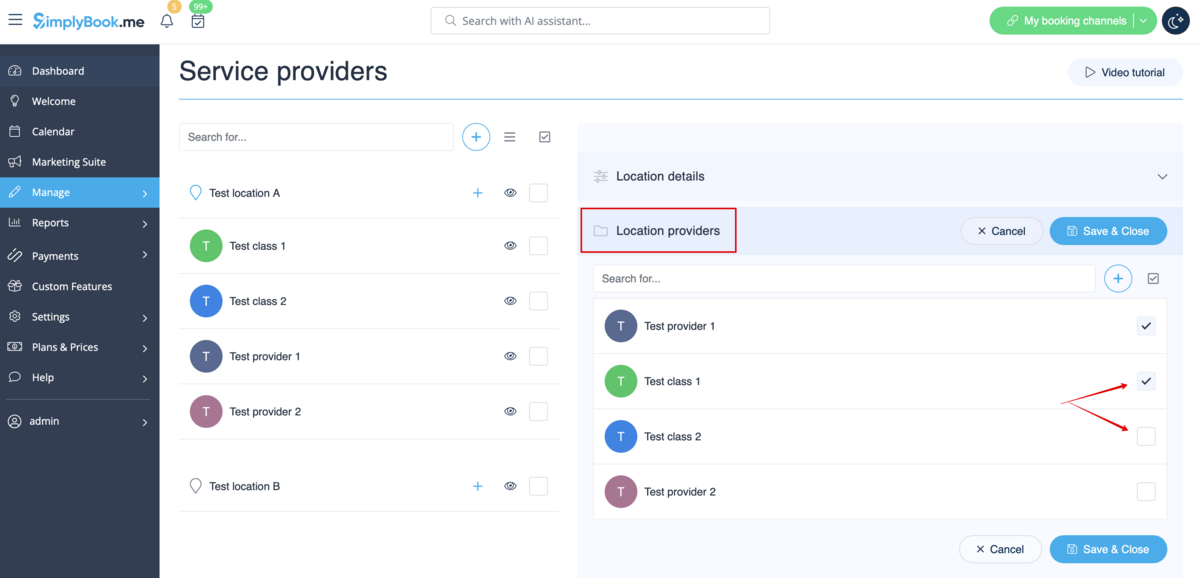
3. Click on "Location providers" tab for corresponding location and check necessary boxes to connect service providers with location.
4. (Optional) In Settings // General settings // Email and SMS settings insert the following variables into your email templates:
- [location] - value of field "Location name"
- [location_address] - value of field "Location address"
- [location_phone] - value of field "Location phone"
- [location_description] - value of field "Location description"
How to set schedule for location
You can set individual schedule for the provider and then relate provider to the location. Thus working hours of the provider related to location will automatically apply to location.
- 1. To set individual schedule for provider go to Settings//Service providers//Working hours, or to Manage//Service Providers//Service providers schedule and you can set opening hours, break times, and special days for this specific employees. Just take care that opening hours of employees must be within opening hours of company.
- 2. To relate provider and location go to Manage//Service Providers//Service provider's locations and check the boxes with location(s) provider should be related to.
How can I relate service to location
Locations can be related only to service providers, thus if you need to relate service to the particular location, you need initially to relate this service to the service provider:
- 1. In Manage//Service Providers//Services, attached to this service provider check the boxes with services related to this provider.
- 2. In Manage//Service Providers//Service provider's locations and check the boxes with location(s) provider should be related to.


