From SimplyBook.me
Importing a new version from external source |
Importing a new version from external source |
||
| Line 3: | Line 3: | ||
;How to use | ;How to use | ||
:1. Enable <span style="background-color:#d4f8e5; padding:5px; border-radius:5px;">Client Fields</span> Custom Feature on the <span style="background-color:#d4f8e5; padding:5px; border-radius:5px;">Custom Features</span> page. | :1. Enable <span style="background-color:#d4f8e5; padding:5px; border-radius:5px;">Client Fields</span> Custom Feature on the <span style="background-color:#d4f8e5; padding:5px; border-radius:5px;">Custom Features</span> page. | ||
[[File:Client | [[File:Client fiedls enable path redesigned.png|1200px|border|center|link=https://help.simplybook.me/images/e/e3/Client_fiedls_enable_path_redesigned.png]] | ||
<br><br> | <br><br> | ||
:2. Go to its settings by clicking on <span style="background-color:#d4f8e5; padding:5px; border-radius:5px;">Manage</span> link. | :2. Go to its settings by clicking on <span style="background-color:#d4f8e5; padding:5px; border-radius:5px;">Manage</span> link. | ||
[[File:Client fields settings path.png|border|center]] | [[File:Client fields settings path redesigned.png|1200px|border|center|link=https://help.simplybook.me/images/1/1d/Client_fields_settings_path_redesigned.png]] | ||
<br><br> | <br><br> | ||
:3. Here you will see default client login registration fields. You can click on any of them to rename if needed. | :3. Here you will see default client login registration fields. You can click on any of them to rename if needed. | ||
:Press <span style="background-color:#d4f8e5; padding:5px; border-radius:5px;">+</span> button to create a new form. | :Press <span style="background-color:#d4f8e5; padding:5px; border-radius:5px;">+</span> button to create a new form. | ||
[[File: | [[File:Client field create redesigned.png|1200px|border|center|link=https://help.simplybook.me/images/e/e6/Client_field_create_redesigned.png]] | ||
<br><br> | <br><br> | ||
:4. In the field <span style="background-color:#d4f8e5; padding:5px; border-radius:5px;">Question title</span> write the question you want your clients to answer. | :4. In the field <span style="background-color:#d4f8e5; padding:5px; border-radius:5px;">Question title</span> write the question you want your clients to answer. | ||
| Line 22: | Line 22: | ||
:'''date''' - creates date selection option with calendar. | :'''date''' - creates date selection option with calendar. | ||
:'''custom HTML''' - allows to add visual dividers or additional text near the client field. Cannot be used for client input. | :'''custom HTML''' - allows to add visual dividers or additional text near the client field. Cannot be used for client input. | ||
[[File:Client fields | :'''file uploader - Google Drive''' - available if [[File Uploader - Google Drive custom feature]] is enabled. Allows file upload that you will be able to see in the dedicated folder on your Google Drive. | ||
[[File:Client fields types redesigned.png|1200px|border|center|link=https://help.simplybook.me/images/4/4f/Client_fields_types_redesigned.png]] | |||
<br><br> | <br><br> | ||
:6. Make it rather <span style="background-color:#d4f8e5; padding:5px; border-radius:5px;">obligatory or not</span> with the help of <span style="background-color:#d4f8e5; padding:5px; border-radius:5px;">Should this field be optional</span> switcher.<br> | :6. Make it rather <span style="background-color:#d4f8e5; padding:5px; border-radius:5px;">obligatory or not</span> with the help of <span style="background-color:#d4f8e5; padding:5px; border-radius:5px;">Should this field be optional</span> switcher.<br> | ||
| Line 29: | Line 30: | ||
<br><br> | <br><br> | ||
:7. You can also re-order all the forms to your taste by using the arrows on the left-side block or by setting the position in the form editing mode on the right side. | :7. You can also re-order all the forms to your taste by using the arrows on the left-side block or by setting the position in the form editing mode on the right side. | ||
[[File: | [[File:Client fields reorder redesigned.png|1200px|border|center|link=https://help.simplybook.me/images/a/aa/Client_fields_reorder_redesigned.png]] | ||
<br><br> | <br><br> | ||
:8. If you want to include client form information to email templates, find the client forms <span style="background-color:#d4f8e5; padding:5px; border-radius:5px;">variables</span> and add them to templates in <span style="background-color:#d4f8e5; padding:5px; border-radius:5px;">Settings</span> -> <span style="background-color:#d4f8e5; padding:5px; border-radius:5px;">Email and SMS settings.</span><br> | :8. If you want to include client form information to email templates, find the client forms <span style="background-color:#d4f8e5; padding:5px; border-radius:5px;">variables</span> and add them to templates in <span style="background-color:#d4f8e5; padding:5px; border-radius:5px;">Settings</span> -> <span style="background-color:#d4f8e5; padding:5px; border-radius:5px;">Email and SMS settings.</span><br> | ||
:(Or use <span style="background-color:#cdeffc; padding:5px; border-radius:5px;">[[Special:MyLanguage/Flexible_Notifications_custom_feature|Flexible Notifications]]</span> feature for customized templates per service and/or provider) | :(Or use <span style="background-color:#cdeffc; padding:5px; border-radius:5px;">[[Special:MyLanguage/Flexible_Notifications_custom_feature|Flexible Notifications]]</span> feature for customized templates per service and/or provider) | ||
[[File: | [[File:Add client fields to notifications.png|1200px|border|center|link=https://help.simplybook.me/images/b/be/Add_client_fields_to_notifications.png]] | ||
<br><br> | <br><br> | ||
:9. The clients will then be able to fill in their replies during <span style="background-color:#d4f8e5; padding:5px; border-radius:5px;">sign up</span> on the booking site and edit their data in client profiles. | :9. The clients will then be able to fill in their replies during <span style="background-color:#d4f8e5; padding:5px; border-radius:5px;">sign up</span> on the booking site and edit their data in client profiles. | ||
| Line 41: | Line 42: | ||
<br><br> | <br><br> | ||
:10. From your admin page you will be able to view and edit the clients' replies in <span style="background-color:#d4f8e5; padding:5px; border-radius:5px;">Manage</span> -> <span style="background-color:#d4f8e5; padding:5px; border-radius:5px;">Clients</span> -> <span style="background-color:#d4f8e5; padding:5px; border-radius:5px;">Edit</span> for the corresponding client. | :10. From your admin page you will be able to view and edit the clients' replies in <span style="background-color:#d4f8e5; padding:5px; border-radius:5px;">Manage</span> -> <span style="background-color:#d4f8e5; padding:5px; border-radius:5px;">Clients</span> -> <span style="background-color:#d4f8e5; padding:5px; border-radius:5px;">Edit</span> for the corresponding client. | ||
[[File: | [[File:View and edit client fields per client redesigned.png|1200px|border|center|link=https://help.simplybook.me/images/7/79/View_and_edit_client_fields_per_client_redesigned.png]] | ||
<br><br> | <br><br> | ||
:and export answers to Excel file in <span style="background-color:#d4f8e5; padding:5px; border-radius:5px;">Reports</span> -> <span style="background-color:#d4f8e5; padding:5px; border-radius:5px;">Clients</span> -> <span style="background-color:#d4f8e5; padding:5px; border-radius:5px;">Export to excel.</span> | :and export answers to Excel file in <span style="background-color:#d4f8e5; padding:5px; border-radius:5px;">Reports</span> -> <span style="background-color:#d4f8e5; padding:5px; border-radius:5px;">Clients</span> -> <span style="background-color:#d4f8e5; padding:5px; border-radius:5px;">Export to excel.</span> | ||
[[File: | [[File:Clients report export path redesigned.png|1200px|border|center|link=https://help.simplybook.me/images/a/ae/Clients_report_export_path_redesigned.png]] | ||
:Or in <span style="background-color:#d4f8e5; padding:5px; border-radius:5px;">Manage</span> -> <span style="background-color:#d4f8e5; padding:5px; border-radius:5px;">Clients</span> -> <span style="background-color:#d4f8e5; padding:5px; border-radius:5px;">Export to Excel.</span><br> | :Or in <span style="background-color:#d4f8e5; padding:5px; border-radius:5px;">Manage</span> -> <span style="background-color:#d4f8e5; padding:5px; border-radius:5px;">Clients</span> -> <span style="background-color:#d4f8e5; padding:5px; border-radius:5px;">Export to Excel.</span><br> | ||
:Or together with booking information in <span style="background-color:#d4f8e5; padding:5px; border-radius:5px;">Reports</span> -> <span style="background-color:#d4f8e5; padding:5px; border-radius:5px;">Booking details</span> -> <span style="background-color:#d4f8e5; padding:5px; border-radius:5px;">Export to Excel.</span> | :Or together with booking information in <span style="background-color:#d4f8e5; padding:5px; border-radius:5px;">Reports</span> -> <span style="background-color:#d4f8e5; padding:5px; border-radius:5px;">Booking details</span> -> <span style="background-color:#d4f8e5; padding:5px; border-radius:5px;">Export to Excel.</span> | ||
<br><br> | <br><br> | ||
<br><br> | <br><br> | ||
Latest revision as of 15:55, 8 January 2025
Please note! When you enable Client Fields custom feature Client Login will be enabled as well.
- How to use
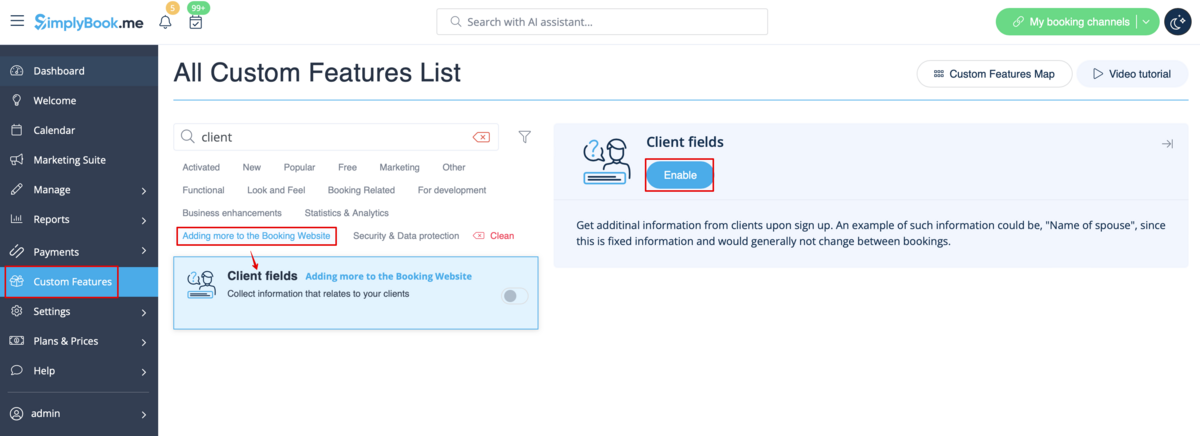
- 1. Enable Client Fields Custom Feature on the Custom Features page.
- 2. Go to its settings by clicking on Manage link.

- 3. Here you will see default client login registration fields. You can click on any of them to rename if needed.
- Press + button to create a new form.
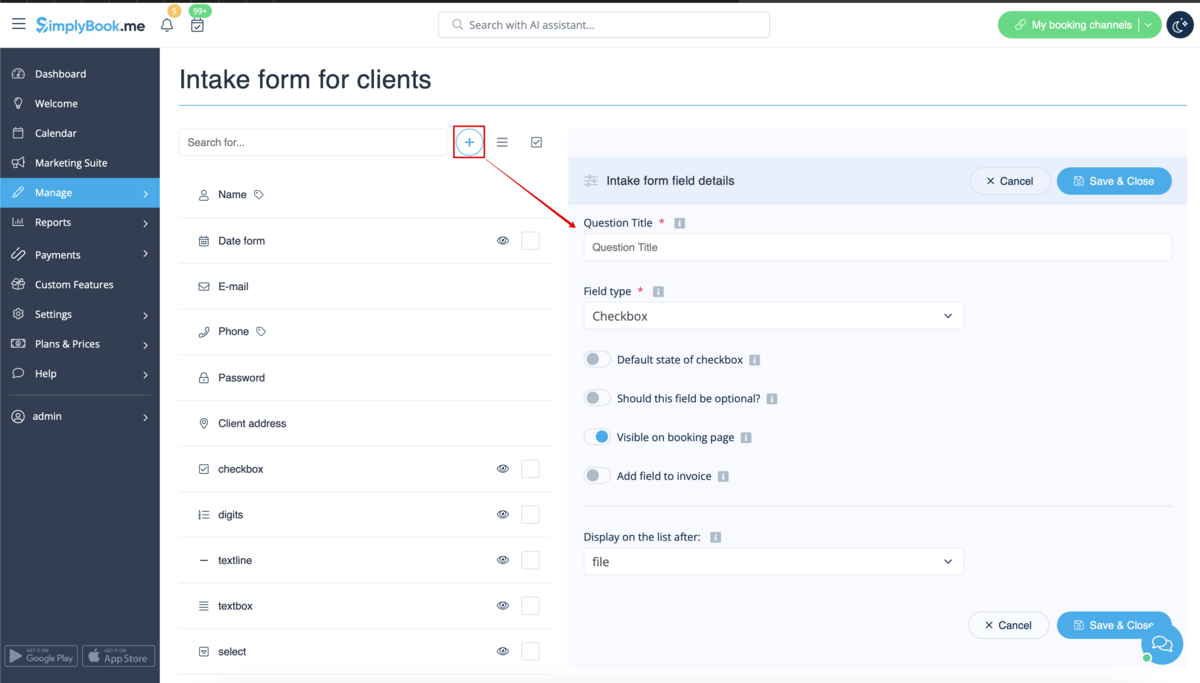
- 4. In the field Question title write the question you want your clients to answer.
- 5. Choose the field type:
- digits only - allows entering only numbers. Useful when you need to know the age, height or any other information that will require only digits.
- single line - usually used for short answers
- multiple lines - use this type of filed if you expect lengthy explanations from your clients
- checkbox - creates a checkbox that clients should either check or leave unchecked.
- dropdown selection - creates a drop-down list with the ability to choose only 1 option. In order to create this field, you will need to create a list of values in the section "Dropdown options and default option". Also you can select the Default value that will be assigned if nothing is chosen from the list.
- date - creates date selection option with calendar.
- custom HTML - allows to add visual dividers or additional text near the client field. Cannot be used for client input.
- file uploader - Google Drive - available if File Uploader - Google Drive custom feature is enabled. Allows file upload that you will be able to see in the dedicated folder on your Google Drive.

- 6. Make it rather obligatory or not with the help of Should this field be optional switcher.
- Include to invoices if you would like its title and client response to be reflected there.
- Save the form when you are done.
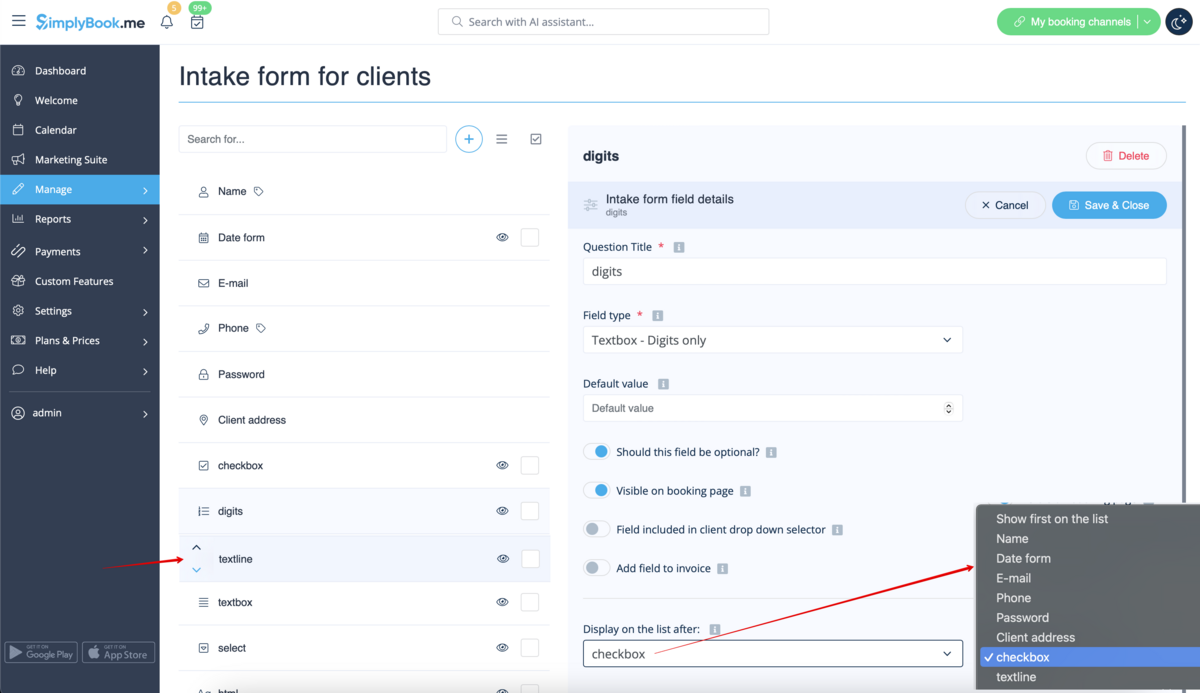
- 7. You can also re-order all the forms to your taste by using the arrows on the left-side block or by setting the position in the form editing mode on the right side.
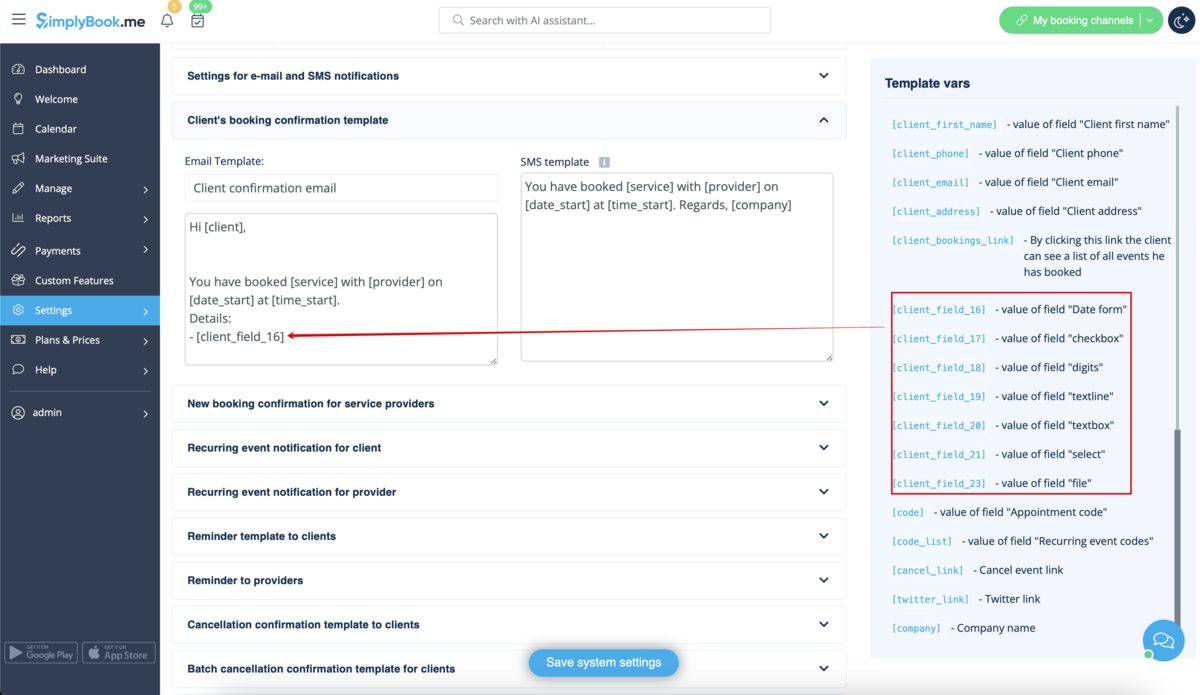
- 8. If you want to include client form information to email templates, find the client forms variables and add them to templates in Settings -> Email and SMS settings.
- (Or use Flexible Notifications feature for customized templates per service and/or provider)
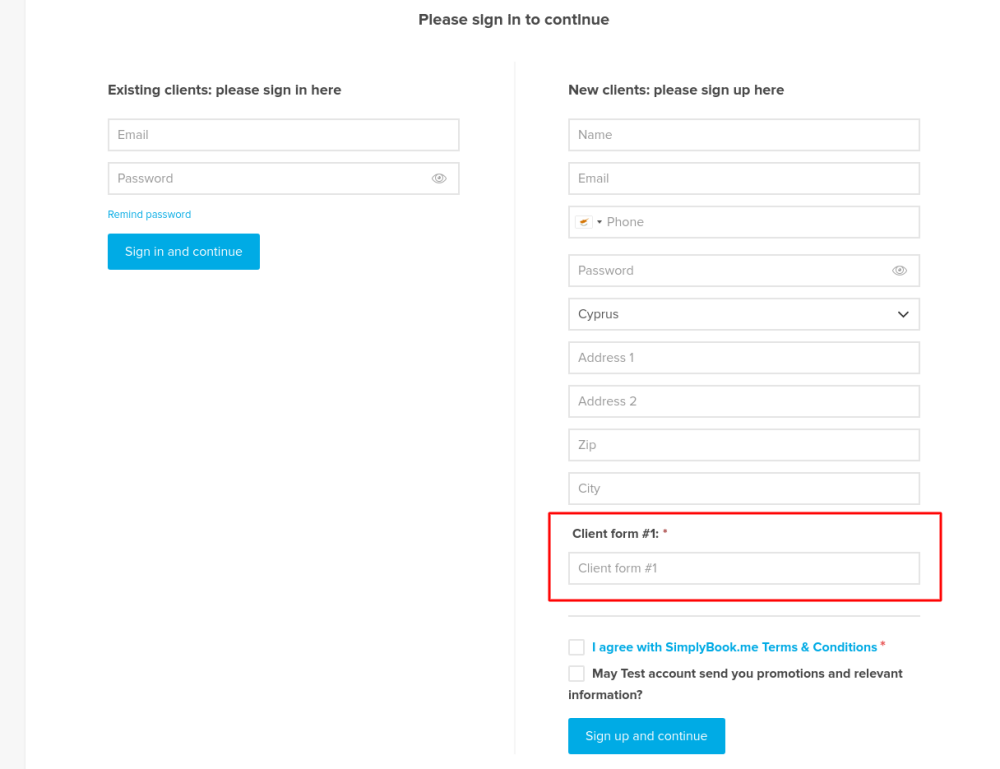
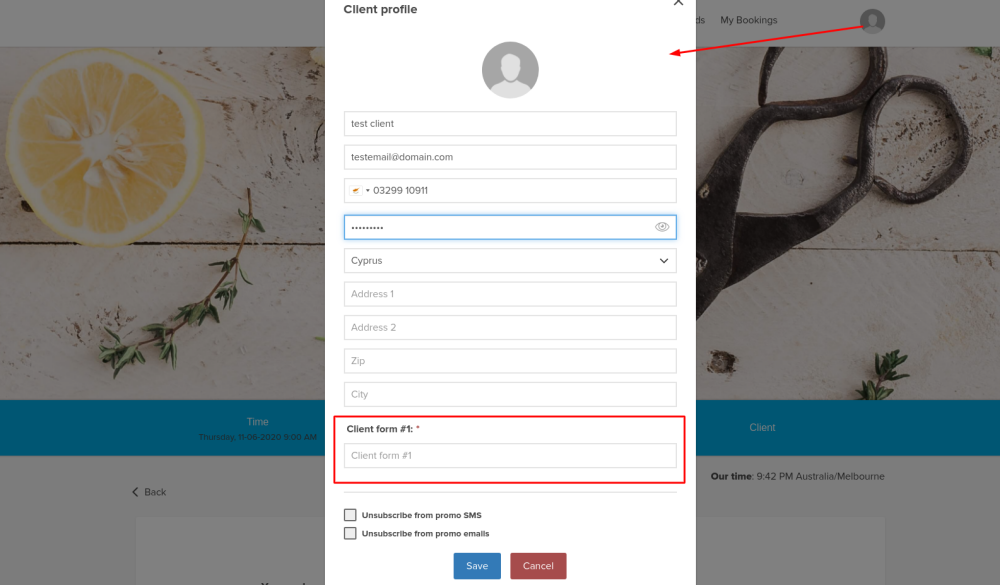
- 9. The clients will then be able to fill in their replies during sign up on the booking site and edit their data in client profiles.
- 10. From your admin page you will be able to view and edit the clients' replies in Manage -> Clients -> Edit for the corresponding client.

- and export answers to Excel file in Reports -> Clients -> Export to excel.

- Or in Manage -> Clients -> Export to Excel.
- Or together with booking information in Reports -> Booking details -> Export to Excel.