Difference between revisions of "1 is not greater than 2 (when trying to change number of clients per provider)"
From SimplyBook.me
(Marked this version for translation) |
|||
| (17 intermediate revisions by the same user not shown) | |||
| Line 1: | Line 1: | ||
| + | <languages/> | ||
| + | <translate> | ||
| + | </translate> | ||
{{#seo: | {{#seo: | ||
| − | |title=Setting up providers in SimplyBook.me | + | |title=Setting up providers in SimplyBook.me |
|titlemode=append | |titlemode=append | ||
| − | |keywords=faq, frequently asked questions, booking software, appointment system questions, appointments online, calendar software, booking system, provider settings | + | |keywords=faq, frequently asked questions, booking software, appointment system questions, appointments online, calendar software, booking system, provider settings, number of clients |
}} | }} | ||
| + | <translate> | ||
| + | <!--T:1--> | ||
<br><br> | <br><br> | ||
| − | If you receive | + | If you receive the similar error when the system does not allow setting smaller number of clients per provider it means that in the past you already had 2 or more bookings at the same time and the system can't change the value to the smaller one because of inner conflict.<br> |
| + | By default, that number can be changed only to the bigger value. | ||
<br><br> | <br><br> | ||
| − | + | <nomobile>[[File:1is not greater than2new.png | border| center]]</nomobile> | |
| + | <mobileonly>[[File:M 1 is not geater than 2.png | border| center]]</mobileonly> | ||
<br><br> | <br><br> | ||
| − | + | ||
| − | < | + | <!--T:2--> |
;How to solve the problem? | ;How to solve the problem? | ||
<br> | <br> | ||
| − | + | ||
| − | :1. Create new provider in Manage / | + | <!--T:3--> |
| − | :2. Disable the old provider from client interface in Manage // | + | :1. Create new provider in <span style="background-color:#d4f8e5; padding:5px; border-radius:5px;"> Manage</span> -> <span style="background-color:#d4f8e5; padding:5px; border-radius:5px;">Service Providers</span> -> <span style="background-color:#d4f8e5; padding:5px; border-radius:5px;">"+"</span> button, and make that provider have only 1(or desired number) client at a time.<br><br> |
| − | [[File: | + | :2. Disable the old provider from client interface in <span style="background-color:#d4f8e5; padding:5px; border-radius:5px;">Manage</span> -> <span style="background-color:#d4f8e5; padding:5px; border-radius:5px;">Service Providers</span> -> <span style="background-color:#d4f8e5; padding:5px; border-radius:5px;">“Eye”</span> icon near the corresponding provider's name(it should become crossed) or disable the option <span style="background-color:#d4f8e5; padding:5px; border-radius:5px;">Display provider on the booking page</span> in <span style="background-color:#d4f8e5; padding:5px; border-radius:5px;">Service provider's details</span> tab. |
| + | <nomobile>[[File:Hide provider from the client side.png | border| center]]</nomobile> | ||
| + | <mobileonly>[[File:M disable provider from the booking page.png | boredr| center]]</mobileonly> | ||
<br> | <br> | ||
| − | In this case clients will not see the old provider and won't book appointment with him/her. | + | :In this case clients will not see the old provider and won't book an appointment with him/her. |
<br><br> | <br><br> | ||
| − | :3. | + | :3. To not get double-booked with the new provider, you will need to block time in his/her schedule when your old provider already has bookings. For example, you have booking for 10am for old provider, but this time is free for the new provider, who has no bookings. Consequently, you need to block time 10 am for the new provider. |
<br> | <br> | ||
| − | ::'''Variant A (good for those who have just several bookings)''': | + | ::'''Variant A (good for those who have just several bookings)''': You can block time for new provider using breaktimes in <span style="background-color:#d4f8e5; padding:5px; border-radius:5px;">Settings</span> -> <span style="background-color:#d4f8e5; padding:5px; border-radius:5px;">Providers schedule</span> -> <span style="background-color:#d4f8e5; padding:5px; border-radius:5px;">Special days</span> -> select <span style="background-color:#d4f8e5; padding:5px; border-radius:5px;">the new provider</span> at the top -> <span style="background-color:#d4f8e5; padding:5px; border-radius:5px;">click on the date</span> your old provider has appointments on -> <span style="background-color:#d4f8e5; padding:5px; border-radius:5px;">add the breaktimes</span> for the booked times. Repeat these actions for all times you need to close for the new provider to not be overbooked. |
| − | [[File: | + | ::We recommend to open the appointments list or calendar of old provider in one tab and the page with the new provider schedule in another tab to better see busy times. |
| + | [[File:Provider schedule path new navigation.png|1200px|border|center]] | ||
| + | <br><br> | ||
| + | [[File:Provider schedule specal days edit new navigation.png|1200px|border|center]] | ||
| + | <br><br> | ||
| + | ::Or you can block the times directly from <span style="background-color:#d4f8e5; padding:5px; border-radius:5px;">Calendar</span> page using <span style="background-color:#d4f8e5; padding:5px; border-radius:5px;">Notes.</span> Please change the mode to <span style="background-color:#d4f8e5; padding:5px; border-radius:5px;">Add note/Block time</span> in the top right corner -> <span style="background-color:#d4f8e5; padding:5px; border-radius:5px;">click on the space you need to block</span>(you can also adjust the times in the popup that will appear) -> check the box <span style="background-color:#d4f8e5; padding:5px; border-radius:5px;">Time is blocked</span>, add note text if necessary and <span style="background-color:#d4f8e5; padding:5px; border-radius:5px;">save</span> the note. Repeat these actions for all times you need to close for the new provider to not be overbooked. | ||
| + | [[File:Block time per provider with note.png||1200px|border|center]] | ||
<br><br> | <br><br> | ||
| − | ::'''Variant B (also good for those who have just several bookings)''': In | + | ::'''Variant B (also good for those who have just several bookings)''': In <span style="background-color:#d4f8e5; padding:5px; border-radius:5px;">Calendar</span> simply press <span style="background-color:#d4f8e5; padding:5px; border-radius:5px;">Edit</span> in the specific booking pop-up and change old provider to new provider. In this case, your providers and clients will receive <span style="background-color:#d4f8e5; padding:5px; border-radius:5px;">Booking Change</span> notification. If you want to prevent this, please uncheck the box near <span style="background-color:#d4f8e5; padding:5px; border-radius:5px;">Booking Change</span> notification in <span style="background-color:#d4f8e5; padding:5px; border-radius:5px;">Settings</span> -> <span style="background-color:#d4f8e5; padding:5px; border-radius:5px;">Email and SMS settings</span> beforehand. |
| − | < | ||
| − | :: | ||
| − | < | ||
| − | |||
| − | |||
| − | |||
| − | |||
| − | < | ||
| − | : | ||
| − | : | ||
| − | |||
<br> | <br> | ||
| − | + | ::'''Variant C (for automatic blocking of times, requires Google/Outlook calendar, works well if you need to have only 1 booking at a time per provider)''': Enable <span style="background-color:#cdeffc; padding:5px; border-radius:5px;">[[Special:MyLanguage/Custom_Features#Calendar_Sync | Calendar Sync custom feature]]</span> in your<span style="background-color:#d4f8e5; padding:5px; border-radius:5px;">Custom Features</span> section and connect both providers to one and the same Google/Outlook calendar. Check the boxes <span style="background-color:#d4f8e5; padding:5px; border-radius:5px;">sync busy time</span> for both providers. In this case, the bookings from old provider will go to Google/Outlook calendar and then block time in the schedule of new provider. | |
| − | |||
| − | |||
| − | ::'''Variant C (for automatic blocking of times, requires Google/Outlook calendar)''': Enable [Custom_Features#Calendar_Sync| Calendar Sync | ||
<br> | <br> | ||
| − | :4. After | + | :4. After bookings dates for old provider pass, you can delete old provider in <span style="background-color:#d4f8e5; padding:5px; border-radius:5px;">Manage</span> -> <span style="background-color:#d4f8e5; padding:5px; border-radius:5px;">Service Providers</span> -> select provider and click on <span style="background-color:#d4f8e5; padding:5px; border-radius:5px;">Delete</span> on the right side, or check the box with this provider name and select <span style="background-color:#d4f8e5; padding:5px; border-radius:5px;">Delete</span> option from action drop-down menu. |
<br><br> | <br><br> | ||
| + | </translate> | ||
Latest revision as of 14:52, 13 December 2023
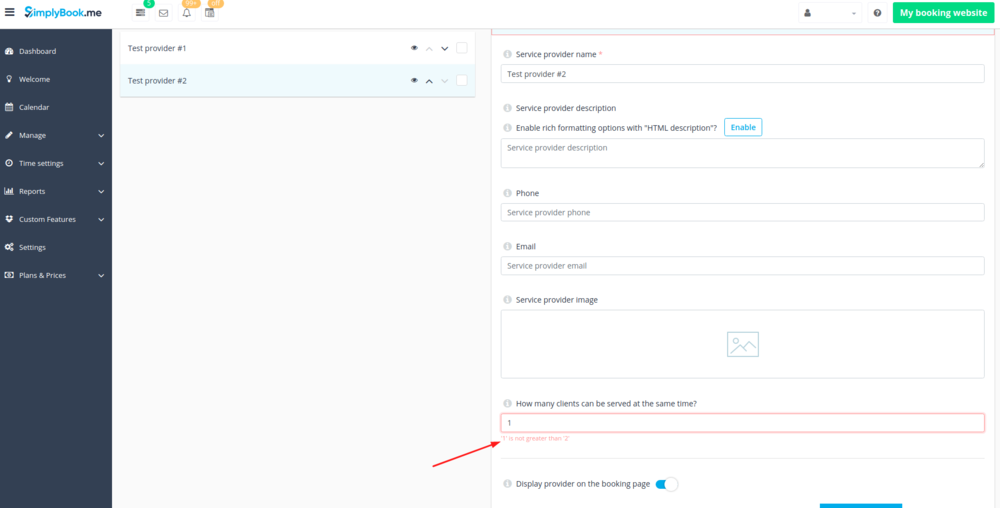
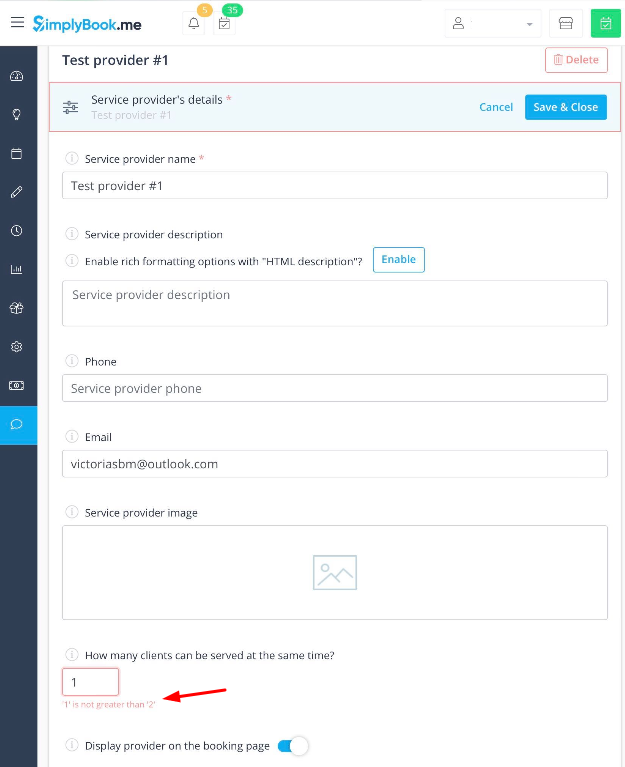
If you receive the similar error when the system does not allow setting smaller number of clients per provider it means that in the past you already had 2 or more bookings at the same time and the system can't change the value to the smaller one because of inner conflict.
By default, that number can be changed only to the bigger value.
- How to solve the problem?
- 1. Create new provider in Manage -> Service Providers -> "+" button, and make that provider have only 1(or desired number) client at a time.
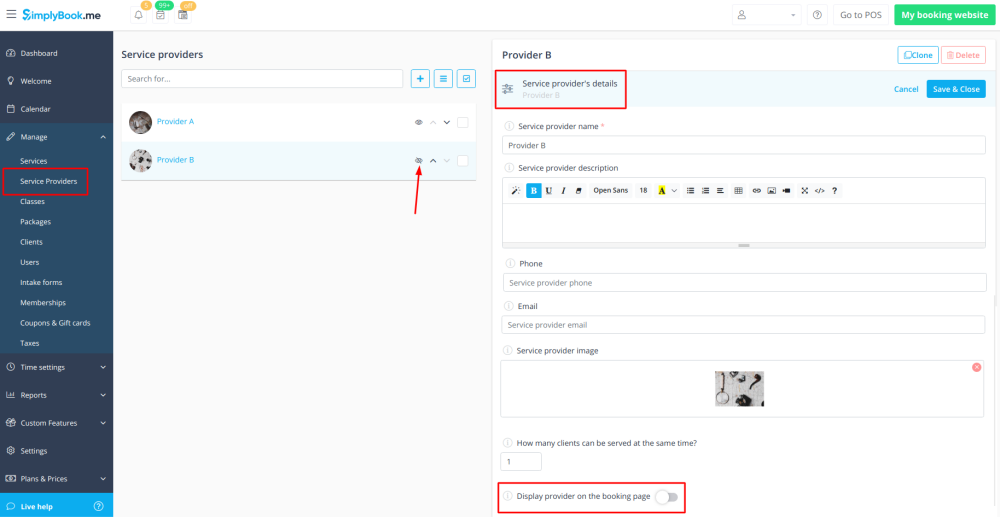
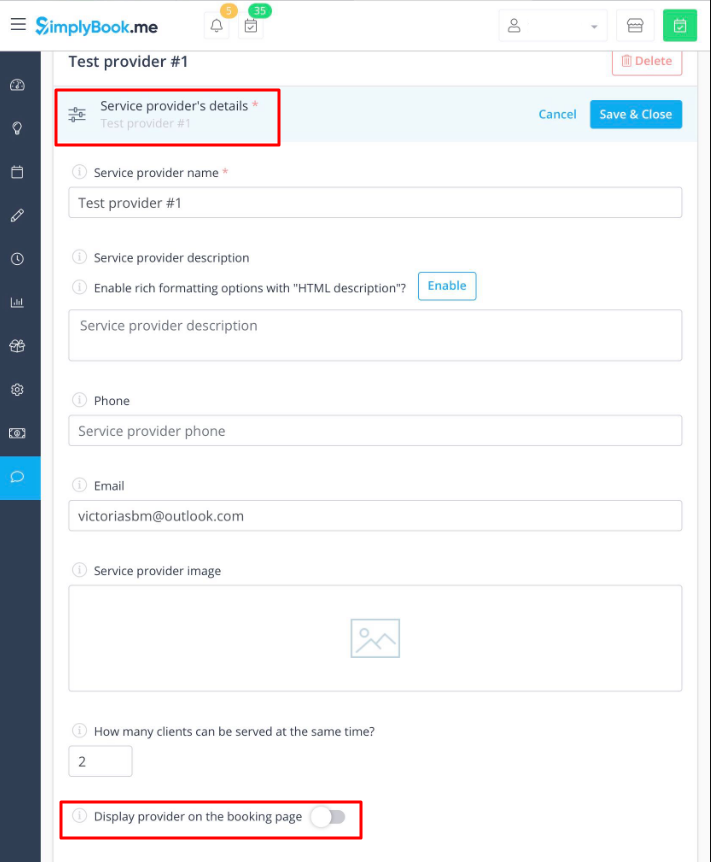
- 2. Disable the old provider from client interface in Manage -> Service Providers -> “Eye” icon near the corresponding provider's name(it should become crossed) or disable the option Display provider on the booking page in Service provider's details tab.
- In this case clients will not see the old provider and won't book an appointment with him/her.
- 3. To not get double-booked with the new provider, you will need to block time in his/her schedule when your old provider already has bookings. For example, you have booking for 10am for old provider, but this time is free for the new provider, who has no bookings. Consequently, you need to block time 10 am for the new provider.
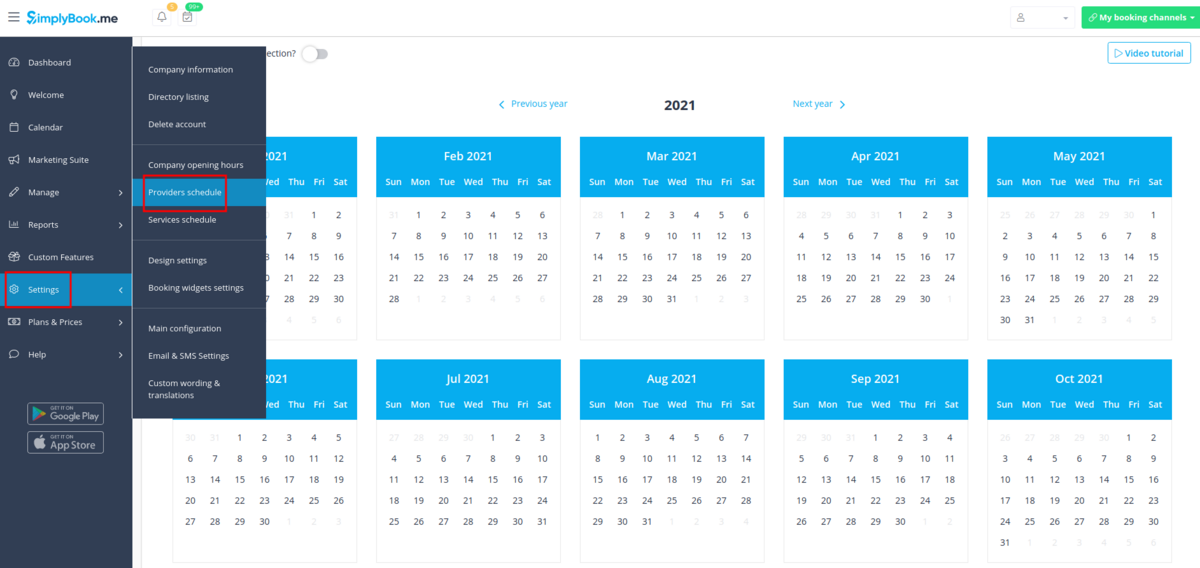
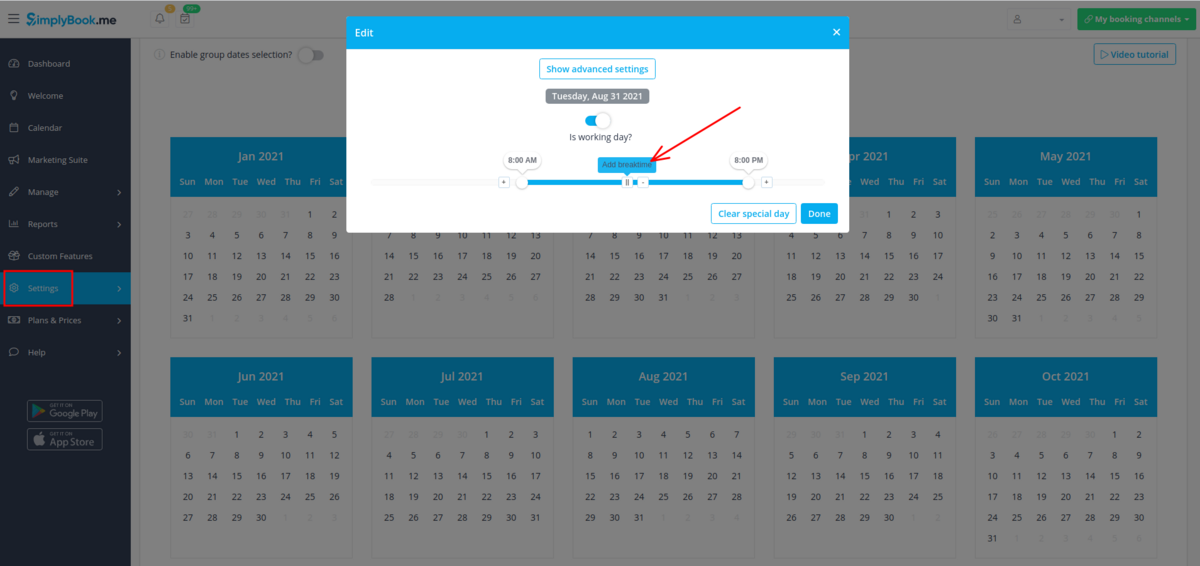
- Variant A (good for those who have just several bookings): You can block time for new provider using breaktimes in Settings -> Providers schedule -> Special days -> select the new provider at the top -> click on the date your old provider has appointments on -> add the breaktimes for the booked times. Repeat these actions for all times you need to close for the new provider to not be overbooked.
- We recommend to open the appointments list or calendar of old provider in one tab and the page with the new provider schedule in another tab to better see busy times.
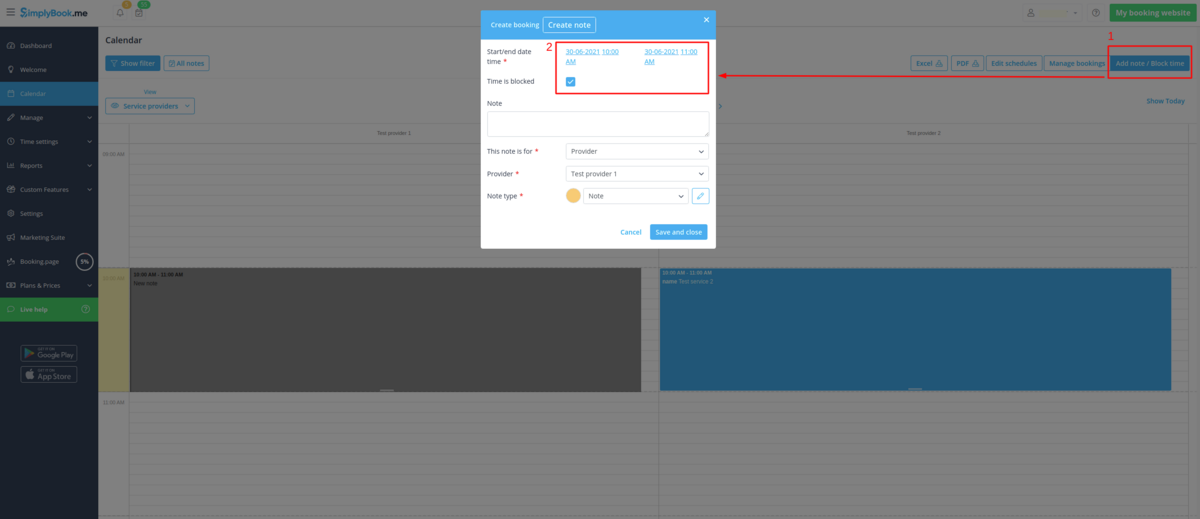
- Or you can block the times directly from Calendar page using Notes. Please change the mode to Add note/Block time in the top right corner -> click on the space you need to block(you can also adjust the times in the popup that will appear) -> check the box Time is blocked, add note text if necessary and save the note. Repeat these actions for all times you need to close for the new provider to not be overbooked.
- Variant B (also good for those who have just several bookings): In Calendar simply press Edit in the specific booking pop-up and change old provider to new provider. In this case, your providers and clients will receive Booking Change notification. If you want to prevent this, please uncheck the box near Booking Change notification in Settings -> Email and SMS settings beforehand.
- Variant C (for automatic blocking of times, requires Google/Outlook calendar, works well if you need to have only 1 booking at a time per provider): Enable Calendar Sync custom feature in yourCustom Features section and connect both providers to one and the same Google/Outlook calendar. Check the boxes sync busy time for both providers. In this case, the bookings from old provider will go to Google/Outlook calendar and then block time in the schedule of new provider.
- 4. After bookings dates for old provider pass, you can delete old provider in Manage -> Service Providers -> select provider and click on Delete on the right side, or check the box with this provider name and select Delete option from action drop-down menu.
