Difference between revisions of "Widgets for your own website"
| (21 intermediate revisions by the same user not shown) | |||
| Line 1: | Line 1: | ||
{{#seo: | {{#seo: | ||
| − | |title= | + | |title=Widgets for your own website - SimplyBook.me |
|titlemode=append | |titlemode=append | ||
| − | |keywords=faq, frequently asked questions, booking software, appointment system questions, appointments online, calendar software, booking system, booking calendar, scheduling software, online appointment scheduling, online scheduling, widget, widgets | + | |keywords=faq, frequently asked questions, booking software, appointment system questions, appointments online, calendar software, booking system, booking calendar, scheduling software, online appointment scheduling, online scheduling, widget, widgets, integration, website integration, website widgets, widgets for website |
}} | }} | ||
| + | |||
| + | :Why you should use our Widgets [[File:Youtube-Logo.png|link=https://www.youtube.com/watch?v=ngAxW1uTOk4]] | ||
| + | <br><br> | ||
| + | :Video tutorial available [[File:Youtube-Logo.png|link=https://youtu.be/8mi4MCmE_qg]] | ||
| + | <br><br> | ||
__FORCETOC__ | __FORCETOC__ | ||
| Line 10: | Line 15: | ||
=iFrame Widget= | =iFrame Widget= | ||
<br><br> | <br><br> | ||
| − | :1. Take the iFrame code of your booking page in Settings// | + | :1. Take the iFrame code of your booking page in <span style="background-color:#d4f8e5; padding:5px; border-radius:5px;">Settings</span> -> <span style="background-color:#d4f8e5; padding:5px; border-radius:5px;">Booking widgets settings</span> -> <span style="background-color:#d4f8e5; padding:5px; border-radius:5px;">iFrame widget</span> -> <span style="background-color:#d4f8e5; padding:5px; border-radius:5px;">Get widget code.</span> |
| − | + | [[File:Booking widgets path new navigation.png|1200px | center]] | |
| − | [[File: | + | <br><br> |
| − | + | [[File:Create iframe widget.png | center]] | |
| − | + | <br><br> | |
| − | [[File: | + | [[File:Iframe widget code.png | center]] |
| − | + | <br><br> | |
| − | + | :2. Insert it to the HTML code <body> of your website (or any other place in your website platform designed for inserting HTML JavaScript iFrame code). <br> | |
| − | [[File: | + | <span style="background-color:#ffe9e9; padding:5px; border-radius:5px;">'''Please note!''' Different website builders/platforms may have various ways to add HTML code, you should check first whether your website supports inserting HTML JavaScript code.</span> |
| − | <br> | ||
| − | :2. Insert it to the HTML code <body> of your website (or any other place in your website platform designed for inserting | ||
:'''Here are tutorials for several popular website builders:''' | :'''Here are tutorials for several popular website builders:''' | ||
| − | :::*[ | + | :::*[https://help.simplybook.me/index.php/WordPress_integration Wordpress] |
| − | :::*[ | + | :::*[https://help.simplybook.me/index.php/Shopify Shopify] |
| − | :::*[ | + | :::*[https://help.simplybook.me/index.php/Joomla_integration Joomla] |
| − | :::*[ | + | :::*[https://help.simplybook.me/index.php/Wix_integration Wix] |
| − | :::*[ | + | :::*[https://help.simplybook.me/index.php/Squarespace Squarespace] |
| − | :::*[ | + | :::*[https://help.simplybook.me/index.php/Weebly Weebly] |
| + | :::*[https://help.simplybook.me/index.php/Go_Daddy Go Daddy] | ||
:::*[https://help.simplybook.me/index.php/SITE123_integration SITE123] | :::*[https://help.simplybook.me/index.php/SITE123_integration SITE123] | ||
| − | ;[ | + | ;[https://simplydemowidgets.mozello.com/ Check how widgets can look like on your website] |
<br><br> | <br><br> | ||
==Widgets with predefined service, provider,category or location== | ==Widgets with predefined service, provider,category or location== | ||
<br> | <br> | ||
| − | This feature allows you to generate iframe code specifically for service, provider, category or location you have. For example, if you have 2 services A and B and you choose service A as predefined, the widget will open on that service, skipping the step of choosing the service. This feature may be useful if you need to display only certain services on specific page on your website. The steps to generate the code are the same as above, only in the settings of the widget, choose the item you need to predefine. | + | This feature allows you to generate iframe code specifically for service, provider, [[Custom_Features#Service_Categories |category]] or [[Custom_Features#Multiple_Locations |location]] you have. For example, if you have 2 services A and B and you choose service A as predefined, the widget will open on that service, skipping the step of choosing the service. This feature may be useful if you need to display only certain services on a specific page on your website. The steps to generate the code are the same as above, only in the settings of the widget, choose the item you need to predefine. |
| − | [[File: | + | [[File:Iframe widget predefined options.png| center]] |
<br><br> | <br><br> | ||
| Line 43: | Line 47: | ||
<br> | <br> | ||
Now you can also create a widget for some particular client with his/her details already filled in. | Now you can also create a widget for some particular client with his/her details already filled in. | ||
| − | Just select the widget type you need in Settings// | + | :1. Just select the widget type you need in <span style="background-color:#d4f8e5; padding:5px; border-radius:5px;">Settings</span> -> <span style="background-color:#d4f8e5; padding:5px; border-radius:5px;">Booking widgets settings</span>, set the design and click on <span style="background-color:#d4f8e5; padding:5px; border-radius:5px;">Get widget code.</span> |
| − | [[File: | + | [[File:Create iframe widget.png | center]] |
<br><br> | <br><br> | ||
| − | You will see a pop-up window with the code, click on the bottom part to get client code details. | + | :2. You will see a pop-up window with the code, click on the bottom part to get client code details. |
| − | Please copy the main code, add bottom part to it(to predefined section) and replace "Predefined client name" | + | :Please copy the main code, add bottom part to it(to predefined section) and replace <span style="background-color:#d4f8e5; padding:5px; border-radius:5px;">Predefined client name</span>, <span style="background-color:#d4f8e5; padding:5px; border-radius:5px;">Predefined client email</span>, <span style="background-color:#d4f8e5; padding:5px; border-radius:5px;">Predefined client phone</span> with the necessary client details. |
| − | [[File: | + | [[File:Iframe widget predefined client.png |border| center]] |
<br><br> | <br><br> | ||
| − | + | :3. You will get the code like this:<br> | |
<code><script src="//simplybook.me/v2/widget/widget.js"></script> | <code><script src="//simplybook.me/v2/widget/widget.js"></script> | ||
<script>var widget = new SimplybookWidget({"widget_type":"iframe","url":"https:\/\/companyname.simplybook.me","theme":"belle","theme_settings":{"sb_base_color":"#FF6969","body_bg_color":"#ffffff","dark_font_color":"#494949","light_font_color":"#ffffff","sb_busy":"#dad2ce","sb_available":"#d3e0f1"},"timeline":"flexible","datepicker":"top_calendar","is_rtl":false,"app_config":{"predefined": {"client": {<br> | <script>var widget = new SimplybookWidget({"widget_type":"iframe","url":"https:\/\/companyname.simplybook.me","theme":"belle","theme_settings":{"sb_base_color":"#FF6969","body_bg_color":"#ffffff","dark_font_color":"#494949","light_font_color":"#ffffff","sb_busy":"#dad2ce","sb_available":"#d3e0f1"},"timeline":"flexible","datepicker":"top_calendar","is_rtl":false,"app_config":{"predefined": {"client": {<br> | ||
| Line 59: | Line 63: | ||
}});</script></code> | }});</script></code> | ||
<br><br> | <br><br> | ||
| − | As a result the details of this client will be filled | + | :4. As a result the details of this client will be pre-filled in the widget and there will be no need for client to provide them. |
| − | [[File:Predefined client | + | [[File:Predefined client result view.png | center]] |
| + | <br><br> | ||
| + | ==Widgets for [[Client_Login_custom_feature|Client Login]], [[Packages_custom_feature|Packages]], [[Membership_custom_feature|Memberships]], [[Coupons_and_Gift_Cards_custom_feature|Gift Cards]]== | ||
| + | <br><br> | ||
| + | <span style="background-color:#ffe9e9; padding:5px; border-radius:5px;">'''Please note!''' It currently works with iFrame widgets only and does not work with booking button and contact button widgets.</span><br> | ||
| + | <br><br> | ||
| + | If you are using one or several of these features it may be necessary to add a widget that will allow your clients to use the option on your website.<br> | ||
| + | It can be done in a simple way by adding of the corresponding <span style="background-color:#d4f8e5; padding:5px; border-radius:5px;">"navigate"</span> element to the widget code: | ||
| + | *<span style="background-color:#cdeffc; padding:5px; border-radius:5px;">[[Client_Login_custom_feature|Client Login]]</span> - <span style="background-color:#fef3de; padding:5px; border-radius:5px;">"navigate":"client/sign-in"</span> | ||
| + | *<span style="background-color:#cdeffc; padding:5px; border-radius:5px;">[[Packages_custom_feature|Packages]]</span> - <span style="background-color:#fef3de; padding:5px; border-radius:5px;">"navigate":"packages"</span> | ||
| + | *<span style="background-color:#cdeffc; padding:5px; border-radius:5px;">[[Membership_custom_feature|Memberships]]</span> - <span style="background-color:#fef3de; padding:5px; border-radius:5px;">"navigate":"membership"</span> | ||
| + | *<span style="background-color:#cdeffc; padding:5px; border-radius:5px;">[[Coupons_and_Gift_Cards_custom_feature|Gift Cards]]</span> - <span style="background-color:#fef3de; padding:5px; border-radius:5px;">"navigate":"gift-card"</span> | ||
| + | <br><br> | ||
| + | <span style="background-color:#cdeffc; padding:5px; border-radius:5px;">[[Coupons_and_Gift_Cards_custom_feature|Gift Cards]]</span> widget code example:<br><br> | ||
| + | <code><script src="//simplybook.it/v2/widget/widget.js"></script> | ||
| + | <script>var widget = new SimplybookWidget({"widget_type":"iframe","url":"https:\/\/demo.simplybook.it",'''"navigate":"gift-card",'''"theme":"default","theme_settings":{"timeline_show_end_time":"0","timeline_modern_display":"as_slots","sb_base_color":"#0cadef","display_item_mode":"block","booking_nav_bg_color":"#80d0f2","body_bg_color":"#f7f7f7","dark_font_color":"#494949","light_font_color":"#ffffff","btn_color_1":"#5e7da7","sb_company_label_color":"#ffffff","hide_img_mode":"0","show_sidebar":"1","sb_busy":"#dad2ce","sb_available":"#0cadef"},"timeline":"modern","datepicker":"inline_datepicker","is_rtl":false,"app_config":{"predefined":[]}});</script></code> | ||
<br><br> | <br><br> | ||
=Booking Button Widget= | =Booking Button Widget= | ||
<br><br> | <br><br> | ||
| − | :1. Take the booking button code of your booking page in Settings// | + | :1. Take the booking button code of your booking page in <span style="background-color:#d4f8e5; padding:5px; border-radius:5px;">Settings</span> -> <span style="background-color:#d4f8e5; padding:5px; border-radius:5px;">Booking widget settings</span> -> <span style="background-color:#d4f8e5; padding:5px; border-radius:5px;">Booking button</span> -> <span style="background-color:#d4f8e5; padding:5px; border-radius:5px;">Get widget code.</span> |
| − | + | [[File:Booking widgets path new navigation.png|1200px | center]] | |
| − | [[File: | + | <br><br> |
| − | + | [[File:Booking button widget path step 3 new navigation.png|1200px|border|center]] | |
| − | + | <br><br> | |
| − | [[File: | + | [[File:Create booking button widget v3.png | center]] |
| − | + | <br><br> | |
| − | + | [[File:Booking button widget code.png | center]] | |
| − | [[File: | + | <br><br> |
| − | <br> | + | :2. Insert it to the HTML code <body> of your website (or any other place in your website platform designed for inserting HTML JavaScript iFrame code).<br> |
| − | :2. Insert it to the HTML code <body> of your website (or any other place in your website platform designed for inserting | + | <span style="background-color:#ffe9e9; padding:5px; border-radius:5px;">'''Please note!''' Different website builders/platforms may have various ways to add HTML code, you should check first whether your website supports inserting HTML JavaScript code.</span> |
:'''Here are tutorials for several popular website builders:''' | :'''Here are tutorials for several popular website builders:''' | ||
| − | :::*[ | + | :::*[https://help.simplybook.me/index.php/WordPress_integration Wordpress] |
| − | :::*[ | + | :::*[https://help.simplybook.me/index.php/Shopify Shopify] |
| − | :::*[ | + | :::*[https://help.simplybook.me/index.php/Joomla_integration Joomla] |
| − | :::*[ | + | :::*[https://help.simplybook.me/index.php/Wix_integration Wix] |
| − | :::*[ | + | :::*[https://help.simplybook.me/index.php/Squarespace Squarespace] |
| + | :::*[https://help.simplybook.me/index.php/Weebly Weebly] | ||
| + | :::*[https://help.simplybook.me/index.php/Go_Daddy Go Daddy] | ||
:::*[https://help.simplybook.me/index.php/SITE123_integration SITE123] | :::*[https://help.simplybook.me/index.php/SITE123_integration SITE123] | ||
| − | ;[ | + | ;[https://simplydemowidgets.mozello.com/ Check how widgets can look like on your website] |
| − | ;Widgets with predefined service, provider,category or location. | + | ;Widgets with predefined service, provider, category or location. |
| − | This feature allows you to generate iframe code specifically for service, provider, category or location you have. For example, if you have 2 services A and B and you choose service A as predefined, the widget will open on that service, skipping the step of choosing the service. This feature may be useful if you need to display only certain services on specific page on your website. The steps to generate the code are the same as above, only in the settings of the widget, choose the item you need to predefine. | + | This feature allows you to generate iframe code specifically for service, provider, [[Custom_Features#Service_Categories |category]] or [[Custom_Features#Multiple_Locations |location]] you have. For example, if you have 2 services A and B and you choose service A as predefined, the widget will open on that service, skipping the step of choosing the service. This feature may be useful if you need to display only certain services on a specific page on your website. The steps to generate the code are the same as above, only in the settings of the widget, choose the item you need to predefine. |
<br><br> | <br><br> | ||
=Booking and Contact Button Widget= | =Booking and Contact Button Widget= | ||
<br><br> | <br><br> | ||
| − | :1. Enable [[Custom_Features#Contact_Widget |Contact Widget]] in Custom Features | + | :1. Enable <span style="background-color:#cdeffc; padding:5px; border-radius:5px;">[[Custom_Features#Contact_Widget |Contact Widget]]</span> in <span style="background-color:#d4f8e5; padding:5px; border-radius:5px;">Custom Features</span> -> <span style="background-color:#d4f8e5; padding:5px; border-radius:5px;">For Development</span>. |
| − | [[File:Contact widget enable new.png | center]] | + | [[File:Contact widget enable path new cf.png | center]] |
| + | <br><br> | ||
| + | :2. Take the booking button code of your booking page in <span style="background-color:#d4f8e5; padding:5px; border-radius:5px;">Settings</span> -> <span style="background-color:#d4f8e5; padding:5px; border-radius:5px;">Booking widgets settings</span> -> <span style="background-color:#d4f8e5; padding:5px; border-radius:5px;">Contact widget</span> -> <span style="background-color:#d4f8e5; padding:5px; border-radius:5px;">Get widget code.</span> | ||
| + | [[File:Booking widgets path new navigation.png|1200px|border| center]] | ||
| + | <br><br> | ||
| + | [[File:Contact widget path step3 new navigation.png|1200px|border|center]] | ||
| + | <br><br> | ||
| + | [[File:Contact widget setup.png | center]] | ||
<br><br> | <br><br> | ||
| − | + | :3. Insert it to the HTML code <body> of your website (or any other place in your website platform designed for inserting HTML JavaScript iFrame code). <br> | |
| − | + | <span style="background-color:#ffe9e9; padding:5px; border-radius:5px;">'''Please note!''' Different website builders/platforms may have various ways to add HTML code, you should check first whether your website supports inserting HTML JavaScript code.</span> | |
| − | |||
| − | |||
| − | |||
| − | |||
| − | |||
| − | :3. Insert it to the HTML code <body> of your website (or any other place in your website platform designed for inserting | ||
:'''Here are tutorials for several popular website builders:''' | :'''Here are tutorials for several popular website builders:''' | ||
| − | :::*[ | + | :::*[https://help.simplybook.me/index.php/WordPress_integration Wordpress] |
| − | :::*[ | + | :::*[https://help.simplybook.me/index.php/Shopify Shopify] |
| − | :::*[ | + | :::*[https://help.simplybook.me/index.php/Joomla_integration Joomla] |
| − | :::*[ | + | :::*[https://help.simplybook.me/index.php/Wix_integration Wix] |
| − | :::*[ | + | :::*[https://help.simplybook.me/index.php/Squarespace Squarespace] |
| + | :::*[https://help.simplybook.me/index.php/Weebly Weebly] | ||
| + | :::*[https://help.simplybook.me/index.php/Go_Daddy Go Daddy] | ||
:::*[https://help.simplybook.me/index.php/SITE123_integration SITE123] | :::*[https://help.simplybook.me/index.php/SITE123_integration SITE123] | ||
| − | ;[ | + | ;[https://simplydemowidgets.mozello.com/ Check how widgets can look like on your website] |
| Line 116: | Line 140: | ||
<br><br> | <br><br> | ||
Wish to add reviews your clients leave on the booking page to your website?<br> | Wish to add reviews your clients leave on the booking page to your website?<br> | ||
| − | |||
Just follow these instructions: | Just follow these instructions: | ||
| − | :1 | + | :1. Please go to <span style="background-color:#d4f8e5; padding:5px; border-radius:5px;">Settings</span> -> <span style="background-color:#d4f8e5; padding:5px; border-radius:5px;">Booking widgets settings</span> -> <span style="background-color:#d4f8e5; padding:5px; border-radius:5px;">Reviews widget.</span> |
| − | [[File:Reviews widget | + | [[File:Reviews widget path new upd.png|1200px | center|link=https://help.simplybook.me/images/1/11/Reviews_widget_path_new_upd.png]] |
<br><br> | <br><br> | ||
| − | :2 | + | :2. On the page you will be able to select the theme, set colors, decide on the number of reviews you wish to display and whether you wish your clients to be able to add reviews using the widget. |
| − | [[File:Reviews widget | + | [[File:Reviews widget setup.png | center]] |
<br><br> | <br><br> | ||
| − | :3 | + | :3. And now, when design is set, just click on <span style="background-color:#d4f8e5; padding:5px; border-radius:5px;">Get widget code</span> button, copy the code and insert it to your website to the desired place. |
| − | [[File:Reviews widget code.png | center]] | + | [[File:Reviews widget code v3.png | center]] |
<br> | <br> | ||
Congratulations! Widget is now ready, your reviews will be published and updated on your website! | Congratulations! Widget is now ready, your reviews will be published and updated on your website! | ||
<br><br> | <br><br> | ||
Latest revision as of 10:17, 14 March 2024
- Why you should use our Widgets

- Video tutorial available
iFrame Widget
- 1. Take the iFrame code of your booking page in Settings -> Booking widgets settings -> iFrame widget -> Get widget code.


- 2. Insert it to the HTML code <body> of your website (or any other place in your website platform designed for inserting HTML JavaScript iFrame code).
Please note! Different website builders/platforms may have various ways to add HTML code, you should check first whether your website supports inserting HTML JavaScript code.
- Here are tutorials for several popular website builders:
Widgets with predefined service, provider,category or location
This feature allows you to generate iframe code specifically for service, provider, category or location you have. For example, if you have 2 services A and B and you choose service A as predefined, the widget will open on that service, skipping the step of choosing the service. This feature may be useful if you need to display only certain services on a specific page on your website. The steps to generate the code are the same as above, only in the settings of the widget, choose the item you need to predefine.

Widgets with predefined client details
Now you can also create a widget for some particular client with his/her details already filled in.
- 1. Just select the widget type you need in Settings -> Booking widgets settings, set the design and click on Get widget code.
- 2. You will see a pop-up window with the code, click on the bottom part to get client code details.
- Please copy the main code, add bottom part to it(to predefined section) and replace Predefined client name, Predefined client email, Predefined client phone with the necessary client details.

- 3. You will get the code like this:
<script src="//simplybook.me/v2/widget/widget.js"></script>
<script>var widget = new SimplybookWidget({"widget_type":"iframe","url":"https:\/\/companyname.simplybook.me","theme":"belle","theme_settings":{"sb_base_color":"#FF6969","body_bg_color":"#ffffff","dark_font_color":"#494949","light_font_color":"#ffffff","sb_busy":"#dad2ce","sb_available":"#d3e0f1"},"timeline":"flexible","datepicker":"top_calendar","is_rtl":false,"app_config":{"predefined": {"client": {

"name": "Mary",

"email": "mary@gmail.com",

"phone": "+1234567890"

}}
}});</script>
- 4. As a result the details of this client will be pre-filled in the widget and there will be no need for client to provide them.

Widgets for Client Login, Packages, Memberships, Gift Cards
Please note! It currently works with iFrame widgets only and does not work with booking button and contact button widgets.
If you are using one or several of these features it may be necessary to add a widget that will allow your clients to use the option on your website.
It can be done in a simple way by adding of the corresponding "navigate" element to the widget code:
- Client Login - "navigate":"client/sign-in"
- Packages - "navigate":"packages"
- Memberships - "navigate":"membership"
- Gift Cards - "navigate":"gift-card"
Gift Cards widget code example:
<script src="//simplybook.it/v2/widget/widget.js"></script>
<script>var widget = new SimplybookWidget({"widget_type":"iframe","url":"https:\/\/demo.simplybook.it","navigate":"gift-card","theme":"default","theme_settings":{"timeline_show_end_time":"0","timeline_modern_display":"as_slots","sb_base_color":"#0cadef","display_item_mode":"block","booking_nav_bg_color":"#80d0f2","body_bg_color":"#f7f7f7","dark_font_color":"#494949","light_font_color":"#ffffff","btn_color_1":"#5e7da7","sb_company_label_color":"#ffffff","hide_img_mode":"0","show_sidebar":"1","sb_busy":"#dad2ce","sb_available":"#0cadef"},"timeline":"modern","datepicker":"inline_datepicker","is_rtl":false,"app_config":{"predefined":[]}});</script>
Booking Button Widget
- 1. Take the booking button code of your booking page in Settings -> Booking widget settings -> Booking button -> Get widget code.


- 2. Insert it to the HTML code <body> of your website (or any other place in your website platform designed for inserting HTML JavaScript iFrame code).
Please note! Different website builders/platforms may have various ways to add HTML code, you should check first whether your website supports inserting HTML JavaScript code.
- Here are tutorials for several popular website builders:
- Widgets with predefined service, provider, category or location.
This feature allows you to generate iframe code specifically for service, provider, category or location you have. For example, if you have 2 services A and B and you choose service A as predefined, the widget will open on that service, skipping the step of choosing the service. This feature may be useful if you need to display only certain services on a specific page on your website. The steps to generate the code are the same as above, only in the settings of the widget, choose the item you need to predefine.
Booking and Contact Button Widget
- 1. Enable Contact Widget in Custom Features -> For Development.

- 2. Take the booking button code of your booking page in Settings -> Booking widgets settings -> Contact widget -> Get widget code.


- 3. Insert it to the HTML code <body> of your website (or any other place in your website platform designed for inserting HTML JavaScript iFrame code).
Please note! Different website builders/platforms may have various ways to add HTML code, you should check first whether your website supports inserting HTML JavaScript code.
- Here are tutorials for several popular website builders:
Reviews Widget
Wish to add reviews your clients leave on the booking page to your website?
Just follow these instructions:
- 1. Please go to Settings -> Booking widgets settings -> Reviews widget.
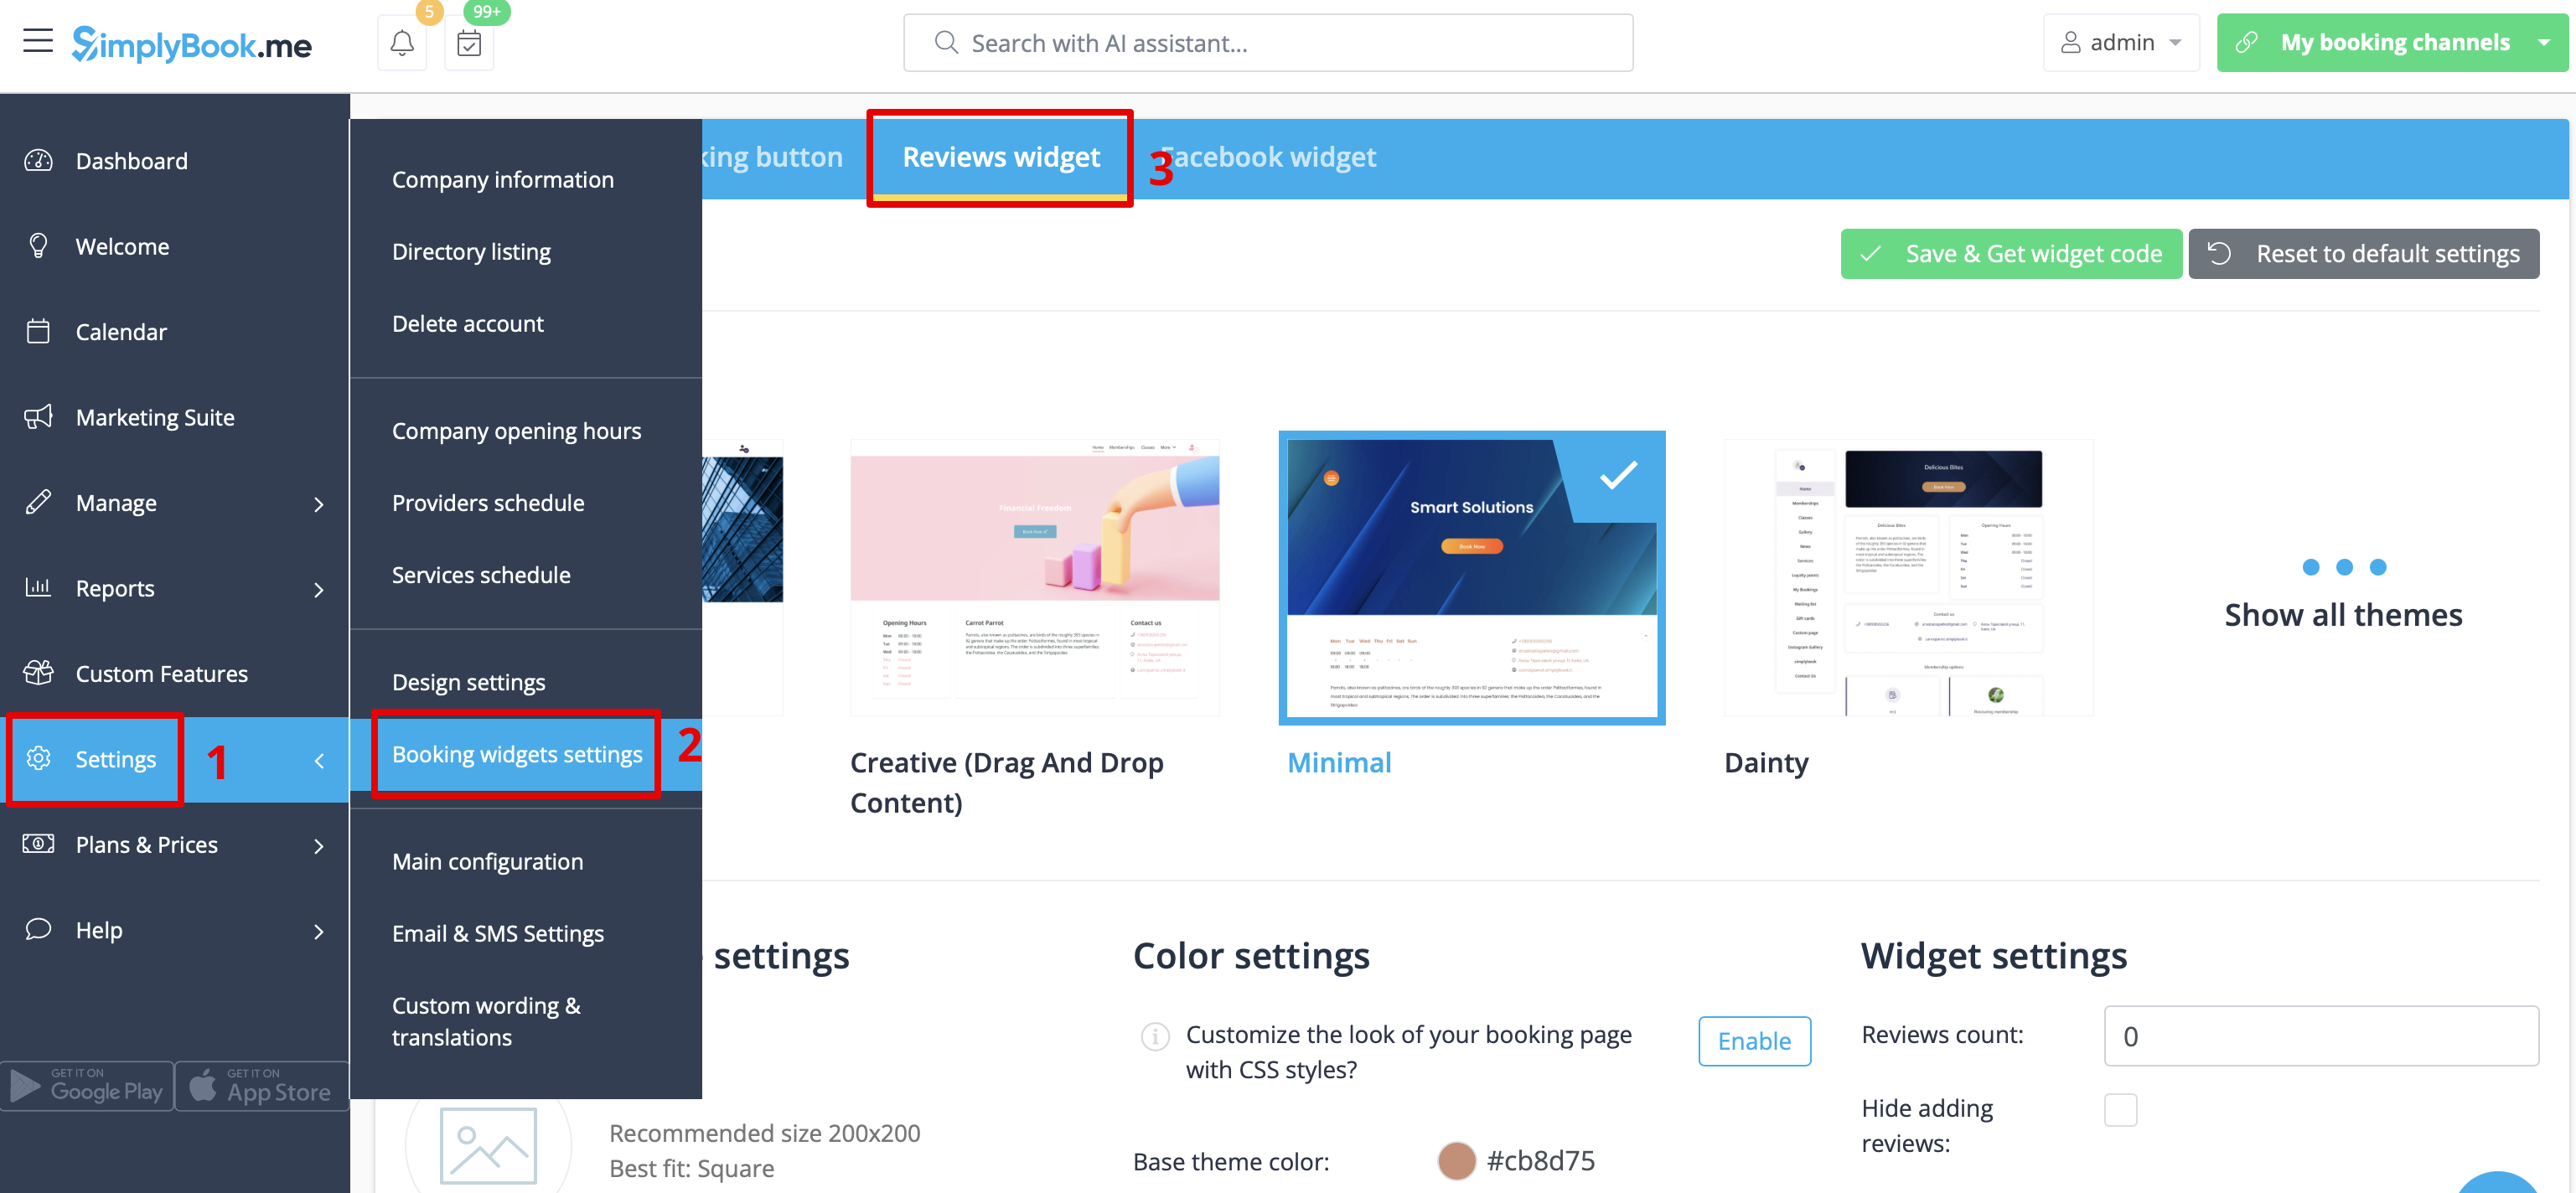
- 2. On the page you will be able to select the theme, set colors, decide on the number of reviews you wish to display and whether you wish your clients to be able to add reviews using the widget.

- 3. And now, when design is set, just click on Get widget code button, copy the code and insert it to your website to the desired place.

Congratulations! Widget is now ready, your reviews will be published and updated on your website!