No edit summary |
No edit summary |
||
| (39 intermediate revisions by the same user not shown) | |||
| Line 1: | Line 1: | ||
<languages/> | |||
<translate> | |||
<!--T:1--> | |||
{{#seo: | {{#seo: | ||
|title=SBPay.me integration | |title=SBPay.me integration | ||
|description=Integrate SBPay.me for secure and efficient payment processing. Manage transactions directly from your account. Learn more here! | |||
|titlemode=append | |titlemode=append | ||
|keywords=faq, frequently asked questions, setup, setup help, support, help content, sbpay, online payments, refunds, payments management, payment management feature, accept payments, accept payments online, | |keywords=faq, frequently asked questions, setup, setup help, support, help content, sbpay, online payments, refunds, payments management, payment management feature, accept payments, accept payments online, | ||
}} | }} | ||
</translate> | |||
__FORCETOC__ | |||
<translate> | |||
<!--T:2--> | |||
SBPay.me is the payment management feature by SimplyBook.me that lets you accept and manage payments via multiple payment providers, whilst simplifying online and offline payments, sending payment links, charging saved cards and making refunds. | SBPay.me is the payment management feature by SimplyBook.me that lets you accept and manage payments via multiple payment providers, whilst simplifying online and offline payments, sending payment links, charging saved cards and making refunds. | ||
<!--T:3--> | |||
[https://sbpay.me/en/ READ MORE] | [https://sbpay.me/en/ READ MORE] | ||
See video tutorial | <!--T:4--> | ||
See video tutorial <p><youtube>XPX7Xnsp5aM</youtube></p> | |||
==The list of currently supported payment processors:== <!--T:5--> | |||
==The list of currently supported payment processors:== | |||
{| style="width: | <!--T:6--> | ||
|- style=" | {| style="width: 60%; box-shadow: 2px 2px 15px rgba(45, 51, 72, 0.1); border-radius: 8px; border-collapse: collapse; border-bottom: 1px solid #0B3052;" | ||
! style="font-weight: bold; text-align: left; border-bottom: 2px solid | |- style="" | ||
! style="text-align: | ! style="font-weight: bold; text-align: left; border-bottom: 2px solid #0B3052; padding: 20px; text-transform: uppercase; color: white; width: 60%" | Supported payment system | ||
! style="text-align: | ! style="text-align: center; font-weight: bold; color: #0B3052; border-bottom: 2px solid #0B3052;" | Recurring | ||
! style="text-align: center; font-weight: bold; color: #0B3052; border-bottom: 2px solid #0B3052;" | Rebilling | |||
|- | |- | ||
| style="border-bottom: 1px solid | | style="padding: 30px; border-bottom: 1px solid #0B3052;" | Stripe(SCA) | ||
| style="border-bottom: 1px solid | | style="border-bottom: 1px solid #0B3052; padding: 10px; text-align: center; color: #06ADEF;" | ✔ <br> | ||
| style="border-bottom: 1px solid | | style="border-bottom: 1px solid #0B3052; padding: 10px; text-align: center; color: #06ADEF;" | ✔ | ||
|- style=" | |- style="" | ||
| style="border-bottom: 1px solid | | style="padding: 30px; border-bottom: 1px solid #0B3052;" | ECPay | ||
| style="border-bottom: 1px solid black; text-align: | | style="border-bottom: 1px solid black; text-align: center;" | − <br> | ||
| style="border-bottom: 1px solid black; text-align: | | style="border-bottom: 1px solid black; text-align: center;" | − <br> | ||
|- | |- | ||
| style="border-bottom: 1px solid | | style="padding: 30px; border-bottom: 1px solid #0B3052;" | PayPal | ||
| style="border-bottom: 1px solid black; text-align: | | style="border-bottom: 1px solid black; text-align: center; color: #06ADEF;" | ✔ <br> | ||
| style="border-bottom: 1px solid black; text-align: | | style="border-bottom: 1px solid black; text-align: center; color: #06ADEF;" | ✔ <br> | ||
|- style="border-bottom: 1px solid | |- style="" | ||
| style="border-bottom: 1px solid black; padding: | | style="padding: 30px; border-bottom: 1px solid #0B3052;" | SafeCharge | ||
| style="border-bottom: 1px solid black; text-align: | | style="border-bottom: 1px solid black; text-align: center; color: #06ADEF;" | ✔ <br> | ||
| style="border-bottom: 1px solid black; text-align: | | style="border-bottom: 1px solid black; text-align: center; color: #06ADEF;" | ✔ <br> | ||
|- style="" | |||
| style="padding: 30px; border-bottom: 1px solid #0B3052;" | Helcim | |||
| style="border-bottom: 1px solid black; text-align: center; color: #06ADEF;" | ✔ <br> | |||
| style="border-bottom: 1px solid black; text-align: center; color: #06ADEF;" | ✔ <br> | |||
|- | |- | ||
| style="border-bottom: 1px solid | | style="padding: 30px; border-bottom: 1px solid #0B3052;" | 2Checkout | ||
| style="border-bottom: 1px solid black; text-align: | | style="border-bottom: 1px solid black; text-align: center;" | − <br> | ||
| style="border-bottom: 1px solid black; text-align: | | style="border-bottom: 1px solid black; text-align: center;" | − <br> | ||
|- style=" | |- style="" | ||
| style="border-bottom: 1px solid | | style="padding: 30px; border-bottom: 1px solid #0B3052;" | Mollie | ||
| style="border-bottom: 1px solid black; text-align: | | style="border-bottom: 1px solid black; text-align: center; color: #06ADEF;" | ✔ <br> | ||
| style="border-bottom: 1px solid black; text-align: | | style="border-bottom: 1px solid black; text-align: center; color: #06ADEF; " | ✔ <br> | ||
|- | |- | ||
| style="border-bottom: 1px solid | | style="padding: 30px; border-bottom: 1px solid #0B3052;" | Authorize | ||
| style="border-bottom: 1px solid black; text-align: | | style="border-bottom: 1px solid black; text-align: center; color: #06ADEF;" | ✔ <br> | ||
| style="border-bottom: 1px solid black; text-align: | | style="border-bottom: 1px solid black; text-align: center; color: #06ADEF;" | ✔ <br> | ||
|- style=" | |- style="" | ||
| style="border-bottom: 1px solid | | style="padding: 30px; border-bottom: 1px solid #0B3052;" | Squareup (Square) | ||
| style="border-bottom: 1px solid black; text-align: | | style="border-bottom: 1px solid black; text-align: center; color: #06ADEF;" | ✔ <br> | ||
| style="border-bottom: 1px solid black; text-align: | | style="border-bottom: 1px solid black; text-align: center; color: #06ADEF;" | ✔ <br> | ||
|- | |- | ||
| style="border-bottom: 1px solid | | style="padding: 30px; border-bottom: 1px solid #0B3052;" | Worldpay | ||
| style="border-bottom: 1px solid black; text-align: | | style="border-bottom: 1px solid black; text-align: center; color: #06ADEF;" | ✔ <br> | ||
| style="border-bottom: 1px solid black; text-align: | | style="border-bottom: 1px solid black; text-align: center; color: #06ADEF;" | ✔ <br> | ||
|- style=" | |- style="" | ||
| style="border-bottom: 1px solid | | style="padding: 30px; border-bottom: 1px solid #0B3052;" | Adyen | ||
| style="border-bottom: 1px solid black; text-align: | | style="border-bottom: 1px solid black; text-align: center; color: #06ADEF;" | ✔ <br> | ||
| style="border-bottom: 1px solid black; text-align: | | style="border-bottom: 1px solid black; text-align: center; color: #06ADEF;" | ✔ <br> | ||
|- | |- | ||
| style="border-bottom: 1px solid | | style="padding: 30px; border-bottom: 1px solid #0B3052;" | LiqPay | ||
| style="border-bottom: 1px solid black; text-align: | | style="border-bottom: 1px solid black; text-align: center; color: #06ADEF;" | ✔ <br> | ||
| style="border-bottom: 1px solid black; text-align: | | style="border-bottom: 1px solid black; text-align: center; color: #06ADEF;" | ✔ <br> | ||
|- style=" | |- style="" | ||
| style="border-bottom: 1px solid | | style="padding: 30px; border-bottom: 1px solid #0B3052;" | Skrill | ||
| style="border-bottom: 1px solid black; text-align: | | style="border-bottom: 1px solid black; text-align: center; color: #06ADEF;" | ✔ <br> | ||
| style="border-bottom: 1px solid black; text-align: | | style="border-bottom: 1px solid black; text-align: center; color: #06ADEF;" | ✔ <br> | ||
|- | |- | ||
| style="border-bottom: 1px solid | | style="padding: 30px; border-bottom: 1px solid #0B3052;" | Asiapay | ||
| style="border-bottom: 1px solid black; text-align: | | style="border-bottom: 1px solid black; text-align: center; color: #06ADEF;" | ✔ <br> | ||
| style="border-bottom: 1px solid black; text-align: | | style="border-bottom: 1px solid black; text-align: center; color: #06ADEF;" | ✔ <br> | ||
|- style=" | |- style="" | ||
| style="border-bottom: 1px solid | | style="padding: 30px; border-bottom: 1px solid #0B3052;" | Borgun | ||
| style="border-bottom: 1px solid black; text-align: | | style="border-bottom: 1px solid black; text-align: center; color: #06ADEF;" | ✔ <br> | ||
| style="border-bottom: 1px solid black; text-align: | | style="border-bottom: 1px solid black; text-align: center; color: #06ADEF;" | ✔ <br> | ||
|- | |- | ||
| style="border-bottom: 1px solid | | style="padding: 30px; border-bottom: 1px solid #0B3052;" | Paytabs | ||
| style="border-bottom: 1px solid black; text-align: | | style="border-bottom: 1px solid black; text-align: center; color: #06ADEF;" | ✔ <br> | ||
| style="border-bottom: 1px solid black; text-align: | | style="border-bottom: 1px solid black; text-align: center; color: #06ADEF;" | ✔ <br> | ||
|- style=" | |- style="" | ||
| style="border-bottom: 1px solid | | style="padding: 30px; border-bottom: 1px solid #0B3052;" | Rapyd | ||
| style="border-bottom: 1px solid black; text-align: | | style="border-bottom: 1px solid black; text-align: center; color: #06ADEF;" | ✔ <br> | ||
| style="border-bottom: 1px solid black; text-align: | | style="border-bottom: 1px solid black; text-align: center; color: #06ADEF;" | ✔ <br> | ||
|- | |- | ||
| style="border-bottom: 1px solid | | style="padding: 30px; border-bottom: 1px solid #0B3052;"| Payfast | ||
| style="border-bottom: 1px solid black; text-align: | | style="border-bottom: 1px solid black; text-align: center; color: #06ADEF;" | ✔ <br> | ||
| style="border-bottom: 1px solid black; text-align: | | style="border-bottom: 1px solid black; text-align: center; color: #06ADEF;" | ✔ <br> | ||
|- style=" | |- style="" | ||
| style="border-bottom: 1px solid | | style="padding: 30px; border-bottom: 1px solid #0B3052;" | PayULatam | ||
| style="border-bottom: 1px solid black; text-align: | | style="border-bottom: 1px solid black; text-align: center;" | − <br> | ||
| style="border-bottom: 1px solid black; text-align: | | style="border-bottom: 1px solid black; text-align: center;" | − <br> | ||
|- | |- | ||
| style="border-bottom: 1px solid | | style="padding: 30px; border-bottom: 1px solid #0B3052;" | Paymentasia | ||
| style="border-bottom: 1px solid black; text-align: | | style="border-bottom: 1px solid black; text-align: center;" | − <br> | ||
| style="border-bottom: 1px solid black; text-align: | | style="border-bottom: 1px solid black; text-align: center;" | − <br> | ||
|- style=" | |- style="" | ||
| style="border-bottom: 1px solid | | style="padding: 30px; border-bottom: 1px solid #0B3052;"| Newebpay | ||
| style="border-bottom: 1px solid black; text-align: | | style="border-bottom: 1px solid black; text-align: center;" | − <br> | ||
| style="border-bottom: 1px solid black; text-align: | | style="border-bottom: 1px solid black; text-align: center;" | − <br> | ||
|- | |- | ||
| style="border-bottom: 1px solid | | style="padding: 30px; border-bottom: 1px solid #0B3052;" | PinPayments | ||
| style="border-bottom: 1px solid black; text-align: | | style="border-bottom: 1px solid black; text-align: center; color: #06ADEF;" | ✔ <br> | ||
| style="border-bottom: 1px solid black; text-align: | | style="border-bottom: 1px solid black; text-align: center; color: #06ADEF;" | ✔ <br> | ||
|- style=" | |- style="" | ||
| style="border-bottom: 1px solid | | style="padding: 30px; border-bottom: 1px solid #0B3052;"| Swish | ||
| style="border-bottom: 1px solid black; text-align: | | style="border-bottom: 1px solid black; text-align: center;" | − <br> | ||
| style="border-bottom: 1px solid black; text-align: | | style="border-bottom: 1px solid black; text-align: center;" | − <br> | ||
|- | |- | ||
| style="border-bottom: 1px solid | | style="padding: 30px; border-bottom: 1px solid #0B3052;" | Braintree | ||
| style="border-bottom: 1px solid black; text-align: | | style="border-bottom: 1px solid black; text-align: center; color: #06ADEF;" | ✔ <br> | ||
| style="border-bottom: 1px solid black; text-align: | | style="border-bottom: 1px solid black; text-align: center; color: #06ADEF;" | ✔ <br> | ||
|- style=" | |- style="" | ||
| style="border-bottom: 1px solid | | style="padding: 30px; border-bottom: 1px solid #0B3052;" | TapPay | ||
| style="border-bottom: 1px solid black; text-align: | | style="border-bottom: 1px solid black; text-align: center; color: #06ADEF;" | ✔ <br> | ||
| style="border-bottom: 1px solid black; text-align: | | style="border-bottom: 1px solid black; text-align: center; color: #06ADEF;" | ✔ <br> | ||
|- | |- | ||
| style="border-bottom: 1px solid | | style="padding: 30px; border-bottom: 1px solid #0B3052;" | Line Pay | ||
| style="border-bottom: 1px solid black; text-align: | | style="border-bottom: 1px solid black; text-align: center; color: #06ADEF;" | ✔ <br> | ||
| style="border-bottom: 1px solid black; text-align: | | style="border-bottom: 1px solid black; text-align: center; color: #06ADEF;" | ✔ <br> | ||
|- style=" | |- style="" | ||
| style="border-bottom: 1px solid | | style="padding: 30px; border-bottom: 1px solid #0B3052;"| TwoCheckout [Verifone] | ||
| style="border-bottom: 1px solid black; text-align: | | style="border-bottom: 1px solid black; text-align: center;" | − <br> | ||
| style="border-bottom: 1px solid black; text-align: | | style="border-bottom: 1px solid black; text-align: center;" | − <br> | ||
|- | |- | ||
| style="border-bottom: 1px solid black; padding: | | style="padding: 30px; border-bottom: 1px solid #0B3052;" | CCAvenue | ||
| style="border-bottom: 1px solid black; text-align: | | style="border-bottom: 1px solid black; text-align: center;" | − <br> | ||
| style="border-bottom: 1px solid black; text-align: | | style="border-bottom: 1px solid black; text-align: center;" | − <br> | ||
|- style="border-bottom: 1px solid black; border- | |- style="" | ||
| style="border-bottom: 1px solid black; padding: | | style="padding: 30px; border-bottom: 1px solid #0B3052;" | Revolut | ||
| style="border-bottom: 1px solid black; text-align: | | style="border-bottom: 1px solid black; text-align: center; color: #06ADEF;" | ✔ <br> | ||
| style="border-bottom: 1px solid black; text-align: | | style="border-bottom: 1px solid black; text-align: center; color: #06ADEF;" | ✔ <br> | ||
|- style="" | |||
| style="padding: 30px; border-bottom: 1px solid #0B3052;" | Sumup | |||
| style="border-bottom: 1px solid black; text-align: center;" | − <br> | |||
| style="border-bottom: 1px solid black; text-align: center;" | − <br> | |||
|- style="" | |||
| style="padding: 30px; border-bottom: 1px solid #0B3052;" | Payrexx | |||
| style="border-bottom: 1px solid black; text-align: center;" | − <br> | |||
| style="border-bottom: 1px solid black; text-align: center;" | − <br> | |||
|- style="" | |||
| style="padding: 30px; border-bottom: 1px solid #0B3052;" | JCC | |||
| style="border-bottom: 1px solid black; text-align: center; color: #06ADEF;" | ✔ <br> | |||
| style="border-bottom: 1px solid black; text-align: center; color: #06ADEF;" | ✔ <br> | |||
|- style="" | |||
| style="padding: 30px; border-bottom: 1px solid #0B3052;" | Pagar.me | |||
| style="border-bottom: 1px solid black; text-align: center;" | − <br> | |||
| style="border-bottom: 1px solid black; text-align: center;" | − <br> | |||
|- style="" | |||
| style="padding: 30px; border-bottom: 1px solid #0B3052;" | PayPal Checkout | |||
| style="border-bottom: 1px solid black; text-align: center;" | − <br> | |||
| style="border-bottom: 1px solid black; text-align: center;" | − <br> | |||
|- style="" | |||
| style="padding: 30px; border-bottom: 1px solid #0B3052;" | Monobank | |||
| style="border-bottom: 1px solid black; text-align: center;" | − <br> | |||
| style="border-bottom: 1px solid black; text-align: center;" | − <br> | |||
|- style="" | |||
| style="padding: 30px; border-bottom: 1px solid #0B3052;" | Moneris | |||
| style="border-bottom: 1px solid black; text-align: center;" | − <br> | |||
| style="border-bottom: 1px solid black; text-align: center;" | − <br> | |||
|} | |} | ||
<!--T:7--> | |||
'''How to set specific payment processors''' | |||
<!--T:8--> | |||
Video tutorials [[File:Youtube-Logo.png|link=https://www.youtube.com/playlist?list=PLM9QxGer1Y2rKQwKDx4TmfnTYtuZDbN7r]] | |||
:1. First of all, as you plan to work with online payment, you need to have <span style="background-color:#cdeffc; padding:5px; border-radius:5px;">[[Accept payments custom feature|Accept Payments]]</span> custom feature enabled in your [https://simplybook.me/ SimplyBook.me] account. | ==How to set and use it with [https://simplybook.me/ SimplyBook.me]== <!--T:22--> | ||
[[File:Accept payments | |||
<!--T:10--> | |||
:1. First of all, as you plan to work with online payment, you need to have <span style="background-color:#cdeffc; padding:5px; border-radius:5px;">[[Special:MyLanguage/Accept payments custom feature|Accept Payments]]</span> custom feature enabled in your [https://simplybook.me/ SimplyBook.me] account. | |||
[[File:Accept payments enable path redesigned.png|1200px|center|link=https://help.simplybook.me/images/9/9e/Accept_payments_enable_path_redesigned.png]] | |||
<br><br> | <br><br> | ||
:2. Click on <span style="background-color:#d4f8e5; padding:5px; border-radius:5px;"> | :2. Click on <span style="background-color:#d4f8e5; padding:5px; border-radius:5px;">Settings</span> button on the <span style="background-color:#d4f8e5; padding:5px; border-radius:5px;">custom features page</span> next to the <span style="background-color:#cdeffc; padding:5px; border-radius:5px;">[[Special:MyLanguage/Accept payments custom feature|Accept Payments]]</span> feature. | ||
[[File: | [[File:Accept payments settings path redesigned.png|1200px|border | center|link=https://help.simplybook.me/images/3/37/Accept_payments_settings_path_redesigned.png]] | ||
<br><br> | <br><br> | ||
:3. Adjust your <span style="background-color:#d4f8e5; padding:5px; border-radius:5px;">company information</span> in the registration form if necessary. | :3. Adjust your <span style="background-color:#d4f8e5; padding:5px; border-radius:5px;">company information</span> in the registration form if necessary. | ||
| Line 150: | Line 195: | ||
:Click on <span style="background-color:#d4f8e5; padding:5px; border-radius:5px;">Activate SBPay.me</span> button below.<br> | :Click on <span style="background-color:#d4f8e5; padding:5px; border-radius:5px;">Activate SBPay.me</span> button below.<br> | ||
:Congratulations! Your SBPay.me account is created! | :Congratulations! Your SBPay.me account is created! | ||
[[File: | [[File:Sbpay registration form redesigned.png|1200px|center|link=https://help.simplybook.me/images/d/dd/Sbpay_registration_form_redesigned.png]] | ||
<br><br> | <br><br> | ||
:4. Navigate to the <span style="background-color:#d4f8e5; padding:5px; border-radius:5px;">Payment system settings</span> and <span style="background-color:#d4f8e5; padding:5px; border-radius:5px;">add the credentials</span> of the payment gateway that you plan to use for online payments.<br> | :4. Navigate to the <span style="background-color:#d4f8e5; padding:5px; border-radius:5px;">Payment system settings</span> and <span style="background-color:#d4f8e5; padding:5px; border-radius:5px;">add the credentials</span> of the payment gateway that you plan to use for online payments.<br> | ||
| Line 157: | Line 202: | ||
<br><br> | <br><br> | ||
:5. Once you have set the payment processors up you will be able to see the active ones on the SimplyBook.me side as well. | :5. Once you have set the payment processors up you will be able to see the active ones on the SimplyBook.me side as well. | ||
[[File: | [[File:Active payment processors redesigned.png|1200px|center|link=https://help.simplybook.me/images/0/03/Active_payment_processors_redesigned.png]] | ||
<br><br> | <br><br> | ||
:6. Set the prices for your services, <span style="background-color:#cdeffc; padding:5px; border-radius:5px;">[[Classes custom feature|classes]]</span>, <span style="background-color:#cdeffc; padding:5px; border-radius:5px;">[[Packages custom feature|packages]]</span>, <span style="background-color:#cdeffc; padding:5px; border-radius:5px;">[[Membership custom feature|memberships]]</span>, <span style="background-color:#cdeffc; padding:5px; border-radius:5px;">[[Coupons and Gift Cards custom feature|gift cards]]</span>, <span style="background-color:#cdeffc; padding:5px; border-radius:5px;">[[Products for Sale custom feature|products]]</span> or <span style="background-color:#cdeffc; padding:5px; border-radius:5px;">[[Service Add-Ons custom feature|service add-ons]]</span> in your [https://simplybook.me/ SimplyBook.me] account and you are ready to get payments online. | :6. Set the prices for your services, <span style="background-color:#cdeffc; padding:5px; border-radius:5px;">[[Special:MyLanguage/Classes custom feature|classes]]</span>, <span style="background-color:#cdeffc; padding:5px; border-radius:5px;">[[Special:MyLanguage/Packages custom feature|packages]]</span>, <span style="background-color:#cdeffc; padding:5px; border-radius:5px;">[[Special:MyLanguage/Membership custom feature|memberships]]</span>, <span style="background-color:#cdeffc; padding:5px; border-radius:5px;">[[Special:MyLanguage/Coupons and Gift Cards custom feature|gift cards]]</span>, <span style="background-color:#cdeffc; padding:5px; border-radius:5px;">[[Special:MyLanguage/Products for Sale custom feature|products]]</span> or <span style="background-color:#cdeffc; padding:5px; border-radius:5px;">[[Special:MyLanguage/Service Add-Ons custom feature|service add-ons]]</span> in your [https://simplybook.me/ SimplyBook.me] account and you are ready to get payments online. | ||
<br><br> | <br><br> | ||
==Using PRO version features== | ==Using PRO version features== <!--T:23--> | ||
<!--T:12--> | |||
If you have a higher subscription in your SimplyBook.me account then the <span style="background-color:#d4f8e5; padding:5px; border-radius:5px;">PRO</span> version of SBPay.me is enabled by default so you can get access to the list of additional options like vaulted payments, refunds and payment links. | |||
[[File: | [[File:Sbpay pro activated redesigned.png|1200px|center|link=https://help.simplybook.me/images/7/7e/Sbpay_pro_activated_redesigned.png]] | ||
<br><br> | <br><br> | ||
In case you do not plan to use the additional options listed below you can easily disable the "PRO" version by turning the switch off. | In case you do not plan to use the additional options listed below you can easily disable the "PRO" version by turning the switch off. | ||
<br><br> | <br><br> | ||
<!--T:13--> | |||
===Vaulted payments=== | ===Vaulted payments=== | ||
<span style="background-color:#ffe9e9; padding:5px; border-radius:5px;">'''Please note!'''</span> | <span style="background-color:#ffe9e9; padding:5px; border-radius:5px;">'''Please note!'''</span> | ||
*<span style="background-color:#ffe9e9; padding:5px; border-radius:5px;">It requires <span style="background-color:#cdeffc; padding:5px; border-radius:5px;">[[Client Login custom feature|Client login]]</span> custom feature to be enabled to use this functionality.</span> | *<span style="background-color:#ffe9e9; padding:5px; border-radius:5px;">It requires <span style="background-color:#cdeffc; padding:5px; border-radius:5px;">[[Special:MyLanguage/Client Login custom feature|Client login]]</span> custom feature to be enabled to use this functionality.</span> | ||
*<span style="background-color:#ffe9e9; padding:5px; border-radius:5px;">Not all the payment gateways support this feature. Please check the availability of such an option in the [[SBPay.me_integration#The_list_of_currently_supported_payment_processors:|table]] and/or by contacting your payment gateway support as it may require some adjustments on their side.</span> | *<span style="background-color:#ffe9e9; padding:5px; border-radius:5px;">Not all the payment gateways support this feature. Please check the availability of such an option in the [[Special:MyLanguage/SBPay.me_integration#The_list_of_currently_supported_payment_processors:|table]] and/or by contacting your payment gateway support as it may require some adjustments on their side.</span> | ||
<br> | <br> | ||
:1. Enable the option <span style="background-color:#d4f8e5; padding:5px; border-radius:5px;">Allow vaulted payments</span> on your <span style="background-color:#cdeffc; padding:5px; border-radius:5px;">Accept payments</span> settings page. | :1. Enable the option <span style="background-color:#d4f8e5; padding:5px; border-radius:5px;">Allow vaulted payments</span> on your <span style="background-color:#cdeffc; padding:5px; border-radius:5px;">Accept payments</span> settings page. | ||
[[File: | [[File:Alloe vaulted payments on redesigned.png|1200px|center|link=https://help.simplybook.me/images/4/4f/Alloe_vaulted_payments_on_redesigned.png]] | ||
<br><br> | <br><br> | ||
:2. As the result the client will be able to tick the checkbox <span style="background-color:#d4f8e5; padding:5px; border-radius:5px;">Save my payment method for easy charging in my future purchases</span> at checkout on the booking website and his/her payment details will be attached to the client profile. | :2. As the result the client will be able to tick the checkbox <span style="background-color:#d4f8e5; padding:5px; border-radius:5px;">Save my payment method for easy charging in my future purchases</span> at checkout on the booking website and his/her payment details will be attached to the client profile. | ||
[[File:Save payment method client side.png|1200px|center|link=https://help.simplybook.me/images/ | [[File:Save payment method client side new.png|1200px|center|link=https://help.simplybook.me/images/5/5b/Save_payment_method_client_side_new.png]] | ||
<br><br> | <br><br> | ||
:3. During the next purchase or booking on the client side he/she can decide whether to confirm the order with the already saved payment method or to choose the new option. | :3. During the next purchase or booking on the client side he/she can decide whether to confirm the order with the already saved payment method or to choose the new option. | ||
[[File: | [[File:Pay with saved card new client side.png|1200px|center|link=https://help.simplybook.me/images/c/cf/Pay_with_saved_card_new_client_side.png]] | ||
<br><br> | <br><br> | ||
:4. During the payment approval on the admin side <span style="background-color:#d4f8e5; padding:5px; border-radius:5px;">Payment transactions</span> report or sale management inside the <span style="background-color:#d4f8e5; padding:5px; border-radius:5px;">POS interface</span> you will also be able to use the client's saved payment method. | :4. During the payment approval on the admin side <span style="background-color:#d4f8e5; padding:5px; border-radius:5px;">Payment transactions</span> report or sale management inside the <span style="background-color:#d4f8e5; padding:5px; border-radius:5px;">POS interface</span> you will also be able to use the client's saved payment method. | ||
[[File: | [[File:Approve payment with saved card redesigned.png|1200px|center|link=https://help.simplybook.me/images/7/7b/Approve_payment_with_saved_card_redesigned.png]] | ||
<br><br> | <br><br> | ||
[[File:Use saved payment method pos.png|1200px|center|link=https://help.simplybook.me/images/e/e8/Use_saved_payment_method_pos.png]] | [[File:Use saved payment method pos.png|1200px|center|link=https://help.simplybook.me/images/e/e8/Use_saved_payment_method_pos.png]] | ||
<br><br> | <br><br> | ||
<!--T:15--> | |||
===Payment links=== | ===Payment links=== | ||
:1. Enable <span style="background-color:#d4f8e5; padding:5px; border-radius:5px;">Send payment link on Delay payment method</span> in the settings of Accept payments custom feature, inside the <span style="background-color:#d4f8e5; padding:5px; border-radius:5px;">Email template settings</span> block and adjust the template to your needs.<br> | :1. Enable <span style="background-color:#d4f8e5; padding:5px; border-radius:5px;">Send payment link on Delay payment method</span> in the settings of Accept payments custom feature, inside the <span style="background-color:#d4f8e5; padding:5px; border-radius:5px;">Email template settings</span> block and adjust the template to your needs.<br> | ||
:Please do not forget to add <span style="background-color:#d4f8e5; padding:5px; border-radius:5px;">[payment_link] variable</span> for the client to easily navigate to the payment. | :Please do not forget to add <span style="background-color:#d4f8e5; padding:5px; border-radius:5px;">[payment_link] variable</span> for the client to easily navigate to the payment. | ||
[[File:Send payment | [[File:Send payment links redesigned.png|1200px|center|link=https://help.simplybook.me/images/f/fa/Send_payment_links_redesigned.png]] | ||
<br><br> | <br><br> | ||
:2. After you create the order from admin side or from <span style="background-color:#d4f8e5; padding:5px; border-radius:5px;">POS interface</span> with <span style="background-color:#d4f8e5; padding:5px; border-radius:5px;">Pay later</span> selected as the payment method, or if the client selects <span style="background-color:#d4f8e5; padding:5px; border-radius:5px;">Pay later</span> at the checkout step on the booking website, the system will automatically send the email/SMS with the link to pay for the sale (saved payment methods can also be used in this case). | :2. After you create the order from admin side or from <span style="background-color:#d4f8e5; padding:5px; border-radius:5px;">POS interface</span> with <span style="background-color:#d4f8e5; padding:5px; border-radius:5px;">Pay later</span> selected as the payment method, or if the client selects <span style="background-color:#d4f8e5; padding:5px; border-radius:5px;">Pay later</span> at the checkout step on the booking website, the system will automatically send the email/SMS with the link to pay for the sale (saved payment methods can also be used in this case). | ||
<br><br> | <br><br> | ||
:3. You can also trigger sending payment link from <span style="background-color:#d4f8e5; padding:5px; border-radius:5px;">Payment transactions</span> report or <span style="background-color:#d4f8e5; padding:5px; border-radius:5px;">POS interface</span> or simply copy the payment link per the specific order there and send it to your client using own communication channels. | :3. You can also trigger sending payment link from <span style="background-color:#d4f8e5; padding:5px; border-radius:5px;">Payment transactions</span> report or <span style="background-color:#d4f8e5; padding:5px; border-radius:5px;">POS interface</span> or simply copy the payment link per the specific order there and send it to your client using own communication channels.<br> | ||
:As well, if the client is at your place, you can show him/her the QR code to scan with his/her phone camera and be redirected to the payment page to complete the order. It can be found in <span style="background-color:#d4f8e5; padding:5px; border-radius:5px;">Reports</span> -> <span style="background-color:#d4f8e5; padding:5px; border-radius:5px;">Payment transactions</span> -> <span style="background-color:#d4f8e5; padding:5px; border-radius:5px;">Receive payment.</span> | |||
[[File:Send payment link | [[File:Send payment link options in transactions report.png|1200px|center|link=https://help.simplybook.me/images/3/36/Send_payment_link_options_in_transactions_report.png]] | ||
[[File: | [[File:Send payment link options from pos.png|1200px|center|link=https://help.simplybook.me/images/e/ec/Send_payment_link_options_from_pos.png]] | ||
<br><br> | |||
===Refunds=== | '''Easy mobile payments from the app''': video tutorial <p><youtube>CSI-gWjKtm8</youtube></p> | ||
<br><br> | |||
===Refunds=== <!--T:24--> | |||
<!--T:16--> | |||
It may happen that you need to return the money back to your customer due to some reason and now it is possible to easily manage such cases with SBPay.me PRO integration. | It may happen that you need to return the money back to your customer due to some reason and now it is possible to easily manage such cases with SBPay.me PRO integration. | ||
:1. After you activate SBPay.me integration in your [https://simplybook.me/ SimplyBook.me] account you can simply navigate to <span style="background-color:#d4f8e5; padding:5px; border-radius:5px;">Reports</span> -> <span style="background-color:#d4f8e5; padding:5px; border-radius:5px;">Payment transactions</span> -> find the necessary invoice -> click on <span style="background-color:#d4f8e5; padding:5px; border-radius:5px;">Actions</span> and select <span style="background-color:#d4f8e5; padding:5px; border-radius:5px;">Refund</span> from the drop down menu. Confirm the action and the refund will be automatically made to the corresponding client's account. | :1. After you activate SBPay.me integration in your [https://simplybook.me/en SimplyBook.me] account you can simply navigate to <span style="background-color:#d4f8e5; padding:5px; border-radius:5px;">Reports</span> -> <span style="background-color:#d4f8e5; padding:5px; border-radius:5px;">Payment transactions</span> -> find the necessary invoice -> click on <span style="background-color:#d4f8e5; padding:5px; border-radius:5px;">Actions</span> and select <span style="background-color:#d4f8e5; padding:5px; border-radius:5px;">Refund</span> from the drop down menu. Confirm the action and the refund will be automatically made to the corresponding client's account. | ||
[[File:Refund from | [[File:Refund from report path redesigned.png|1200px|center|link=https://help.simplybook.me/images/7/71/Refund_from_report_path_redesigned.png]] | ||
<br><br> | <br><br> | ||
:2. Or you can go directly to the <span style="background-color:#d4f8e5; padding:5px; border-radius:5px;">SBPay.me interface</span> -> <span style="background-color:#d4f8e5; padding:5px; border-radius:5px;">Transactions</span> -> open the necessary record and select <span style="background-color:#d4f8e5; padding:5px; border-radius:5px;">Refund</span>. | :2. Or you can go directly to the <span style="background-color:#d4f8e5; padding:5px; border-radius:5px;">SBPay.me interface</span> -> <span style="background-color:#d4f8e5; padding:5px; border-radius:5px;">Transactions</span> -> open the necessary record and select <span style="background-color:#d4f8e5; padding:5px; border-radius:5px;">Refund</span>. | ||
[[File:Refund on sbpayme side.png|1200px|center|link=https://help.simplybook.me/images/8/86/Refund_on_sbpayme_side.png]] | [[File:Refund on sbpayme side.png|1200px|center|link=https://help.simplybook.me/images/8/86/Refund_on_sbpayme_side.png]] | ||
<br><br> | <br><br> | ||
:3. In the <span style="background-color:#cdeffc; padding:5px; border-radius:5px;">[[Accept payments custom feature|Accept payments]]</span> custom feature settings you can also enable <span style="background-color:#d4f8e5; padding:5px; border-radius:5px;">Send refund confirmation</span> option and adjust the templates to automatically notify your clients via email and/or sms about the refunds. | :3. In the <span style="background-color:#cdeffc; padding:5px; border-radius:5px;">[[Special:MyLanguage/Accept payments custom feature|Accept payments]]</span> custom feature settings you can also enable <span style="background-color:#d4f8e5; padding:5px; border-radius:5px;">Send refund confirmation</span> option and adjust the templates to automatically notify your clients via email and/or sms about the refunds. | ||
[[File: | [[File:Send refund confirmation redesigned.png|1200px|center|link=https://help.simplybook.me/images/a/a9/Send_refund_confirmation_redesigned.png]] | ||
<br><br> | <br><br> | ||
==SBPay.me Invoices== | |||
==SBPay.me Invoices== <!--T:25--> | |||
<!--T:17--> | |||
You can now easily adjust the invoices settings to your needs and send them to your customers after any purchase. | You can now easily adjust the invoices settings to your needs and send them to your customers after any purchase. | ||
;How to use | ;How to use | ||
| Line 234: | Line 291: | ||
<br><br> | <br><br> | ||
:7. You can also print the invoices directly from the SimplyBook.me system, Reports -> Payment transactions, by selecting the corresponding action per record. | :7. You can also print the invoices directly from the SimplyBook.me system, Reports -> Payment transactions, by selecting the corresponding action per record. | ||
[[File:Print | [[File:Print invoice path redesigned.png|1200px|border|center|link=https://help.simplybook.me/images/5/5a/Print_invoice_path_redesigned.png]] | ||
<br><br> | <br><br> | ||
==SBPay.me Reports== | <span style="background-color:#ffe9e9; padding:5px; border-radius:5px;">'''Please note!''' Importing invoices from external platforms directly into the system is not supported. However, SimplyBook.me offers integration options with various accounting software, including [[Special:MyLanguage/Xero_integration| Xero]], [[Special:MyLanguage/QuickBooks_integration| QuickBooks]], and [[Special:MyLanguage/FreshBooks_integration| FreshBooks]]. You can efficiently manage your invoices within your preferred accounting system.</span> | ||
<br><br> | |||
==SBPay.me Reports== <!--T:26--> | |||
<!--T:18--> | |||
SBPay.me is just starting but already has several useful reports that you can use to track your payments: | SBPay.me is just starting but already has several useful reports that you can use to track your payments: | ||
:1. ''Dashboard'' - contains currencies, payment systems and tags charts. | :1. ''Dashboard'' - contains currencies, revenues, payment systems and tags charts. | ||
:2. '' | :2. ''Payments'' - allows to view, confirm or refund orders. | ||
:3. ''Recurring profiles'' - contains the information on memberships recurring profiles. You can easily view, prolong or cancel profiles on that page. | :3. ''Invoices'' - appears when the corresponding custom feature is enabled and allows to view, resend invoices, issue credit notes. | ||
: | :4. ''Recurring profiles'' - contains the information on memberships recurring profiles. You can easily view, prolong or cancel profiles on that page. | ||
: | :5. ''Customers payment methods'' - allows you to view the list of saved payment methods of your clients, check the list of related payments and disable the profiles if necessary. | ||
: | :6. ''Tax report'' - allows to see a list of all your sales within each country (if your sales are in more than one country) and the tax amounts as well as total count of transactions | ||
:7. ''VIES report'' - The purpose of a VIES (VAT Information Exchange System) tax report is to ensure compliance with EU VAT regulations by enabling businesses to report and verify cross-border transactions within the European Union.This report is especially important for businesses engaged in B2B cross-border trade within the EU. This report shows you a list of your customers, including their contact details, their tax numbers, their residence and the amount of sales to each of them. | |||
:8. ''OSS report'' - The purpose of an OSS (One Stop Shop) tax report is to simplify VAT reporting for businesses that sell goods or services to customers in multiple EU countries. It allows businesses to manage their VAT obligations in one place, avoiding the need to register for VAT in every country where they sell. The OSS report is particularly useful for e-commerce businesses and service providers who sell to customers in multiple EU countries. This report shows you the total sales and taxed amount within each of the countries you sell to, the VAT tax rate in each of the countries as well as total transactions counts in each country. | |||
:9. ''Customer report'' - shows you a table including name of each customer, their contact details, when t hey became your clients, count of succesful payments, number of error payments, when they made their last purchase and their last payment status (received, pending, error). The report also allows you to select a specific client and see all the concerning details. | |||
:10. ''Accrual based revenue'' - is related to the revenue earned/recognized by a business for which the invoice is yet to be billed to the customer. | |||
:11. ''Subscription Metrics'' - allows to track the trends of your recurring subscription customers. View graphs showing active customers, monthly sales trends, and a comparison of new customers versus those who have left. | |||
:12. ''Snowball MRR Report'' - is a detailed table showing trends in your recurring revenue. Easily see the number of active customers, new sign-ups, cancellations, and the total active recurring customers at the end of each period. | |||
==Create payment requests== <!--T:27--> | |||
<!--T:20--> | |||
'''Video tutorial''' <p><youtube>JHN6T1QzsHk</youtube></p> | |||
<!--T:21--> | |||
With just a few clicks, users can easily generate payment links that can be shared with their clients via email, sending the direct link or QR code. This feature enables business owners and individuals to easily collect payments for their goods or services, without the need for a website or an online store. | |||
<br><br> | |||
In addition, it allows users to set up recurring payments, so that they can automatically charge their clients on a regular basis. This is a useful feature for businesses that offer subscription-based services or recurring billing. | |||
<br><br> | |||
Users can also choose from a wide selection of payment processors to be used for payments or to choose previously saved payment method, making it easy for returning customers to pay for their purchases quickly and securely. | |||
<br><br> | |||
For businesses that need to keep track of their payments, SBPay.me offers the ability to list detailed descriptions of sale items, including any additional taxes or discounts. This feature ensures that users can easily monitor their sales and keep accurate records. | |||
<br><br> | |||
Finally, SBPay.me allows users to tag payments so that they can group them when creating reports. This feature provides an organized way to manage payment data and generate comprehensive reports. Overall, SBPay.me is a powerful payment system that provides a simple, yet effective way to manage payments and increase revenue.<br><br> | |||
More features coming! | More features coming! | ||
</translate> | |||
Latest revision as of 08:51, 30 October 2025
SBPay.me is the payment management feature by SimplyBook.me that lets you accept and manage payments via multiple payment providers, whilst simplifying online and offline payments, sending payment links, charging saved cards and making refunds.
See video tutorial
The list of currently supported payment processors:
| Supported payment system | Recurring | Rebilling |
|---|---|---|
| Stripe(SCA) | ✔ |
✔ |
| ECPay | − |
− |
| PayPal | ✔ |
✔ |
| SafeCharge | ✔ |
✔ |
| Helcim | ✔ |
✔ |
| 2Checkout | − |
− |
| Mollie | ✔ |
✔ |
| Authorize | ✔ |
✔ |
| Squareup (Square) | ✔ |
✔ |
| Worldpay | ✔ |
✔ |
| Adyen | ✔ |
✔ |
| LiqPay | ✔ |
✔ |
| Skrill | ✔ |
✔ |
| Asiapay | ✔ |
✔ |
| Borgun | ✔ |
✔ |
| Paytabs | ✔ |
✔ |
| Rapyd | ✔ |
✔ |
| Payfast | ✔ |
✔ |
| PayULatam | − |
− |
| Paymentasia | − |
− |
| Newebpay | − |
− |
| PinPayments | ✔ |
✔ |
| Swish | − |
− |
| Braintree | ✔ |
✔ |
| TapPay | ✔ |
✔ |
| Line Pay | ✔ |
✔ |
| TwoCheckout [Verifone] | − |
− |
| CCAvenue | − |
− |
| Revolut | ✔ |
✔ |
| Sumup | − |
− |
| Payrexx | − |
− |
| JCC | ✔ |
✔ |
| Pagar.me | − |
− |
| PayPal Checkout | − |
− |
| Monobank | − |
− |
| Moneris | − |
− |
How to set specific payment processors
How to set and use it with SimplyBook.me
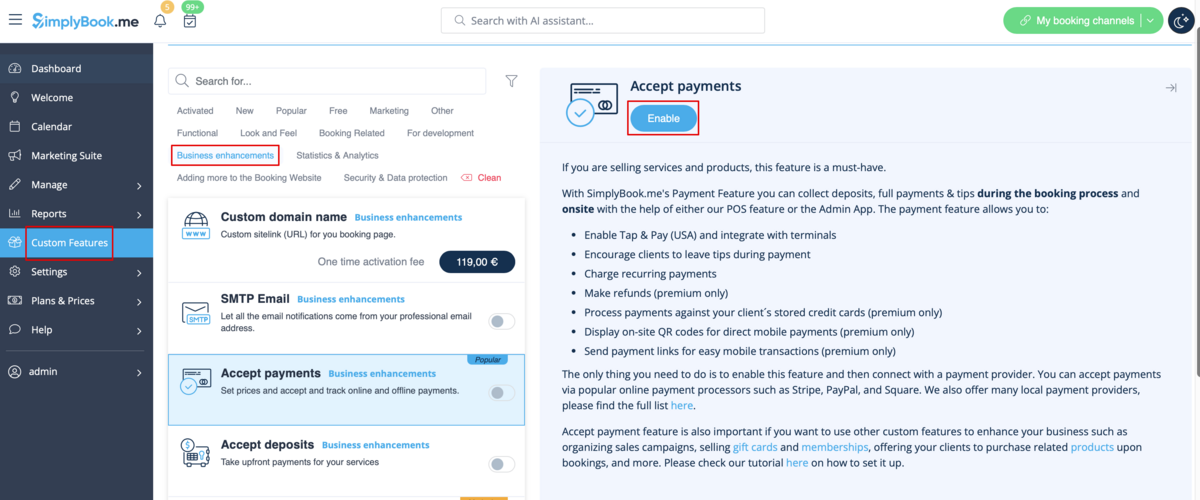
- 1. First of all, as you plan to work with online payment, you need to have Accept Payments custom feature enabled in your SimplyBook.me account.
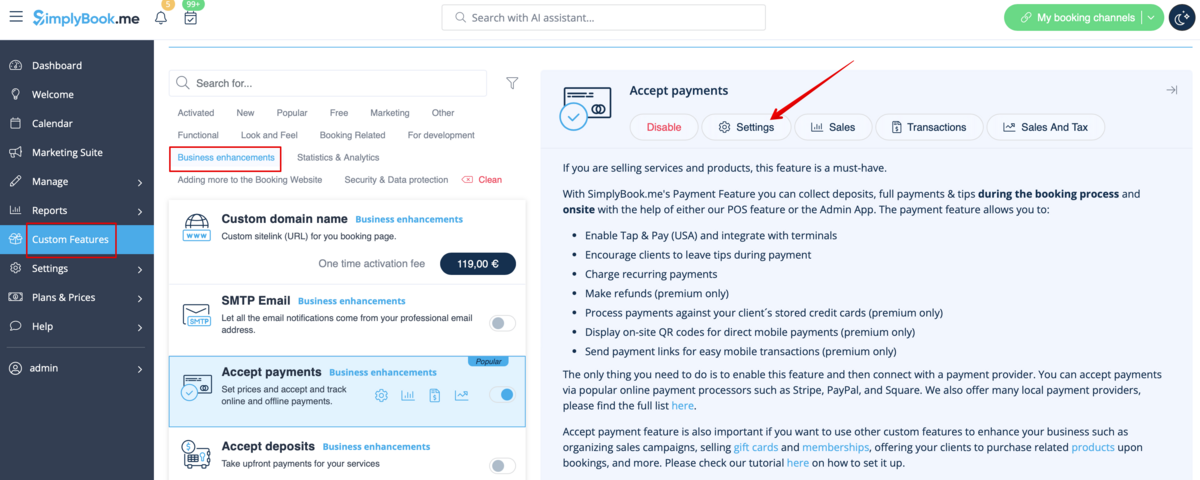
- 2. Click on Settings button on the custom features page next to the Accept Payments feature.
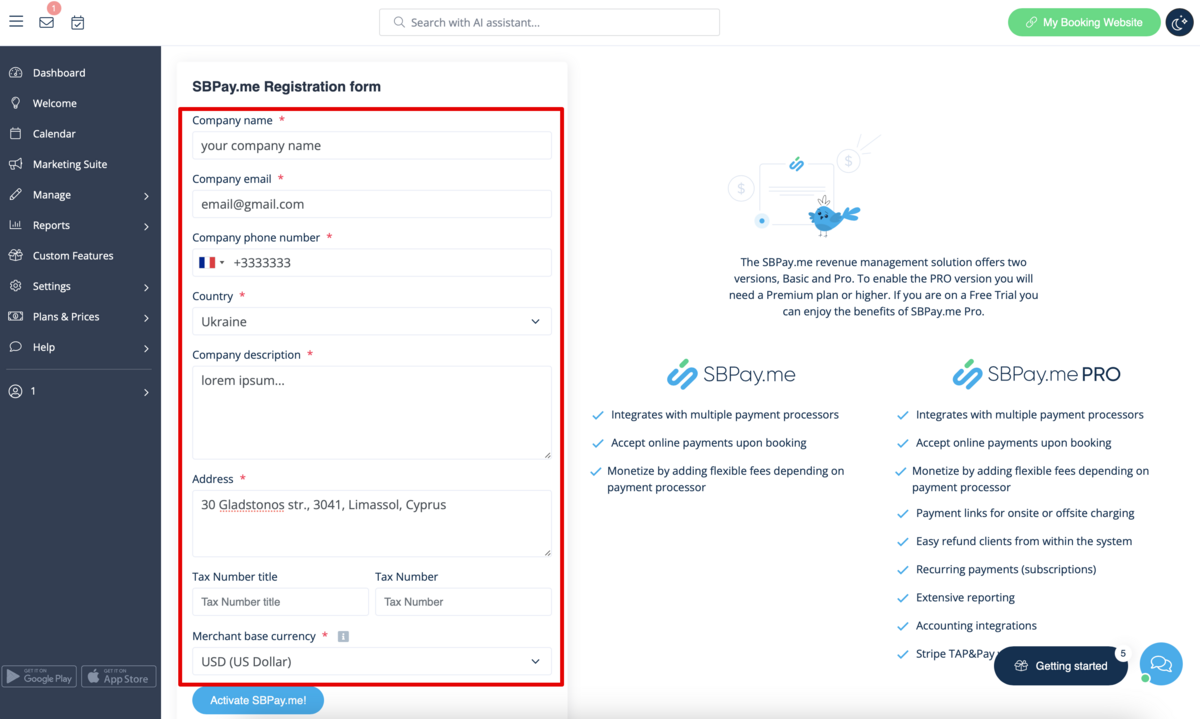
- 3. Adjust your company information in the registration form if necessary.
- (It will be autocompleted with the company details that you already have in your system).
- Click on Activate SBPay.me button below.
- Congratulations! Your SBPay.me account is created!
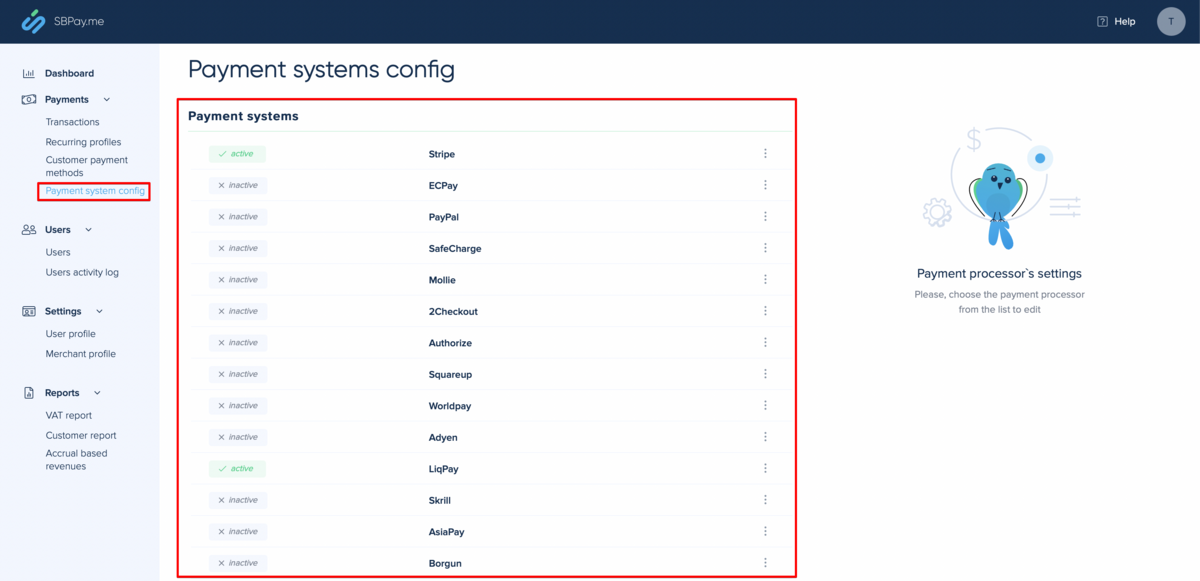
- 4. Navigate to the Payment system settings and add the credentials of the payment gateway that you plan to use for online payments.
- If you had some payment system details before enabling SBPay.me integration it may have been copied to SBPay.me side, but there may be some changes in the payment flow so you will need to check if all the settings are added there for the smooth online payments operation.
- 5. Once you have set the payment processors up you will be able to see the active ones on the SimplyBook.me side as well.
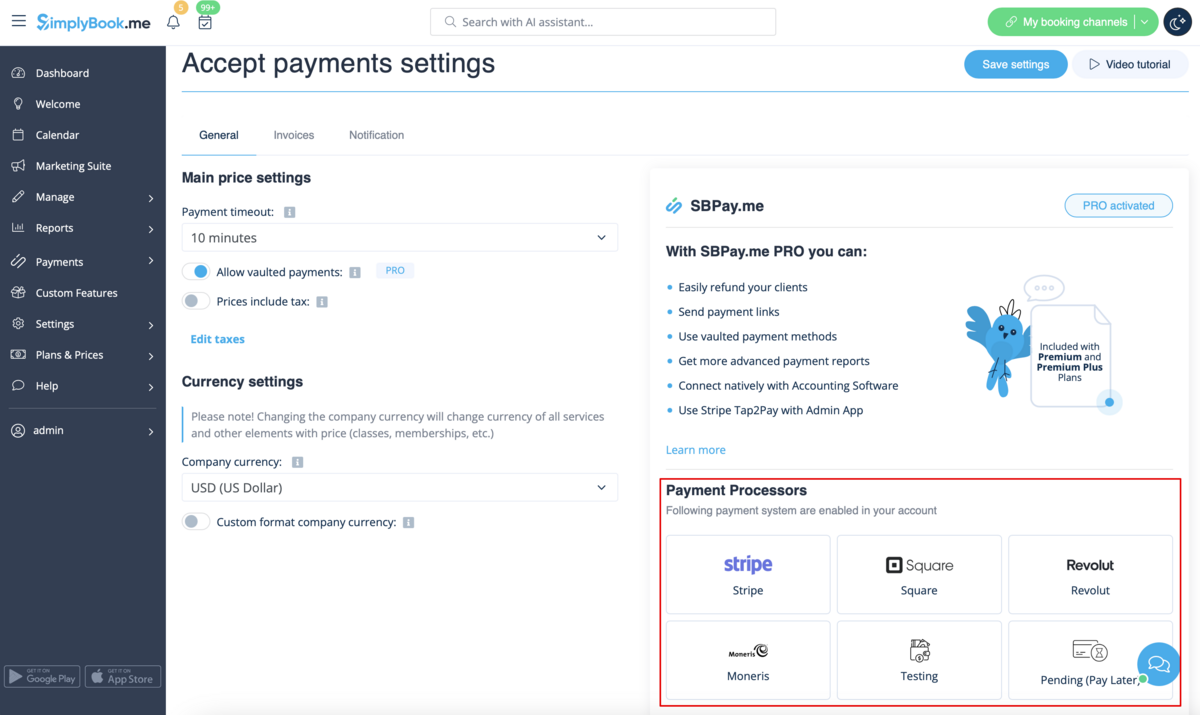
- 6. Set the prices for your services, classes, packages, memberships, gift cards, products or service add-ons in your SimplyBook.me account and you are ready to get payments online.
Using PRO version features
If you have a higher subscription in your SimplyBook.me account then the PRO version of SBPay.me is enabled by default so you can get access to the list of additional options like vaulted payments, refunds and payment links.
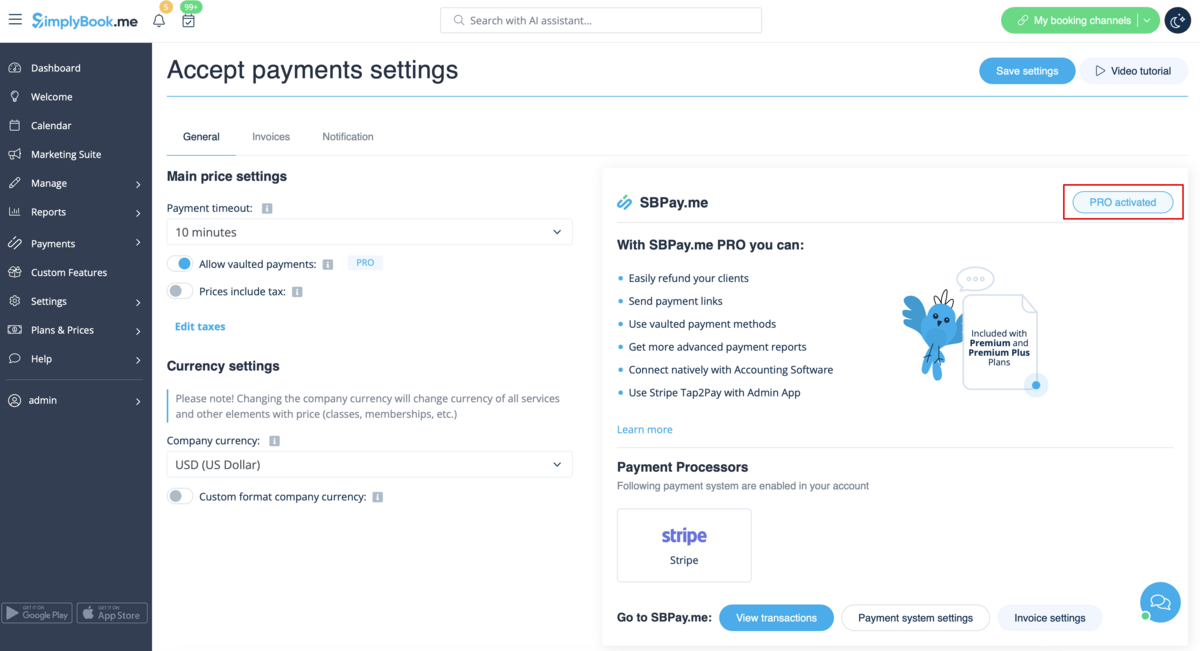
In case you do not plan to use the additional options listed below you can easily disable the "PRO" version by turning the switch off.
Vaulted payments
Please note!
- It requires Client login custom feature to be enabled to use this functionality.
- Not all the payment gateways support this feature. Please check the availability of such an option in the table and/or by contacting your payment gateway support as it may require some adjustments on their side.
- 1. Enable the option Allow vaulted payments on your Accept payments settings page.
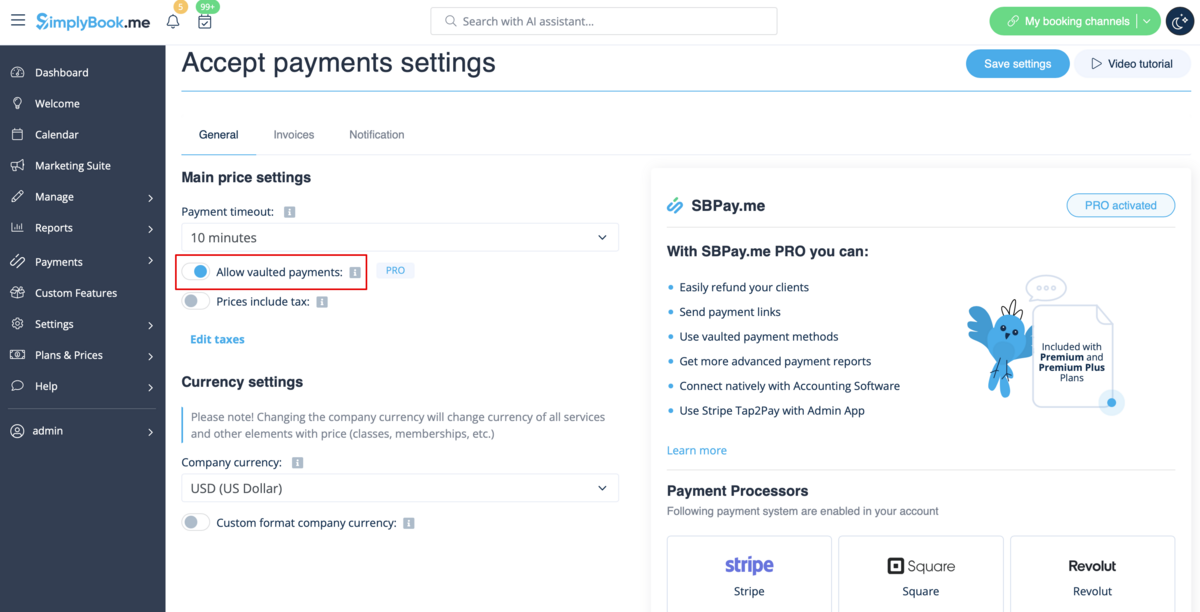
- 2. As the result the client will be able to tick the checkbox Save my payment method for easy charging in my future purchases at checkout on the booking website and his/her payment details will be attached to the client profile.

- 3. During the next purchase or booking on the client side he/she can decide whether to confirm the order with the already saved payment method or to choose the new option.

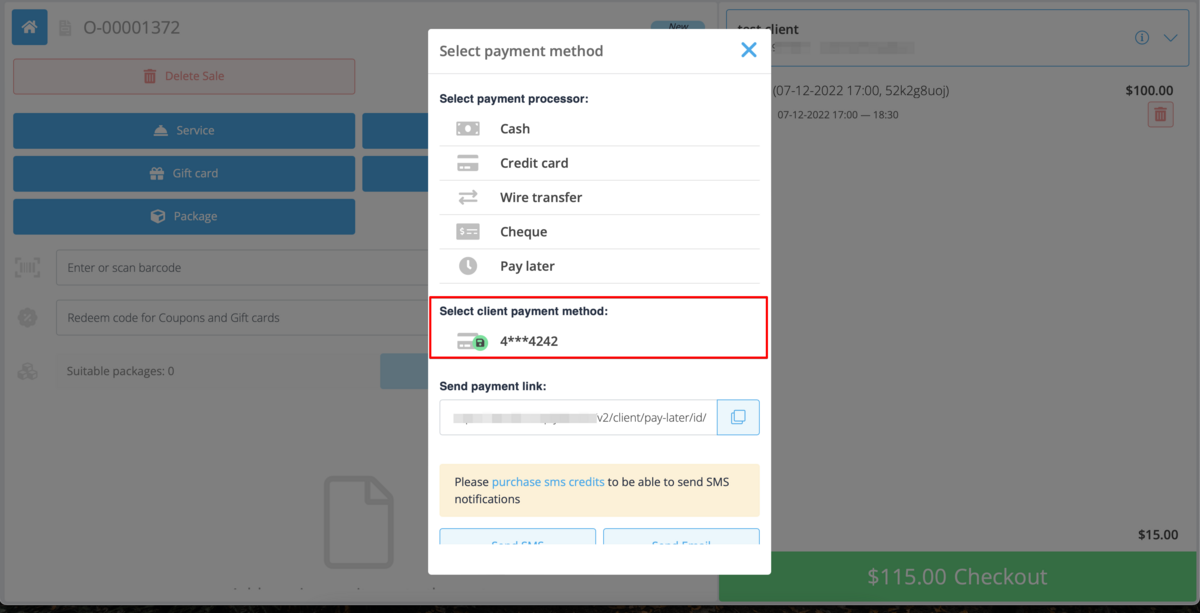
- 4. During the payment approval on the admin side Payment transactions report or sale management inside the POS interface you will also be able to use the client's saved payment method.

Payment links
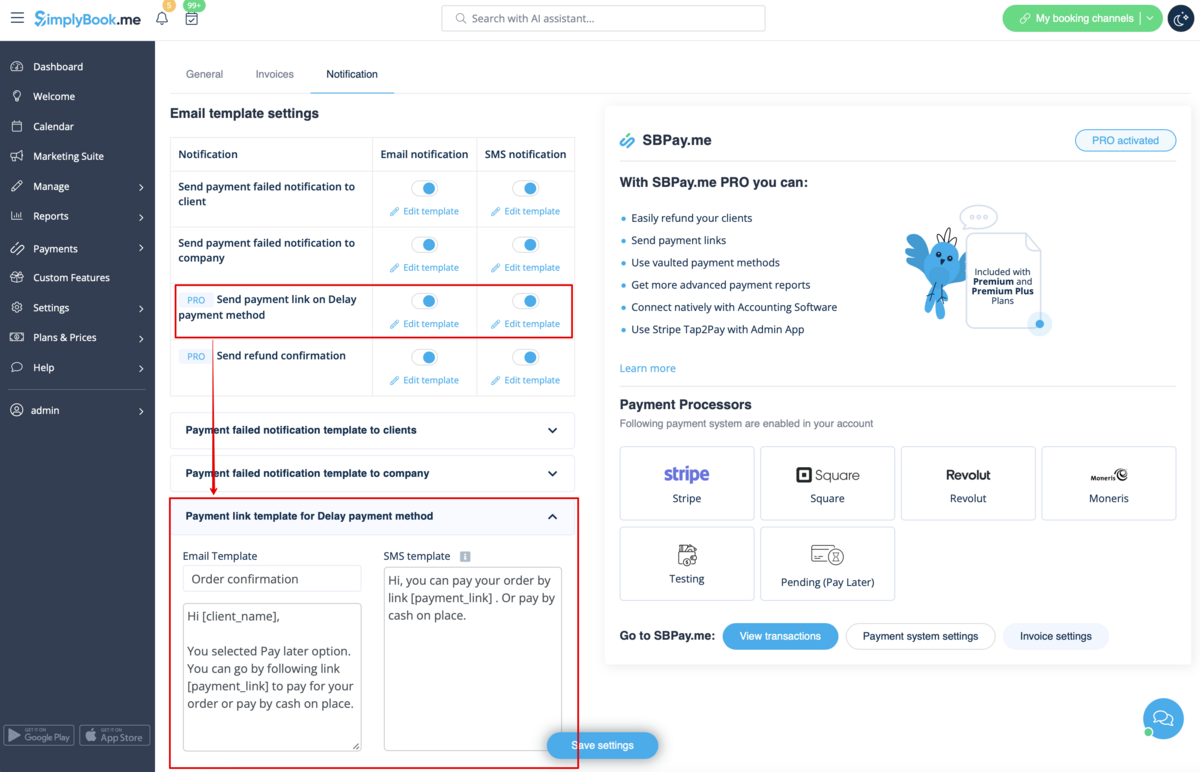
- 1. Enable Send payment link on Delay payment method in the settings of Accept payments custom feature, inside the Email template settings block and adjust the template to your needs.
- Please do not forget to add [payment_link] variable for the client to easily navigate to the payment.
- 2. After you create the order from admin side or from POS interface with Pay later selected as the payment method, or if the client selects Pay later at the checkout step on the booking website, the system will automatically send the email/SMS with the link to pay for the sale (saved payment methods can also be used in this case).
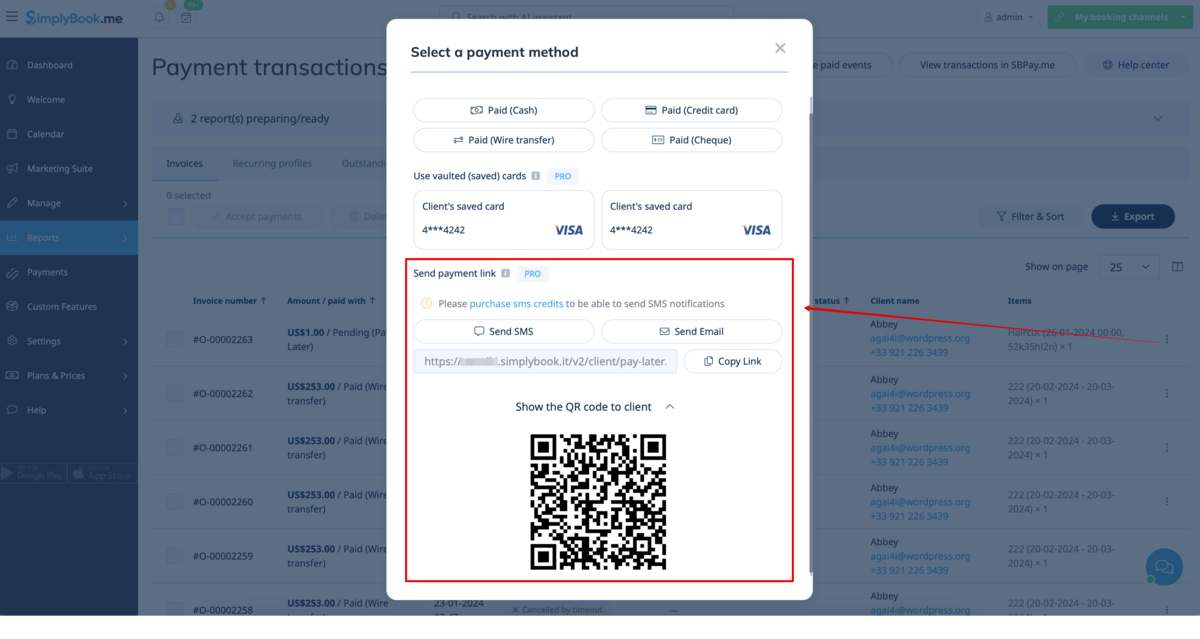
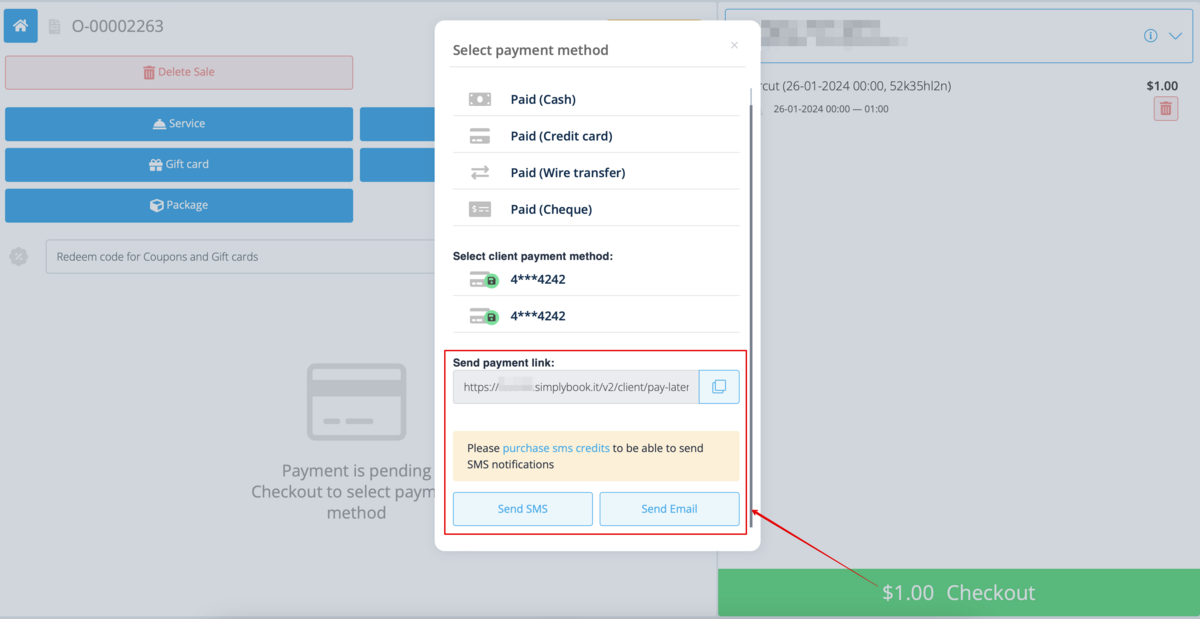
- 3. You can also trigger sending payment link from Payment transactions report or POS interface or simply copy the payment link per the specific order there and send it to your client using own communication channels.
- As well, if the client is at your place, you can show him/her the QR code to scan with his/her phone camera and be redirected to the payment page to complete the order. It can be found in Reports -> Payment transactions -> Receive payment.
Easy mobile payments from the app: video tutorial
Refunds
It may happen that you need to return the money back to your customer due to some reason and now it is possible to easily manage such cases with SBPay.me PRO integration.
- 1. After you activate SBPay.me integration in your SimplyBook.me account you can simply navigate to Reports -> Payment transactions -> find the necessary invoice -> click on Actions and select Refund from the drop down menu. Confirm the action and the refund will be automatically made to the corresponding client's account.

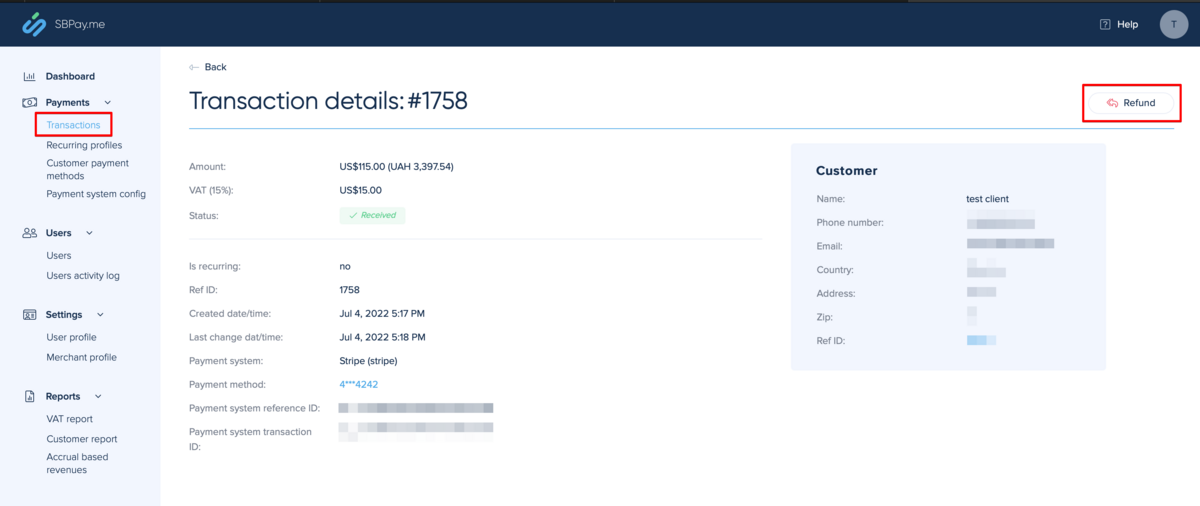
- 2. Or you can go directly to the SBPay.me interface -> Transactions -> open the necessary record and select Refund.
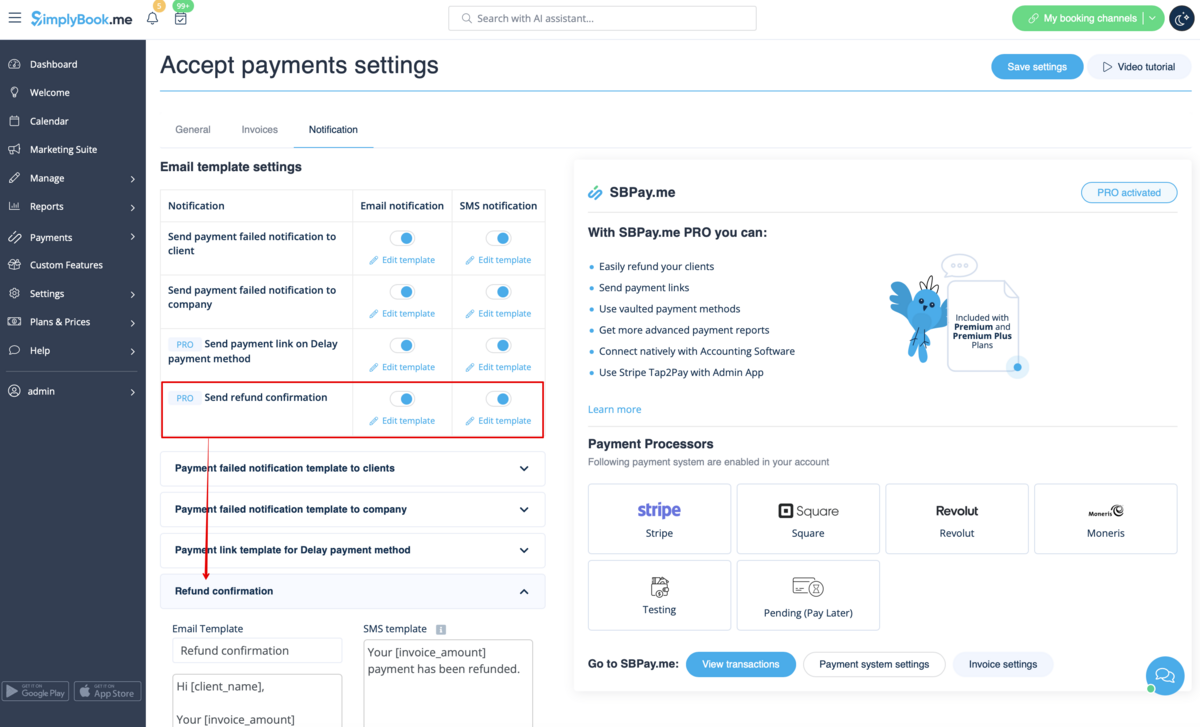
- 3. In the Accept payments custom feature settings you can also enable Send refund confirmation option and adjust the templates to automatically notify your clients via email and/or sms about the refunds.
SBPay.me Invoices
You can now easily adjust the invoices settings to your needs and send them to your customers after any purchase.
- How to use
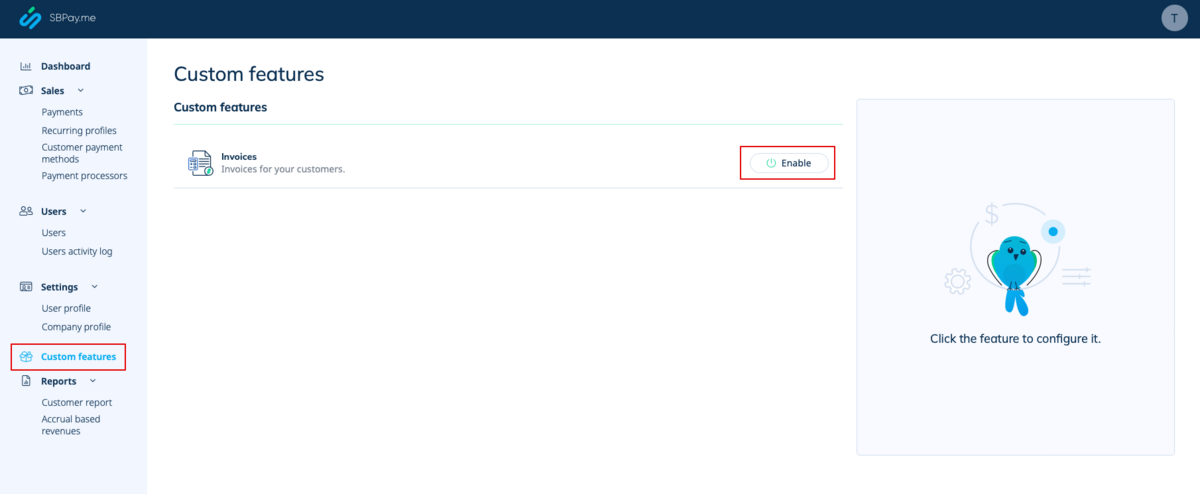
- 1. Enable the corresponding option on your "Custom features" page.
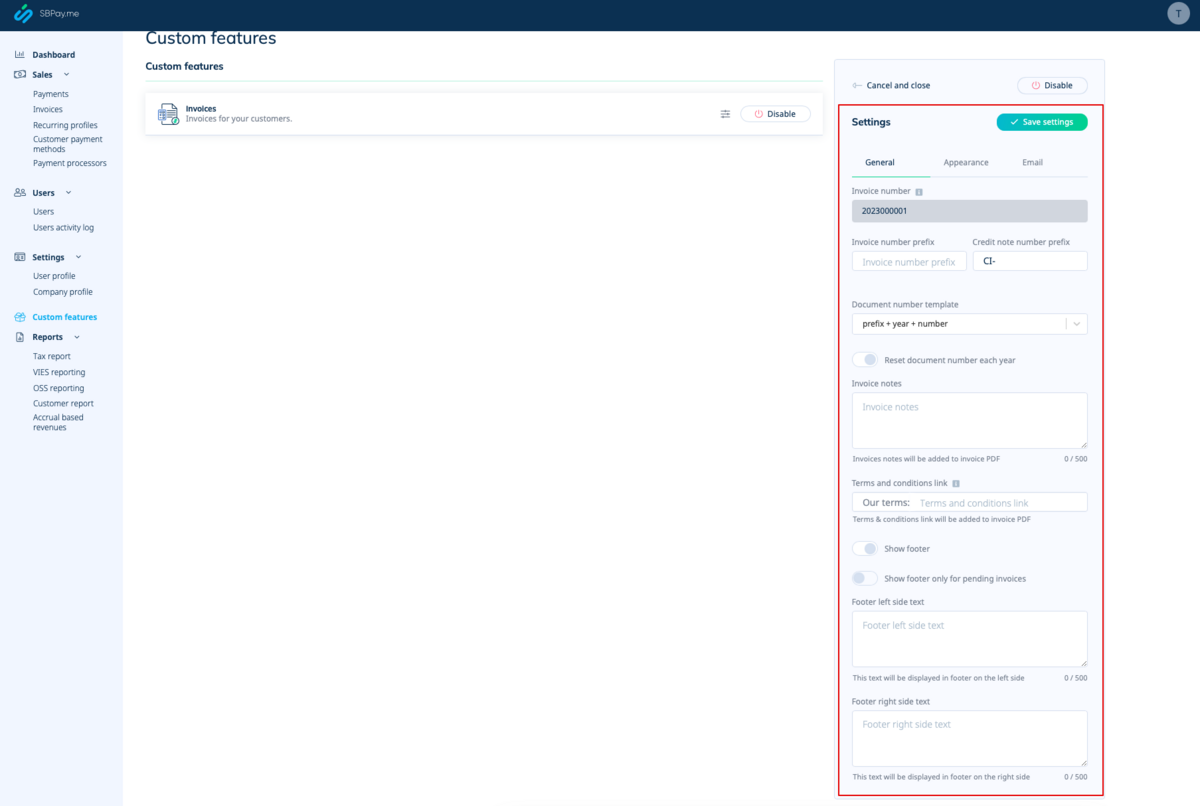
- 2. Adjust the general settings to your needs: the invoice and credit note numbering format, add notes, link to your Terms and Conditions and footer information if necessary.
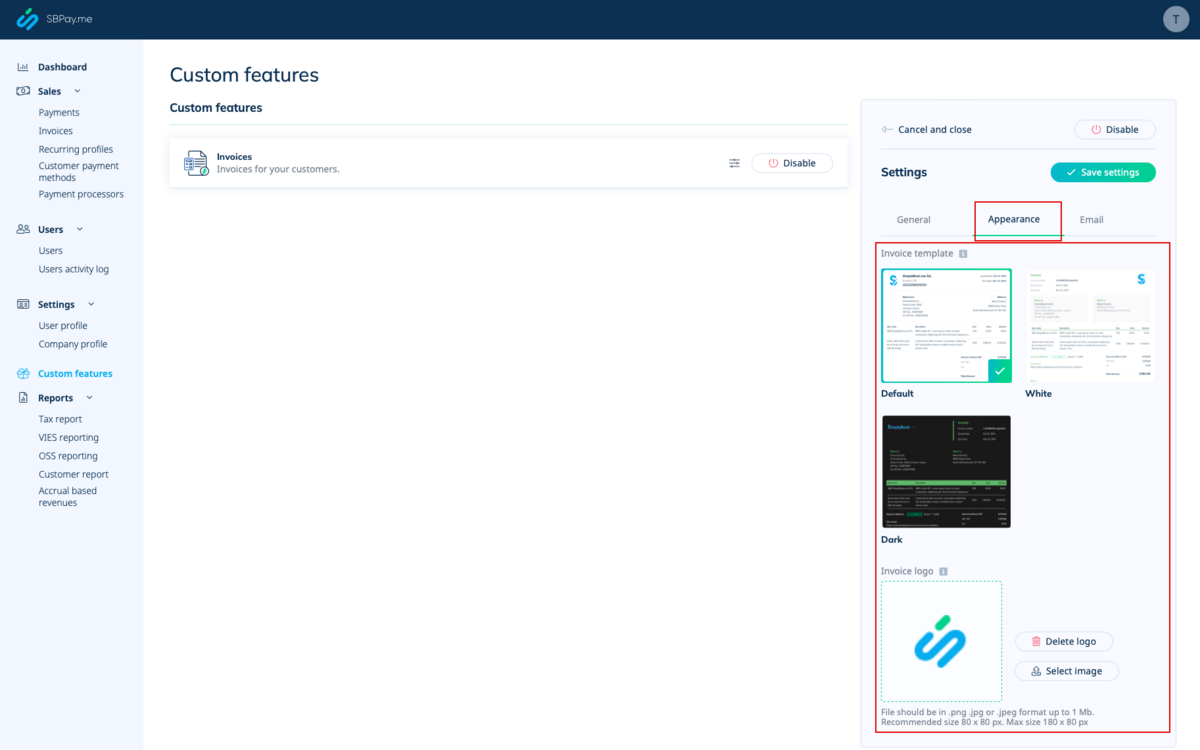
- 3. Set the desired look in "Appearance" tab, upload your company logo.
- 4. Switch to the third, "Email", tab and set the notifications templates. You can use several variables mentioned below the form. save your settings.
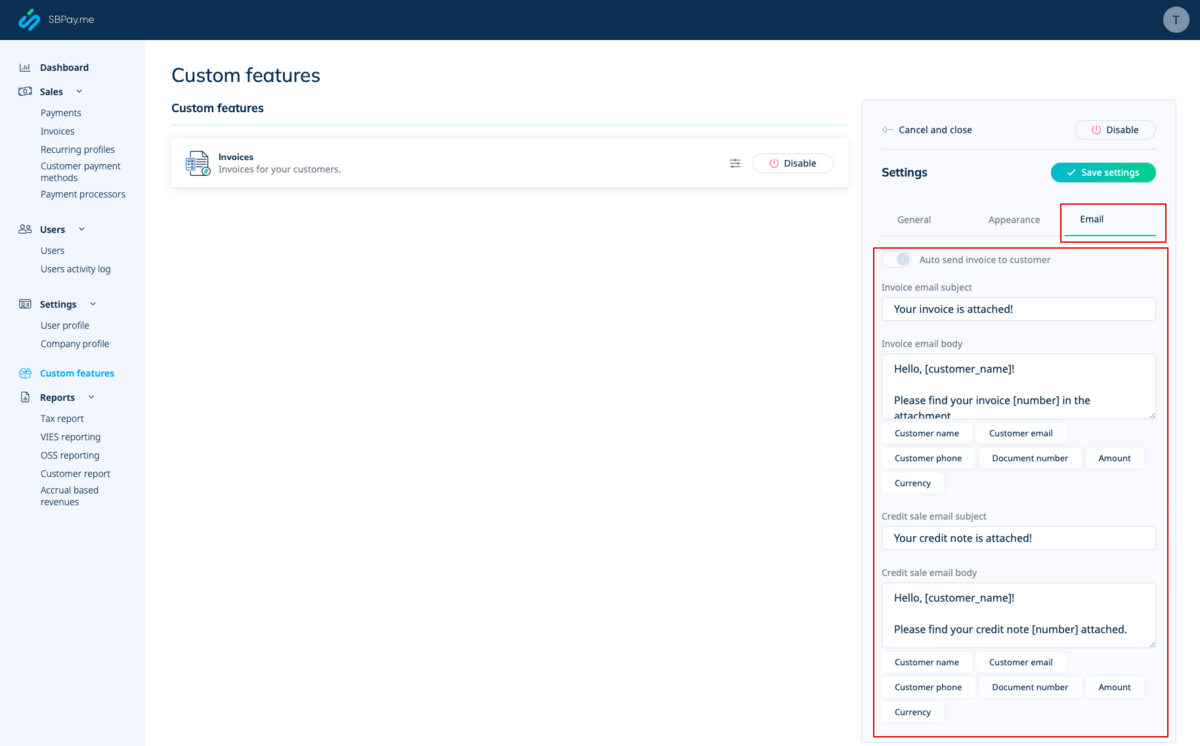
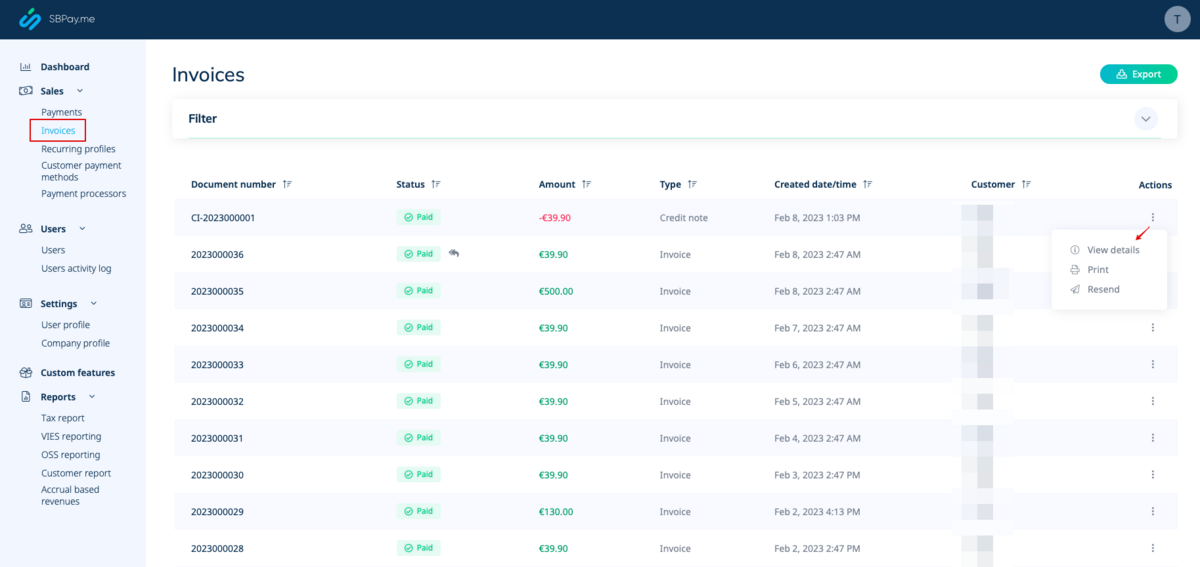
- 5. In the Sales -> Invoices you can see the list of created invoices and credits notes. You can resend them to the clients when needed, issue credit notes, print or simply view the details.
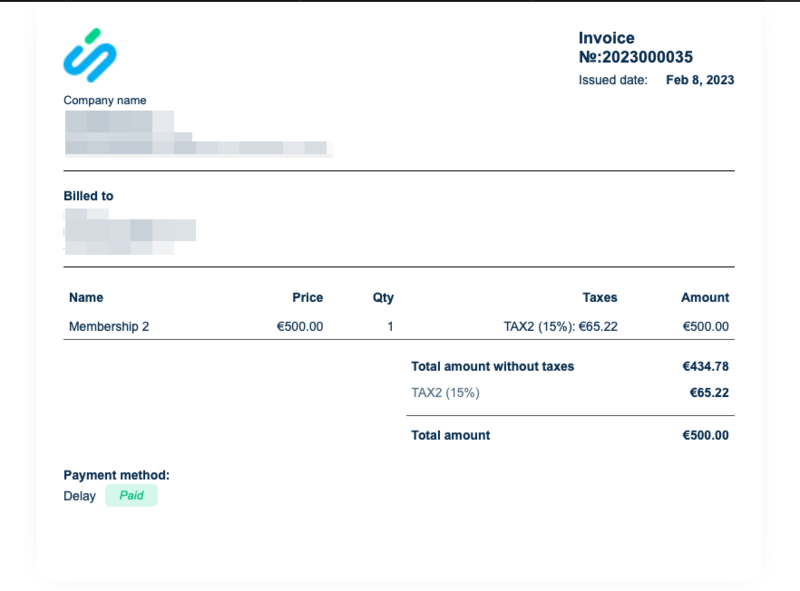
- 6. Here is the example of how print invoice version can look like.
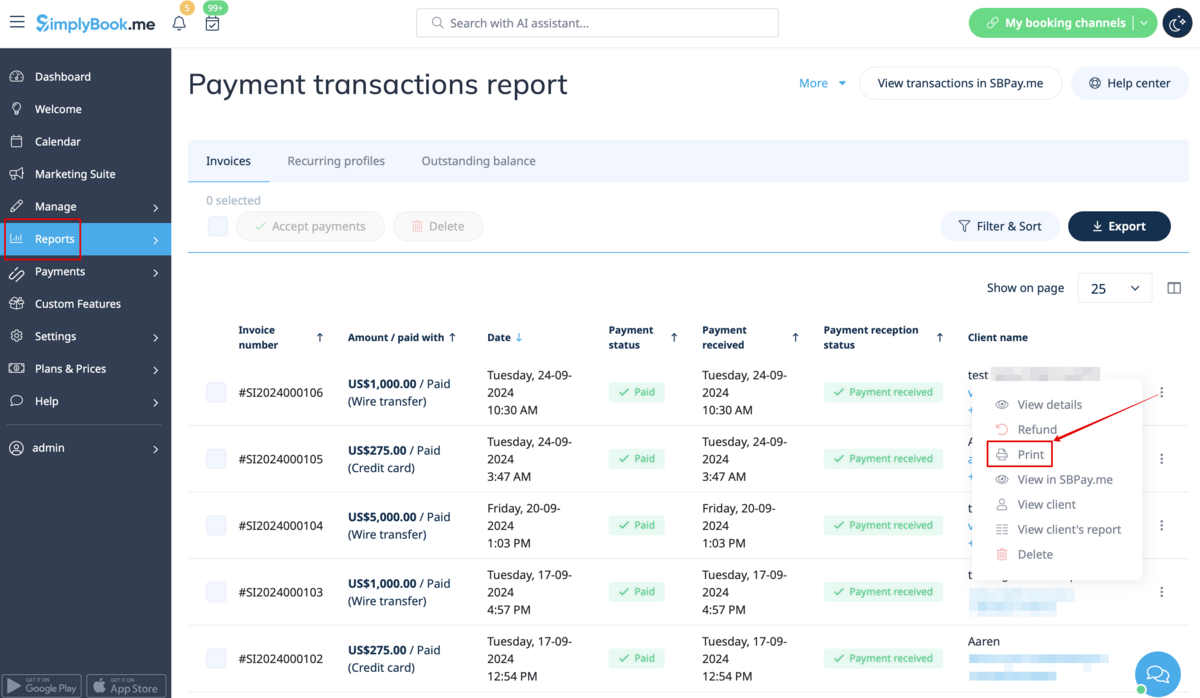
- 7. You can also print the invoices directly from the SimplyBook.me system, Reports -> Payment transactions, by selecting the corresponding action per record.
Please note! Importing invoices from external platforms directly into the system is not supported. However, SimplyBook.me offers integration options with various accounting software, including Xero, QuickBooks, and FreshBooks. You can efficiently manage your invoices within your preferred accounting system.
SBPay.me Reports
SBPay.me is just starting but already has several useful reports that you can use to track your payments:
- 1. Dashboard - contains currencies, revenues, payment systems and tags charts.
- 2. Payments - allows to view, confirm or refund orders.
- 3. Invoices - appears when the corresponding custom feature is enabled and allows to view, resend invoices, issue credit notes.
- 4. Recurring profiles - contains the information on memberships recurring profiles. You can easily view, prolong or cancel profiles on that page.
- 5. Customers payment methods - allows you to view the list of saved payment methods of your clients, check the list of related payments and disable the profiles if necessary.
- 6. Tax report - allows to see a list of all your sales within each country (if your sales are in more than one country) and the tax amounts as well as total count of transactions
- 7. VIES report - The purpose of a VIES (VAT Information Exchange System) tax report is to ensure compliance with EU VAT regulations by enabling businesses to report and verify cross-border transactions within the European Union.This report is especially important for businesses engaged in B2B cross-border trade within the EU. This report shows you a list of your customers, including their contact details, their tax numbers, their residence and the amount of sales to each of them.
- 8. OSS report - The purpose of an OSS (One Stop Shop) tax report is to simplify VAT reporting for businesses that sell goods or services to customers in multiple EU countries. It allows businesses to manage their VAT obligations in one place, avoiding the need to register for VAT in every country where they sell. The OSS report is particularly useful for e-commerce businesses and service providers who sell to customers in multiple EU countries. This report shows you the total sales and taxed amount within each of the countries you sell to, the VAT tax rate in each of the countries as well as total transactions counts in each country.
- 9. Customer report - shows you a table including name of each customer, their contact details, when t hey became your clients, count of succesful payments, number of error payments, when they made their last purchase and their last payment status (received, pending, error). The report also allows you to select a specific client and see all the concerning details.
- 10. Accrual based revenue - is related to the revenue earned/recognized by a business for which the invoice is yet to be billed to the customer.
- 11. Subscription Metrics - allows to track the trends of your recurring subscription customers. View graphs showing active customers, monthly sales trends, and a comparison of new customers versus those who have left.
- 12. Snowball MRR Report - is a detailed table showing trends in your recurring revenue. Easily see the number of active customers, new sign-ups, cancellations, and the total active recurring customers at the end of each period.
Create payment requests
Video tutorial
With just a few clicks, users can easily generate payment links that can be shared with their clients via email, sending the direct link or QR code. This feature enables business owners and individuals to easily collect payments for their goods or services, without the need for a website or an online store.
In addition, it allows users to set up recurring payments, so that they can automatically charge their clients on a regular basis. This is a useful feature for businesses that offer subscription-based services or recurring billing.
Users can also choose from a wide selection of payment processors to be used for payments or to choose previously saved payment method, making it easy for returning customers to pay for their purchases quickly and securely.
For businesses that need to keep track of their payments, SBPay.me offers the ability to list detailed descriptions of sale items, including any additional taxes or discounts. This feature ensures that users can easily monitor their sales and keep accurate records.
Finally, SBPay.me allows users to tag payments so that they can group them when creating reports. This feature provides an organized way to manage payment data and generate comprehensive reports. Overall, SBPay.me is a powerful payment system that provides a simple, yet effective way to manage payments and increase revenue.
More features coming!